A couple weeks ago we shared how our closet looked after painting everything. In case you need a reminder:

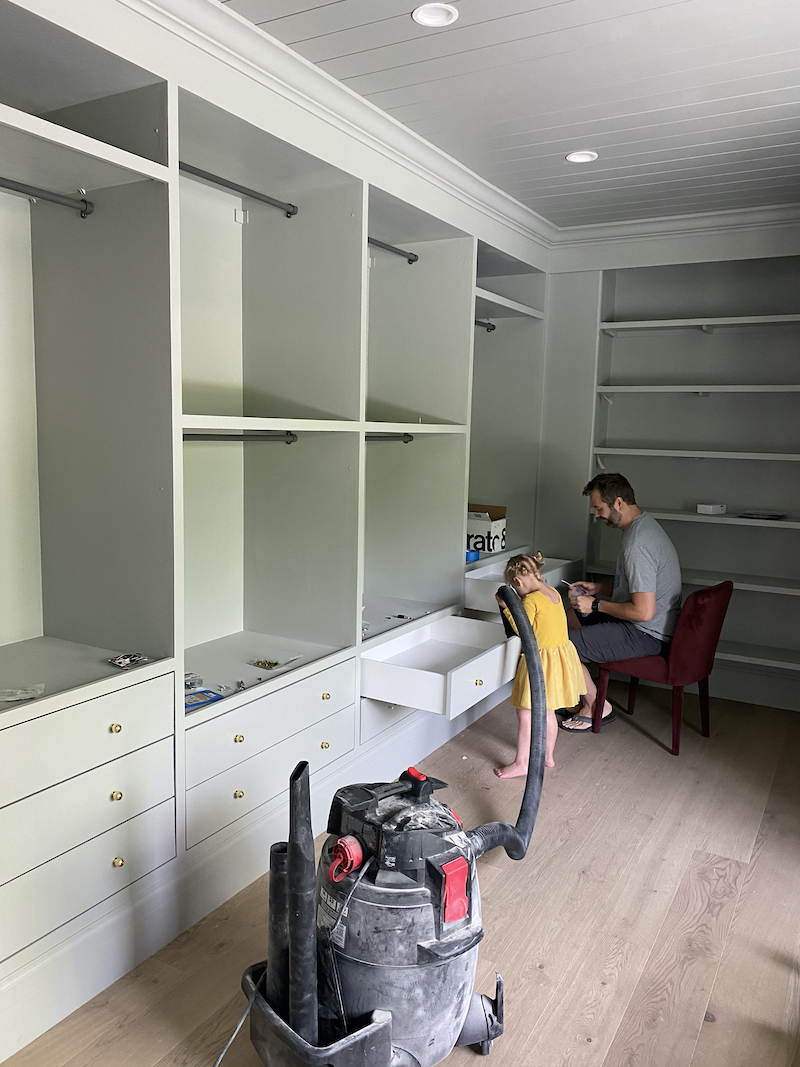
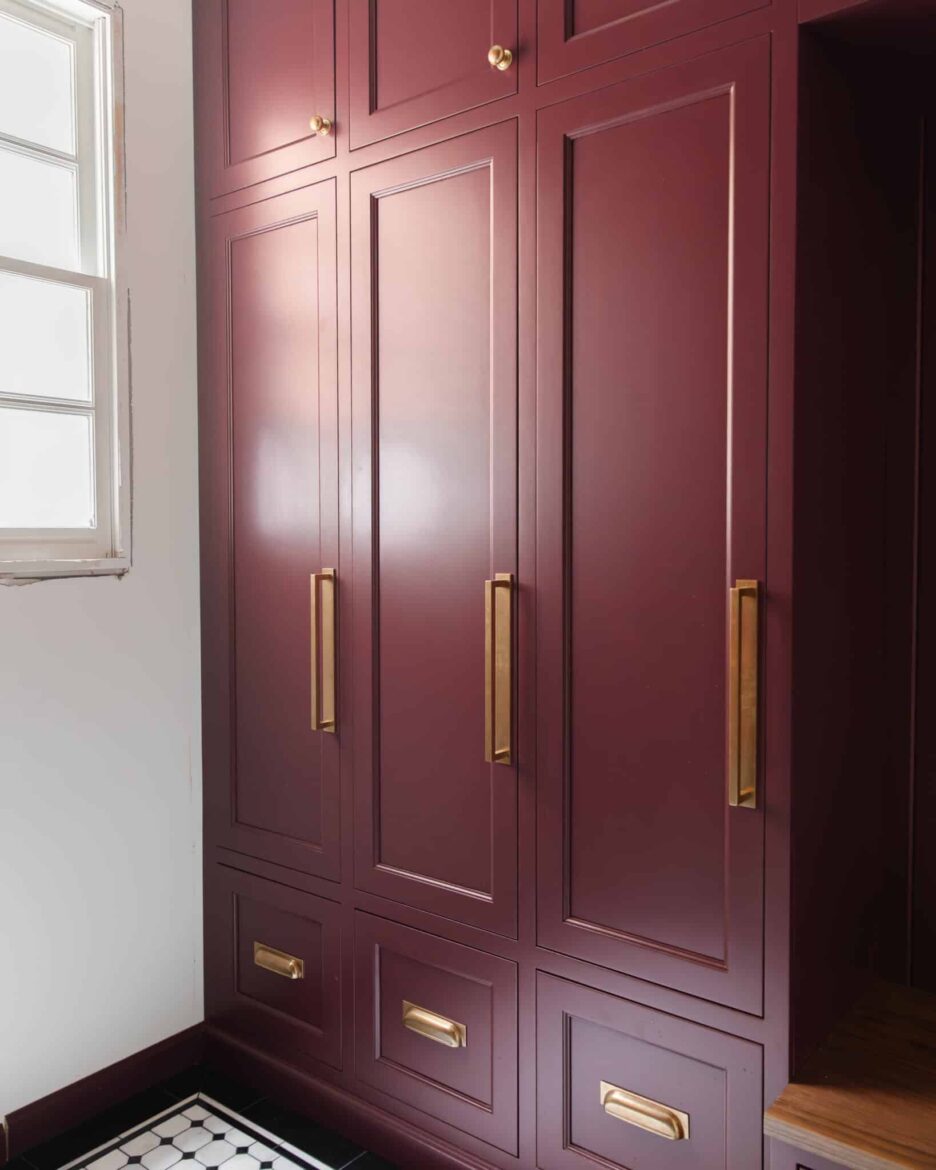
Yes, those are IKEA PAX closets. We built bases for them to raise them up the height of our baseboards; filled the extra holes and added facing; added base, crown, and a ceiling treatment; and painted everything the same, beautiful, Farrow & Ball Lamp Room Gray. And this week, we brought the cabinets home with custom, flat drawer fronts for each of the drawers, and we want to share as many details as we can on how we did it.
The Ikea Pax system comes with great, soft-close drawers but there is a lot of space above the the drawers so you can easily open them. We didn’t add drawer fronts to our last closet–you can see how it looked here. Still nice, but not as custom looking.

Mounting Custom Drawer Fronts on IKEA PAX Closet Drawers
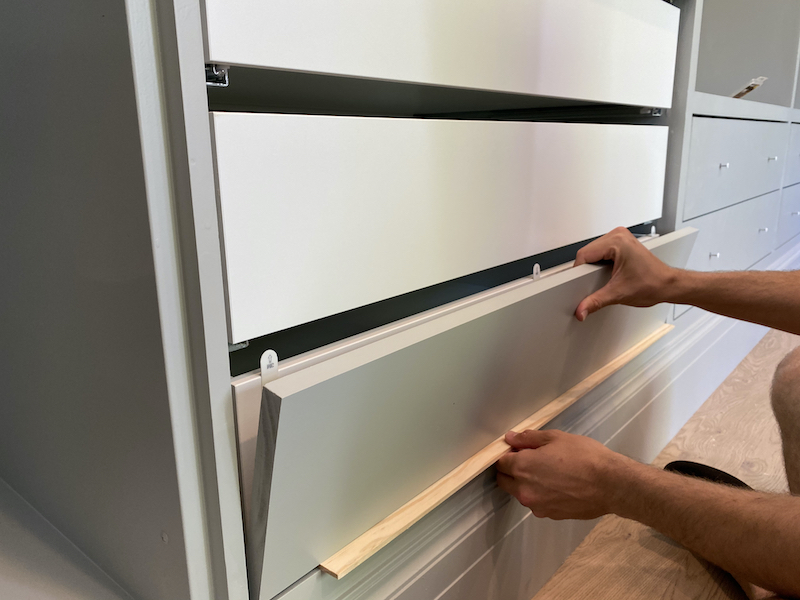
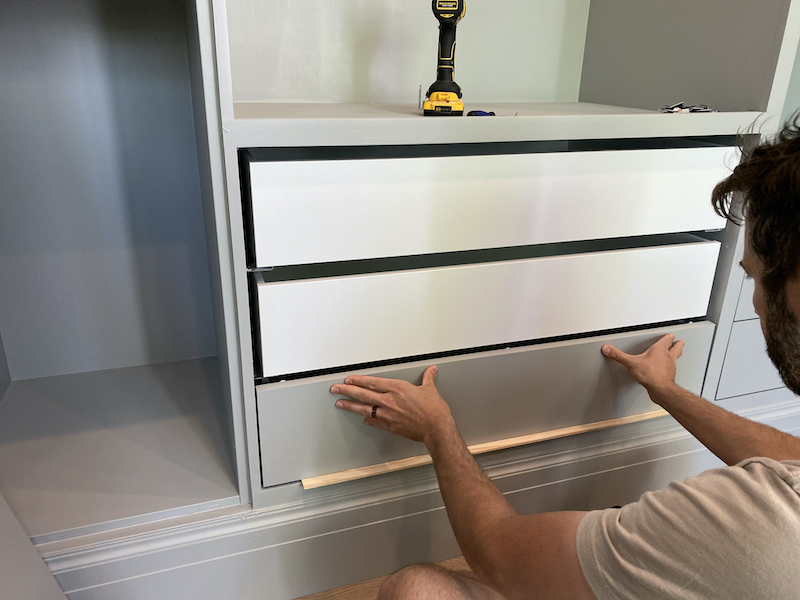
The trickiest part to this was honestly getting the drawer sizing and spacing nailed down. The problem is, areas with 5 drawers have less spacing per drawer than areas with two drawers. Not huge differences – like less than 1/16 of an inch per drawer, but it adds up and if you use the same spacer for areas with differing drawer counts, you’ll be left with too much or not enough space at the top.
We made out of drawer fronts our of solid pine, cut to 7 3/8×37 1/2 (for the ~40in wide PAX cabinets). This would give us 3/16 spacing around each drawer on the 5-drawer cabinets, and fractions over that on the 2 and 3-drawer cabinets. We painted them the same color as the rest of the closet, and predrilled for hardware.

We used a leftover piece of pine from cutting the drawer fronts to length as a template for our hardware. We simply marked the spacing for the hardware on the template, laid it over each drawer front on each side, and drilled into the face of the drawer.
Now this might seem like an odd time to mark for hardware, but the problem is this: you need to mount your drawer fronts from inside the drawer, so you don’t have visible screws. But you need the spacing right before you can mount it. So we decided to use our hardware locations to temporarily mount our drawer fronts in place from the front, then we could open the drawers, attach them from behind, and remove the screws from the hardware holes (so the hardware could be added). Did that make sense?
Of course, you also have to find a way to mount the drawer fronts before you screw them in, so they can be adjusted until the spacing around each drawer is correct. Our solution for this wasn’t super elegant, but it worked great.
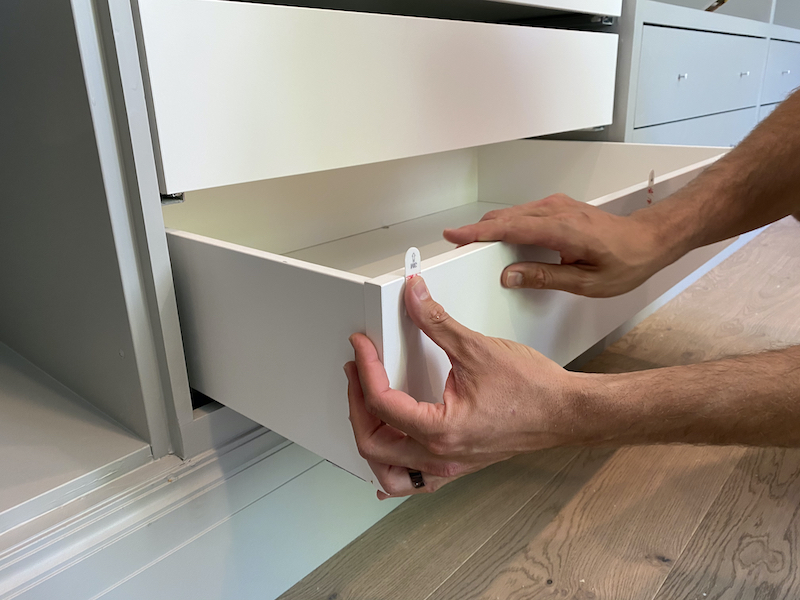
We stuck 3 command strips onto each drawer front, then used a spacer underneath the drawer as we put it in place and centered it. Then pressed it into the command strips.
Obviously the weight of the drawer fronts is a bit much for command strips to hold for long, so you have to work quickly. But they held even when we added the weight of another drawer front as we spaced them out from bottom to top.
And once we had the spacing we were comfortable with, we mounted the drawer fronts with temporary screws through the hardware locations.

From there, we used 6 screws, 1 3/8in long, to secure the drawer front from behind (2 at each end and 2 in the center-ish). Then loosened the screws in the hardware holes about halfway out to use as temporary drawer pulls so we could still open them as needed.


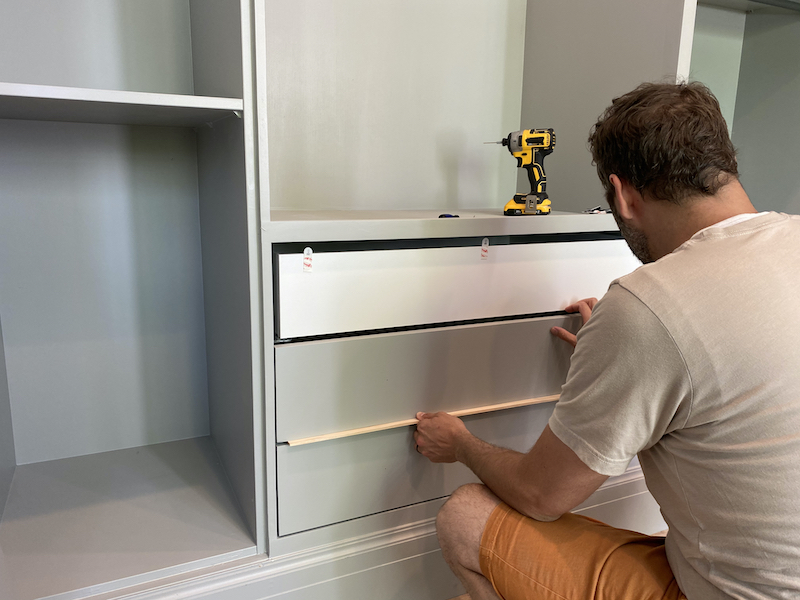
Adding the Hardware
Remove the temporary mounting screws from the drawer and drill a hole large enough for your hardware mounting screw to fit through.

Drawer hardware almost always comes with screws for mounting, but if it’s one that mounts from behind (like ours) they’re likely too short for this type of drawer set up. Essentially we’ve doubled the thickness of the expected mounting location by adding a drawer front. You can either take one of your pieces of hardware to the store and find longer screws with compatible thread sizes, or do what we did.

I used the bit for my Kreg Jig to drill holes from inside the drawer, so our screws could reach the knobs. Kreg Jig bits come with an adjustable depth stop, and the size of the bit was perfect for the heads of our mounting screws to sit inside the pilot holes.


After I finished each drawer, it was just a quick vacuum and dust to clean them out. which I had a little help doing.
We used these 1″ round knobs in brass, and opted for two on each drawer since the drawers are so wide. Also, can you believe how good that ottoman looks in here with the rug and the paint?
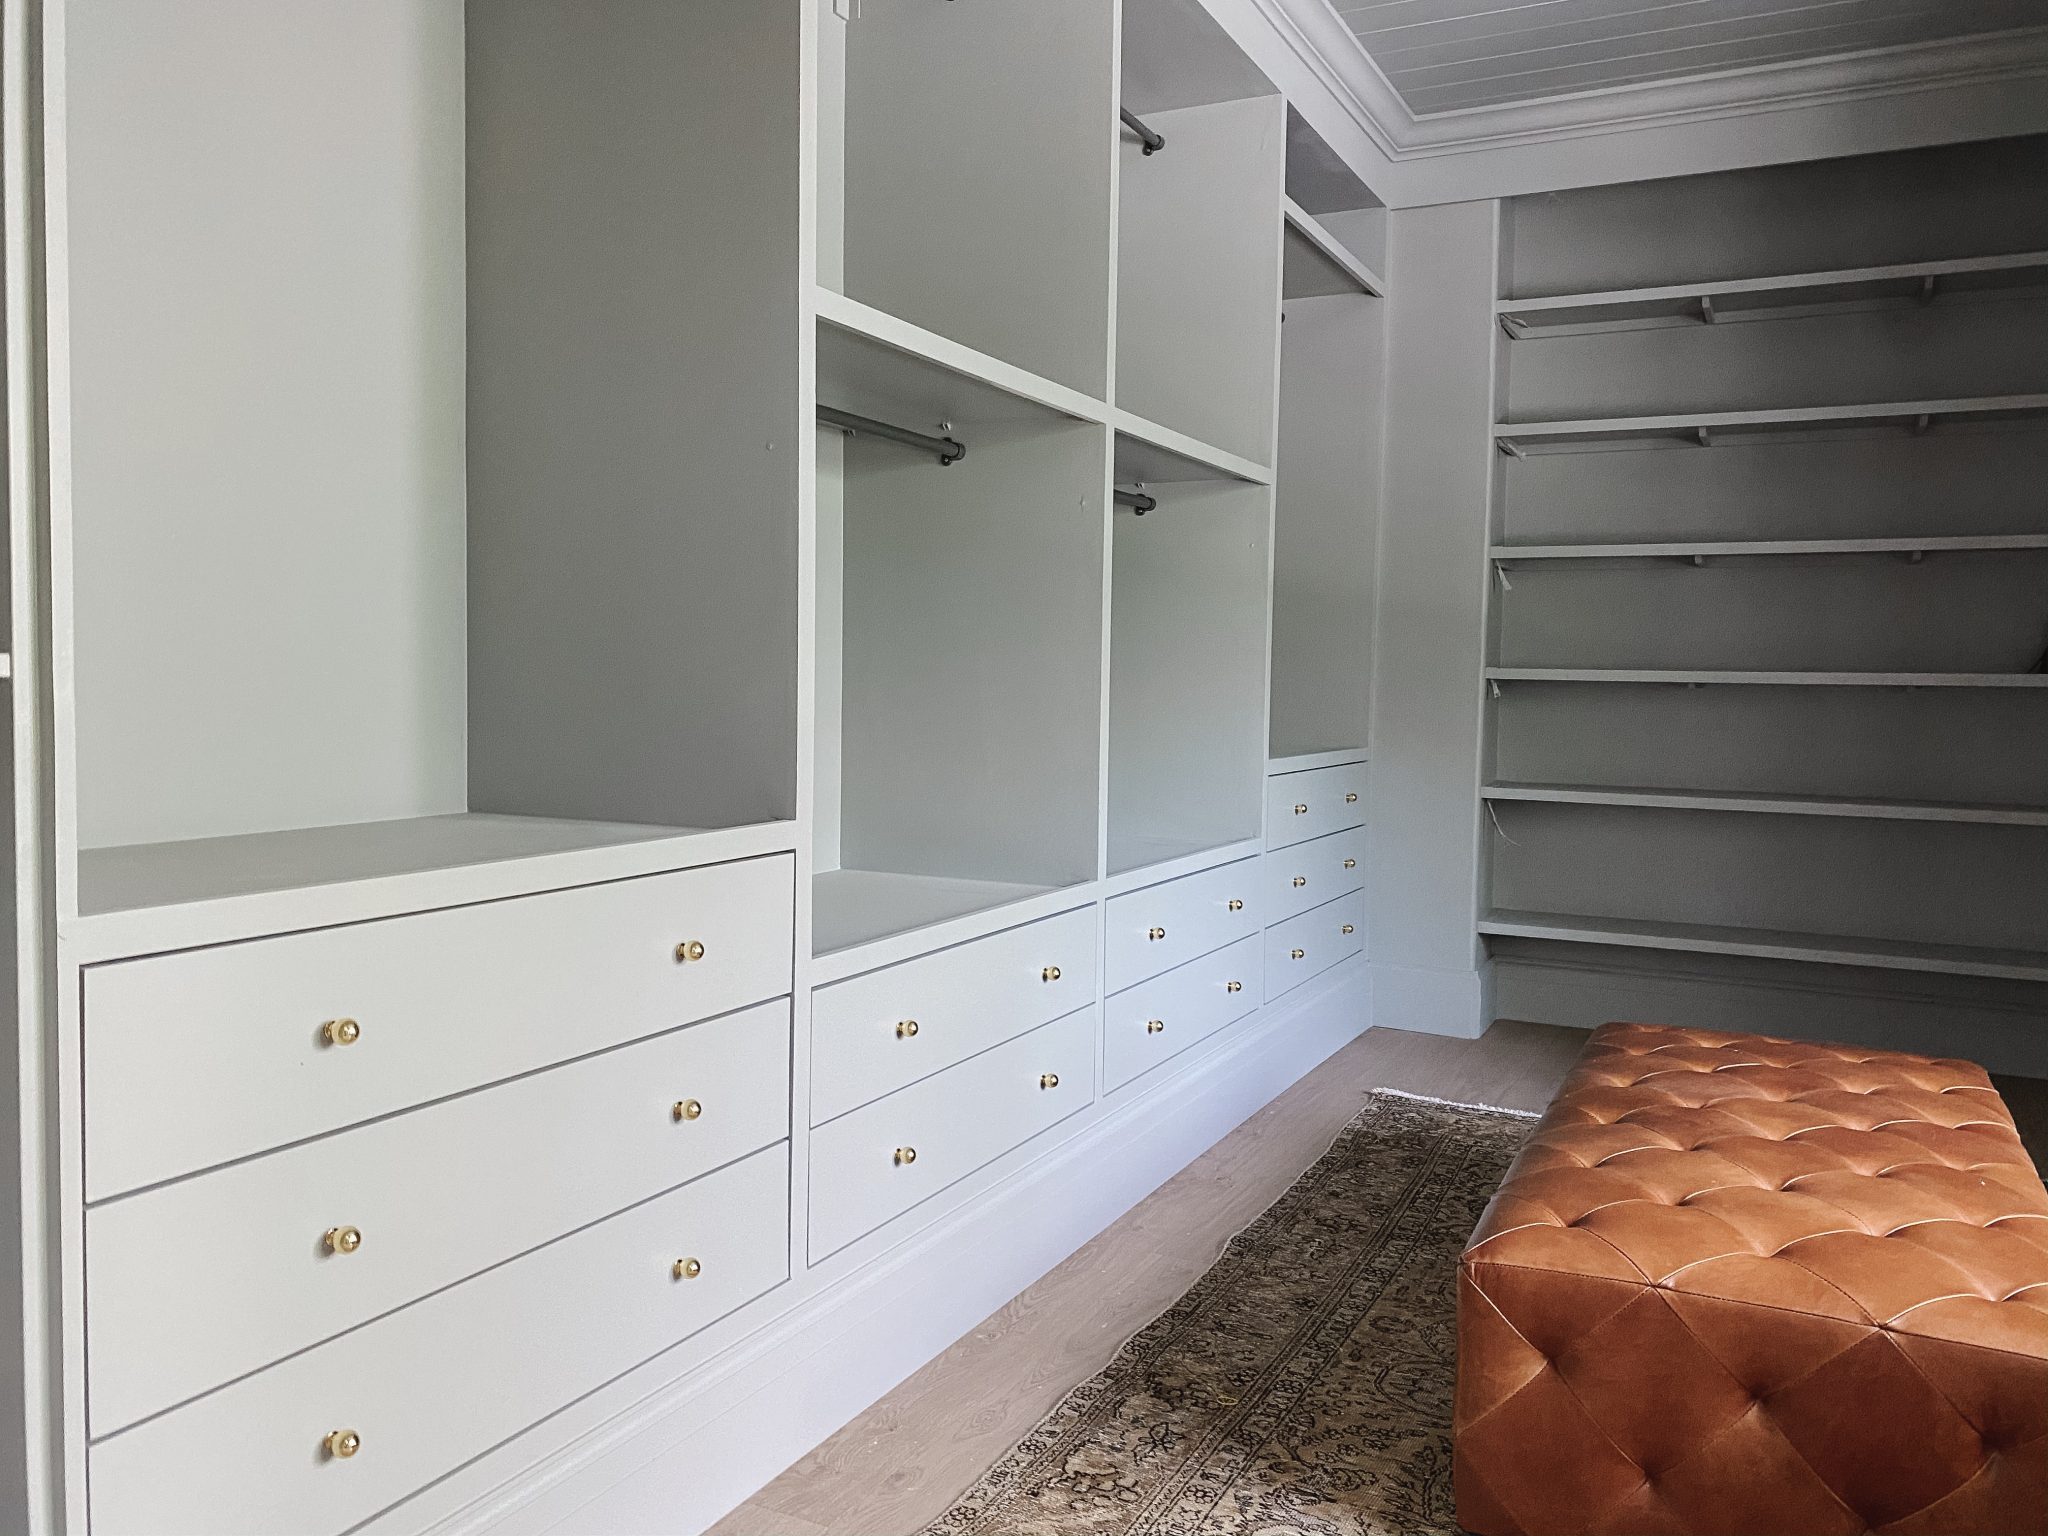
We’ve had a lot of questions about why we used IKEA in the first place if we were going to do so much custom work. The answer is simply that we aren’t cabinet builders. And if we didn’t use IKEA as a starting point, we would be doing everything we’re already doing, as well as learning how to build cabinet boxes from scratch (and drawers and shelves etc.). So even though it may seem like customizing IKEA is just as much work as building custom cabinetry, it’s really not. Not even close, haha. And we couldn’t be happier with how it’s turning out and are so excited to show you the whole thing, finished (!), next week. But… one last peek…


Hi! I love this space!
I am currently trying to design my closet with pax.
Can you share what height pax you ordered?
I couldn’t find it anywhere in the post, so sorry if I missed it!
I am trying to decide on drawers vs hanging clothes and shelf height and what you did looks perfect!
We ordered the shorter versions so we could add baseboard and crown. But we have tall ceilings. What you order will depend on your ceiling height.
So beautiful! Can you you tell me how you got the drawers flush with the frame? From what I can tell the PAX drawers are flush (or very close to) the frame. It would seem like adding the custom drawer fronts would stick out? Also, did you use the provided backing on the frames or just your drywall? Thanks for sharing and the inspiration!
We trimmed out the entire front of the wardrobes so the drawer fronts we added would also sit flush.
Did you guys use the backer board that came with the ikea shelves? I’m currently installing the billy shelves and there is a very large gap without that board…wondering how you guys did it? Thanks!
We used 1/4″ plywood
Can you show how Chris did the floating shelves?? I’ve been wanting to do the same in my closet but lost on how to begin.
I’m planning my own pax closet right now and was just wondering what you’re doing for your hamper situation. In your last house you had the pull out hamper right? Maybe I missed it, but I’d love to know what your solution is!