Projects

Master Closet Update: Filling Holes, Adding Trim, and Nixing the Ceiling Beams

April 23, 2020

We believe we should all love where we live.

We’re a couple of homebodies, working to uncover the home our home wants to be. And we’re so happy to have you here. 

Portfolio

Projects

Design

We're Chris + Julia

read more

What we're                   right now

Loving

browse the shop

Befores, afters, mood boards, plans, failures, wins. We’ve done a lot of projects, and they’re all here. 

We have a long-standing relationship with DIY, and love rolling our sleeves up and making it happen. 

Even when you don’t want to rip down a wall, you can make that space in your home better. Right now.

browse all

browse all

browse all

02

01

03

Popular Posts

1.

2.

3.

Top Categories

We’ve got another master closet update for you! Last week, we built the wardrobes, and this week, we’ve spent a lot of time trimming them out and making them look really custom, solid, and professional:

1. First, we filled all of the holes.

IKEA cabinets come with lots of little holes on the sides so that you can customize where you put your shelves. They actually make plugs for these holes (we used them in our last closet), but these plugs are still pretty visible (kind of like an outie). We used wood filler instead, and it made the holes disappear. If you apply this method, make sure you allow the wood filler to dry overnight before sanding. Those little holes are pretty deep, and if the wood filler isn’t completely dry, you risk pulling out the “plug” with your sander.

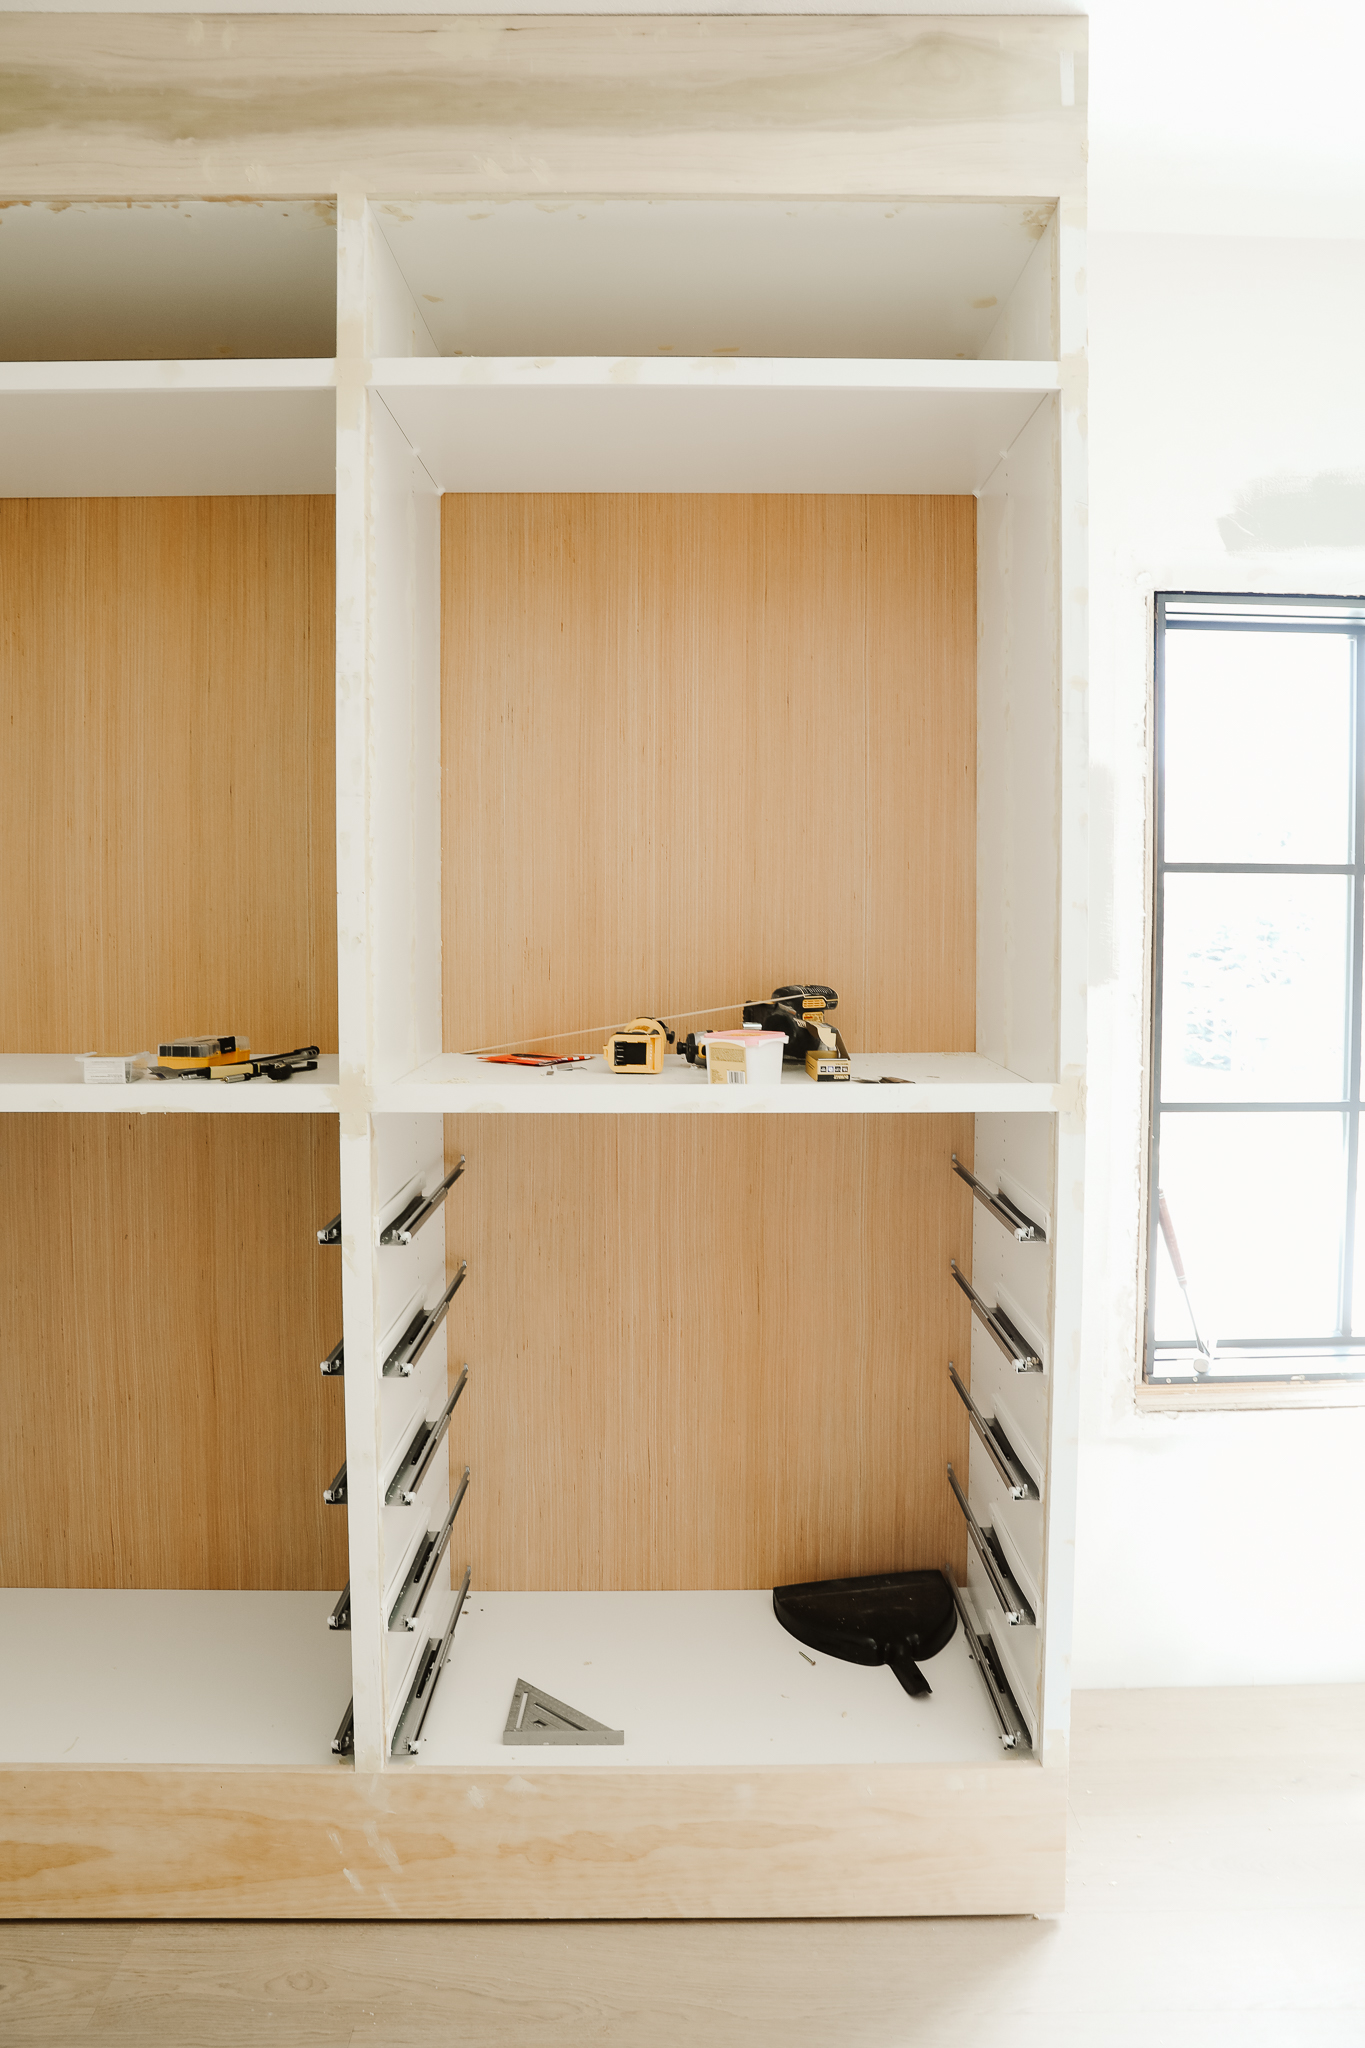
2. Next, we attached the trim to the top and bottom.

For a custom closet look, we wanted to apply trim all the way to the ceiling. We used a mix of pine 1×12 for the top and 1×10 on the bottom, all 8 feet long. We cut small wood blocks out of dimensional lumber, scrap pieces of 2×4 that we attached to the tops of the cabinets and the ceiling so we’d have something to attach the trim to. We glued the backs of the trim with Liquid Nails and then used Finish nails to attach the trim to the blocking.

3. Then, we added “fronts.”

After the tops and bottoms were all trimmed out, we added thin pieces of wood (primed finger joint 1x3s) to front of the cabinets, where the individual boxes came together. We did this for a couple of reasons: (1) Adding trim to the closet fronts covered all of the seams, giving the closet a truly custom-built look. (2) The fronts were now level or “even” with the top and bottom trim. (3) The front pieces make all of the shelves more sturdy, like one solid piece of wood. Once we add our drawer fronts, they’ll be flush, too!

4. Finally, we added more wood-fill to close the gaps.

The trim left little slivers of spaces (less than 1/8 inch) where the pieces aren’t *quite* coming together. We could probably leave these, and no one would ever notice. But this is the part of carpentry that really makes a space look finished. So, we’re going to keep applying wood-fill to the little cracks and crannies that we find. We’ll sand those spots the following morning, and repeat. We’ll likely fill and sand several times for a completely smooth finish.

What’s next:

We tested out Farrow & Ball’s Lamproom Gray on different surfaces and in different light. At first it looked a little dark — but we’re not afraid of dark. It’s a warm gray that captures some blue and green at certain times of the day. So dimensional and gorgeous.

We also started playing with the idea of a modern crystal chandelier. Originally, we were planning to go with this one. But I also love this one because it’s so pearly and linear and modern. This option really surprised Chris the most. I love it because I think it would play so well with the more masculine elements in the room (the gray, the ottoman…). I also love this modern take on a classic. Which is your favorite?

We’ve decided against the ceiling beams. Like all of you, we’re staying home and practicing social distancing at the grocery store. The ceiling beams are not something that we can DIY with a delivery or a curbside pickup, (we have to special order the white oak we wanted) and we’re not willing to risk contact with people. So, we’re going to plank the ceiling. We really love this inspiration from The Fox Group:

We’re using it to inspire our basement family room/theater room, too, so I think it will be a nice tie in! The beams also were kind of intersecting with our mirror design so this directional pivot has us feeling very excited.

Leave a Reply

Your email address will not be published. Required fields are marked *

This site uses Akismet to reduce spam. Learn how your comment data is processed.

What do you think?

  1. Loren says:

    Just an FYI, I think you may have accidentally linked a different wood filler than the one you used. The link goes to a high performance wood filler (it doesn’t appear to be the same packaging seen in your photos) – not a big deal. But, I used it this weekend and the fumes were so bad that my husband and I had to quarantine in the bedroom for as much of the day as possible, haha! Just thought you may want to adjust that link if possible so others don’t do the same thing I did :)

  2. pooja says:

    The way you choose features and planned how it will work, how it will look is amazing..closet after finished look is surprisingly awesome outcome. your suggestion for what to choose and how it will look like are pretty cool. we look more forward for it.

  3. Piper says:

    For the ceiling trim, how did you attach scrap pieces of 2×4 to the tops of the cabinets and the ceiling for blocking?

  4. Penny says:

    Astrid is gorgeous. But the site says it’s out of stock. Clarissa’s my second choice and would look very pretty in the space. I think some sparkle is going to be important if you’ve got dark, moody walls. I’d also consider picking up the brass of the mirror in the light fixture, for cohesiveness and added shine.

  5. I shiplapped my bedroom and it added so much luxury and coziness to the room! I can’t wait to see what your closet looks like when you add it!

  6. Jane says:

    Love the pearly one!

  7. Stephanie says:

    What do you plan on doing with the doorway to the closet? It looks unfinished? Open, Barn door, repurposed door?

  8. Sharon says:

    Hi Julia, I noticed that you did not fill all the holes in the Pax boxes, but left the second and third rows of holes in the drawer area unfilled. Will you be filling these or leaving them since they will not be seen when the drawers are in? Taking inspiration form your closet as we will be doing something similar in our Master soon. Thanks for always sharing.

  9. Beth says:

    Astrid all the way, no contest

  10. EP says:

    I’d love to see you lean in to the traditional elements of the home with a vintage or antique chandelier. Check out Chairish. I feel like a really unique light would be perfect in here — the center of attention for sure!

  11. Asta says:

    Love what you are doing with your closet! Can you please explain how do you decide when to use wood putty and when to use caulk? Thanks :)

    • Chris Loves Julia says:

      Sure! We use wood filler to fill holes in wood, and we use caulk to seal gaps and cracks.

      • Chantal says:

        Hey Julia & Chris. I’m just curious as to why you chose to use wood filler as opposed to drywall compound. I’m trying both and so far the compound is proving easier to work with on the laminate as the wood filler is impossible to sand. Did you have to do multiple coats and did you hand sand it?

        Thank you :)

  12. Asta says:

    I love watching and reading about your IKEA closet customization! I am working on making some changes to my own closet too. Why did you decide on using wood filler for narrow gaps between attachment versus using caulk? I hear that some people prefer caulk over putty. Can you please explain?

  13. Astrid is a stunner and I’m here for it!

  14. Margaret says:

    I have a much smaller fixture with the glass drops like the Clarissa. It’s a cleaning nightmare because when dusty each drop needs to be cleaned individually. No idea how that could be managed with such a large fixture. Just something to think about.

  15. Liz says:

    I love that mother of pearl fixture. I wish I could see it in person!

  16. PennyMargaret says:

    Hello! I’ve loved following along. Will you post your process for planking the ceiling, or have you posted something like that already?

  17. Naomi says:

    I have 2 IKEA PAX freestanding wardrobes in my master, they give me much more space than a dresser and with the mirrored doors they don’t take up too much visual space. My closets in their have only hanging space and no shelves. For now they are a great option; we bought them for our second apartment and now we are homeowners to a small townhouse, but in the future I can’t imagine using the PAX system – our PAX shelves warped just a few months with nothing too heavy on the shelves. They are still holding up fine but I know you wouldn’t want sagging shelves in your custom closet. Are you doing something specific to prevent the composite wood from sagging? You said “the front pieces make it like one piece of wood” but I don’t really get what that means. Thanks!

  18. Cheryl says:

    We are just starting our home build and this IKEA system is perfect!! I have a question, once you wood fill in the shelf holder holes, what next? Since they’re a laminate melamine something on the surface, do you just touch up paint the holes or sand and prime and paint the entire insides or?

    Also, could you share the construction company you’re using? We are in your area and after watching your stucco surprise I am so scared with the type of construction we are doing we might get caught with a similar problem. We are building the home ourselves and I’d like an expert opinion before we move forward. Thanks for all the fantastic inspiration, as always!! We are doing a modern traditional/Tudor/mountain farmhouse style, (whatever that is? Haha) and a lot of your design is helping me see my way as well!

  19. Deborah says:

    I like options 2 and 4 the best. My husband refers to light fixtures like option 1 as “trying to be candles when they are not”, and he has vetoed anything in the house that vaguely resembles candles. We have the linear version of option 3 (the previous owners installed it), and it’s fine but not fabulous. The other two options just read more special to me.

  20. Kimberly Stewart says:

    I love watching this process on Instagram and seeing all the little tweaks you guys come up with to make this system look custom! I wonder if I could use white Sektion cabinetry in our laundry room and paint it like you’re painting Pax. Have you tried that? Does it just depend on the material? I’ll definitely keep watching on Insta to see what you do when you paint. Thank you for bringing us along.

  21. Amy says:

    From a designers view, the pearl chandelier is absolutely perfect. It’s modern lines will mimic the ceiling feature you’ve landed in. It’s also a perfect mix of modern, masculine and feminine!! Go for it!!

  22. Maya says:

    It is so interesting to watch how you transform Ikea into something totally custom and high-end looking. I’d never have the guts to let it go through the middle “awkward” stage where it looks worse than it did at the start, yet I can already start to see how amazing it’s going to look. Good luck!!

  23. Miria says:

    LOVE the Astrid Mother of pearl lamp… think it blends everything in the room and will look the best with the planked ceiling.. i do love the Clarissa Crystal.. but in a different room, i think.

  24. AC says:

    Love it. Plus you have beams already in two rooms

  25. Lori R. says:

    Your progress is looking amazing , congratulations !The CB2 light option! Perfect blend of feminine and masculine????

  26. caitlin low says:

    The Astrid chandelier has my heart.

  27. Kate says:

    Love all these updates! Dumb question- but what is the difference between wood filler and spackling putty? And how do you know which is the better choice for the project?

  28. Ev says:

    the berkshire chandelier looks perfect for the space! my second favorite is the Astrid, then the Orion, and I’m not a huge fan of the clarissa. I think you have a lot of traditional elements like the woodwork and the more transitional and modern lighting will be a nice balance! I think the Clarissa would be beautiful but doesn’t have the same modern/traditional balance as the rest of the finishes in the house!

  29. Amanda says:

    Astrid mother of Pearl all the way, it’s masculine and feminine, modern and a hint of vintage Art Deco feels .. love

  30. Christine says:

    I love the third option. It seems the most feminine to offset the masculine items already chosen. This is going to be spectacular.

  31. Brenda says:

    The Astrid Mother of Pearl Round Chandelier has my heart.

    • Rachel says:

      Yes! That is definitely “the one” with such a perfect combination of vintage and modern. *Insert heart eyes*

  32. Kelly says:

    Oh my goodness this is looking FAB! I am *living* for your project updates right now. Question – Are you planing on custom-making the drawer fronts or using an off-the-shelf option?

  33. Claire Kelly says:

    Looks amazing, thanks for sharing.

  34. Sydney85 says:

    Your closet update is coming along so nicely. Love the 3rd selection of light fixture, Orion. So much thought and detail for all your renovations. So fun to watch it all come together beautifully. You are doing an amazing job.

all the latest

We believe we should all love where we live.

We’re a couple of homebodies, working to uncover the home our home wants to be. And we’re so happy to have you here. 

HI! We're Chris + Julia

read more

Load More

Reader Faves

SHop all

What We're                     Right Now

What We're                 Right Now

Looking for our favorite things? A place to shop our home room by room, or just catch up on what Julia's wearing / loving right now? Browse the CLJ shop. 

Loving

looking for inspiration? 

A reader recently asked me if I’m starting to fully embrace traditional style and whether we still consider our house to be a “modern Colonial” and why. It was a really great question and so timely — I had really just been thinking about my approach to this home and how my style has changed […]

Can We Send You Our Love Letter?

Another way for us to stay in touch! Joining our weekly newsletter gives you access to exclusive content, never-before-seen photos, your questions answered, and our favorite DIYs. Sign up below!

Follow Along on Instagram

Welcome to our online community where we've posted home, DIY, style, renovations, and family since '09. Renovating our #cljmoderncottage in Idaho and headed for new adventures in Raleigh, NC. #cljfam #cljtransformations

@chrislovesjulia