Projects

Painted Cabinets + Wallpaper!: A DIY WIN & Fail in the Playroom.

August 12, 2020

We believe we should all love where we live.

We’re a couple of homebodies, working to uncover the home our home wants to be. And we’re so happy to have you here. 

Portfolio

Projects

Design

We're Chris + Julia

read more

What we're                   right now

Loving

browse the shop

Befores, afters, mood boards, plans, failures, wins. We’ve done a lot of projects, and they’re all here. 

We have a long-standing relationship with DIY, and love rolling our sleeves up and making it happen. 

Even when you don’t want to rip down a wall, you can make that space in your home better. Right now.

browse all

browse all

browse all

02

01

03

Popular Posts

1.

2.

3.

Top Categories

Surprise!! We’ve been busy in the playroom the past week! And it’s looking like a really cheery space. But before I write any more of this post, I should let you know–this post doesn’t end well. We were really pumped about the playroom and the direction and the progress we’ve made and now? Now things are different. Haha! But let’s get back to happier times. Like when we finished painting the cabinets and were nearly done hanging the wallpaper and I unrolled the new rug 3 minutes before snapping this photo (hence the wrinkles…yes, that’s foreshadow).

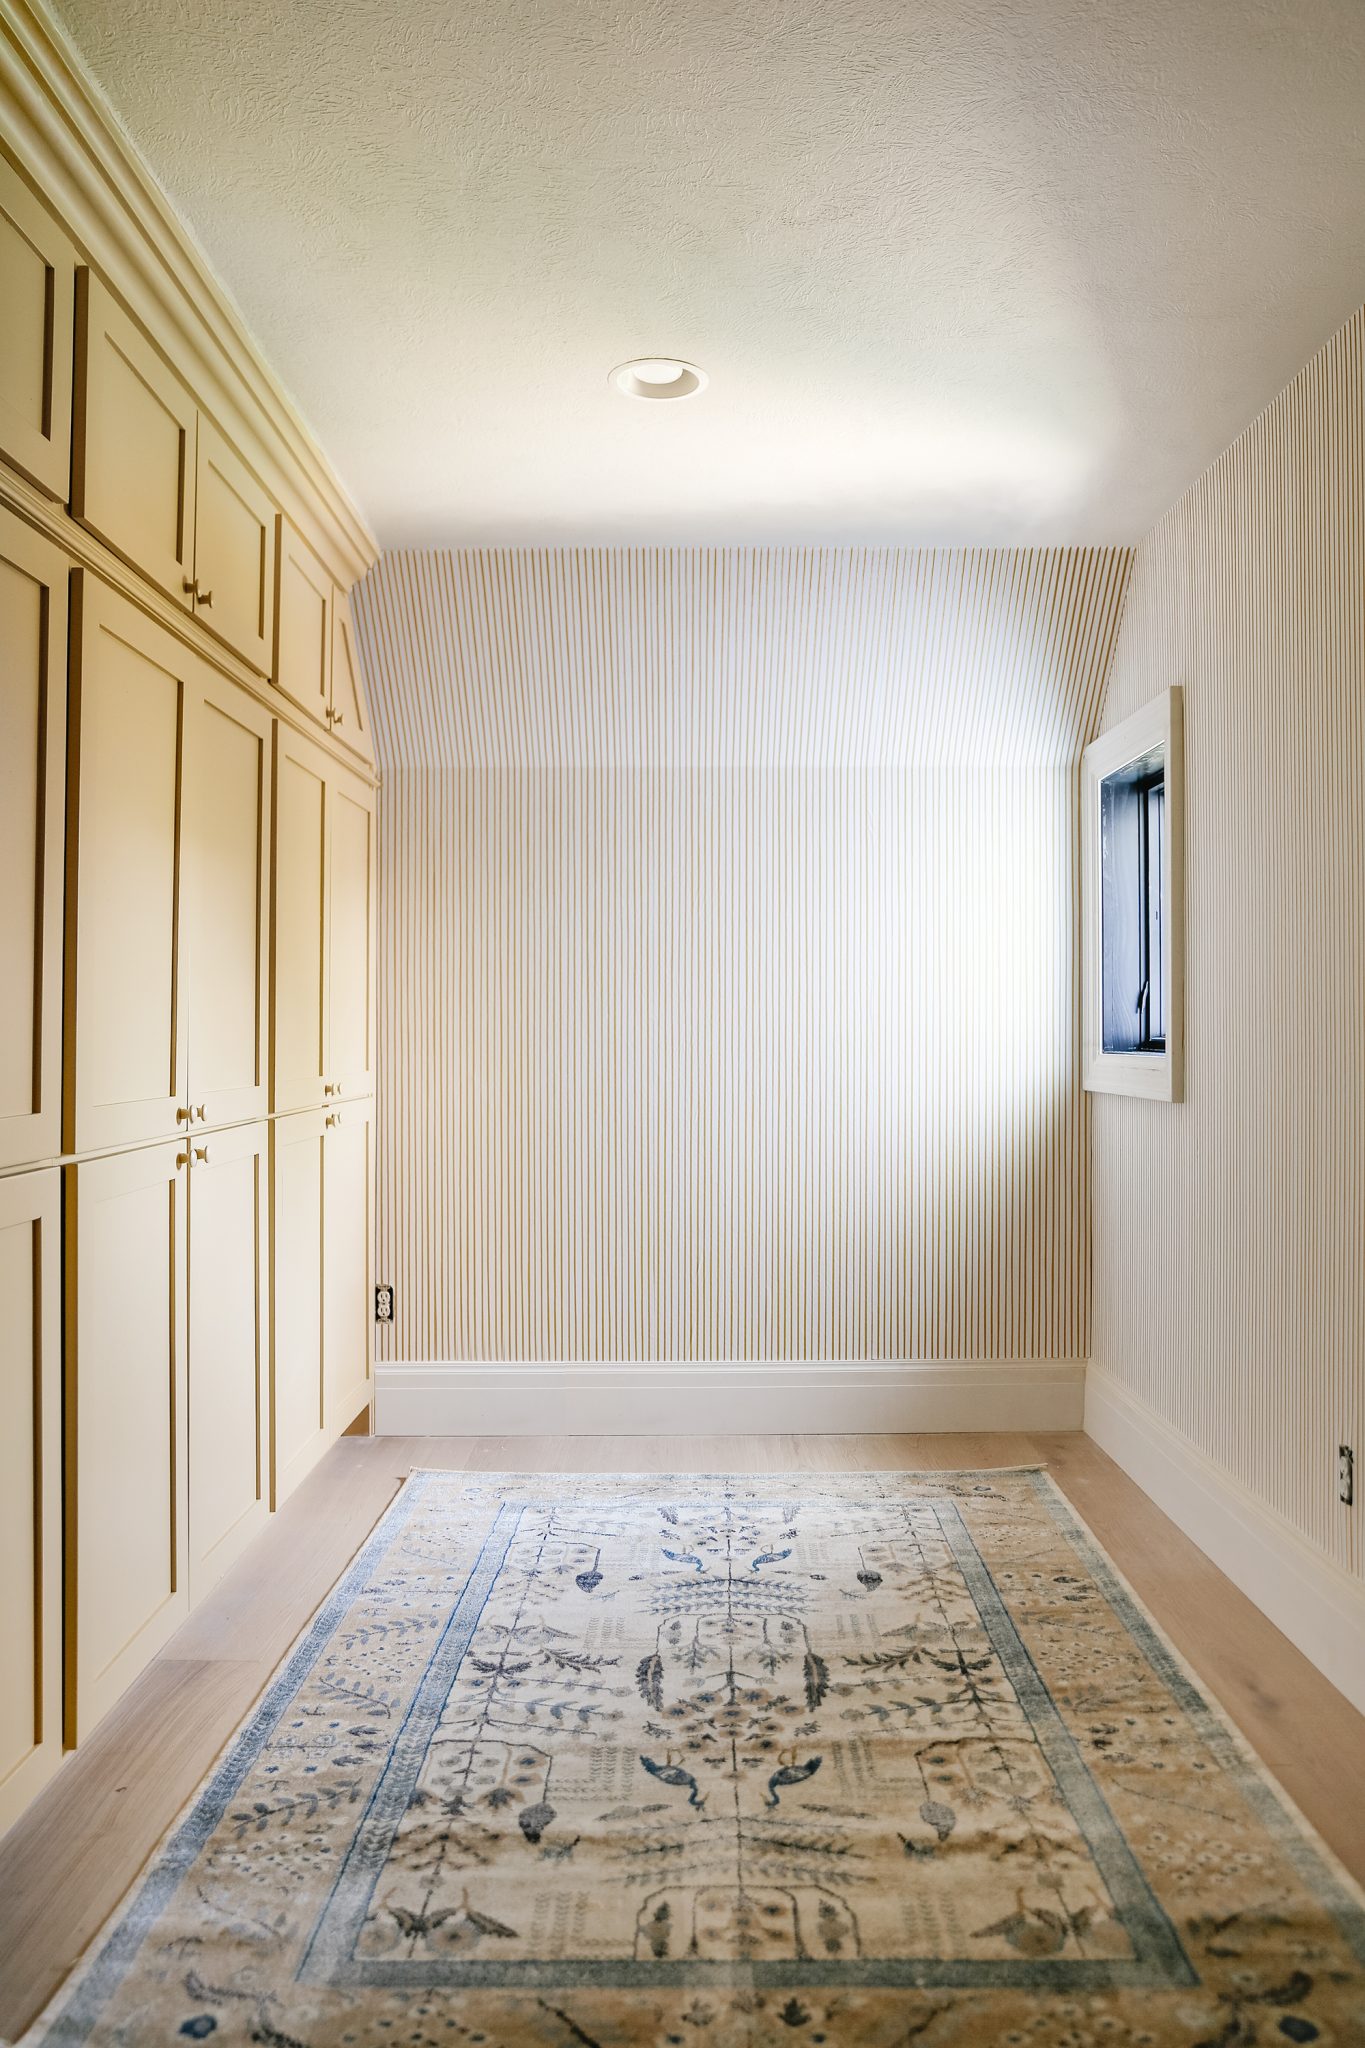
Life was sunny then and my only worry in this space was what color I was going to paint the baseboards–a yellow to match the cabinets would be so fun, but white is feeling fresh too! Speaking of the cabinets–I painted them using the exact same tutorial as we shared when we painted our kitchen cabinets last year. The color is HGTV HOME by Sherwin-Williams “Restrained Gold.” (We shared all the real time details here)

I also swapped the knobs for wooden ones that I painted the same color and the color just really sings in here!

We wasted no time starting to hang the peel and stick wallpaper from Chasing Paper. I was so excited to see it next to the cabinets and even though it would have been 100x easier to paint the baseboards before installing the wallpaper, I really felt like I could make a better decision once I saw it in place. The first few panels, there was a learning curve. But then we started to get into a rhythm.

We got about this far on day 1.

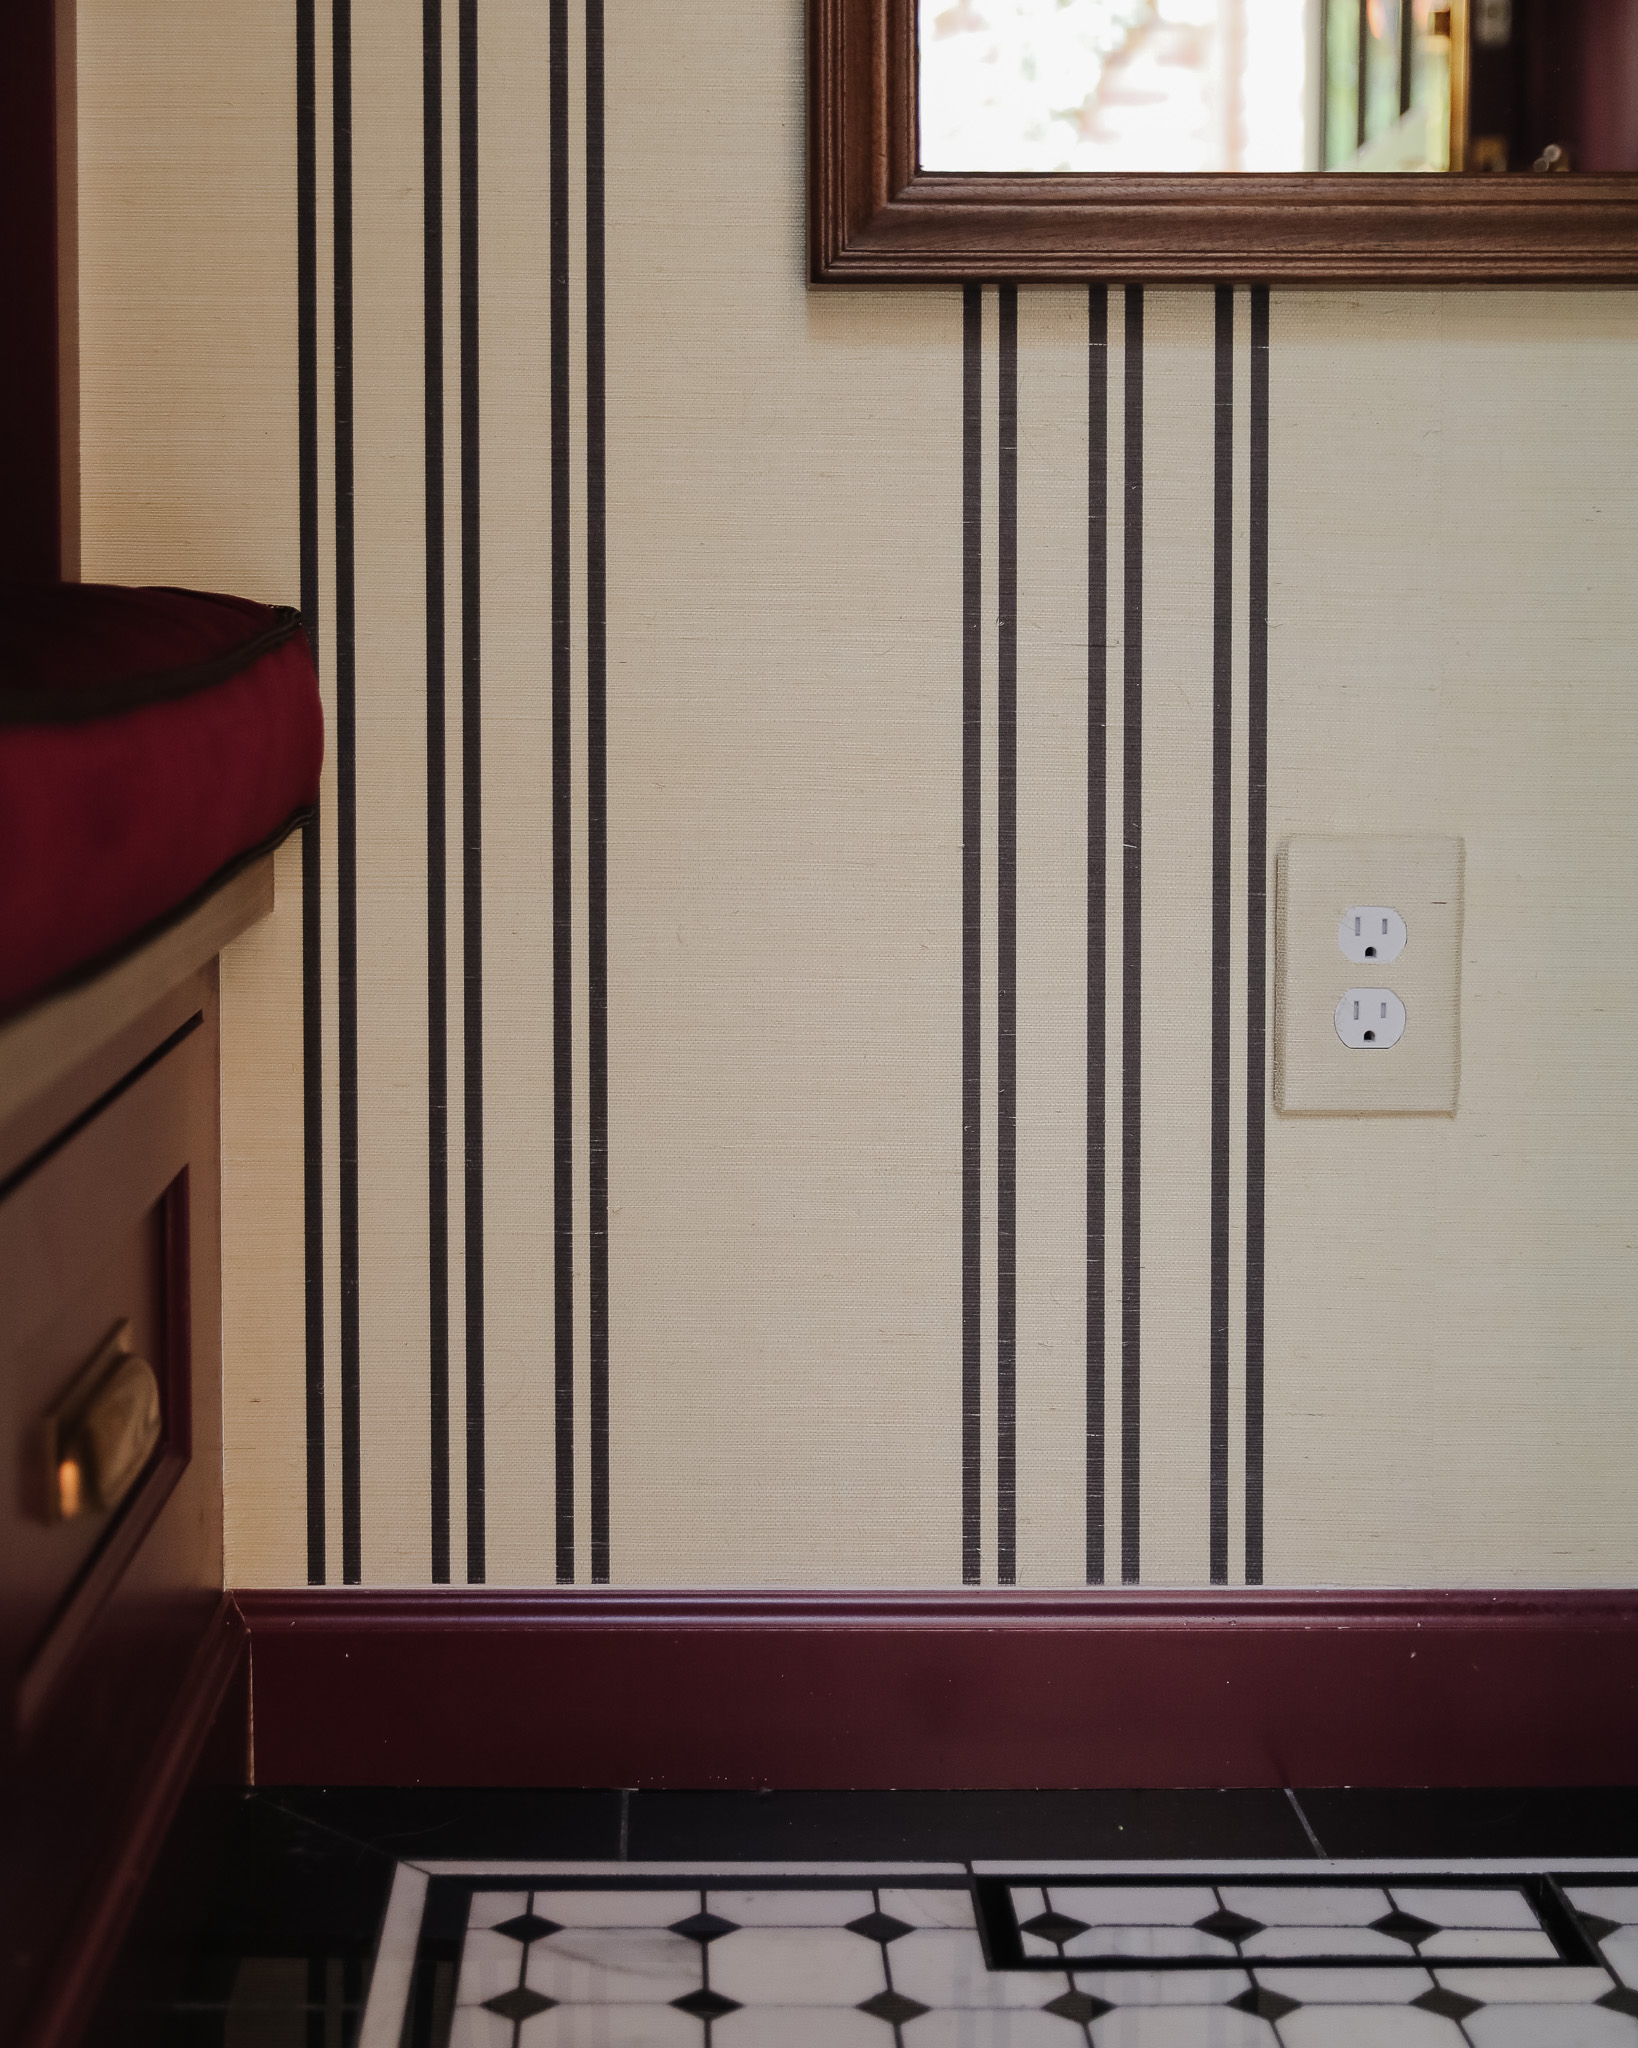
And on day 2 when we returned, although it was completely smooth when we left — it started bubbling. Chasing Paper recommends installation on a smooth surface, so we knew there was a risk to installing this on textured walls but proceeded with caution thinking we could smooth it out as we went.

I smoothed it all out again and we put on another panel and the previous ones started bubbling within minutes! Again, we cautiously  proceeded as we were so in love with this paper. We’ve used Chasing Paper in other projects so we know we can rely on the quality of the product.

I guess I’m stubborn because we sunk 3 more hours into it, continuing down the hallway that meets Greta’s room before I turned around and saw the nightmare wrinkles again. I started admitting this wasn’t going to work when there were only a few panels left–typical. The worst part–we were SO IN LOVE with how it was looking. In the end, I think the orange peel texture of our walls were just not a match for peel and stick wallpaper unfortunately.

Can you tell Chris was feeling defeated, too?

Where do we go from here? I don’t know to be honest. I’m mourning this wallpaper loss. I know that I could paint something similar ( boy oh boy would that be time consuming) or go the traditional paste the wall wallpaper route (which worked well in Greta’s room!) which Chasing Paper does offer. The perfectly imperfect stripes of this wallpaper are what I love so much…not to mention I painted the cabinets to coordinate!!

Sometimes DIY projects don’t go as planned. We took a risk installing on textured walls and unfortunately it didn’t work – I think that’s just part of DIY. and I think that’s just part of DIY. You have to account for that percentage of it not working out even if you really really want it to and I guess we were due. The wallpaper is all wrinkly again, but it’s still up until I can figure out what I’m going to do next. It’s not the end of the yellow striped walls–THAT I KNOW!!

Leave a Reply

Your email address will not be published. Required fields are marked *

This site uses Akismet to reduce spam. Learn how your comment data is processed.

What do you think?

  1. Lynda H. Cobb says:

    Have you thought about trying wallpaper liner? We had a stucco-ish wall in our last house that would have been a major mess to sand– not to mention the hours… we used this stuff under wallpaper. It worked wonderfully! https://www.homedepot.com/p/Patton-Prepasted-Wall-Liner-Paper-Strippable-Roll-Covers-55-sq-ft-LPP-2/308769189

  2. Melody says:

    Can you try a paste-on wallpaper liner for the first layer and then do the peel and stick over the top? That way you get the best of both worlds and the orange peel texture would not be as visible.

  3. Lisa says:

    I’m so in love with the design plan for this room. How disappointing that the wallpaper just doesn’t want to cooperate. I do hope you find a solution but throwing out a crazy idea just in case. What about taking the peel and stick wallpaper and using it on the cabinets door inserts? Perhaps then using the same cabinet paint color (or a slightly lighter version of the beautiful yellow paint) for the walls. I know you will come up with a fabulous solution and the room is going to look stunning.

  4. gigi says:

    Since you like the irregular stripes on the paper I am sure you could hand paint stripes on the wall.

  5. Charisse says:

    Most of the peel and stick wallpapers advise not to use on less than smooth walls. I don’t remember if those walls were recently painted, but one needs to wait (usually 6 weeks) for the paint to cure before papering. This is because any off-charging while drying interacts with the “paste” on peel and stick wallpaper. This has been my experience with regular pre-pasted wall paper as well. Sorry as the paper you chose is quite pretty in the room.

  6. Marcy Horne says:

    You might try sizing the walls before hanging the paper. It maybe the paint under the paper causing the wrinkles.

  7. Trudy says:

    The stripes would be lovely painted, I am sure. Also the iSpyDIY trick of doing think stripes with a gold sharpie could also be cool. Hers looked fantastic. Your aesthetic decisions are PERFECT. Thanks for sharing when execution doesn’t work out. And now you’re making me reconsider the peel and stick mural I was going to try. I don’t have much extra time for likely failure. My walls are regular drywall. Have you successfully used peel and stick elsewhere? We have a humid climate here in NC.

    • Lisa Jones says:

      Trudy I also live in NC and used peel and stick wallpaper on our regular drywall walls in our laundry room with great success.

  8. Erika says:

    Could the wallpaper be salvaged and used to line the interior of the cabinets so you’d still have the stripes peeking out?

  9. It’s absolutely beautiful. Great space.

  10. Kay Duncan says:

    Can you decopauge it so that the soaking through the wall paper with adhesive gives it a stronger adhesion and takes out the wrinkles. In decopauge it sometimes requires small pin size pricked holes in the paper to let out the air the is causing the wrinkles. It is worth a try before giving up and taking down because you have nothing g to lose.

  11. Sarah says:

    Ugh so sorry! Love how it looked though. Thanks for sharing that things don’t always work out.

  12. Katy says:

    I LOVE the wallpaper! It sings with the cabinetry and the rug and the hardwood floor. I hate that this happened because your vision did not fail you! Handy folks- how can @chrislovesjulia make the wallpaper work? ????????????

  13. Bean says:

    So sorry!
    Can you share rug details? Thank you

  14. Ashley says:

    Avid diy-er here…it sucks how this turned out for you this time, but thanks so much for sharing the fails! Keep up the great work. You got it

  15. Umm why can’t you paste up the paper you like??
    Or past it and maybe anchor it with like the small staircase rounds on treads at the top & bottom of the walls?! Maybe paint them the same color as the cabinets??! But if you didn’t think of it it’s probably for a good reason! Thx for sharing!!

  16. Meghan says:

    Where should I look for a playlet with a climbing wall, swings and a playhouse sort of structure? Thanks

  17. Joy Gross says:

    I am so sorry you guys! It is so pretty.

  18. I did peel and stick Tempaper in my daughter’s nursery. We had a very slight texture on the walls and were strongly advised to skim coat the room — which we did. It was a freaking pain. But I guess that for peel and stick the walls have to be super smooth. The playroom really looks beautiful though.

  19. Tiffany says:

    I’ve had the same problem with Chasing Paper’s peel and stick wallpaper. And in a mere weeks, it will separate from wall altogether and flop over on itself, sticking together. Total nightmare. It’s not you, it’s them.

  20. Carrie says:

    I’m scared. I bought some for my basement laundry room, but I have one wall and that is rougher than orange peel. Please keep us updated if you figure out a work around. It looks so cute.

  21. Rob says:

    I loved the wallpaper when you did the mood board and was excited to see it go up, but know that I see i up, I like the room better without it. Makes the cabinet color stand out more.

  22. Natalie says:

    Use spray adhesive on the wallpaper, it will stick better!!

  23. Lyla W. says:

    Can you affix the wallpaper to a smooth surface….MDF, plywood, etc. and then mount the newly-created wallpaper panel on the wall and trim it out? Basically, it would look like a wallpaper panel with trim to match the cabinets….

  24. Sarah says:

    Chris’ face is exactly how 2020 feels, ha. So very relatable.

    Thanks as always for sharing – best of luck in problem solving; I’m sure you guys will come out with a great solution.

  25. Rachelle says:

    This happened to us as well!! Did you guys put a fresh coat of paint on it before hand? Our walls were smooth and the “ideal” wall for peel and stick! We read that it doesn’t adhere to a sheen paint! That’s the only thing that could make sense for us! We had painted our walls satin white about 2 months before we put wallpaper on an accent wall! Not sure if this was your case, but something I wanted to share incase this could help someone else! Don’t paint your wall before peel and stick wallpaper!

    • Sarah says:

      100%. Paint really wants two weeks to cure minimum before wallpaper application—the two months you gave sound even better!

      I also had a major non-stick fail when working on a project in Shanghai once. The type of paint was just not compatible with the film they used. Low VOC paints can also create issues with adhesion. I know wallpaper isn’t exactly the same as paint, but you might try some of the techniques 3M puts out for graphic film application on low VOC (page 2; https://multimedia.3m.com/mws/media/1193340O/install-prep-for-low-voc-painted-walls.pdf). Hope this helps!

  26. Taylor says:

    I don’t know how time-consuming this would be for you, or if it’s even possible, but is skim coating the walls an option like you did with the ceiling portion?

  27. Teresa Marek says:

    I follow you because you are very realistic with your projects. You tell it like it is and so the good, the bad and the ugly… although there is nothing ugly, just ugly uncoverings such as mold etc.

  28. Heidi says:

    I am ashamed to admit I thought that wall paper and cabinet color were going to be a big mistake. I know better than to doubt you guys. I am in love it is perfection.

  29. Kara says:

    When hanging the wallpaper, did you use the burnishing tool that came with it, or what looks like a paint roller? I think the wallpaper needs to be strongly pressed against the wall to get all the bubbles out. Hope that works. It does look really great when it is smooth.

  30. Emily says:

    Oof. I feel your pain. I just had a BEAST of a time installing a small bit of Hygge and West removable paper to my bathroom. Lemme tell ya, I am NOT sold on removable paper at all. Adorable but SUCH a pain. I’m ???? about the ease of York SureStrip technology (not a shill, just happy with the two types of wallpaper I’ve used elsewhere that are pre-pasted) – slightly easier than regular paper + paste and a much easier product to work with than peel & stick!!

  31. Linda Johns says:

    From 30 years as a designer, a great paper hanger would put paste in a syringe, where the bubbles were, as we lived in Florida, with high humidity…just sharing their trick!

  32. sydney says:

    Oh noooo Julia. This is NOT what I wanted to hear. I LOVE the yellow top, and the striped wallpaper. From the image, i would say leave the baseboards white ???? dont give up on your ideal image!

  33. Liz says:

    I vote painted stripes on the wall! ????????‍♀️????????‍♀️ It looks so good and if you really love it, it’s just time, right?! Find a good show and play it like a audio book while painting! ????????

  34. Amanda says:

    I know it’s a pain too, but can you mud the walls to smooth them out and put up the wallpaper? We had to do that in our entryway to put up peel and stick wallpaper, but it went on beautifully!

  35. Karen says:

    Aw man! The stripes are beautiful! Could you rig up some sort of multi-brush holder (kind of like a candelabra) and paint those stripes by hand, many at a time?

  36. Tara Cee says:

    You can get custom paper, just bring this paper and have them do it in traditional paste. Home Depot also has printable rolls.

  37. Nicole Roe says:

    1st- this happened to me and I will never use peel and stick, always traditional.
    2nd- go to spoonflower.com and make a similar design or find one and ask the artist to change the color for you. It’s really simple. Their pasted paper is very easy to install.

  38. Becky says:

    Soooo gorgeous! Have you considered customizing a wallpaper through Spoonflower?

  39. Lindsay says:

    Oh, no!! Sometimes my DIY fails and getting creative to work around my problems ends up becoming some of my favorite projects. The cabinets look AMAZE! I’m sure you’ll figure something out and it will be just as gorgeous!

  40. Dee says:

    Wow, I feel your pain!
    Thank you for telling it like it is, I so much admire your honesty and transparency. Remodeling is HARD. I am a fairly new follower/ fan and I gasp at how even keeled the both of you are. It calms me to watch you guys in action lol. I am an architect and I applauded your designs and attention to detail. OMG did you nail your master closet!
    I will look forward to your playroom solution ????

  41. Tracey says:

    I’ve used paste in the backs of prepared paper although not after it’s been put on the walls. But I would try reusing the paper with paste to see if that works. You might not need to replace it all then.

  42. Jenna says:

    I used peel and stick for my daughters room and it ended being a hot mess! Mine had a pattern so I matched it up perfectly and after a winter, the wallpaper SHRINKED! So now there is about 1/4 inch gap in between all of them.

  43. Lindsey says:

    How frustrating! I’m so sorry!
    I vote hand painted lines just because I want to see your results :) I LOVE wallpaper but have sand swirl texture in every room (UGH), so I’ve hand stenciled all 4 walls of a bathroom and nursery since peel & stick and even real wallpaper won’t work. I love the results but it is time consuming!

  44. Ashley says:

    I’m so sorry execution wasn’t what you had planned but the concept is ADORABLE! As many others have suggested, I’d skim coat the walls, sand, cover in an oil-based primer, and then hang pre-pasted rather than peel and stick. We just did some wallpaper in our son’s room. I wanted so badly to skip the skim coating and get the wallpaper on the walls but the prep was WELL worth it. We have orange peel texture all over the house; unfortunately, it’s just not enough surface area to allow anything to grip long term (usually…I know some people have success). Don’t give up on it! It’s PERFECT and I hope you try for it again! Also, I’m sure you know all these tips and tricks already, so disregard my suggestions if you already knew this! Love learning from y’all!

  45. Alexis says:

    What a bummer. Although it’s kind of reassuring to see that you guys are DIY mortals just like the rest of us. :) I love the previous idea to do yellow beadboard – would give that vertical, linear look. Or — and this might be too wacky — maybe board and batten walls, and paint the battens yellow?

  46. Rachel says:

    Ugh! I’ll admit I was a little skeptical in the beginning, but as always, you really pulled it off. It was starting to look so great! I’m so sorry this happened. Question: I know in your stories towards the beginning, you showed Chris skim-coating the angled parts of the wall/ceiling. I’m sure it would take some time, but do you think doing this on the entire wall would help the bubbling?

  47. LJ says:

    When I was in HS, a friend’s mom used a squeegee where she notched out the edge so it looked like a tiling trowel and “squeegeed” stripes onto the bottom half of her dining room. I just remember one corner not looking so hot that was her “learning curve corner” where she figured out how much paint to put on the end. She ended up redoing the 3 feet and it looked great! Definitely a “hand done” wobbly appearance, not perfect stripes, but it sounds like that is what you are going for? Not sure how that plays out with an orange peel wall but thought I’d mention it here anyway.

  48. Andrea says:

    This would not be cost effective, but … couldn’t you purchase the traditional version of this same wallpaper from Chasing Paper? I noticed they have both peel and stick and traditional products now. Also, I had this same experience with their peel and stick paper on smooth walls. I was using their paper on an exterior wall and I think somehow there was moisture in the wall that was causing the paper to bubble and not stick properly. I feel your frustration!

  49. Troy says:

    The room looks great! It’s so disheartening to spend so much time on something then have unforseen things ruin it! I feel for you.

    A easy and possibly quick solution I’d suggest is that on one of the panels, take a hairdryer, starting on a lower heat setting and gradually increase the heat as needed go over the paper were it is wrinkled. That should reactivate the adhesive- you will know when the adhesive is at the right temperature because the paper will kinda lift off the wall.. Then smooth the paper in the same manner as you originally did. I also have used a clean chaulk board or white board eraser to do the smoothing, as it is helps control the amount of pressure you are putting on the paper so you do not damage it. This also kind of “shrinkwraps” the paper to the wall. Also use a small needle to “pop” any air bubbles as needed..

    Wait a day or so and see how the test panel holds- if it does, repeat the process for the rest of the walls.. If it doesn’t hold, then you know you have an adhesive problem that could be caused by the orange peel texture, the surface sheen, possible moisture in the walls, etc. You guys know what you are doing!

    This has worked for me in the past and by trying it on one panel, you won’t hurt the paper, the walls underneath, require you to remove all the paper, start all over, etc. Peel and stick has advantages – and disadvantages..

    Good luck!

    • Erin says:

      This is so helpful!

    • Erin says:

      Oh nooo!! But it looks so good! Troy gives great advise here. Also, it looks like you are using a paint roller to apply and smooth? If so you need a firmer j-roller, your contractor probably has one for applying tape flashing to window rough-ins. Most adhesives adhere best when using both heat and pressure, especially if the surface isn’t totally flat-just be careful not to scorch or scratch your lovely paper. And if it doesn’t work out, I know you will figure out something even better. Please keep us updated-we are rooting for you!

  50. Allison M. says:

    Oh no! That’s unfortunate as the yellow is so charming and the irregular lines have a wonderful whimsical quality. Don’t despair though!! Hiccups happen.

    Does the wallpaper company also offer a traditional application in the same print? This way you could keep the original design intent, and utilize a wallpaper that will adhere better with your wall finish. I’ve had similar instances occur with clients and have had to switch the application style.

    Keep your chin up!

  51. Theresa says:

    Ahh it looks amazing too, what a bummer! I have peel and stick in my office and it’s constantly peeling and has bubbles, what a pain. I’ll never use it again. I keep a swiffer in her and use it to smooth it back down when it does lol, not ideal. I vote for similar wall paper with glue because it looks amazing but I KNOW you’ll come up with something that will look equally as good or even better.

  52. Ann says:

    I know this is disappointing, but thanks so much for sharing this post. It’s good to know even the best of the best have hiccups. I recognize that look of defeat on Chris’s face all too well. I know you two will come up with a plan. I’ll be watching to see how this turns out, I have no doubt it will be great! Hang in there❤️

  53. Ellen says:

    Looks amazing ! Hope you’ll find a solution for the wallpaper. I just finished wallpaper in our mushroom/office and I because I fell in love with a specific wallpaper which was only available in peel-and-stick I went with that. I have wallpapered a lot before but always with paste. I hated the application of the peel-and-stick and after a couple of days the wallpaper have shrinks and now I’m stuck with spaces between the panels. Enormous bummer, never ever doing peel-and-stick again. I looks like you can get this exact same wallpaper in the traditional version though.

  54. Radhika Sinha says:

    Love the rug ! Where is that from?

  55. Allison says:

    Do a super fast skim coat of the walls, prime and re-hang it! It looks so good!

  56. Prima Hayter says:

    Setbacks aside, it looks adorable! I think it is worth the effort to move forward with the wallpaper. You could skim coat the walls and reapply, or source a traditional pasted paper. I know Sister Parish and Farrow & Ball both have some really cute yellow stripe wallpaper that might be lovely. Don’t give up! By the way, that rug is to die for, please please link it.

  57. Katie says:

    How about painting a mural? That would add some fun and playfulness to the space.

  58. Gordana says:

    I’m so sorry, guys, this didn’t work out for you. But with that carpet…it looked soooo CUTE ???????????? I know you will figure out something as great and original. Hang in ????????

  59. Barbara says:

    I’m sorry that your wallpaper was not a success. However, it helped me tremendously. I went back and forth on traditional wallpaper or peel and stick. I also have orange peel walls. Thank goodness I was too chicken to use peel and stick!

  60. Liz says:

    I absolutely love this combination. That rug is so perfect. Can you link it?

    So sorry about the wallpaper hiccup but it looks like you have some great suggestions here. How awesome to have a community like this that can help.

    Also thanks for sharing the “fail”. This is basically how every DIY project I do goes. And yet somehow we keep taking on new ones…..

  61. Laura says:

    I once awoke to piles of wallpaper on the floor all around me after spending the previous day applying it incorrectly to the walls in my bedroom. It was a language barrier issue as I was living abroad. The shop owner very kindly drew me pictures the next day to illustrate pasting and booking the paper before applying it. It’s been 40 years and I’ve not attempted wallpapering since.

  62. Mandi says:

    Back out of the wallpaper, skim coat the texture to smooth, and then reapply. I think it really does make the space.

  63. Dianne says:

    Can you possibly use wallpaper paste and rehang each piece? I’ve heard way too many horror stories about peel and stuck to ever use it ????

  64. Monica says:

    Oh, wow- that was a lot of work -am sure you gave it all you could – it you can’t do it no one can! The cabinets look like they came out lovely – perhaps you could just put some fun prints or other artwork on the wall to make it feel like a playroom instead of an adult space ? Your youngest is still very young, isn’t she? ! Maybe frame some of their artwork and put it on the walls. That would add a “kid” feel to the space!

  65. Steph says:

    Oh that’s so disappointing! It looks so adorable. But I know you will figure out a way to make it all come together somehow. The yellow cabinet is AMAZING!!! It’s seriously making me think about where I could add yellow into my home! ❤️

  66. Stephanie says:

    Also this area totally needs a vintage green chalkboard! ????

    • Penny says:

      Love love love this idea!! How cool were those old school green chalkboards from 2nd grade that doubled as a magnet board? Or maybe those don’t exist anymore bc I am one hundred years old ???? ANYWAY carry on

  67. Stephanie says:

    Try peeling up a panel and using a spray adhesive.

  68. Karen says:

    What ifyou do board-and-batten over the wallpaper, paint the same color as the cabinet?

  69. Kelley says:

    Have you tried poking with a needle to let air bubbles out? Sorry that’s so defeating

  70. Sandra G from Michigan says:

    I bet this would make it really DIYable

    https://www.musiciansfriend.com/classroom-kids/grossman-music-chalkboard-staff-liner/910017000000000?cntry=us&source=3SOS0DRBA

    Just stick 5 paintbrushes in there (or 4 and leave one empty to line up with the previous) and you’ve got your perfectly imperfect stripes in your custom perfect color!

  71. Donna says:

    I feel you! I have had this happen to me with pasted wallpaper, but nothing beats my mom’s experience when I was a kid – she papered our entry only to come back in the morning and find it all on the floor! It had released and slid off the wall in the night! Since it was prepasted paper she showed it, she bought wallpaper paste and put it right back up! And better yet it stayed! As you know, you’ve got to be tough when you DIY!

  72. Sara says:

    What a beautiful room for your daughters!

  73. Bridey says:

    I was seriously considering doing a tiny bit of peel and stick in my laundry room. It’s the only room in the house that doesn’t have a thick hand troweled texture, but it does have a tiny bit of texture to it. Could you show in your stories what the texture on your walls look like? Maybe it won’t work on ours either. It does look really pretty—and I’m not really a yellow/gold fan. It’s just too bad you went through all the effort. :(

    • Rachel says:

      I have orange peel walls, and have done peel and stick in my laundry and in one of my daughter’s rooms. It looks totally fine- no warping or bubbling. But I have large floral patterns on both, and I assume that a precise linear pattern would show any little bump. I hope that helps you make your decision! Hope it Turns out for you!

    • Jamie says:

      I have used peel and stick in two rooms of our house with the same texture in both rooms. One room bubbled and the other really didn’t. I think it can really depend on the wallpaper.

  74. Chelsea Kunk says:

    Use spray adhesive and it will totally stay!

  75. Stephanie says:

    I guess you’ll have to fly Rachael from @banyanbridges in to paint a mural. ????????‍♀️
    I’m sorry it didn’t work out as planned. So frustrating. ❤️

  76. Lindsey says:

    I’m so sorry! That’s incredibly disappointing ????. It was looking good. Knowing you, you’ll find a wonderful alternative.

  77. Emily says:

    Don’t give up on that beautiful wallpaper! You can use wallpaper paste on peel and stick wall paper. Love and Renovations just did it :)

  78. Colette says:

    Could you get one of those chalk book staff liners (that makes multiple straight lines) and tape paint brushes in it instead of chalk? Then move over in between the lines so they are close together?

  79. Katy says:

    So I’m not sure what it is about the recent peel and stick paper. I have not seen a successful project, including my own, because of bubbling and the paper losing its grip, even on smooth surfaces. Have they changed formulas at the manufacturing facility? It’s not just one brand- it seems like every brand isn’t holding!

  80. Jennifer says:

    Aw it looks so good aside from the wrinkles! It looks like there’s no wrinkles on the slopes part where there was a skim coat- could you carefully peel the panels off, skim coat the walls, then put the wallpaper back? I’m sure whatever you do it will be great in the end!

  81. Oh I hate when it bubbles! I hope you find a good alternative. Have you considered adding paste to that wallpaper?

  82. Hannah Forman says:

    Thanks for your openness here. It’s good to see failures and it’s cool to see potential solutions in the comments! I had a big failure with peel and stick wallpaper last year – just on normal drywall that was primed! I know it was user error! – but 12 hours after installing it, it was just falling off the wall! So we bought a can of 3M spray and just went for it. I’m sure that will make de-installation a beast, but it’s still on the wall almost 12 months later and we have no plans of removing it yet. :-)

  83. Rebecca says:

    I love it, I really hope someone has the perfect answer for you to save it.
    But how heartbreaking to do all that work!!

  84. Kelsey says:

    How sad!! It really is perfect. ❤️

  85. Amber Polk says:

    Awe, man. That does look great though. Sorry it didn’t work out. I do think painting the baseboards to match the cabinets would be fantastic!! I can’t wait to see what you end up doing with the walls. I Know whatever it is, it’ll be good.

  86. Gigi says:

    You fought the good fight – that’s for sure! Why does my brain tell me you probably dreamt up a Plan B already? ???? Positive vibes!

  87. Wow Julia! This just turned out phenomenal! You guys are so inspiring!

  88. Ellen says:

    This same wallpaper comes in traditional paste! https://www.chasingpaper.com/wallpaper/stripes-away/?sscid=81k4_c7qvl&

    Just change the material from peel & stick to traditional

  89. Julie says:

    Dang it! It looks sooooo good. :( Could you add wallpaper glue to it or does that not work for peel and stick? I can’t wait to see what you come up with!

  90. Caroline says:

    Beautiful! I’m sure you’ll be able to find a solution you’re even happier with in the end. May you please share the rug source, as well? Love those colors!

    Thanks!

  91. Leigh D says:

    I have textured walls too. When I installed peel and stick wallpaper in my bathroom I first applied a traditional backer that helped cover up the texture. I’ve had no issues with the peel and stick using the backer. Still a lot of work for you to have to redo it though. What a bummer!

  92. Stephanie O. says:

    Maybe you could try spoonflower? It’s all custom, and I bet you could match the pattern and the color and select a pasted wallpaper instead of peel and stick? Sorry for the DIY fail—whomp, whomp. As a reader, though, it is nice sometimes to see that not every DIY is a success story (not that that makes you feel any better!). Good luck with whatever your next steps are!

  93. Gina says:

    been there…

  94. Ana says:

    Can you skim coat the walls the same as you did the angled ceiling transition? It would be WORK – but totally worth it? I’m in a similar situation and from everything I’ve researched, that should be a successful solution.

  95. Kelly says:

    So disappointing! I’m so sorry it didn’t work out. :(

    Seeing it in the shot with Sad Chris, though, I’m wondering how well it plays with Greta’s wallpaper. Is it a lot in person, or perfectly playful?

  96. Christina says:

    Awwww dang! The worst week!!!! Honestly, I think you guys should take a break from it for a few days. Cuddle sweet Polly, work on other projects if you want, rest, exercise, eat good food. Go for a swim.

    Don’t let yourselves think about it too much. When you’re rested and ready, the right answer will come to you! Thanks for always sharing the highs and lows. Xoxo

  97. Jessica S says:

    Did you say that Greta’s room also has the same texture walls? I saw that Chasing Paper also offers the same “Stripes Away” print as a traditional wallpaper. Obviously the investment of time and money would be lost but you could still get the same look you want if you think traditional wallpaper would stay in place better!

    Unless of course you pivot in a new direction. You guys are always so good at that and whatever you come up with the end feels like it was meant to be all along :)

  98. Ashley says:

    Oh bummer! On a positive note, those golden yellow cabinets are just perfect!

  99. Erin says:

    Could you try using wallpaper glue?

  100. Pam F says:

    I feel so bad for you guys after all that work! It looked amazing and fresh for your sweet playroom. I also love the colour of your cabinets. I know you didn’t have this bubbling issue in your daughter’s bedroom when you wallpapered. Very odd. I went to the website of your wallpaper (chasing paper) and found this warning below:

    Will your wallpaper work on my walls?
    Surfaces with a texture can get you into some trouble with our peel and stick substrate. It’s your world, of course, but it usually doesn’t end well. If you do have a slight texture to your walls, we’d recommend traditional wallpaper. If you are unsure if your wall is smooth please email a picture to hello@chasingpaper.com and we can help!

  101. Allison says:

    The cabinets are glorious!

    And the wallpaper was so cute too! I had the same problem with peel and stick wallpaper on orange peel texture at my home. Not wanting the wallpaper to go to waste, I then used a $5 tub of removable wall paper paste and applied that to the wall before placing the wallpaper. It worked! However, it does make the paper cling to the wall more and you can see a little bit of the orange peel texture beneath the wallpaper. I don’t mind it with the pattern I used though.

  102. Rebecca says:

    I love the wall paper too and sad it’s not working out. Painting stripes may not work well with or angle peel either – can you even get crisp lines? What about a board and batten treatment? Or use the wallpaper in some type of big kid friendly art for the room? Best of luck. No matter what you do, you will end up loving it.

  103. Becky says:

    We have textured walls too, and our painter recommended sanding off the texture before we applied wallpaper. He let us borrow a sanding block attached to a pole and we sanded the wall so it was smooth. It didn’t take as long as you would think (we did just one accent wall though) and the wallpaper has been holding up beautifully.

  104. Lori says:

    It is super cute! Love the wood knobs most. I believe this design comes in traditional wallpaper.

  105. Ursa says:

    What about using a decorative paint roller directly on your walls. Its more vintage application for the wall (was used a lot in older times my part of Europe instead of wallpapers) and might go quicker than a stencil or hand drawing on the walls. I’m not sure how it would work on your texture of walls, but maybe it would work if you went with more subtle look of yellow on white… Search ‘paint roller texture’ on etsy (or example: https://etsy.me/2XTfP05 – I have nothing to gain if you click on this link, it’s just an example, I don’t know the seller or anything!)

  106. Katy says:

    But it’s soooo cute! I hope someone can chime in to say this is totally salvageable. Like, can you paste traditional glue on the back of it and go on?? Ugh I hope so.

  107. Emily says:

    Could you try a hand-painted pattern similar to what @PlankandPillow or @Carmeon.Hamilton did? White as the background and then use the same pretty yellow color for the pattern. I think it would give the same feel as this wallpaper. If anyone could pull that off, it’s you!

  108. Adair says:

    Y’all should do skinny bead board floor to ceiling, all painted yellow!

  109. Brenda says:

    Heartbreaking! :(

  110. Kristy says:

    Ooh, a bummer. That paper is so playful and classy all rolled into one for a great look to your girls’ play area. You’ll come up with a great solution, probably even better than the 1st.

    I have those annoying orange-textured walls, too. I put vertical stripes on my entry wall using Washi tape and it’s still holding up 10yrs later with no wrinkles. Lots of measuring, but worth it. Plus, it was super inexpensive compared to rolls of wallpaper.

  111. EP says:

    I know whatever you do instead will be even better! That is the bright side to the twists and turns of design. Use those cabinets as a jumping off point and you’ll be golden (no pun intended ????).

  112. Susan W Byers says:

    Did you use a wallpaper prep before you applied the paper? Sherwin Williams makes a good one that you paint on first and it gives you a tacky surface. I use it with regular wallpaper, but I imagine it would do really well with peel-and-stick.

all the latest

We believe we should all love where we live.

We’re a couple of homebodies, working to uncover the home our home wants to be. And we’re so happy to have you here. 

HI! We're Chris + Julia

read more

Load More

Reader Faves

SHop all

What We're                     Right Now

What We're                 Right Now

Looking for our favorite things? A place to shop our home room by room, or just catch up on what Julia's wearing / loving right now? Browse the CLJ shop. 

Loving

looking for inspiration? 

A reader recently asked me if I’m starting to fully embrace traditional style and whether we still consider our house to be a “modern Colonial” and why. It was a really great question and so timely — I had really just been thinking about my approach to this home and how my style has changed […]

Can We Send You Our Love Letter?

Another way for us to stay in touch! Joining our weekly newsletter gives you access to exclusive content, never-before-seen photos, your questions answered, and our favorite DIYs. Sign up below!

Follow Along on Instagram

Welcome to our online community where we've posted home, DIY, style, renovations, and family since '09. Renovating our #cljmoderncottage in Idaho and headed for new adventures in Raleigh, NC. #cljfam #cljtransformations

@chrislovesjulia