Projects

HOW TO PAINT YOUR CABINETS IN A WEEKEND (WITHOUT SANDING THEM)

August 13, 2019

We believe we should all love where we live.

We’re a couple of homebodies, working to uncover the home our home wants to be. And we’re so happy to have you here. 

Portfolio

Projects

Design

We're Chris + Julia

read more

What we're                   right now

Loving

browse the shop

Befores, afters, mood boards, plans, failures, wins. We’ve done a lot of projects, and they’re all here. 

We have a long-standing relationship with DIY, and love rolling our sleeves up and making it happen. 

Even when you don’t want to rip down a wall, you can make that space in your home better. Right now.

browse all

browse all

browse all

02

01

03

Popular Posts

1.

2.

3.

Top Categories

This post is sponsored by Lowe’s


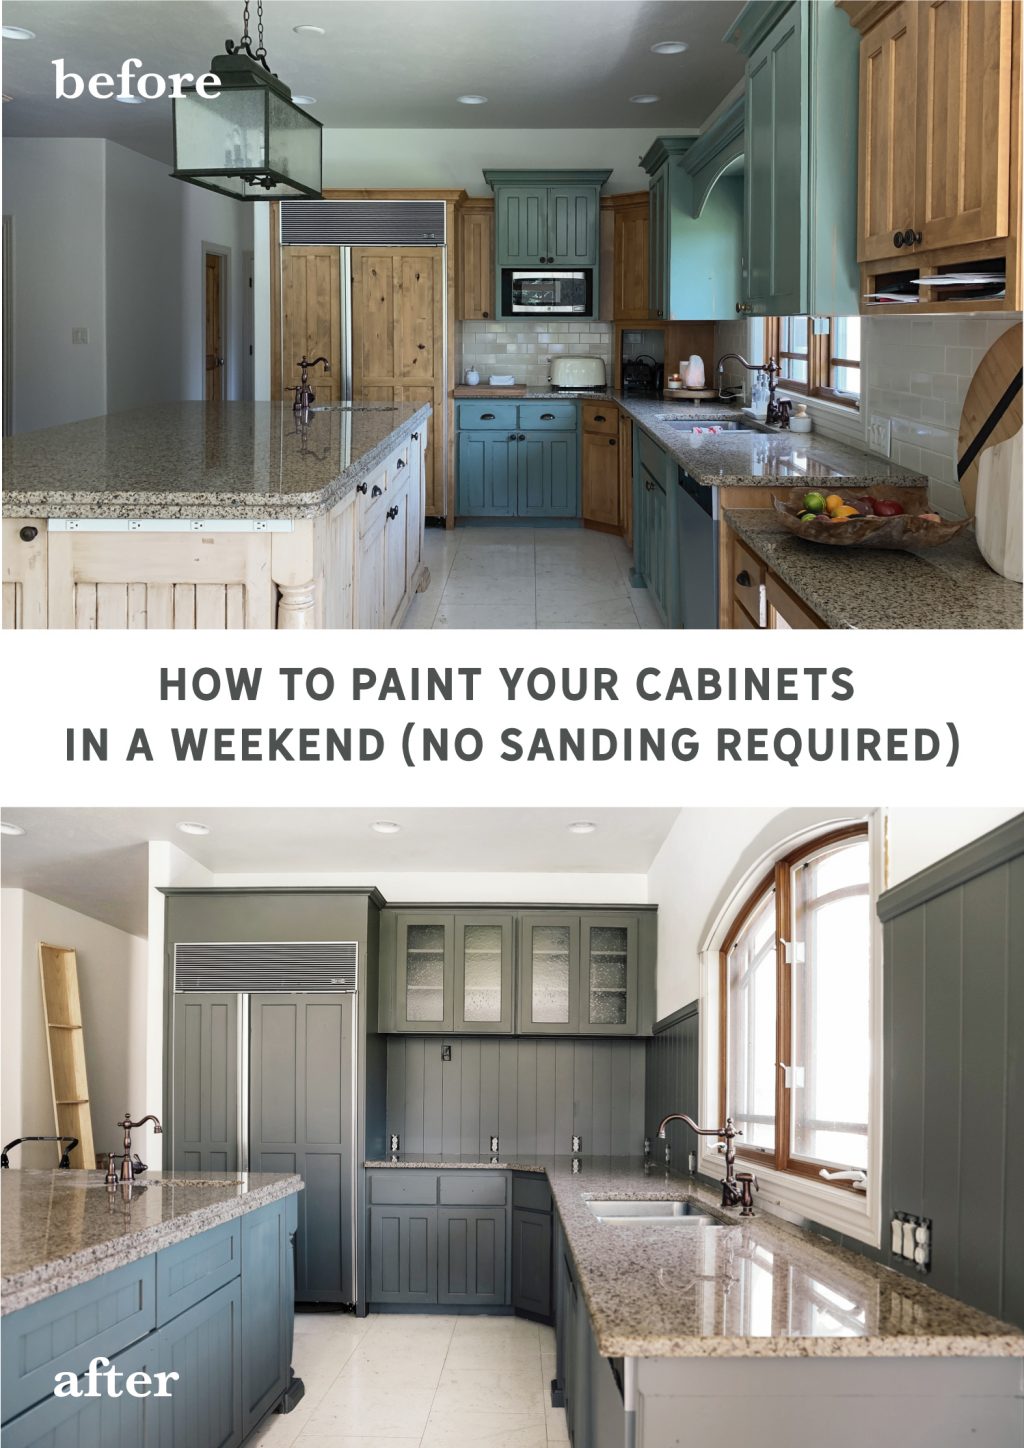
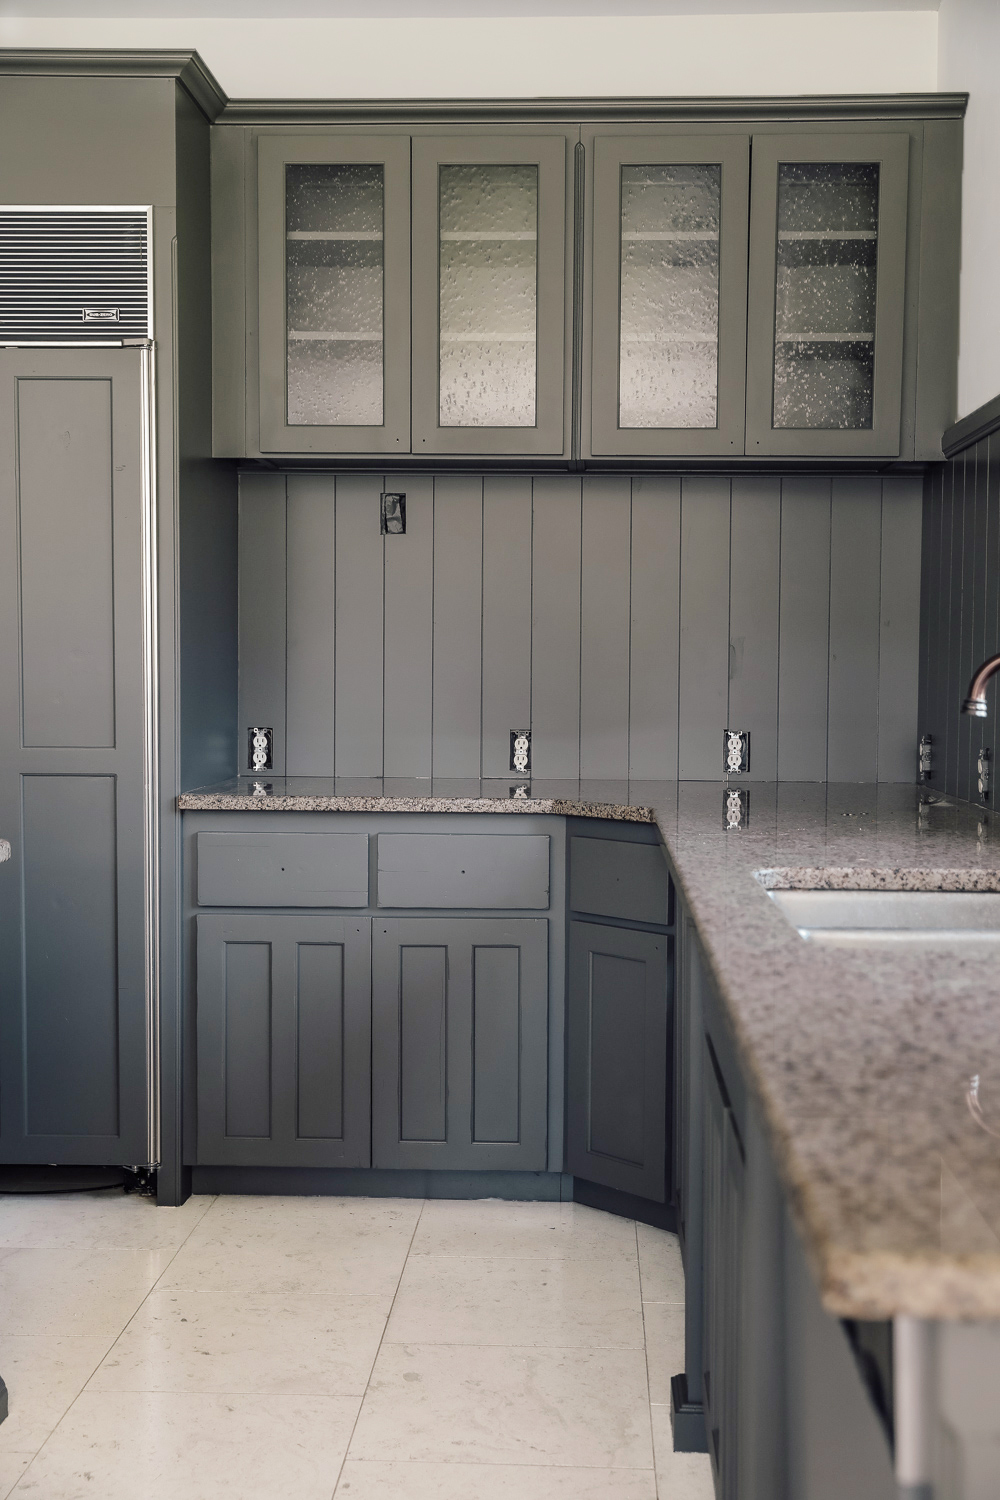
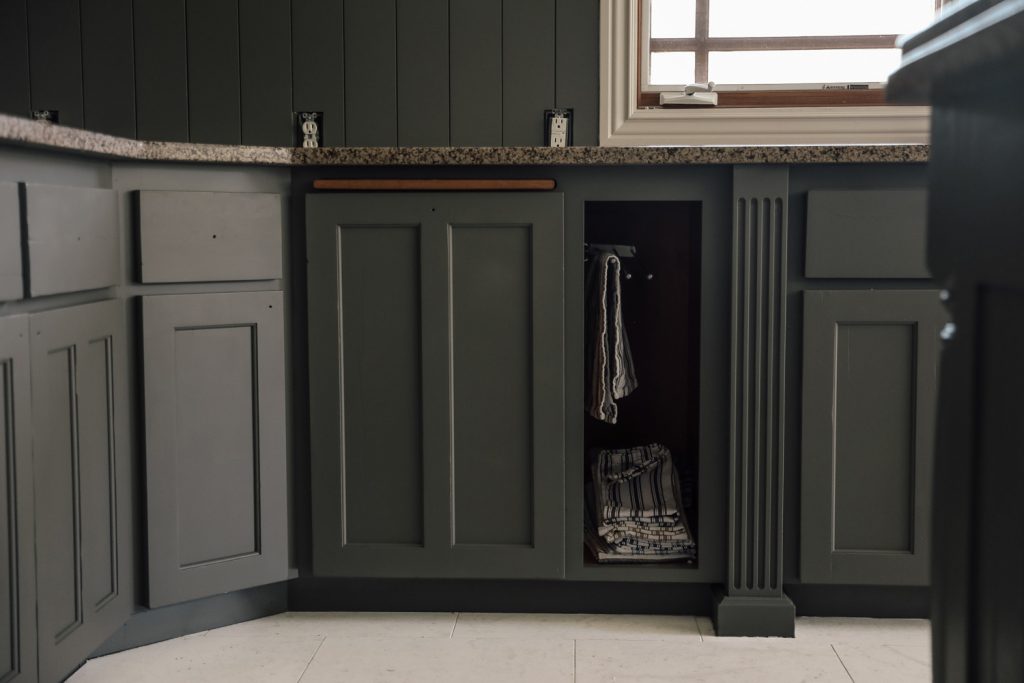
Our week-long phase 1 kitchen refresh is all but done now. The most dramatic change besides rearranging the cabinets (did you even know you could do that?) was painting the cabinets this past weekend. Everyone knows how transformative paint can be, but one of my favorite aspects is one hue isn’t going to be more or less expensive than another. This deep green-gray color we chose (Sherwin Williams Thunderous mixed in HGTV Home by Sherwin Williams Infinity Line at Lowe’s in a Satin finish) is really rich, unified our kitchen added a lot of depth and made everything look a lot more intentional (and even more expensive) for very little money (we also added a bunch of this shiplap vertically as our backsplash and wooooooow! It’s a really amazing product that actually comes pre-painted white, but we painted ours the same green as our cabinets. Back to that…

Painting cabinets sounds really daunting, but this is our 4th time doing it and we’re pretty confident we came up with a system that anyone can do. We even had my niece and nephew (both 17) to help us and they nailed it! Whether you’re planning to eventually swap out your cabinets or they’re going to be there for the long haul, this tutorial is for you. And there’s a few time-saving (and sanity saving) tricks we can happily pass on! It’s even the perfect weekend project if you time it right.

Shopping List–Here’s what you need to paint your cabinets!

Paint: We used HGTV Home by Sherwin Williams’ Infinity line in a Satin Finish available exclusively at Lowe’s. It’s an advanced hiding paint and primer and promises a one-coat perfection (we did two just because ), flawless finish and lifetime protection. It’s the creme de la creme. Lowe’s also carries an enamel paint specifically made for cabinets that has that dries super hard, but it only comes in a semi-gloss finish. Since we were trying to minimize some of the antiquing done to our cabinetry, we were happy to go with a lower sheen (Tip: the higher the sheen, the more imperfections will shine through, so if you have textured walls; or erm, cabinets, a lower sheen will minimize that!). The good news is that our paint dried hard with no tackiness at all–so far, so good!

Primer: No sanding required, but don’t skimp on the primer (even if the paint boasts it has a built in one). This is what is going to make the paint on your cabinets last! Also, primer is significantly cheaper than paint, so a coat of primer will actually help extend your paint coverage. We really love Zinsser Bulls Eye 1-2-3 Interior/Exterior Multi-purpose Water-based Wall and Ceiling Primer. It’s designed for all surfaces (interior/exterior drywall, concrete, wood, non-galvanized metal), dries quickly and my favorite–adheres to glossy surfaces without sanding. Tip: If you’re going for a dark paint color like we did, the paint counter will tint your primer dark for you for free! It definitely cuts down on top coats.

Liquid Deglosser: No need to sand your cabinets and make a huge mess when you use this. We’ve tried a couple different brands and really prefer this Jasco Easy Liquid Sander Deglosser. It works on paint, varnish, enamel, lacquer, polyurethane, and stain–you name it. We’ve used it on cabinets, wood moldings and doors with great success.

Paint Applicator: You have options here. You can brush/roll by hand or you can spray. Spraying will give you the smoothest finish by far, which will help extend the life of your paint job, but it will require a bit more of an investment up front. Whether you go the paint sprayer or brush route–here’s what we’d recommend.

  • If you’re going to brush/roll: Only brush the inset edges and do that first. I love this Blue Hawk short-handled brush. It’s comfortable and easy to control. But the real MVP is this Whizzlock mini foam roller. It rolls on an even, smooth finish.
  • If you want to use a paint sprayer: We’ve tried so many paint sprayers (two for this job alone) just because we feel like testing and providing feedback is a part of our job. This Graco Magnum Painter Plus Electric Stationary Airless Paint Sprayer is the best of the best. I was using a smaller paint sprayer to paint the cabinet fronts and it was taking about 30 minutes for each coat and then Chris painted our entire kitchen in, literally (literally!) 12 minutes with this paint sprayer. There’s no watering down or thinning the paint. It sucks it right up from the gallon so there’s not a ton of mess. No air compressor needed and it connects to a hose for fast and easy clean-up. This thing is tops. Couldn’t recommend it enough.
    • Of course the downside to using a paint sprayer is there is a LOT of taping off involved. I swear it took us 6 hours to tape everything off that we didn’t want sprayed in our kitchen. But! it’s always worth it when the actual painting takes less than 30 minutes total. (Plus, it’s fun). If you’re using a paint sprayer, add painter’s tape and plastic and canvas drop cloths to you list to cover everything and some builder’s paper for the floors and countertops!

Plastic Wood (optional): This was one extra product that we used to help fill heavy knots (the kind that have holes in them) and old hardware holes we weren’t going to use again. It’s the consistency of peanut butter and you’ll apply it with a spackle knife. It dries really hard and then grab a sanding block (I promise the only time you’ll touch one and it’s only if you NEED to) and sand off the excess. Also, I’ll save you some confusion–it’s supposed to be stored upside down so the label is placed that way.

Okay, okay–so what exactly is the process?

HOW TO PAINT YOUR CABINETS IN A WEEKEND WITHOUT SANDING THEM

  1. Remove all cabinet doors. Tip: A piece of painter’s tape with a number on it that matches a piece of tape with the same number on the back of the corresponding door will save you a lot of headache when you’re done.
  2. Decide if you’re going to paint the backs of the cabinet doors. We chose not to for our base cabinets because they weren’t painted on the back originally, but we did for our uppers because they will be opened a lot more it feels like. If you’re going to paint the backs of your cabinet doors–paint that side first! Place all cabinet doors up off the ground so you can easily reach the sides. We used Dixie cups to prop ours up and it was inexpensive and effective.
  3. Time to Degloss! You can just pour the liquid deglosser in a bucket and go to town with a sponge or rag. There’s no need to rinse, there’s virtually no odor. It also degreases so I kind of just combine the cleaning/deglossing step here. We used this on both the cabinet doors and boxes. I would recommend gloves and a mask.
  4. If you’ve got any knots or old holes you don’t want anymore, now’s the time to fill them with the Plastic Wood. Once dry, sand off the excess and remove any debris with a microfiber cloth.
  5. Primer time! I see a lot of people skipping this step and I kind of feel like it’s the most important one. During this project I got a lot of paint and primer on my hands and guess what stayed through multiple showers and hand-washings–the primer! It’s the glue. A good primer trumps it all. We started with our cabinet doors and then primed the inside of the kitchen and by the time we were done with the the doors were ready to get the first coat of paint. The Zinsser primer we love is ready to paint over in about 30 minutes!
  6. Painting. This is the finish line, but don’t rush it. If you are using a paint sprayer, keep it moving and just plan on doing 2 coats (no matter what the can says). If you choose to paint the inside of your cabinet doors, do two coats (our can says to allow 2 hours between each one, but we only waited about an hour). But! Before you flip the doors over, I’d wait overnight. It would be a complete shame to ruin your paint job at the finish line.In the morning, flip it over and do two coats on the front, 1-2 hours apart and then let it sit at least 24 hours before reattaching the doors to the cabinet boxes. I recommend doing the fronts after the backs because that extra curing time will ensure there’s no imperfections on the fronts.We painted the cabinet boxes the same day as the primer, so there was 48 hours of drying time before the doors and boxes were reunited. No stickiness or issues like that. Follow the instructions on the can for full curing, but for the INFINITY paint we used, it mentions to wait 14 days before washing the coating. So although it feels dry and hard–it won’t be fully cured for 2 weeks.
  7. You’re done! Reattach the doors and pop on some fresh hardware to really drive the new look home. We’re using these gorgeous and inexpensive brass knobs (the online pictures don’t do them justice) that are really gonna pop off the dark cabinets.

We hope this empowers you to take on the task of painting your cabinets! It’s so transformative.

The color we chose is the definition of a chameleon color. Sometimes it’s sage-y. Sometimes it’s charcoal. Other times it leans blue. We love how it changes throughout the day. Our to-do list is not quite finished, we added a few shelves yesterday that still need paint and I’m determined to paint the wood window trim, along with bringing back in all of our plates and styling this kitchen! Can’t wait to show you the afters–I think with all the accessories in it and hardware–it’s going to look completely different than even these photos!!

Leave a Reply

Your email address will not be published. Required fields are marked *

This site uses Akismet to reduce spam. Learn how your comment data is processed.

What do you think?

  1. Brenda Schoolcraft says:

    I would really like to know in addition to the thunderous color of the cabinets, what is the paint color on your wall and on your trim around the window? It is absolutely beautiful

  2. Tyler B says:

    With painters with 10+ yeas of experience, you are getting quality work. I get this 100%, thank you for educating us as homeowners

  3. Thank you for educating us. It’s all useful to all homeowners. Nobody wants a dull cabinet, so this is interesting.

  4. Crystal Vas Dias says:

    What is the name of the cable color?

  5. Stephanie Cameron says:

    Thank you for your post. I love how the kitchen looks and I’m now motivated to tackle my own kitchen. I do have a question though in regards to wood grain showing through the paint. I don’t think they are oak but they are that similar look from the late 90’s. In your experience with painting cabinets do you know if I prime properly and paint 2 coats if the grain of the wood will show through or do you recommend sanding and wood filler to mask the wood grain?

  6. Cassie says:

    This may be a silly question but I live in the Midwest-humid! Any extra tips for doing this in a more humid climate? My husband is super intimidated by this project but I told him I’m following Chrislovesjulia’s method-it has to work!!

  7. Jannie says:

    Thank you so much for all this detail… I am so excited to start on my kitchen paint job.

  8. Christine says:

    This is super helpful. Would you recommend this same process for painting wood paneling? We have an old 1960’s house and our mudroom has original solid wood paneling and cabinets. We debated removing it, but I love the idea of painting it a color similar to this. The wood has some gloss to it… do you think we should sand AND use the chemical sander? Any tips you may have would be GREATLY appreciated!

  9. Wendy says:

    Looks great! What color black did you use on your windows

  10. Franny says:

    I have read thru your post on How to Paint Your Cabinets in a Weekend without Sanding Them a couple of time. I’ve been wanting to redo our interior doors for quite some time. Some are damaged pretty badly from previous owners and I’ve always thought I’d refinish them with stain. They are currently are mahogany; however, I’m now leaning toward painting them instead and have a couple questions on your How To’s: (1) Do you think this process would work for internal doors? (2) Did you or do you recommend spray painting the primer? I will most likely spray paint the color.
    Thank you!

  11. Jessica says:

    This was truly one of the best blogs I have ever read. Thank you for the details and care you put into it. That kitchen is incredible!

  12. GG says:

    Hello! Thank you for posting this. This definitely gets me excited painting my cabinets. Would you do anything different from the steps you shared when painting dark color to white?

  13. Demi says:

    LOVE how your kitchen turned out. This post has been so helpful in preparing to renovate our new kitchen. This might be a very dumb question but did you use the sprayer for the primer as well? Confused if that is a bad idea or not. Thank you for all the advice!

  14. Leslyn says:

    Thank you for all of these great tips! If we’re priming and painting using a brush/roller (instead of a sprayer), do you feel two coats of paint are necessary? We’re painting our cabinets and all interior doors from a creamy color to a more true white. Also, we decided to tackle this project with a 5 week old baby, so if the extra coat isn’t necessary, we wouldn’t be too mad about it. Haha! Thank you guys :)

  15. Bruce Bremer says:

    This is pure BS.Sure, it looks nice, until you touch it specially around the knobs and pulls. Then you will see scratches and paint worn down to the original finish, specially if not sanded, to the point it looks worse than before. No sanding just makes it worse. Let’s see this kitchen a year later. I dare you.

  16. Sarah valadez says:

    Hi! I love love love your kitchen! My husband and I are so inspired we are going to paint our cabinets. I was wondering how the painted cabinets are holding up we have four children and I want to make sure painting the cabinets will be durable.

  17. Lisa says:

    My husband and I have been researching painting our own cabinets for a while now and after studying this information we are giving it a try! I just wanted to know if the deglossing/liquid sander works on mdf cabinets? We have older cabinets from Home Depot (off the shelf) They are in excellent condition but do you think the liquid sand/deglosser will work? Sanding probably isn’t an option since they are mdf. Thank You!

  18. Victoria says:

    This might seem like a silly question, but did you spray the primer as well? If so, did you have to use a different nozzle? Thank you… your work is so beautiful.

  19. Elle says:

    Hi!! This was amazing. I was addicted to watching this transformation on insta stories and since we’ve been in quarantine, I’ve been trying to muster up the courage to paint some cabinets! I had to come back to this post. I was wondering if this method would also work with bathroom cabinets? We don’t do a ton of home renos so we’re definitely rookies and don’t have a ton of knowledge. I just wasn’t sure if we needed to factor in humidity when choosing a painting method. Can we follow the exact methods here or will we need an extra step? Thank you so much for the constant inspiration!!

  20. Wendy Darling says:

    Question…..

    The end caps of my cabinets are MDF (I know I know…)….can I use the same recommended products that I’m using for the doors?

  21. Anna Andersen says:

    Hey there! Decided we want to paint our kitchen cabinets, but the paint you recommended HGTV HOME by Sherwin-Williams Infinity Base C Satin is no longer available. Is there another paint you can recommend?

    Thanks!

  22. Jennifer MacDonald says:

    My husband and I are thinking this is the perfect time to paint our cupboards. Did you let your doors dry overnight on your step? We live on Cape Breton Island in Nova Scotia where the weather is damp. Do you think that might interfere with the drying process?? I so love you guys by the way. You have helped me in so many ways and enriched my life. I am truly grateful for you.

  23. Emily Steuwe says:

    Love your tutorials on painting cabinets!
    I have a few questions…

    1) Did you spray the primer on the bases as well as the doors, or do you roll the bases?

    2) Which sprayer did you like better?
    a) Wagner Spraytech Flexio 590 (from your two tone, white and light gray, cabinet post)
    b) Graco Magnum Stationary Airless (from dark green cabinet post)

    Thank you so much!
    -Emily

    • Emily Steuwe says:

      Another question…
      3) Did you use the same spray gun by purging the primer then using the color?

      I think that is all my questions.

      Thanks again!
      -Emily

  24. Victoria says:

    Thanks for all the advice. After living in the same house for 26 years, we’ve downsized and moved into a fixer-upper from 1974 and are needing to update everything. I had no idea how much new Hvac, siding and windows would be! There went most of the profit from our previous sale! Thankfully I found your website and it has given me some great ideas and much needed motivation and confidence that my husband and I can remodel in stages, and still have our home function well and look nice.

  25. Madison says:

    I’m not sure if this has been asked/answered, but what if you don’t have a covered porch or garage? Where/how would you recommend taking the doors to be prepped and sprayed to them stay out to dry overnight?

  26. erin says:

    Thank you so much for sharing! So appreciate all of the details. Makes me feel like just maybe we really can paint our cabinets! It would go SUCH A LONG WAY in our kitchen, which really is beautiful but just needs a new, fresh color! Makes me think my husband and I can take this on.

  27. Hannah says:

    We just bought our first home and we are painting the entire interior. ???? goodbye dark tan everything! We have received a few quotes from local painters, but feel like it would save us so much to do it ourselves. We are both nowhere near handy and have no idea how to use a sprayer at all. Could we use the tips here and get away with doing the whole house? Buy the sprayer you recommend, spend a looooooong time taping off everything, and then going to town? Primer first over the tan, and then going back in with the same sprayer and painting? It’ll save us a biiiig chunk so I think we might attempt it, but I’m nervous because we are rookies. Any thoughts? Tips? Should we just pay someone? Haha.

    • Chris Loves Julia says:

      Painting your entire interior is ambitious, but totally doable. My advice is not to tape off every room. Start with just one room. Assign one person a roller and one person an edging brush. By the second room, you might be pros and have no use for painter’s tape :)

  28. Valerie says:

    Sorry if this question was posted and I missed it, however, how much would a project like this cost? I know it would obviously vary based off kitchen size but mine looks pretty similar to yours! Thanks!

  29. Megan Burgin says:

    I am wanting to repaint some cabinets but I can’t find the liquid deglosser and it says on Jasco’s website it’s been discontinued. Do you have a recommendation for another brand?

  30. If someone asked this already, I apologize. With the deglosser (I’m using the same brand), how much should be left on/wiped off? There is a white residue left over – should I get that all off, I assume? Did you just use a lint free rag? I’m debating using a scrubber sponge as well. Just want to make sure I’m not creating issues for myself down the line!

  31. Elise says:

    Your phase one kitchen is so inspiring and I love your tips for painting cabinets! I have painted cabinets in three different houses using various methods (including oil paint in one) and I’m loving the great advice here. We definitely learn from our mistakes but it was feeling like I was just learning what NOT to do! We don’t have cabinets to paint now but I had some furniture to paint so I used a lot of your tips for the prep. I borrowed a professional sprayer from my dad and ended up ruining my furniture and getting overspray on my patio! In desperation I decided to try the one you recommended here (the Graco Magnum Project Painter Plus Electric Stationary Airless Paint Sprayer). I bought a smaller tip/nozzle to keep the sprayed area smaller and used Benjamin Moore Advance paint. All I can say is “WOW” and of course “THANK YOU”! The sprayer did an amazing job. I am so impressed with how professional the results are. Thank you so much for sharing everything with us with you as you go. I love seeing your progress and all your helpful tips and inspiration.

  32. Samantha says:

    I love following all of your projects–you two are so inspiring! Thank you for sharing all of your tips and sources so we can try to attempt for ourselves and follow in your footsteps! I have a rather sad coffee table that I want to paint. Do you think I could follow the same tips as you provide here for prepping & painting the cabinets or would you recommend a different process and/or materials for painting a coffee table that will get more action than cabinet doors? I really appreciate any tips you can provide!

  33. Kelsy says:

    Do you have any tips on alkyd vs latex paint? We are getting ready to paint some built in book shelves and trim pieces. I’m trying to research which would be better? We want a harder finish that won’t leave smudge marks after you place something on a shelf. Can you use alkyd semi gloss in a sprayer?

  34. Jennifer says:

    Hi! We are in the middle of priming our cabinets. (Thanks for the step by step! Excited to see the finished product thanks to y’alls help!)We have the sprayer and I was going to spray the doors and hand paint/roll the frame of the cabinets. I’m leaning towards spraying the frame of the cabinets bc it’s taking forever to hand paint/roll. When y’all prepped the kitchen to spray the cabinets did y’all cover the ceilings, floors, and walls with brown paper everything you didn’t want to get paint on?

  35. Rachelle says:

    Getting ready to tackle my kitchen cabinets with all your tips! I can’t seem to find the Jasco sander Deglosser anywhere. It’s not available at my Lowe’s or for delivery ????. Is there another brand you recommend? ????????????

  36. Erin says:

    I’ve followed you forever and I complymissed you painted it with Thunderous! We had the outside of our home painted in the same color and just love it! Different times of the day it looks like a completely new color! Just like your kitchen. Super amazing work! Can’t wait to use this tutorial on our 1990’s oak built in!

  37. Amanda says:

    I was wondering if you were painting new, unfinished cabinets if this process would change drastically? Would it still include no sanding in between painting coats, the same paints and primers etc. I’m getting some cabinets built for a laundry room but they don’t paint and wanted to use this as my guide minus the obvious parts that wouldn’t be unfinished but was curious it is actually almost the same or different because they’re unfinished? Thank you!!

  38. Anna says:

    Thank you for listing this out step by step. You are truly inspirational and this is such a great example of your motto, Don’t Wait. I’m in awe. I am looking to use this tutorial for our laundry room cabinets, and the Jasco Easy Liquid Sander Deglosser is no longer available at Lowe’s and I can’t seem to find it anywhere else. Can you recommend another brand that works as well, or do you know where else you can purchase this? Thank you!

  39. Callee says:

    Question: I did the deglosser on a painted crib and then did the primer. Even after hours after the primer dried, it would scrape off with my fingernail. Is that normal or did I mess something up? Thanks in advance. I’m love love love your kitchen and how it turned out!

  40. Tiffany says:

    Thanks for this helpful tutorial! Does this process work on thermafoil cabinets?

  41. Kelsey McNair says:

    It looks beautiful! Nice work! How do you keep the freshly painted wet cabinet doors from sticking to the drop cloth/paper while drying?

  42. WENDI HICKS says:

    I LOVE the makeover! I have the same countertops and am going to try and paint my cabinets the same color. Fo you think it will look ok with dark wood grain tile flooring?

  43. Joe Guggia says:

    Very helpful…thank you! The process is complete, and really shows me that I can do it with patience, the right products, and, well, patience!

  44. Jackie Verbeten says:

    Can you tell me how long the deglossing took before you could start priming? Thanks!!

  45. Katy says:

    I saw that you used a smaller paint sprayer when spraying the cabinets. The price point is better for me based on the project size I am doing. Did it do well on the cabinets? Did you have to thin the paint?

  46. Christine says:

    I really want to refresh my cabinets, especially the knobs, but the current ones are huge and also left deep imprints. Is there any way to help lessen the look of this when refinishing yourself?

  47. I love the way they turned out!!
    Do you think this technique would work on builders grade formica cabinets?

  48. Jessica says:

    LOVE how this turned out! How long will the paint last without peeling or chipping?

  49. Jenn says:

    This is such valuable information!! Thank you for putting it all together. I am getting ready to paint an old stained desk made by my grandfather, which now sits in my daughters room. And now I’m a little less intimidated!!

  50. Katie says:

    We are planning our own small kitchen remodel: new backsplash, new countertop/sink, painted cabinets. If we have to phase it out, what do you suggest the order we do these in?

    Thanks for all of your lovely inspiration!

  51. Kacey says:

    So amazing. This is a stupid question but how did you cleanly tape off the inside of cabinets and shelves so there was no paint getting inside or along edges? I saw you put paper- did you tape edges first and then tape paper in?

  52. Tiffany says:

    Is there any other paint that you would recommend as we don’t have a Lowe’s near by?

    You guys are such an inspiration ????

  53. Camille says:

    super helpful post–thank you so much!

  54. Barbie says:

    Did you paint the inside of the cabinets too??

  55. Mallory Morris says:

    Do you use paint thinner or water for the Critter sprayer?

  56. Mallory Morris says:

    When you were using the critter spray painter, did you use water or paint thinner? I’m about to do some smaller molding/light cover detail painting and figured this small sprayer would be best.

  57. Janet says:

    Will this whole process work on veneer faced cabinets?

  58. Tyler says:

    Thanks for the great tips! We have been so nervous to pull the trigger on doing this ourselves as we are not handy at all. Would these steps work going from a dark color of cabinets to a lighter one?

  59. Christin Lett says:

    Hi Julia,

    This looks amazing and I’m wanting to do something similar for our kitchen. Any tips on moving or rearranging cabinets? Our oven/stove is in our kitchen island. It takes up so much space in the middle of the room. Any tips on how to put a cabinet in the open space once it’s moved? I would want something to match as much as possible but also plan to paint our existing wood cabinets…? I feel kind of stuck.

  60. Polina says:

    Perfect timing with all the advice!
    Thanks!
    I hear a lot about sanding in between coats. Any thoughts on this?

  61. Kelly says:

    This looks SO beautiful!!! I have lived with a cabinet color and layout I don’t like for 4 years because the thought of painting and rearranging them was overwhelming. This has inspired me, I’m going to go for it! You guys are awesome, thank you!

  62. Vicki says:

    I love that color and love the satin finish! Beautiful job! I am going to use your technique to paint mine as soon I figure out what color to use with my existing dark gray countertops.

  63. Kristen says:

    Looks amazing! We painted our kitchen cabinets in our last home and loved the outcome. The process however, seemed to take forever. We brushed and rolled the primer on but used a paint sprayer for the paint. We did sand in between each coat. So you think that sanding is totally unnecessary? I think that is what took us so long with all of the sanding and then wiping the sanding dust off between each coat of paint and primer. Also, did you spray the cabinet doors outside just as you have them laid out in the photo? How did you navigate between everything with your paint sprayer to make sure you got good coverage? We are looking to do our kitchen in our new house this fall, but I dread the long process again. Thank you!

  64. Ev says:

    This is a great resource! We painted our cabinets last year, and I read probably every blog on the subject on the entire internet and none were ANYWHERE near as comprehensive and helpful as this. We made all the mistakes even though we did so much research. We are still happy-ish with how it turns out but we had at least 100 working hours in it :D

    We had full wood cabinets from 1961 that were unpainted, so we sanded and did multiple coats of primer just to cover the knots and oil stains. Now I think we could have used a knot blocking product. We also painted all the backs and interiors of drawers and insides of the cabinets which I now realize was probably unnecessary! We used a few coats of oil based Kilz primer (lots of drying time), 2-3 coats of Magnolia for Kilz chalk paint (which we heard was good for cabinets/adhesion, but honestly, i don’t know that we needed to use it, especially since we had already done the sanding/primer which is sort of the point of chalk paint), and then 2 coats of polycrylic on top because chalk paint with nothing on top is matte and pretty but not durable at all. Between all those coats and drying times (both sides of each door, all sides of each drawer (face palm) it took us weeks to complete.

    ^ laundry list of our mistakes so others don’t do them! haha, do what CLJ says instead!

  65. Liz E. says:

    Great progress, Since this is round 1 of the remodel, after a few years, you might be going after a completely different look in terms of the island, cabinets, color and so on. What fun it is to just experiment with what you have to make it more “you” while the rest of your home is dramatically changing. And, the whole home repainting job really helped lift your spirits to work on the rest of the tasks. I also noticed that the lightness of the room changed when you took out the upper cabinets as well as that overhang in front of the window. The darker cabinets fit in beautifully and they are a change of pace from everything being so white and bright.

    I looked at the picture with the fronts on your porch – what a variety of styles. But, are the columns also different styles? I see curves as well as straight columns. But the darker paint seems to hide those variations.

    Another question – are there two wood cutting boards that are hidden – by the stove and by the sink? My mom had one of those and they were useful, but we didn’t worry about cross contamination issues back then! IS Chris planning to use them, after reconditioning?

  66. Sam says:

    I have never been more motivated to paint our kitchen!! And I’ve been wanting to for a long time. This is absolutely gorgeous! Plus you make it seem actually possible that we could do this ourselves. Fingers crossed it doesn’t turn out like one of those memes “what I think my kitchen will look like (insert a photo of yours)” vs “what my kitchen actually looks like (disaster). Hahaha. Thank you for all your insight! :)

  67. Lindsey F says:

    OMG OBSESSED! Just when I thought the blog was going to trend towards more expensive renos that are out of my budget for the long foreseeable future, you come out killing it in the budget game like this. WOW.
    I fully support the suggestions made below of a blog post with inspiration boards to pair paint colors and tile with existing laminate or brown counter tops! I really want to try installing your concrete countertop DIY but worried about the labor of demolishing it in a phase 2 many years from now..

  68. Leslie says:

    We have high end veneer cabinets (Baulthap). Do you think they could be painted?

  69. NM says:

    Love the new arrangement. Hate the colour… but who really cares what I think!!! It isn’t mu home it’s yours!

    If you love it that’s all that matters! Hope you make lots of lovely memories in your new (dark :) ) kitchen!

    (Actually prefer the undercoat – looks light and breezy).

  70. Monica says:

    I absolutely love how your painted cabinets turned out! I’ve been wanting to paint my builder basic oak cabinets for years now. Time to decide on a color! Do you think the Plastic Wood would fill in the oak grain to get a smooth outcome or would you recommend a different product?

  71. Jennifer says:

    I’ve been reading comments on several Instagram stories (from last week) about blogs vs Instagram. This kind of post is why I love blogs, and always read them regularly! I love watching your phase 1 progress. Thank you both.

    • Maria says:

      If you were going intending on not redoing your kitchen in the future, would you add a step to protect the paint finish? Like using poly? Not sure if it’s a necessary step?

  72. Christina Hyer says:

    Did you have any issues with dust settling on the cabinets/paint? I’m thinking of spraying our cabinets ourselves but am nervous about dust ruining the finish!

  73. Madhumita Chakravarti says:

    Great tips

  74. Kitchen looks absolutely amazing! And it isn’t even totally done! You guys are my heros! ;) One question for you…if you already have cabinets that have been painted (ours are old and have at least one coat of paint on them), we still need to sand them right? Would love your insight!

    • Julia says:

      No, these were previously painted, too.

      • Katie Edwards says:

        what about if they were previously sanded and the paint is wearing off because they either weren’t deglossed properly or primed? I’m afraid if we just re paint them, you will still see what looks like chipped paint texture.

  75. Kyra says:

    Feeling very inspired to tackle my own kitchen phase 1!

    Your eye for paint and color has taught me so much Julia- I’m struggling to figure out options for my existing black granite countertops beyond white (my subway tile backsplash is already white). Would you consider doing an in-depth post with granite + paint pairings? Especially for the granite that many of us have – inspiration photos feature a lot of white granite, which is a great blank slate… just not what I have. Thunderous Gray completely transformed your granite and I’m so impressed by the vision!

  76. Ryan says:

    They look great for DIY the only problem I see is your choice of paint. Infinity is not rated for cabinets and will have issues within a year or two. Paints like this do not hold up well to hand oils and will break down and get sticky around the most frequently handled areas.

    As a professional to those of you reading this and considering doing it please do not use this product. Instead use Emerald Urethane, PPG Breakthrough, Insulx Cabinet Coat, or Benjamin Moore Advance. All of those are rated for cabinets and will give you a longer lasting job.

    One last thing I’d like to note is that the knots should have been primed with BIN or any other brands pigmented shellac primer otherwise they will eventually bleed through. I prime all my cabinets with it which also allows us to skip the deglossing step because shellac sticks to just about any surface without dulling including tile, glass, and stainless steel. Plus it dries in 10 mins which is an added bonus.

    All in all it looks fabulous and I really like the colors! You may get lucky on those knots because the color you went with is dark. I’m definitely impressed with the finish you got for DIY.

  77. Teresa says:

    Thanks! This was perfect helpful!

  78. Crystal Sumner says:

    Do you spray the primer on the cabinets as well? Beautiful!

  79. Beth says:

    What do you guys do about paint drips when you are hand-rolling? I feel like no matter how careful I am, I always get drips, and it’s super hard to sand all of them smooth. Any tips?

  80. Keely says:

    It looks so amazing! Does this process apply to laminate cupboards?

  81. B Mart says:

    I have a question about the infinity paint for cabinets. I know it is Lowe’s top line paint for SW. However, at Sherwin William’s there is the Emerald paint (the Urethane Enamel). I know this post was sponsored by Lowe’s and you cannot get the Emerald there, but I was wondering if you had ever used it in all of your cabinet paintings? and if so, is there a difference in the end product?

    • Julia says:

      Okay, we used the Emerald line for our wall paint and it went on like MILK. It could have been the super light color but I was not into the coverage!

    • hannah says:

      we used SW emerald line throughout our entire house – cabinets, doors, walls, trim. My boyfriend is a professional painter and he really recommends it to all clients. we love the durability – it wipes clean so easily and looks flawless!

  82. Megan says:

    Thanks so much, I went out and bought this paint sprayer today! We’re gearing up for a similar project of our own this fall and this makes me very excited. We’re dealing with 60s cabinets that have been painted multiple times so I think we’ll still have to sand to get a good finish, but the paint sprayer is going to be much nicer than doing it all by hand.

  83. Laura says:

    I’ll have to admit that at first I was concerned about the Phase 1 makeover. However, you really nailed it. It looks fantastic and now, I want to paint my cabinets the same color.

  84. Emily says:

    Looks so good and love the color! My painters just finished painting my oak cabinets white (Sherwin-Williams Pure White) and I can see so much of the wood grain through the paint. Not sure if they sprayed or brush painted. I know the texture can show but should the color? I’ve asked them to come back and look. Similar to what you mentioned about the knots, I’ve read that using spackle on the whole cabinet can reduce my issue. I’m also trying to avoid the paint looking too thick and “pooled”. Thoughts?

    • Gia says:

      Texture, yes, wood color, no. I painted oak cabinets white, but used shellac based primer after reading about bleeding when painting oak a light color. It worked well (painted cabinets white in 2 different rooms). I used shellac based primer even when painting oak a dark color even if it’s overkill! If you go with a lower sheen, the texture isn’t as obvious (satin is better than semigloss).

  85. Brooke says:

    I have wanted to paint our cabinets but they are also antiqued wood with those huge knots in them. Some of the knots are on the raised edges of the cabinets and I haven’t been sure how they would look filled and painted. Did you have that issue at all and if so, how do they look filled and painted? I love your kitchen! Thanks for the post!

  86. Lisa says:

    Wow, I’m very impressed. Lining up the cabinets and unifying the craziness with one color has an incredible impact. It’s also amazing how fast you’ve done this! I know we’ll have to tackle our phase 1 over weekends and evenings so it’s not reasonable to expect that we could complete our as fast but seeing your process is so helpful and inspirational. The last owners did such a bad paint job over the original 1950s plywood cabinets. The paint is just peeling off and is tacky. I suppose we’ll still need to sand the fronts that have had peeling paint but deglosser and primer seem like it should do the trick for the rest. I REALLY want to get started on this ASAP. Anybody have recommendations for the best mask for safely painting while pregnant?

    • Frances says:

      First consult with your doctor. If he or she is ok with you painting (be sure to know the voc of the paint you choose), I would choose a respirator type mask used for painting.

  87. Liz W. says:

    Do you think it would look weird to spray the doors and hand paint the boxes? I was thinking it would be nice to avoid taping the kitchen but still save some time by spraying the doors. But do you think the difference in paint methods would look obvious?

    • Julia says:

      I think that would be fine and we were considering it ourselves. the doors are definitely most important to get the smoothest finish.

    • Carrie says:

      I did that in my kitchen and the results look great. As long as you use the right roller for the boxes, the finish is nearly as smooth as the sprayed doors and you cannot tell the difference. Good luck!!

  88. Addie says:

    No top coat (clear) needed?

  89. k.archer says:

    Right on time! I was just discussing painting our cabinets with my husband last night. Thank you for this post.

    And your cabinets are lovely. Beautiful job.

  90. Lynn says:

    It looks amazing. You both are so inspiring. A year ago I saw a Halloween picture of your family with your Bernese mountain dog. Little did I know you would be one of the best diy people to follow. I have truly enjoyed watching this all come together.

  91. Kayla says:

    This is the best content on the internet right now. Thanks so much for sharing this transformation!! I’m feeling so inspired to tackle our cabinets this fall. Do you think you could spray the doors and drawer fronts and then roll/brush the cabinet boxes to avoid having to tape everything or would that lead to an inconsistent finish?

  92. Emily says:

    I am SO impressed with the sheen and smoothness on your cabinets. I honestly would not have imagined that the deglosser would have worked that well! So you think spraying the cabinets is the best way to go?? I love the color you chose also.

    • Julia says:

      I do think painting is superior to brushing and will yield the best results. If a paint sprayer isn’t in the budget though, I don’t want anyone to feel like they can’t roll.

  93. Mel says:

    It looks amazing! I love how that shade compliments the granite and makes it look intentional.

  94. Lee Ann says:

    Hello! This looks FAB! Thank you for the tutorial. I’m planning a bathroom re-do, which will involve painting cabinets, so I needed this help. And I was just last night looking at wall colors, and you’ve given me EXACTLY the color I’m looking for … not grey, not green, not blue … YAY! Thank you!

  95. Absolutely gorgeous! LOVE the tutorial – thank you!

  96. Jessica says:

    Gorgeous! Do you think that these steps would translate to painting furniture like a dresser?

  97. Cary Lumley says:

    Simply amazing! Thank you for sharing such detail about cabinet painting and how moving cabinets can give you a freshened up look.

    Will you be sharing how you addressed the walls where the cabinets were removed? It looks as if the wall around the cabinets is built up and the thickness difference would leave an edge when the wall is painted.

  98. Molly says:

    Do you think everyone can get away with not sanding? Your cabinets looked pretty smooth before, would my old old cabinets need a little more TLC? Would be great to skip but I’m not optimistic :)

  99. Bridget says:

    This looks so beautiful and “easy” to do! Love it!
    I’ve been wanting to tackle my kitchen cabinets. However they have like a wood veneer glued on and the doors touch/rub each other. Would I need
    To remove the veneer and then sand the doors down so they don’t touch and cause paint to chip?

  100. Jillian says:

    WOW this looks so amazing! You guys and your vision!! Slow clap every time. Love following along!!!

    So interested in the “vertical shiplap” trend- I love it, but isn’t it just paneling??? The same look that everyone used in the 1960-80’s and everyone in the 90-00’s tried to get rid of??? I think it’s fun to see again, but what is the difference in “vertical shiplap” and wood paneling from bygone eras??

    • Julia says:

      A lot of wood paneling is all one sheet installed, instead of tongue and groove. But some of it is probably really similar and just in need of a paint job!

  101. Elizabeth says:

    Looks GREAT!
    I am wondering how you like the small towel bar space to the left of the sink under the counter. Is it convenient? Does water drip too much and you worry about water and/or marks on the wood?
    Thanks

    • Julia says:

      I don’t LOVE it or anything. It’s fine and it works but I think I’d almost just like a hook next to the sink tbh. I kind of forget it’s there most of the time. Haha

  102. Gia says:

    Looks beautiful! And the granite looks so much better with the cabinet color.

    I think that I need a paint sprayer. – or I wish that I bought one two years ago!

  103. Jan says:

    About how many gallons of paint and primer did you use with this sprayer to do this project? We have about the same amount, or maybe a bit more, cabinetry than you do. I was literally going to call painters this morning to hire out our kitchen but this post popped up and I feel like this may be something we can actually tackle.

  104. Emily Smith says:

    If I were you, I don’t think I’d be able to tear this kitchen apart in a year! A year is a long time to live in a kitchen you hate, but such a short time in a space you love! I LOVE everything you’ve done and you definitely inspire me to work with what I have first. I was away on vacation so I just binged the whole makeover on IG and I. AM. OBSESSED. I cannot wait for the full reveal!!! And then to have to wait until Thanksgiving for this brand shoot?!? Ugh, just another reason to pray for Fall.

    • Julia says:

      We have definitely made it more livable atheistically and hopefully we’ll be able to last a couple/few years with it. The workflow (the range behind an island with stools separating it!) isn’t the best but we’re really happy with where it is now.

  105. Leigh Cataldo says:

    Loving the updates you made! Our house was built in ‘98 and has the typical oak cabinetry if that era. The sides/back of the peninsula cabinets aren’t wood (not sure what it is, probably particle board or MDF). Would we be able to use the deglosser and paint on that too?

  106. Patricia says:

    I painted my old kitchen cabinets while recycling them for my basement laundry/craft room project about five years ago. Last year I revisited our old house when it went back on the market and noticed a few tiny chips along drawer edges. I didn’t prime … didn’t think I needed to. Guess I should have. But otherwise the craft room looked great!

    I’ve really enjoyed this mini remodel in your kitchen. Love this kind of project.

  107. KC says:

    Looks wonderful! When you showed the kitchen in the first tour, i was like “WOW that’s a nice kitchen!” and now it’s even better! Thanks for sharing this–love seeing these approachable updates!

  108. Becca J says:

    I was going to ask if you’d thought about painting the window trim! I figured I should read your post first to see if you mentioned anything about it. It all looks amazing – can’t wait to see the finished product! I’ve been wanting to paint our cabinets for a while now, and you’re making me feel like I can do it. Would this process and these products work just as well on laminate cabinets?

  109. Cathy says:

    I wished i had your tutorial before tackling my cabinet paint job last year, which was a beast of a DIY that took me over 20 hrs – active hours spent prepping, priming, hand-painting, and cleaning the cabinet hardware.

    My first mistake was that I followed a tutorial that said to leave the cabinet doors/drawers on, which seemed to be a time-saver at first but quickly became more work than it seemed having to paint around them and avoid painting over the hardware.

    My next mistake was not removing the hardware after i decided to remove the cabinet doors and drawer fronts, which meant I then had to paint around them and scrape the accidentally-splattered paint off afterwards.

    And lastly, hand-painting everything took forever and a half. I spread it over i think a week of 3-4 hour nights and was over it less than halfway through. Painting at night didn’t help either, as I’d miss some spots or over-painted others so the finish wasn’t as smooth as I would’ve liked.

    The end product turned out fine and really transformed our kitchen, but the whole process made me wish I would’ve spend the money and hire it out. I *may* attempt a similar project with a paint sprayer next time. Even though the 6 hours you guys spent on taping things off seems like a lot, but knowing that i spent 3-4 times more times brushing/rolling makes it worthwhile. Thanks again for the tutorial – love following your renos!

    • Gia says:

      I have been there, too! After reading this post, I think that I will split the difference next time – hand paint the frames and spray the doors. It’s the doors that take forever, especially if you paint both sides!

  110. Morris says:

    Hi Chris and Julia! I’m in awe, I just love what you’ve done here. Since this isn’t your first rodeo, what do you do to protect the inside of the cabinets where the boxes and shelves are painted? In my case they take more wear and tear than the doors and drawers and, man, pots and pans do some damage. Any recommendations?

  111. Kari says:

    I’ve seen painted cabinets that end up chipping, peeling, or worn off. This has stopped me from painting mine. If I follow your steps/brands, what is the durability (we are a house with 4 young kiddos)!
    Second, do you paint the inside of your cabinets/drawers? I read you painted the inside of your upper doors, but how about the inside of the boxes/drawers? Love following your real life (and real time!) transformation!

  112. Linda Grubbs says:

    Wow….thank you for some much good information and details for painting kitchen cabinets. It’s always nice to get tried and true tips from someone you trust!
    You guys are rockin’ this kitchen update…..can’t wait to see it finished and staged.
    (By the way…I wasn’t positive I was going to be a fan of the paint color…..I was wrong….IT IS SO GORGEOUS!

  113. Laur says:

    Love this project – it’s a great example of how smaller interim changes can allow you to live more comfortably in a space you don’t love while you save up for a larger renovation.

  114. MelissaB says:

    I’ve never seen a kitchen with so many outlets! Curious if you are going to use painted covers to blend them in b/c there are so many or just go with white?

    • Julia says:

      Hahaha…there are 15!!!! In retrospect, we should have capped some. But last night we switched the outlets to black and I’m going to paint the covers.

  115. Beth Sidhu says:

    So good! Do you think this technique would work on thermofoil cabinets?

  116. Marce Einstein says:

    Julia! love it!! you defiantly have inspired me on this DIY project for my Kitchen. I’ll be picking up all the supplies I need from Lowe’s this weekend. Love it so much ! Keep up the amazing job. You guys are an amazing team and I am obsessed with your Stories updates. :)

  117. Trish says:

    How are you dealing with loss of cabinet space?

  118. Whitney says:

    What are you going to do about the outlet covers? paint them the same color? or leave them white?

  119. Jen says:

    I am really hoping you write a post on how Chris added that wood piece and trim above the fridge to make it look seamless!

  120. Asta says:

    Your kitchen looks amazing! It’s like night and day from where you started. I have a kitchen that was done by previous home owners only 7 years ago, but it looks like something from the 90’s. All cabinets have shiny plastic laminate doors. Do you know if it would possible to paint over plastic laminate?

  121. Jane says:

    It looks gorgeous!! Well done! And I can’t aait to see it styled with the brass hardware and shelves. What color are you painting the inside window trim? Are you taking Jenny Komenda’s tip for your plumbing fixtures? Thanks for sharing all of this information!

  122. Heather O. says:

    Love these tips! My husband and I are currently house hunting and so many times I look at a kitchen and think “how hard would it be to paint those cabinets?”. I saw on Instastories how you made a cabinet panel for your dishwasher, someday can you post a step by step on the blog!?

  123. Amanda says:

    Why would you put shiplap behind a stove?

  124. Cat says:

    Love the color! Instead of a look-for-less kitchen post (since it’s already budget), would you consider a post with mood boards for this budget kitchen reno with different tweaks for options/styles besides cottage? Looking for recommendations for a tile that works with that granite…

    • Julia says:

      I’ve thought about going to take photos of dated granite and the store and pairing them with paint colors but I don’t want to offend anyone by saying these are dated granite!

      • Jennifer says:

        I would love to see some mood boards like that, too! Instead of calling it “dated,” maybe you could call it something like “Sustainable decor: How to work with the countertops you already have.” I’m very drawn to that sort of thing, from a sustainability perspective.

      • Wendi says:

        Ahhhhh that would be so incredible, please do!!! We have Baltic brown and trying to modernize our kitchen in any way without replacing the counters feels hopeless!

      • Elizabeth Alter says:

        Wendi- did you come up with any great ideas. We’re trying to do the same thing. Likely need to pick a backsplash that helps modernize without clashing with the brown granite also.

      • Emily Smith says:

        I totally get what you mean about offending people, but I would love your ideas about it!

      • Meg T says:

        This would be so interesting! But instead of calling it dated granite you could just do a post about matching things to pre-existing countertops. Lots of people buy houses with countertops that they did not choose and then want to update their kitchen but are keeping the countertop. So it is more about working with something that you have than getting to choose what you want. It doesn’t make it dated. It is really about the fact the countertop was inherited with the house and not something the homeowner picked themself!

      • Cat says:

        Haha, that would be great! What if instead of calling it dated you just called it it budget, common,
        or builder grade? Help us all!

      • K says:

        PLEASE DO THIS! The granite in my house is what offends me haha

      • Christina says:

        Yes! Amen! Offend away…many want to update their granite, but painting the cabinets is much easier and much easier on the wallet!

      • Kristen says:

        I’ve seen comments where people are offended! lol. Maybe just call them “common” granite colors – but I think that would be a great post that so many people could relate to.

      • Kayla says:

        Please please please do this. You don’t even have to call it outdated…. more like…. busy ???? And pairing backsplash tiles with outdated granite would be so helpful also.

      • Sarah says:

        I agree. There are a couple granites out there that, at least in my area, I see in a TON of homes (and at home improvement stores) that are like that one that don’t really fit what we are seeing on shelter blogs, IG, Pinterest, etc. Showing how to work around it, elevate it, etc. for those of us that can’t replace, would be AWESOME!!!!

  125. Carly says:

    Also- one more question. We have judges paneling in our family room that we want to paint. Do you think this same process would work (deglosser, prime, paint)?

  126. Carly says:

    I am loving this kitchen makeover! It looks so great already so I know the final touches will make it even better! I love the new cabinet color!

    • Amanda says:

      We used your method for our laundry room update. I am SO glad I read this before! Made this project go so much smoother knowing which products we needed plus such clear steps! By the way, if anyone is debating whether to spray or roll/brush…. SPRAY!!!!!! It is amazing how much of a difference it made. We rented a sprayer for 24 hours and it was without a doubt the next decision. Thanks for such a great post!

  127. Yvonne says:

    In one of your prep photos you have cabinets with the shiplap in middle of the cabinet doors (if that makes sense). I don’t see those doors in the finished paint photos. Did you end up covering that panel for a more modern look? That’s how my cabinets look and I’d love to cover that up!

  128. Dawn says:

    Ok, just to clarify – Wait 14 days to wash/fully cure, but you can go ahead and re hang
    After 48 hours? Like, they’re hardened enough to handle, reattach, etc? Thanks! Loving your phase 1 SO much!!

  129. Alex says:

    Wow! During the process it didn’t seem that the color jived with countertops as much as it does looking at it with all the cabinets painted. It looks fabulous!!!
    Can’t wait to see the final product. You guys, for so little money to get that kind of transformation has gotten me all inspired! I know it was a lot of work, but SO worth it! I’ve been waiting to make some changes in our master but I now have all kinds of ideas for things to do to make the space better while I save for the big items. You guys never disappoint!;-)

  130. Shannon Beaty says:

    This looks AMAZING! Great job! I know you had mentioned in your stories that you should have thought about your faucets – but I don’t hate the ORB. I do hear you on the window trim. I would drive there to paint it for you! Love it! Can’t wait to see how you finish it out!

  131. Danielle says:

    Swooning and wiping the drool from my chin! That is an awesome job!

  132. Megan says:

    Looks amazing! That color green is fantastic! And I didn’t notice until seeing the before and after pics at the top of the article but…that window has a pretty arched shape that isn’t noticeable until you removed all that extra cabinetry and it looks like it lets in more light.

  133. Amanda says:

    Where the green/blue cabinets painted or stained before? We are in the midst of a phase 1 Reno as well. The previous owner did a very very poor job painting the kitchen cabinets and it is chipping/peeling/falling off everywhere. I am feeling we will have to sand them because of how irregular things are. And the paint drips from too heavy of coats.

  134. Katie says:

    We had our kitchen cabinets painted and they either didn’t degloss enough or skipped the primer step so now there are places that are wearing off. What do we do about those areas if we were to tackle this since there is a texture change there?

  135. Nikki Lehman says:

    Would this same technique work for baseboards?? specifically dark baseboards? Not having to sand?

  136. Rachael says:

    It is coming together so beautifully. Thanks so much for sharing the process its so inspiring! Do you think this same process may work on cabinets that have already been painted? or cabinets that have been painted with chalk paint?

  137. JO says:

    Do you worry about water damage to the paint from the sink. Our lacquered undersink cabinets are starting to peel from the occasional drop of water?

  138. Nicole says:

    This is so beautiful! You guys really know how to bring things to the next level. I can’t wait to see the finished room for phase 1!

    The previous homeowners of my house re-did the cabinet doors, leaving the original cabinets. I can’t tell if they replaced the doors completely or just refinished them, but they are turning yellow :(. So My kitchen cabinets need to be re-done and this how to was so helpful! I do have a question (if you don’t mind). The cabinets are super smooth which is great, but I can’t tell what kind of wood they are, would the deglosser work on them?

  139. Jamie says:

    I’m dying this is so beautiful!! I just love that color!! I have a question for you – do you think this system would work on thermofoil cabinetry? Thank you!! Also did you see Jenny k’s comment about the black rub n buff?? I think that would look amaze.

  140. Roxanne says:

    LOVE LOVE LOVE. So glad you didnt do white or gray. Time to move on from those colors.

  141. Jackie says:

    So great! Really want to paint our kitchen cabinets-but the exposed sides of both uppers and lowers have a sticker film made to look like the grain of the wood etc-it’s just builder grade kitchen cabinets in a light oak. Not super grainy but wondered if we needed to add a real wood panel to cabinet sides or if we can paint over it the same?

  142. Andi says:

    We are in the process of painting our cabinets right now. I read somewhere that you should use an oil based primer??? I just bought the Kilz oil based. Should I have just got a water based? We are painting the cabinets white…
    Thank you!

  143. Mary Ann Noone says:

    I have an oak bureau but the top of the bureau seems to be some sort of plastic veneer. It’s in excellent shape—can I paint it???

  144. Nicole says:

    Love this! Seems easier than some past cabinet painting tutorials. Do you no longer recommend the Wagner paint sprayer? I just bought it a week or so ago and now I’m wondering if I should try to return it and get one of these newer recs before I start. ????

    • Julia says:

      I’m not saying I wouldn’t recommend the Wagner or the Critter–we love both of those, too! But our favorite favorite is the one we linked here, and Graco has no idea who we are.

  145. Amanda says:

    It looks amazing! Our cabinets are wrapped in a laminate material would these products work on laminate?

  146. Renee says:

    The combo of the three colors and the varying heights of the old kitchen hurts my eyes to look at it, the new version is so calming and lets you think. And…it looks like a completely different kitchen.

    I need to repaint my bathroom vanity and I’m going to use what you used.

  147. This looks so good! It’s amazing that you used a lot of what was already in the kitchen! I LOVE the dark and moody green cabinets! Your Instagram stories are more entertaining than most shows on HGTV! Thank you for sharing this process!

  148. Tiffany says:

    This is so helpful! Thank you! I can’t get the shopping list link to work

  149. Ayisha says:

    Chris, How in the world did you cut that shiplap so perfectly in that arch? Please say there was some kind of projector or arc laser involved. However you pulled it off, you need to reach over your shoulder and pat yourself on the back.

  150. Regan says:

    I’m planning to paint our laminate cabinets in the fall and have read lots of tutorials that say to not skip sanding. Does using the deglosser instead mean you’ll have less longevity of the paint? Any concerns with deglossing instead of sanding? Would love to skip the sanding if I could, but I’m nervous!

  151. Danielle D says:

    I’ve read so many blogs on painting kitchen cabinets, and this one is by far the most helpful. I just started painting my kitchen cabinets and am so grateful I came across this article. Thank you, thank you, thank you!!

  152. Stacy says:

    I’ve been watching this process avidly on Instagram, I can’t believe the transformation – incredible! Can’t wait to see it all styled out.

  153. Diane McKellar says:

    Did you spray the primer?

  154. Andrea says:

    Beautiful transformation and I can’t wait to do ours with your pointers! One question – what size sprayer tip did Chris use with the Graco Magnum?

  155. Kimber Duong says:

    Your cabinets look great! I love the color you chose; paint is so transformative!!

    I really want to paint my kitchen cabinets, but I have those terrible, builder-grade oak cabinets that have a whole bunch of grain that I feel would show through horribly if just primed and painted. Have you ever had to paint grainy cabinets and use a grain filler? If so, any you might recommend?

    • Julia says:

      I’ve never used a grain filler but I’ve heard wonderful things about them! I’d use that in place of the plastic wood step.

    • Michelle says:

      We used grain filler and it’s a MESS, but really does make a difference! If you want a nice smooth finish, you’ll need to sand it smooth, wipe it, and then probably go back for another pass where you thought it was smooth but it was just dust settled into the cracks. Even with the prep work, the grain shows through a little. We had our paint professionally sprayed but I think a first coat done by hand might be better because it can work into any little crevices that didn’t get filled…when you spray, it sort of skims over those imperfections and brushing paint into the grain at that point ruins the nice sprayed finish! We also ended up buying new cabinet doors from a company called Barker Doors and it was SOOO worth it! You just send in all your measurements, pick your style and they make them all custom for you. I thought it was pretty inexpensive as well! Our oak cabinets with arched insets just weren’t going to give us the look we wanted but our cabinet boxes were in really good shape and the configuration was working for us. Hope that’s all helpful!

      • Kimber Duong says:

        Thank you so much, Michelle!! I’ve actually been considering just buying new doors from either Barker Doors or a place called Kitchen Cabinet Doors too. It just seems so much easier than dealing with sanding and filling all of the nooks and crannies of my existing doors, especially when I don’t like their style to begin with.

      • Sarah says:

        We have arched oak doors that I hate and I’ve been eyeing Barker doors. Did you do a full overlay, partial overlay or inset? We have partial overlay now but I’m dying to replace them with inset doors. If you did inset- how has the paint held up?

  156. Summer says:

    So no poly topcoat is needed??? That’s the step that I hate and is holding me back from painting my cabinets.

  157. Emily says:

    This looks amazing! Thank you for doing projects like this to give others confidence in tackling something like this in their own home. I’m bummed you posted about the sprayer you used on the doors in stories (the critter) and did not talk at all about it here. I was hoping for a few tips and tricks with that sprayer.

  158. katie says:

    Honestly your kitchen reno is the only ‘show’ I am addicted too. :D

  159. Mary says:

    Looks gorgeous! Would these products also work on laminate cabinets? Have you ever had success in painting laminate?

  160. Ana says:

    Thank you for all the tips! We’re actually painting unfinished cabinets next weekend and will be using this as a guide! What was the name of the other paint sprayer you recommended that uses an air compressor?

  161. Amber says:

    If my cabinets were painted poorly previously (by me! I wish I had used that primer!) do I have to sand them down or is the deflosser + Zinsser primer combo going to be enough?

  162. Christy Griffin says:

    This is beautiful!!! Can you comment how smelly the Jasco Liquid Deglosser was?

  163. Virginia Napoli says:

    Really enjoyed this process. Just bought a new home where I would love to tackle painting some cabinets. You make me think I can do it! One question – did you use the paint sprayer for the primer as well?

  164. Renee says:

    You guys are so talented and what’s special about your brand is that it’s so accessible. I love that you can make your phase one just as beautiful as your bathroom you saved up for years to do. Totally selfish but any chance your going to paint those countertops? I’m wanting to phase one my bathroom while I save and my granite is too dark and fussy to leave it. Beauty job Chris and Julia. So inspirational.

  165. Molly says:

    It looks like a whole new kitchen! The color you chose is amazing and looks soooo good! I love the step-by-step and it totally seems doable by an average person. We have knotty pine cabinets that are just not my style, but a whole new kitchen is $$$. Painting them might be just the ticket!

  166. Kristin says:

    This is so helpful thank you!!! Embarking on painting bathroom cabinets and then maybe a kitchen refresh. You all have totally inspired me. ????????

  167. Carolyn Thomas says:

    When you put the instastory up showing Chris painting those cabinets, I was flabbergasted! The kitchen looks beautiful. I can’t wait for the reveal.

  168. Kirstyn says:

    I love that this is an easily tackled project on a budget that makes such a big impact! Also allows you to try something trendy for a short time before phase 2 if you want something a little more classic. So fun & moody. Thank you for sharing options for every budget! I’m here for this reveal!!!

  169. Sarah says:

    I love that you did this little makeover. It’s actually totally transformed the kitchen I think! But I’m glad you did it to show that you can work with what you have and still make your home yours without a huge renovation. This is the type of renovation the majority of people need inspiration for because it’s not feasible to completely start over. Its amazing! Love it!

  170. Rachael says:

    I can’t believe how much I love the color! Just absolute perfection.

  171. I cannot wait to see the finished look. I’m amazed at how different and how much better it looks already with just your few improvements! so good. Best content on the internet right now!

  172. Ashley says:

    It’s just sooo good! Cannot wait to see your finished product!

  173. Ginger Adams says:

    This is so helpful and inspiring! What would you recommend if one was doing this with oak cabinets? There is a super deep grain and from what I’ve read, it can bleed through. Would you try to fill with plastic wood? Thank you!!

  174. Stephanie says:

    I LOVE this!!!!! I feel like I could do this…almost. Do you have a post about all the prep work? I’m scared to spray in my house!!! I imagine the paint spray spraying everything like a firehose gone wild!!!

    • Julia says:

      No no no, there’s not as much overspray as you’re thinking. Just cover your floors and countertops and tape everything off (as I mentioned in the post this took us the longest!) but there’s no need to section off a complete room!

  175. Laurielulu says:

    This is an amazing tutorial. So thorough. Wish I could paint my rental cabinets…..❤️

  176. Heather says:

    Absolute perfection! The fridge Crome plate stuck out like a sore thumb before, it looks SO much better now. I’m curious about the front panel Chris made for the dishwasher. Was it a panel dishwasher prior or did you take off the front and somehow hack it? So curious! Can’t wait to see final pictures ????????

  177. Brie says:

    Thank you so much for this post! It’s really really helpful! I’ve never used a liquid deglosser or a paint sprayer, both of which I am now eager to try! Your instructions make it seem very doable! Can’t wait to see the finished kitchen!

  178. Jen says:

    Color looks great with the counters!

  179. Kelly says:

    It’s looking SO GOOD already! Question – is there a reason you didn’t paint the arched window trim (white portion) the same green color (which would have been my first instinct)? Is it to break up the green, or be consistent with the other windows? Always curious as to how other design minds work :)

  180. Kristen says:

    Looks great! I can’t wait to see the full reveal.

  181. Danielle Dallau says:

    Hi! I’ve loved following along :) I was wondering – how many hands on hours does it take?

    • Julia says:

      Hmm—of course every kitchen will be different depending on size. For us, it was 5-6 hours of taping off and prepping. 1 hour to Degloss. 30 minutes to prime everything and then two separate 15 minute painting sessions. And then add another hour or so to put everything back together. Active time is not bad.

  182. Cici Haus says:

    Love it! I can’t wait to see the finished project but it’s gorgeous already (and so much better than it was!)

  183. Erin says:

    Love, love, love the color! Thanks for all the tips. My husband and I have been talking about hiring painters to paint our kitchen cabinets, but this post really does empower me to try it ourselves. Thanks!

all the latest

We believe we should all love where we live.

We’re a couple of homebodies, working to uncover the home our home wants to be. And we’re so happy to have you here. 

HI! We're Chris + Julia

read more

Load More

Reader Faves

SHop all

What We're                     Right Now

What We're                 Right Now

Looking for our favorite things? A place to shop our home room by room, or just catch up on what Julia's wearing / loving right now? Browse the CLJ shop. 

Loving

looking for inspiration? 

A reader recently asked me if I’m starting to fully embrace traditional style and whether we still consider our house to be a “modern Colonial” and why. It was a really great question and so timely — I had really just been thinking about my approach to this home and how my style has changed […]

Can We Send You Our Love Letter?

Another way for us to stay in touch! Joining our weekly newsletter gives you access to exclusive content, never-before-seen photos, your questions answered, and our favorite DIYs. Sign up below!

Follow Along on Instagram

Welcome to our online community where we've posted home, DIY, style, renovations, and family since '09. Renovating our #cljmoderncottage in Idaho and headed for new adventures in Raleigh, NC. #cljfam #cljtransformations

@chrislovesjulia