


Today we’re excited to have our Visual Media Producer (and my sister!), Andi, share how she transformed her kitchen on a dime over the last few months! Take it away!
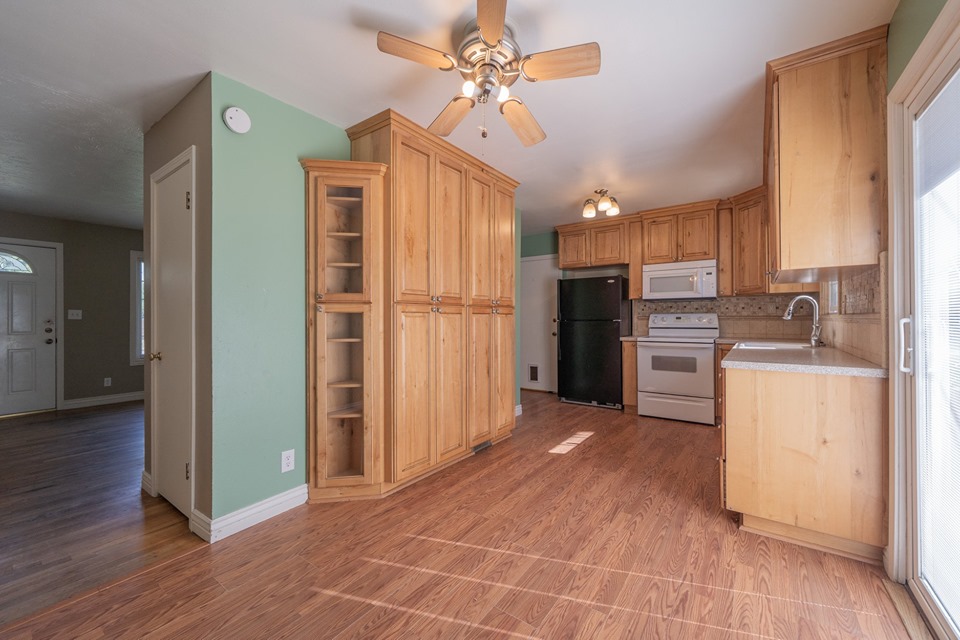
We are coming up on one year living in our first house! And to be honest, it really feels like a non-stop year of arranging, nesting, guessing, styling, and painting. So. much. painting. It fixes everything! Enter : our kitchen. If I had to describe it in three words and use alliteration it would be: brown, boxy, and boring. Floor to ceiling oak–it had to go! And while we’re at it–the leaky black fridge that came with the house, too. Jules, of course, was the one to put the bug in my ear that just painting the cabinets would give us a new kitchen. Our refresh was kickstarted this summer with a birthday wish. I told my family all I wanted was for everyone to come over and help me get a grip on tackling the kitchen. I wanted to do a treatment on one wall, take down a cabinet and replace it with open shelving, and paint our neutral mosaic backsplash white. That’s all. Ha! And of course what followed was the inevitable–you improve one area and you want to do more and more and more. But we took our time, two months time to be exact. A weekend project here, a couple nights in the garage there. Sometimes we were waiting for the right inspiration to keep going, sometimes we were waiting for the right price. Here’s the six things that completely transformed our kitchen, without changing its layout.

1. Painting cabinets for a whole new view
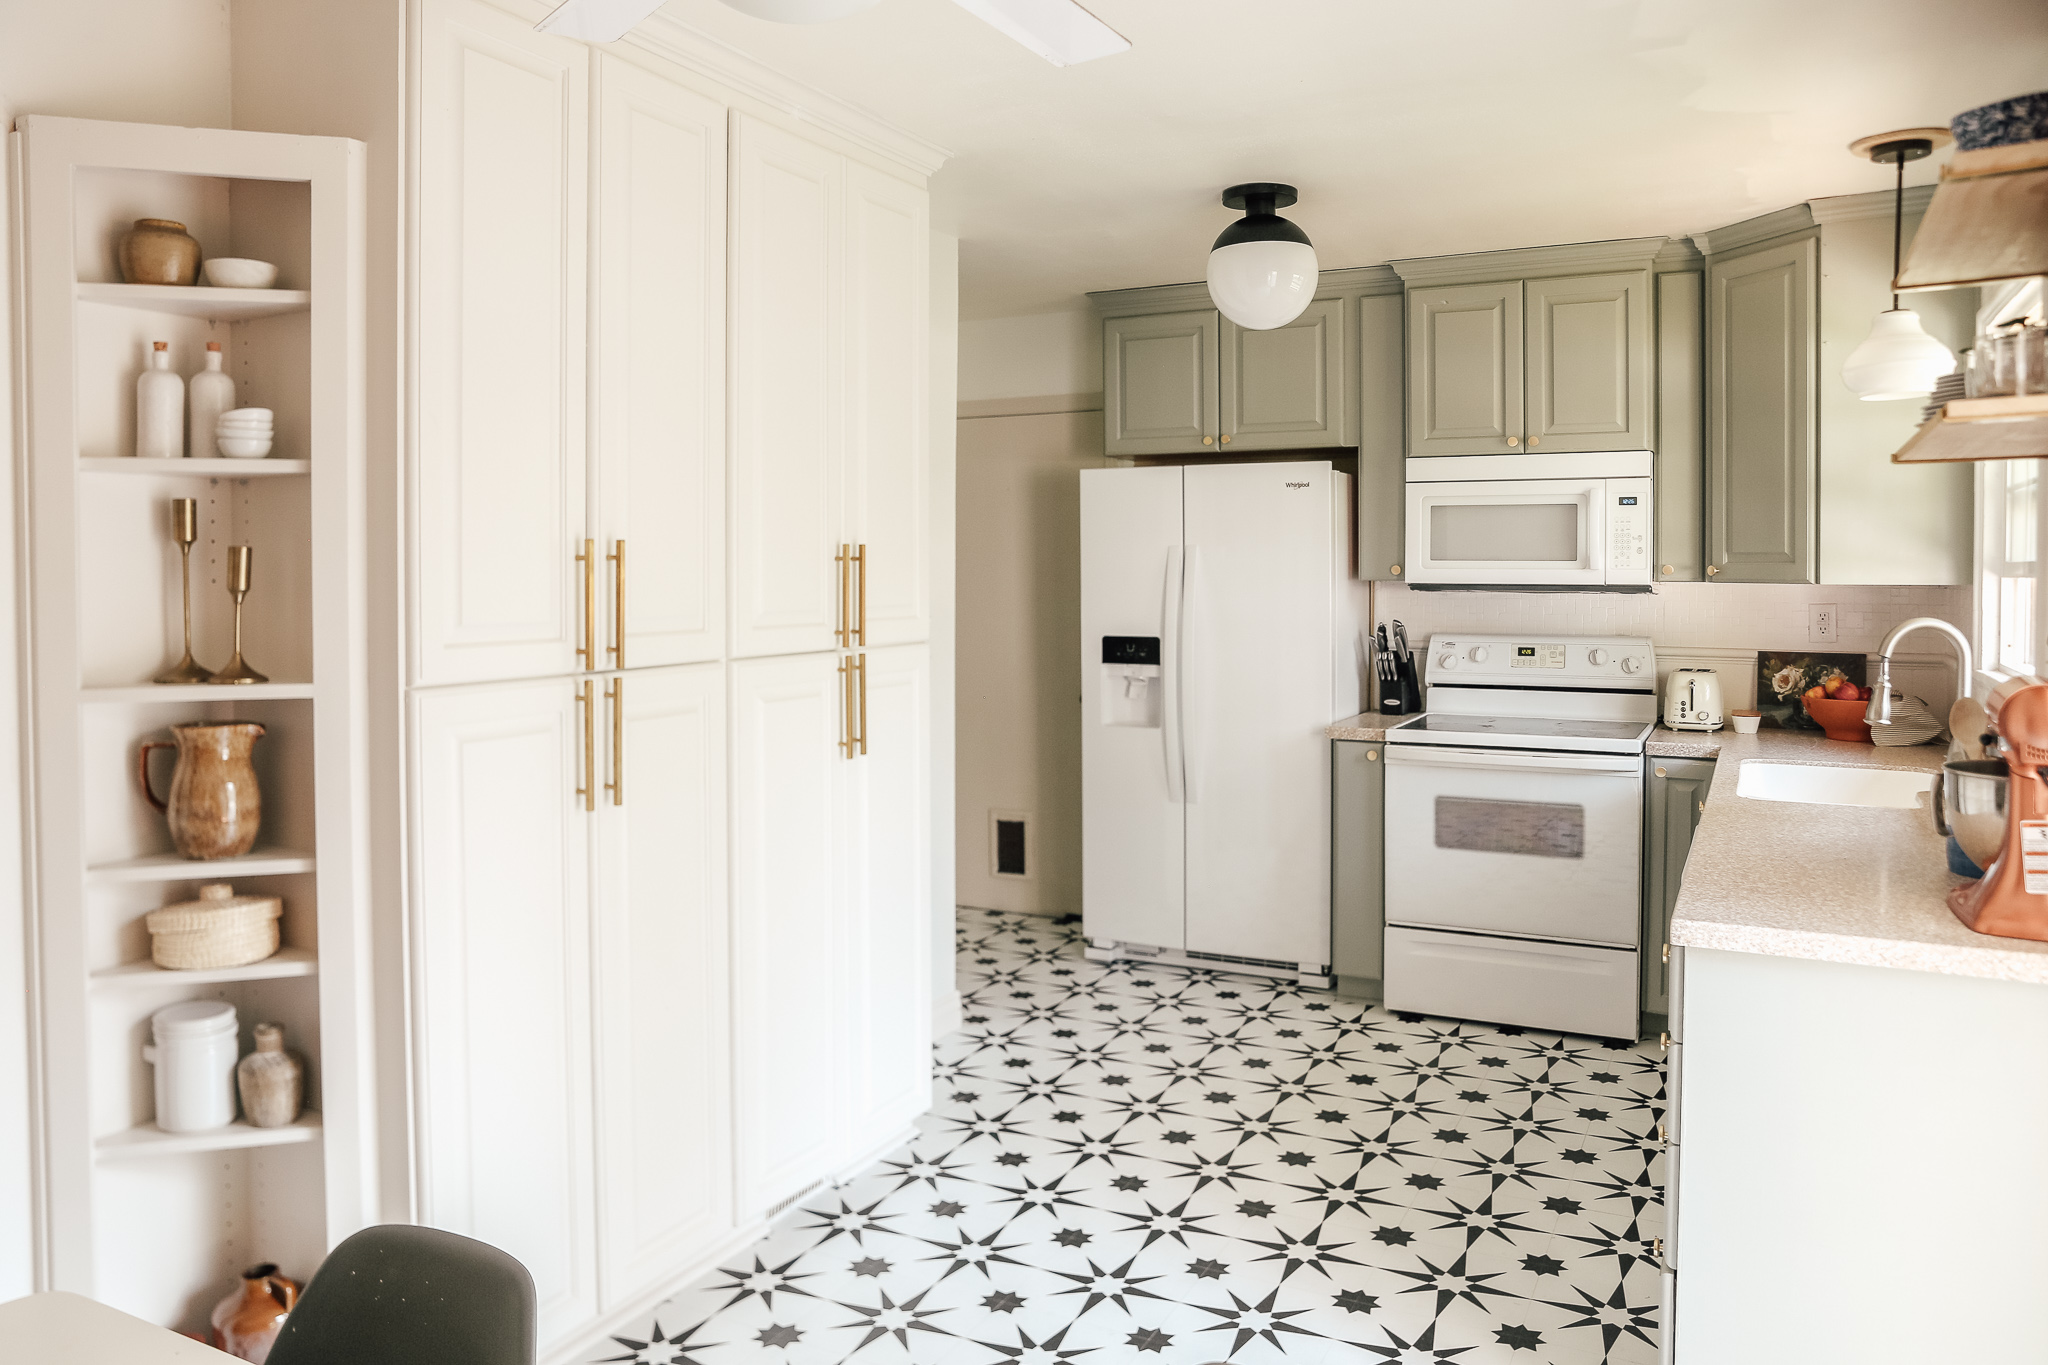
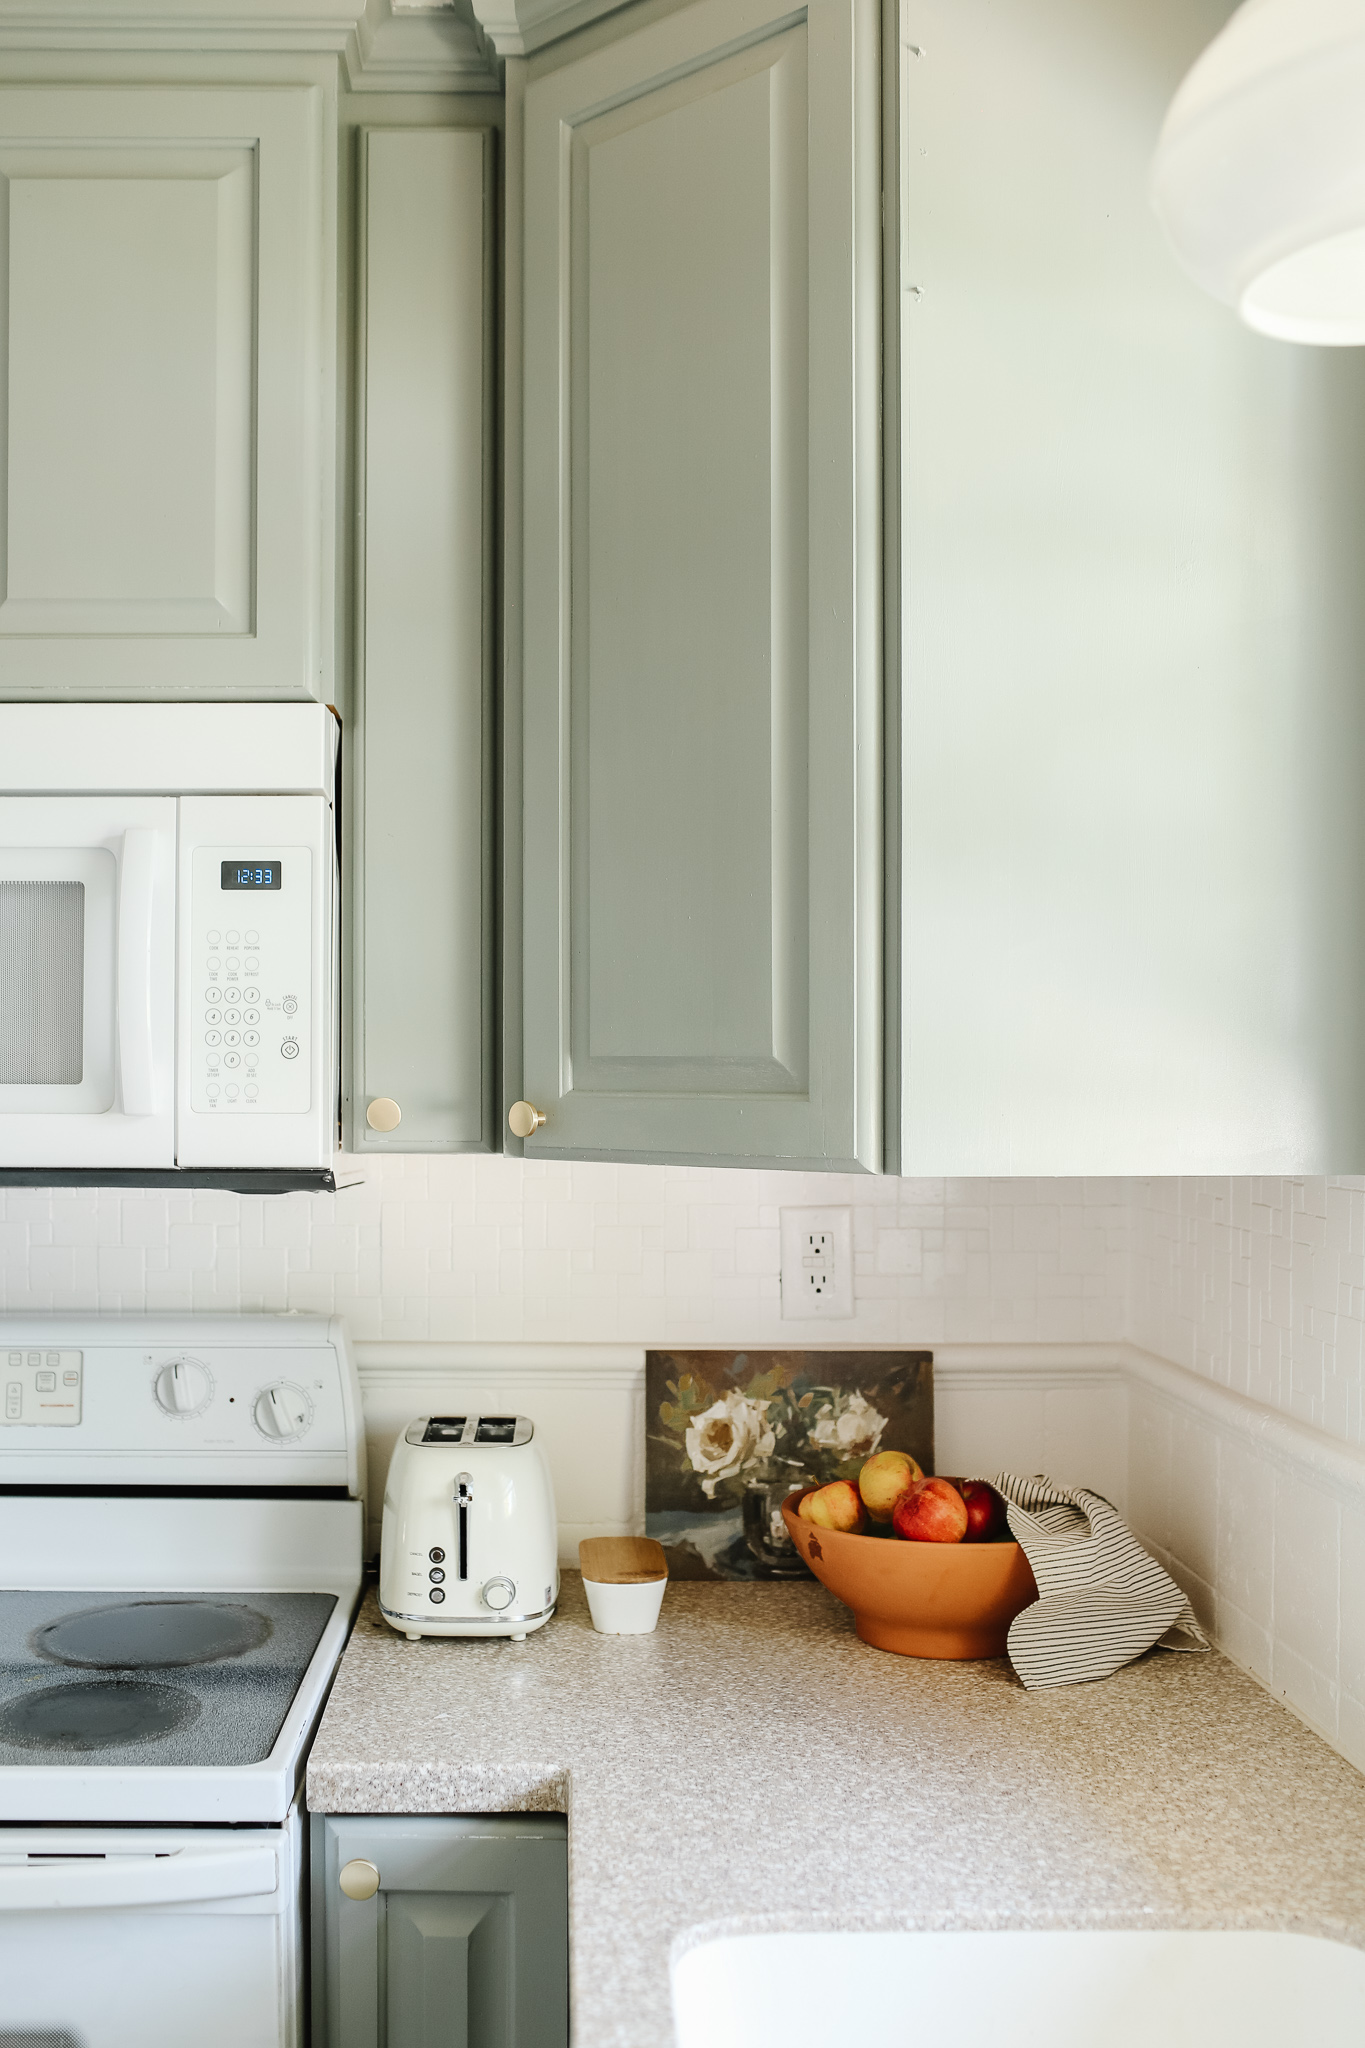
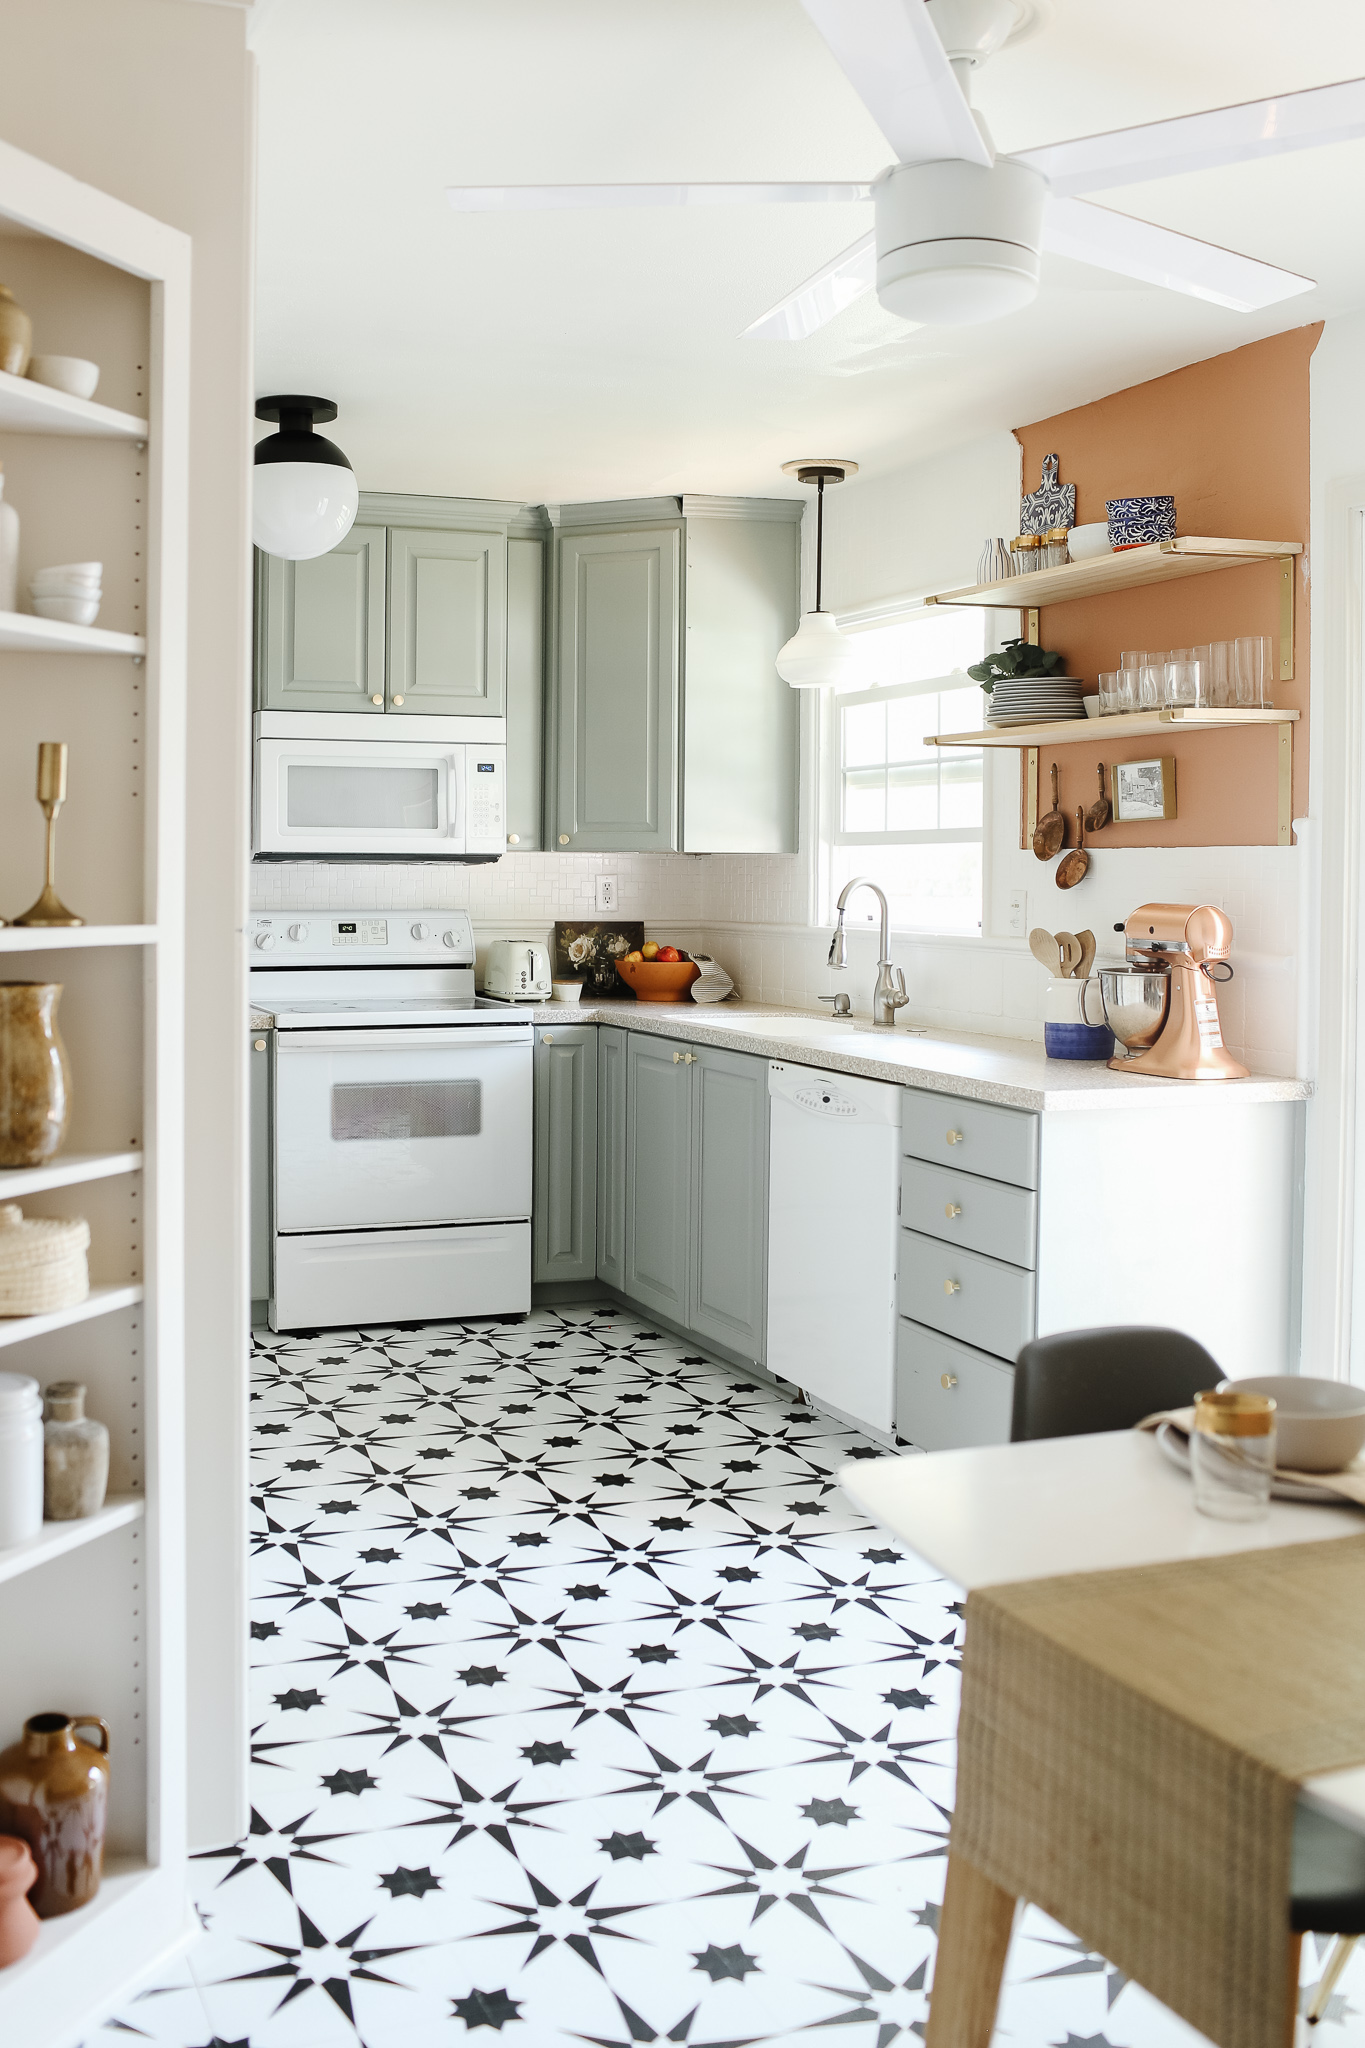
For $45/gallon you can’t beat the power of paint making you feel like you have a completely new kitchen. Our kitchen cabinets are “Pigeon” by Farrow & Ball, color matched at Lowe’s in satin sheen. The pantry is “Shoji White” by Sherwin Williams. Painting cabinets is a time investment. It’s a commitment. For our shiny oak doors we had to first de-gloss, then prime, (both sides of each door) then we were ready to paint. I set up a big canvas drop cloth in the garage, turned up a lot of “Hamilton” and “Conan O’Brian Needs a Friend” and used a 4 inch sponge roller and paint brush on everything. People spray cabinets. That’s wise. I wish I would have thought outside of the box for a minute on my method, but the long night hours still reaped results that made me feel so happy and fulfilled! I also did this part of the kitchen refresh in cabinets. The pantry was such a stand alone structure in the kitchen and I didn’t know what color it should be right off the bat. But I knew my Pinterest was full of muted greens for cabinets, so I tackled those first. I waited three weeks before painting the pantry a light “greige” to play off of our Alabaster walls.

2. New hardware to polish it off
You have to take off the hardware to paint the cabinets, so you might as well swap them while you’re at it. I have to say, I was a little sticker shocked when I first started snooping for knobs and pulls. I would find an ornate brass knob that felt like a conversation piece, not even letting the $7 price tag phase me until I needed to add 20 to my cart. Is this what people pay? Is this what hardware costs? I switched gears, and as always, Amazon did not disappoint! I could shop for a set of 10, or 20, and found exactly what I was looking for! These are the brass knobs I chose for the cabinets, and I went for 6 inch vertical pulls for the pantry. They’re little show stoppers!
3. Open shelving to let in the light
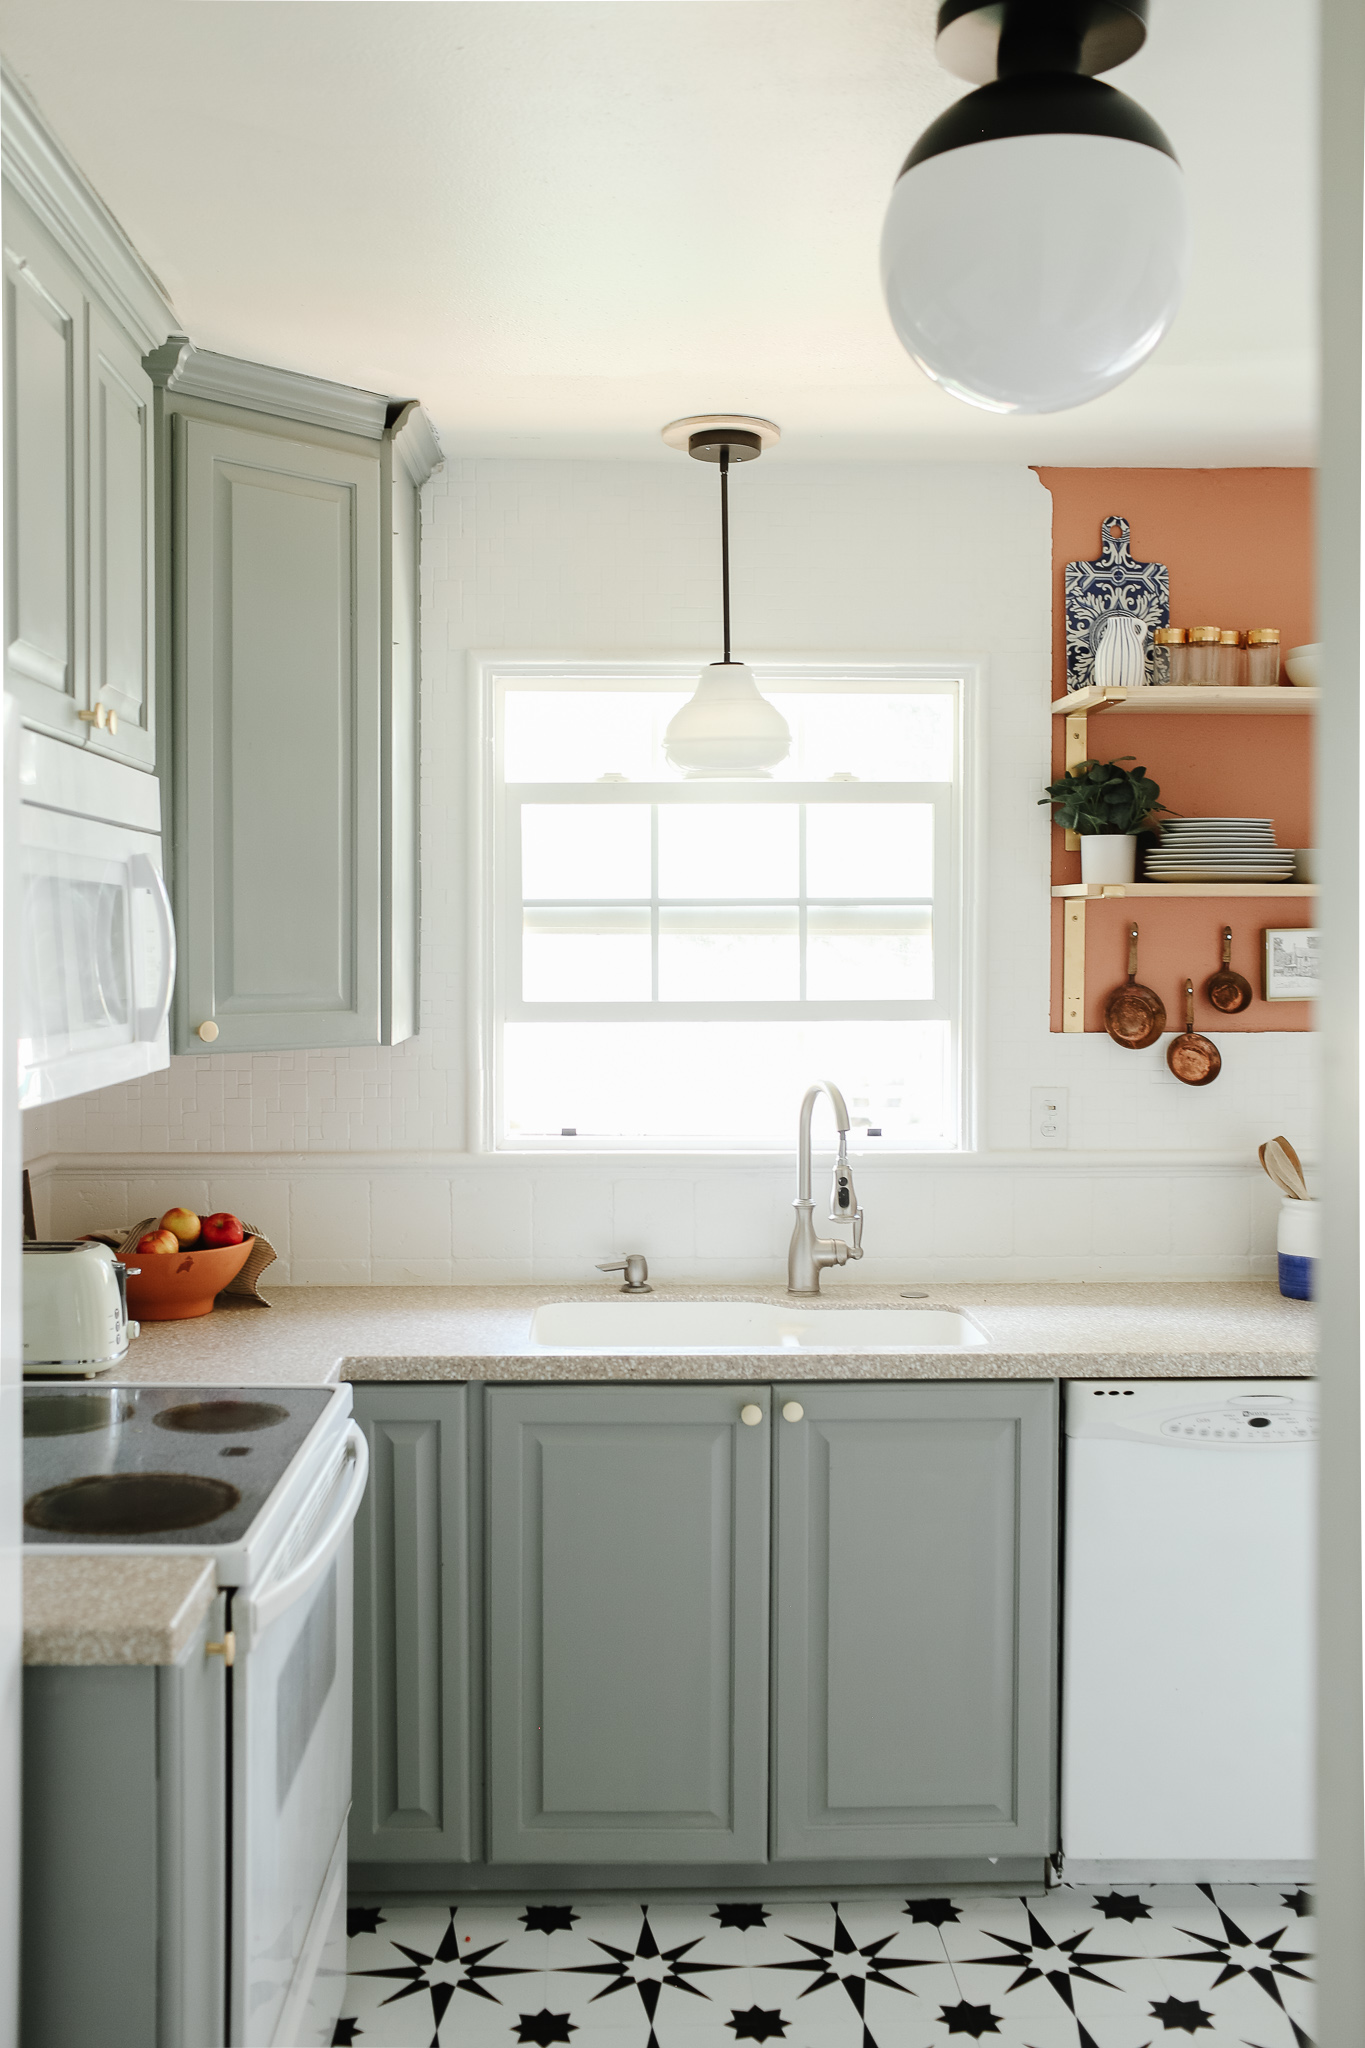
When I looked at our kitchen cabinets objectively, I realized I was filling them because they were there, not necessarily because I needed the storage space. We took down one big bulky cabinet that was never full to the top, but housed our daily glasses, bowls, plates, mugs, etc. Underneath that cabinet were four handy drawers that desperately needed some rearranging and junk drawer purging. We hung 2 shelves for holding our glasses, bowls, and plates, and moved all of our favorite melamine, kid plates and cups to the drawer below. It was a seamless transition! This is was our first “woah the kitchen feels bigger” moment. Along with the cabinet coming down, we took off the arch above the kitchen sink and the light just started spilling in to every corner. Our ceilings felt taller, and it just felt like the room could breathe again.

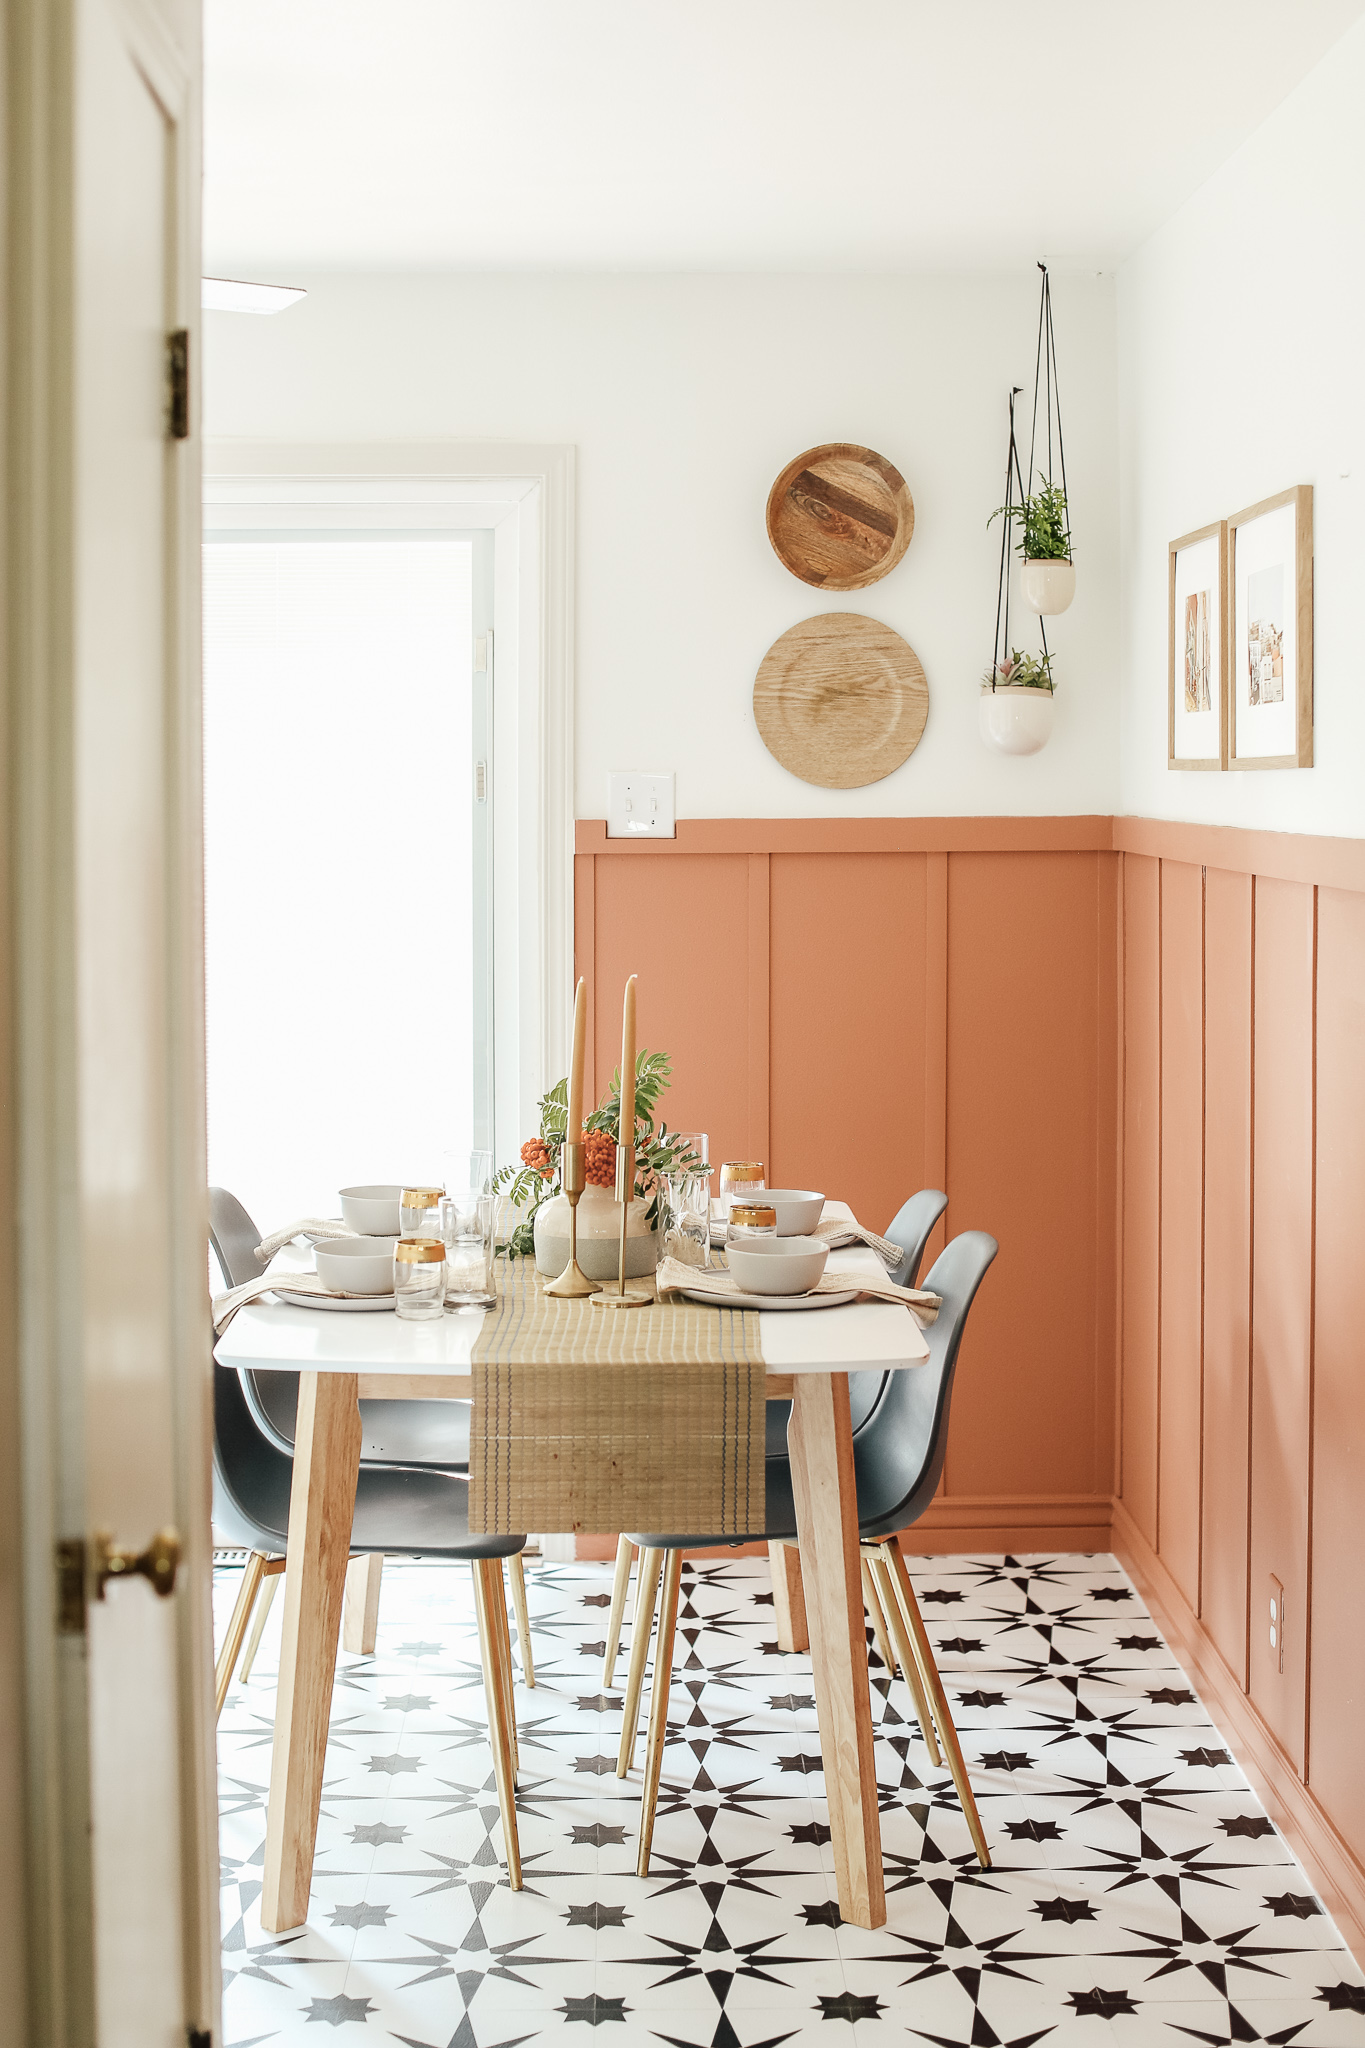
4. A wall treatment to set the tone
This was the project that started all of the projects. It was the new look that snowballed all the rest of the inspiration for the kitchen. Chris and Julia did a board and batten wall for us, just in the corner of the kitchen where we dine on the daily. Terra cotta was the very first inspiration color I had for this space, and I knew painting our accent wall that color would set the tone. Fun fact: I bought a gallon as soon as I saw the paint chip. I read the name and knew it was meant to be. The color is “Kitchen Terra Cotta” by Valspar. It was the most fun color to roll on. It felt like a cosmetic: a lipgloss shade I’d love to try, or maybe it felt so familiar because it resembles a shade I have in my bronzer palette. This was the first spot in the kitchen to get color, and we started with a bang.

5. Upgraded light fixtures to elevate the whole space
We swapped 3 out of 3 light fixtures in our kitchen and to be honest the space never felt completely finished until we did. Our home doesn’t have A/C and we do fine with these cool Idaho nights, but knew we wanted to swap the ceiling fan for a newer, more modern, QUIET one. We feel really cool adjusting it with a remote control too. The pendant above the sink is one of my favorite moments. I love seeing it on from the backyard. The globe flush mount reminds me of the kitchen lights my grandma had, which just feels right. The black trim on both of them is what made me go all-in for our poppy black and white flooring.
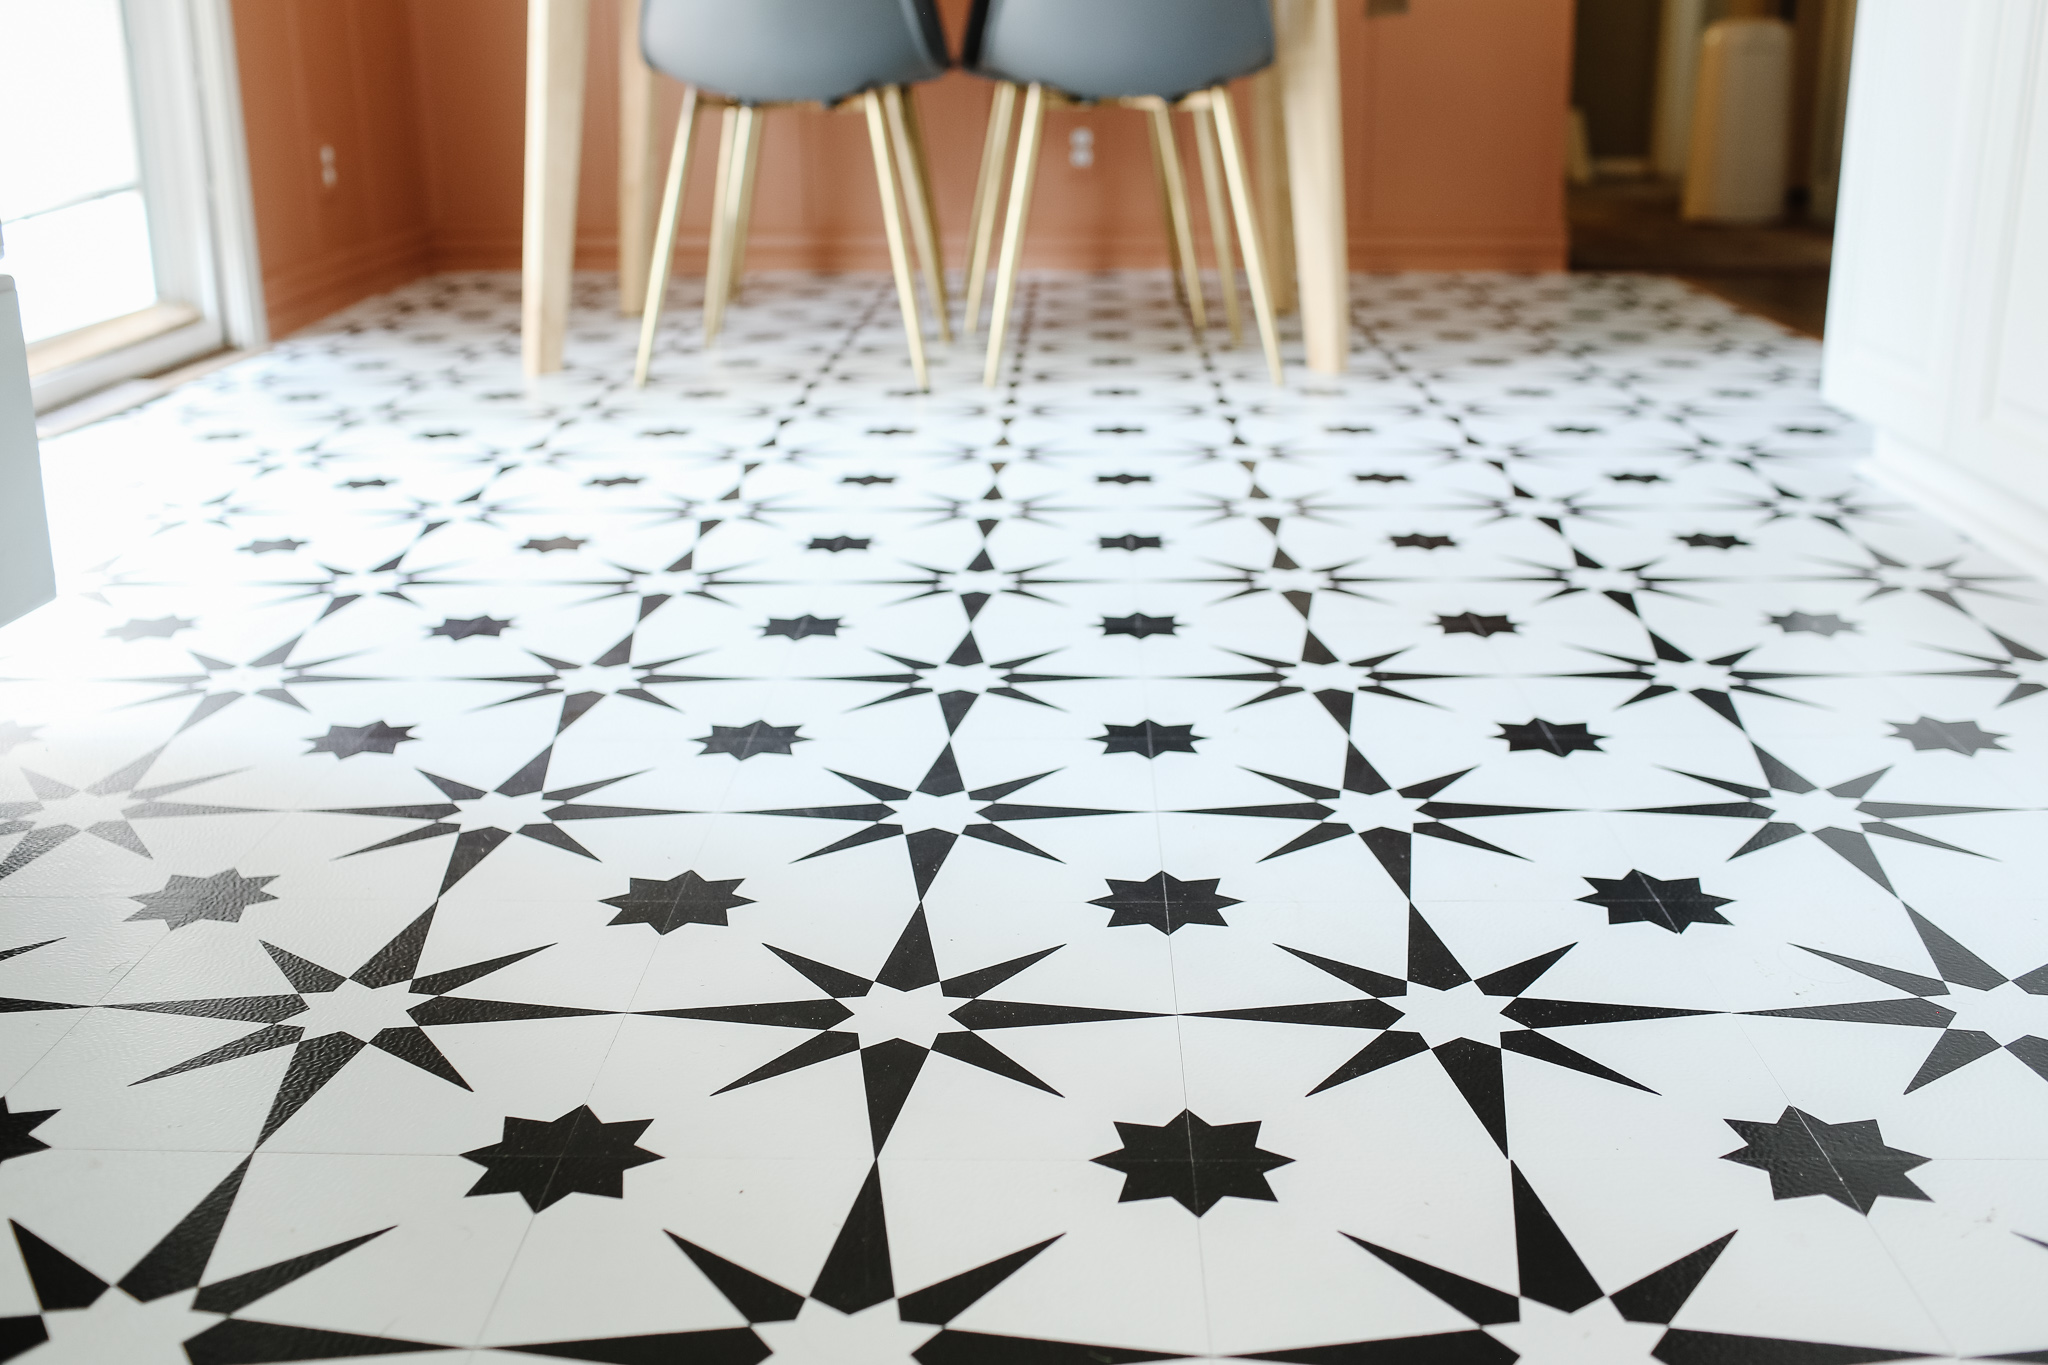
6. Peel-and-stick tile flooring for the jaw-dropping “After”

Adding peel-and-stick vinyl flooring wasn’t on the project docket from the beginning. The kitchen had laminate wood flooring, and it wasn’t a terrible color nor was it in terrible shape. I was waiting for the last light fixture to arrive and felt like the kitchen could be done at that point. Then Jules asked me “What would it take for you to feel like the kitchen is really really complete?” “New flooring” immediately flew out of my mouth and I surprised myself! It wasn’t even something pinned on my Dream Kitchen board! I had no inspo on my radar, not even an idea of what I would like. I think I kept it out of the realm of possibilities because I don’t do DIY, and flooring is scary. This was a demolition-power tool-free kitchen refresh and I just thought new flooring was out of our league. Enter: the friendliest, most approachable, peel-and-stick no fuss flooring. They’re just square foot, sticky vinyl tiles ready to transform your whole room. I was leaning towards black and white flooring, but wanted it to feel more playful than a checkerboard. When I came across FloorPops’s “Altair” design, the stars immediately transported me to Mexico and I was sold. For our kitchen size, we ordered 18 packs of 10, and only had little left over. Order extra than what you anticipate using, so you’re covered on mess-ups and all the edge and corner pieces you’ll be cutting. Peel-and-stick tile is pretty self-explanatory, it only gets tricky once you have to start cutting pieces along the edges, around cabinetry corners, etc. We used utility knives, a matte board, T-square rulers, a contour gauge and alll of our patience. The Floorpops feel thick and durable, and I can tell you it took effort to pry it off the floor if it went on crooked. When these go down, they are ON. All in all, the flooring took about 8 hours (over the course of a couple nights and a Saturday morning) to install and then caulk around the edges to fill in narrow gaps. I adore every square inch of it! I love how poppy and quirky it feels while still looking polished and classic. My favorite view is coming in our front door and seeing the pattern peeking out from both sides of the kitchen. It’s just the happiest floor!
It has been so rewarding to transform the heart of our home to really feel like us. One of my most joyful moments was styling my food photography props that have been in storage on the side pantry built-ins. Stacking little bowls, pairing crocks, housing candlesticks and my favorite ceramic oil & vinegar bottles. It was all in a sad box of “stuff I no longer use because I don’t have a studio anymore” and now it’s all been curated into a little kitchen display! Joy trigger. This was not a Phase 1 kitchen “renovation.” This is it! There’s nothing I would change, but we mayyy be seeing a small wooden island in the future. Can you picture it? I can picture it.

Budget Breakdown:
Primer $20
Paint (3 gallons, 1 gallon for each color) $135
Cabinet/Pantry Hardware $103
Flooring $323
Lighting $341
Fridge $1,169
Total: $2,091
Sources:
Vinyl Flooring
Cabinet Knobs
Cabinet Pulls
Pendant Light Shade
Pendant Light Base
Flush Mount
Ceiling Fan
Toaster
Copper KitchenAid
Fridge
Table
Dining Chairs
Large Hanging Planter
Small Hanging Planter
Faux Potted Plant
Mexico Balcony Print
Mexico Streetscape Print

Leave a Reply
What do you think?


Semihandmade
Our wood grain Shaker cabinet fronts were designed for busy, high-traffic homes like ours. Clad with durable textured thermofoils, this line is compatible with Sektion, Akurum, Godmorgon, and Besta cabinets from IKEA. It's the perfect, practical way to add the warmth of wood to all the rooms of your home.
Collaborations
learn more

next
Loloi
We have teamed up with Loloi to create a line of rugs that are as affordable as they are beautiful. This collection houses a great mix of traditional and modern rugs, in cottage-y colorways, as well as vintage-inspired beauties that you’ll want to roll out in every room.
Collaborations
learn more

next
STUGA
We partnered with Stuga on a line of hardwood floors — The Ingrid is really livable, and the color is very neutral. It doesn’t lean warm or cool, it’s that just right in-between. We have really loved putting it everywhere in our house. It’s the best jumping-off point for design, no matter your interior style. In addition to being beautiful, Ingrid is really durable — we have three kids, and we always have a home construction project going on. Ingrid stands up to it all.
Collaborations
learn more

next


SHop all
What We're Right Now
What We're Right Now
Looking for our favorite things? A place to shop our home room by room, or just catch up on what Julia's wearing / loving right now? Browse the CLJ shop.
Loving


Portfolio


Design
Befores, afters, mood boards, plans, failures, wins. We’ve done a lot of projects, and they’re all here.
BROWSE BY CATEGORY
let's break this thing up
We have a long-standing relationship with DIY, and love rolling our sleeves up and making it happen.
Projects
Even when you don’t want to rip down a wall, you can make that space in your home better. Right now.
read more
read more
read more
02
01
03
looking for inspiration?
A reader recently asked me if I’m starting to fully embrace traditional style and whether we still consider our house to be a “modern Colonial” and why. It was a really great question and so timely — I had really just been thinking about my approach to this home and how my style has changed […]


SEARCH THE BLOG
We've been doing this since 2009 and we've posted a whopping 24145+ blog posts and counting. You might need a little help searching, huh?
looking for something?
find stuff like:
")
Can We Send You Our Love Letter?
Another way for us to stay in touch! Joining our weekly newsletter gives you access to exclusive content, never-before-seen photos, your questions answered, and our favorite DIYs. Sign up below!
Follow Along on Instagram
Welcome to our online community where we've posted home, DIY, style, renovations, and family since '09. Renovating our #cljmoderncottage in Idaho and headed for new adventures in Raleigh, NC. #cljfam #cljtransformations
@chrislovesjulia


Links
Get Around
Make yourself right at home
Portfolio
Design
Casual Friday
Projects
Lifestyle
Gift Guides
All Posts
Shop
Love where you live.
Social
RivrLinks
Links
Get Around
Make yourself right at home
Portfolio
Design
Casual Friday
Projects
Lifestyle
Gift Guides
All Posts
Shop
Love where you live.
Social
RivrLinks
Hi! I absolutely adore this kitchen makeover and return to it over and over again for inspiration. I’d be so grateful for an update on how the vinyl flooring is holding up, and how it’s been to keep clean. Thank you so much! It’s such an exciting and affordable option, if it holds up!
I have always admired that Julia & Chris desire to share their skills and talents with other home owners! I love that they help spread love for all types, styles and price points of home update projects ! They truly encourage everyone to design a home that works for each family style and needs!
Wow! Loved this kitchen update! Please keep us updated on the blog with home decor and projects at Andi’s home when time allows !
Could you please share the greige color used on pantry cabinets?
I apologize if this was asked already in the comments but was hoping you could give any source information for that adorable little house print that is on the accent wall? Looking to add something similar to a very small space in my kitchen. thanks!!
I LOVE the practicality and budget friendly aspect of this makeover! I also applaud you for working with what you have. Sometimes we see huge projects (which is totally fine) but it’s also refreshing to see these more realistic ones. I had a stove like that when we moved into our current home and was able to remove the surface build up with Bar Keeper’s Friend cleaner and some elbow grease. It was the only thing that worked. Love your use of color
Cute kitchen! Just a question about the general layout – do you love all the pantry cabinet wall or do you wish it was a standard countertop and upper cabinet combo? And how deep are your pantry cabinets? Thanks
Andi! Thank you for finding the perfect hardware!!! I have not been finding the right look for my price point but you did it! I am so excited to use them.
This is gorgeous! I never would have put those colours together but I love every bit! Happy, light and looks completely stunning with your photos on the wall.
Love this!! Thank you for sharing! I’m always on the hunt for good looking, hard working budget finds. Your “new” kitchen is beautiful! :)
This is amazing!! How did you transition the new vinyl stick-on flooring to the flooring in your other rooms? I would be so grateful to know, as that’s the thing holding me back from trying it. Beautiful! Love all the colors you chose.
Ignore my question! Just saw your reply to someone else’s same question in their comment. How lucky for you!
Chiming in for Andi here since I helped lay those parts. Hahaha. There was luckily a transition piece between the hardwoods and the laminate that was in the kitchen.
Love your new kitchen! I have a random question. Can you please share where you purchased the utensil crock? I hav been looking for a new one and I really like this one! Thank!
I love the floor! It IS happy.
Beautiful kitchen makeover!
What about the cost for the supplies: brushes, paint trays, tape, sanding down etc?
Great job! Question on the cabinet paint: We also have very orange oak cabinets, and I’m concerned about the grain looking weird if we paint them, since oak is very grainy. Was this an issue for you?
I ADORE this! I’ve loved watching it come together in your stories too! Do you have a source for the shelf brackets? Or did you spray paint them?
Thank you Andi for just saving us a couple thousand dollars! We were bracing ourselves to replace our backsplash, the same tone and texture as yours. I absolutely love how it turned out painted white and we’re now planning to do the same!
Cute, fresh, and very relatable! Love!
Oh my goodness those pantry cabinets!! The before looks like something dated that most people would gut entirely but the after looks like something anyone would pay SO MUCH MONEY to have custom built! All with just paint and hardware. Great job, Andi!!
This is so refreshing! For the past few years, I’ve felt bombarded with renovations with super high price tags. Some of us just want to revamp what we’ve already got!
What brackets did you use for the open shelves?
The little wooden island will be beautiful, such a great refresh full of personality. Love.
I really like this kitchen, really like it a lot! Great job. I love the colors together and the floor–totally a deal maker. :)
I also have this exact floorpop vinyl in my kitchen and I’m so sad there’s not a tile like it for when I gut my kitchen :(
This is gorgeous! I love the greige color you used on the pantry! Do you happen to have the exact color? Well done!
It looks really beautiful! Do you have the material information on the board and batten wall? I would love to try the thin pieces in my new laundry room.
Looks great! I wish there was a close up of the back splash to see a good before and after. There’s also not a before of the view of the kitchen sink wall. I love the cabinet color and the pulls!
Can we see the transition from the peel and stick to the laminate in the living room?
We got lucky. There was already trim placed between the kitchen and living room when the former wood laminate flooring was put in, so it serves as the perfect partition.
This is absolutely beautiful! I love it and I love how brave you were to do these things. It paid off. How did you transition your tile to the wood floor into the family room?
We got lucky. There was already trim placed between the kitchen and living room when the former wood laminate flooring was put in, so it serves as the perfect partition.
I LOVE this make over and I love that it was something that you did with what you had, not needing any powertools or major construction. The terra cotta color is so pretty and I love your choice of floor. Post more of these non construction DIY examples, quick affordable refreshes!!
Oh yeah, I don’t do power tools! If there’s something I’m comfortable doing it’s painting and I love what a difference paint can make in any space. Paint the tile! The walls! The cabinets!
I was scared of power tools for soooo long too! But there is lots you can do without them and you did a fabulous job! I did a board & batten treatment in 3/4 of my house using a handsaw and a hammer lol. Would’ve been much faster with power tools but I did what was in my comfort zone at the time and I still love it.
The colours you’ve chosen in here are fab! It’s light and bright but still warm & homey, great job!
Any details on the floating shelf brackets? We have been looking for some deep ones and those look right!
Those are just standard black brackets I got from Lowe’s and spray painted them gold!
Love that! How about the wood on the gold brackets? What are the details on that?
Ooh it’s such a lovely gold shade! What brand of paint did you get? I once got a very sad can of gold paint and have never tried it since, but I’d like to try and paint white shelf brackets for my daughter’s bedroom makeover.
Oh my gosh this is an AMAZING before and after!!! Love it so much!
Would love the fan source and details on how you painted the backsplash?
We just added the fan to the sources list! It’s from Home Depot. For the backsplash (which I cannot believe I forgot to write about) I cleaned it all with TSP first. Then very thoroughly primed. I rolled on primer than took a brush to all of the grooves and cracks. I used high gloss white interior paint and put on 2 coats and it’s been holding up great! I also caulked (for the first time) all along where the countertop meets the tile backsplash to seal the deal.
We actually just did something similar in our house and used this product with great results! Specifically designed for tiles.
https://www.homedepot.com/p/Rust-Oleum-Home-1-gal-Semi-Gloss-Clear-Low-VOC-Topcoat-358584/312680450
Was a separate type of paint used on tile backsplash? Thanks!! Looks beautiful
Yes, it was a high gloss white interior paint. Not tile paint or epoxy because…I didn’t know that existed! It’s holding up great.
I am gushing over all of this! Absolutely refreshing!!
That little floral painting on the counter is dreamy – do you have a link for that?
This is so beautiful! I really love that you made it clear that this isn’t a “phase 1” renovation. I love that you were able to work with the existing kitchen, I wouldn’t change a thing either. I love how colorful this is while still feeling calm and peaceful. And wow! That floor! I had no idea they made such cute peel and stick tile!
love the before and after
Looks beautiful! And I LOVE that it’s budget friendly and has such a great impact! Ironically we’re getting ready to paint our kitchen backsplash this winter. Any chance you could give a few more details about what you used and how that worked?!?! Thanks!
Sure! It totally slipped my mind to mention the backsplash project! I didn’t even know you could paint backsplash, but after looking into a few tutorials it was really straight forward and simple. First I cleaned it all with TSP, then primed. I rolled on the prime and used a brush in all the grooves and cracks. Can’t emphasize enough how important priming is when you’re going to paint tile. Then I just used interior high gloss white paint. It wasn’t “tile paint” or epoxy. I put on two coats and it’s holding up great. I caulked along the sink and countertops to seal the deal.
I love your paint color choices! What is the name of the color above the terra cotta feature wall?
It’s “Kitchen Terra Cotta” by Valspar. Perfect name, right?
I LOVE this! Especially the “This was not a Phase 1 kitchen “renovation.” This is it!”. We all have different budgets, abilities, preferences, etc. And as much as I love seeing the big gut jobs, this is inspiring me to make small changes to fall in love with my home, and not think of them as temporary band-aids.. THIS IS IT. This is our home, right now. Yep yep yep, I am in so much agreement. Love it, Andi!
Thanks Stephanie! It’s not a phase 1 because I can’t imagine a phase 2! There’s nothing I would change!
So gorgeous and obsessed with the globe light! I noticed that it’s not exactly what you linked in the post. Could you share the source for your exact light if possible?
I searched and searched and searched. Even the exact order link from All Modern took me to this modified light. I only ordered it a month or so ago, so it’s odd I can’t find it on their site. The name of it is: Emil 1-Light Simple Globe Semi Flush Mount by Mercury Row®
Absolutely gorgeous…. this is my dream kitchen!
Wayfair seems to have it: https://www.wayfair.com/home/pdx/mercury-row-yearby-1-light-simple-globe-semi-flush-mount-w002712503.html (you can select the frosted glass option).
This is beautiful! I love the interesting and unexpected combination of colors, and I can just feel the joy you are experiencing through your writing! Thank you so much for sharing it with us!
So much joy! Thanks Emilee
LOVE all the styling! Would love to a lil tutorial on your shelf styling process
I am going to put all of my kitchen content stories in an Instagram highlight today and you’ll see me styling in there. What I did on one side was only use all of my neutral pieces. Whites, creams, tans. It played so well with the “Shoji White” color on the pantry and looked eclectic yet uniform. On the other built in, I implemented some terra cotta pieces because, I had to! There’s some greenery and other neutral pieces again. If it was a larger piece I let it fill the whole shelf, if it was smaller, I paired it with something else.
looks so good! What kind of paint did you guys use on the mosaic backsplash?
It was just an interior high gloss paint.
I like a lot of it! I am not getting the terracotta behind the open shelves though- seems to highlight that a cabinet was removed (given the outline of the crown molding). Did you consider carrying the white there?
Yeah, it was a fun decision to make! Just a surprise color block!
I agree; I’d repaint that crown molding white. It’s a bit jarring to my eye. Other than that, it’s all very nice indeed!
I agree. I thought maybe they had taken cabinets down after painting and still had to touch up that one spot. Doesn’t look right to me. Love it on the board and batten though.
The terra cotta paint is so beautiful! I also love the lighting choices! What a happy fun kitchen, love it!
Thanks Jessica, it really is the happiest kitchen
So lovely! It looks like a happy place, for sure! Would you please share a source for the ceiling fan? We have been wanting to swap out a few of the fans in our home (we live in a hot region, so we have them in every bedroom and one living area!). I like the simple shape that still has a light.
Where is the bracket for the open shelving from?
They were just black brackets from Lowe’s that I spray painted gold!
Love the colors! Any chance you can share where you got the candlestick holders? I’ve been looking for something like them for a long time with no luck!
Those are from HM Home a year or so back, but I love HM Home for candlesticks!
This just proves you can have a “new” kitchen
for less than a $1000 if you don’t need any appliances.
I would love a follow up on the floor in six months.
I need those in my laundry room!!!!
For every new homeowner who wishes their kitchen
was a bit updated…..this should be their shining
guideline.
Thank you so much for sharing.
We’ve had the same flooring in our high traffic laundry room (entrance from basement and garage) for over a year and they look just as good as the day we put them down!
cant beat it for the price and ease of install!
Thanks Darcy! Yes I’m also eager to see how the floor holds up, but I’ve read enough positive reviews that I went forward with the purchase!
Andrea, Did you remove the old flooring or just apply the new peel & stick over the top?
Over top!
Absolutely stunning!!! What a transformation!
Thanks so much, Jen!
Amazing!!! Your hard work certainly payed off!
Feeling great! Thanks Brenda
Fresh and fun instead of what everyone else is doing. Nice job
Thanks Susan!