Photo Editing Tutorial: Photographing a Bright Space While Also Seeing Outside the Window
March 19, 2019


Today we have a very special tutorial by a special guest–this never happens! This tutorial was written by my amazingly talented sister, Andrea, who is a product stylist and commercial photographer living abroad in sunny Monterrey, Mexico for the past 10 years. She taught Digital Photography and Advanced Photoshop for five years at a private school before taking the plunge into the freelance life and has never looked back. While having her fair share of fashion, editorial, and portrait photography in her portfolio, it was when she found her niche in food and product that things took off. She loves foraging for unique spoons and bowls for her ever-growing prop collection, and traveling with her husband with their toddler son in tow. You can check her out on Instagram at @andiofandrea. Take it away, sis!
If you want your home shots to be the envy of every Architectural Digest contributor, your tripod is now your bestie, (next to Alexa, next to Alexa). I love this tripod! A couple weeks ago, Jules reached out to me for some Photoshop help. Her plight: “How do I photograph my kitchen so it’s bright, but you can see what’s outside the windows and they aren’t blown out to white?” I hear ya Jules, the struggle is real.
To achieve this, you need your camera, tripod, annnd Photoshop. But of course you have Photoshop, you’re shooting for AD now. Before we jump into my quick vid tut below, let me walk you through what you’re going to do in camera first.
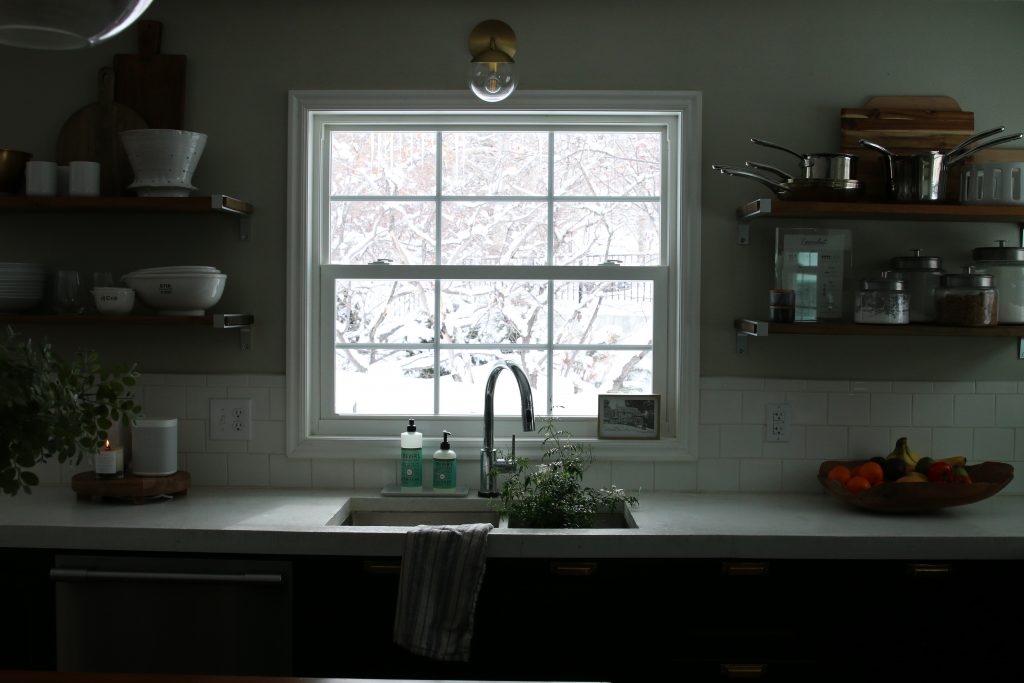
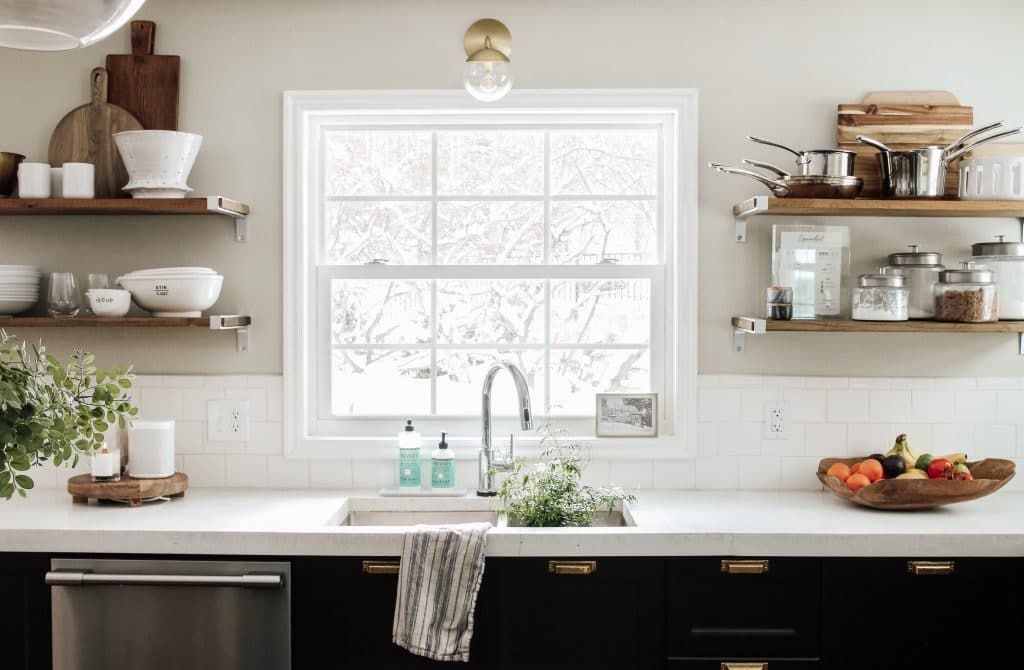
Using your tripod, first take a photo where you can see what’s outside the window, this means you’re gonna want a faster shutter speed. The kitchen will look dark, but that’s okay. We are just focusing on what’s outside the window coming through.
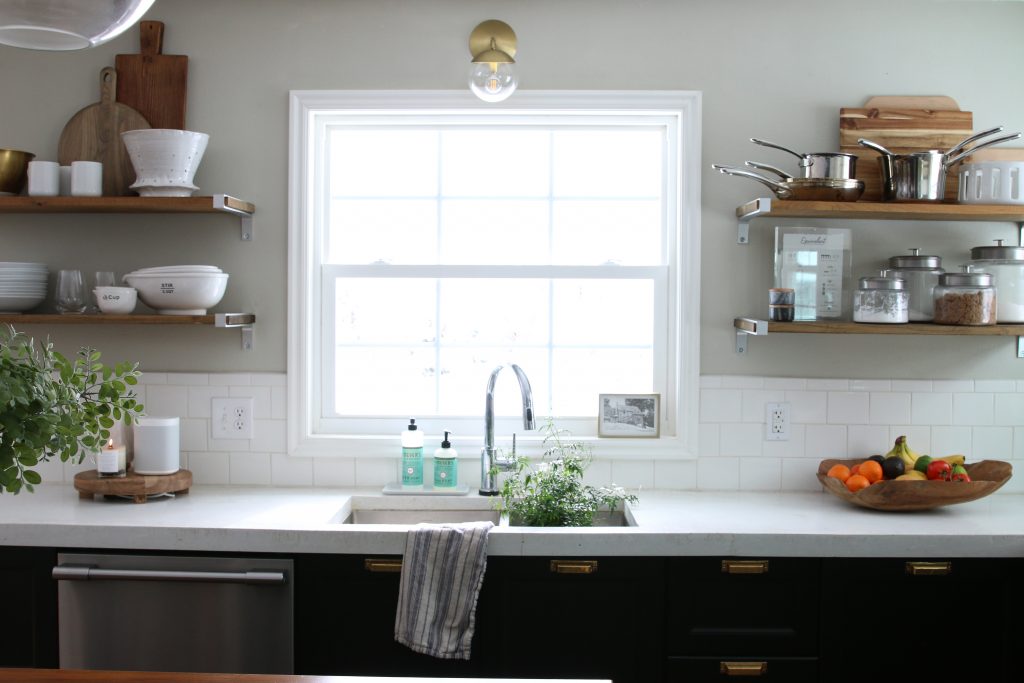
Now, take a second photo in the exact same spot (hence the tripod–don’t move a muscle!) where the entire room is properly exposed and in focus. Use a slower shutter speed. The window will now be whited out.
By taking two different exposures of the same photo, you are so ready for the wonders of Photoshop. Masks, in particular. Don’t be scared, you got this. I hold your hand through it all in this quick video.
Thanks for sharing Andi! Since she shared this with me, I have practiced and experimented and I can’t believe how easy it is! This is an essential skill, especially if you’re someone that’s always photographing interiors. And since we’re on the subject–I’m going to repost my favorite camera equipment below for those that are curious!
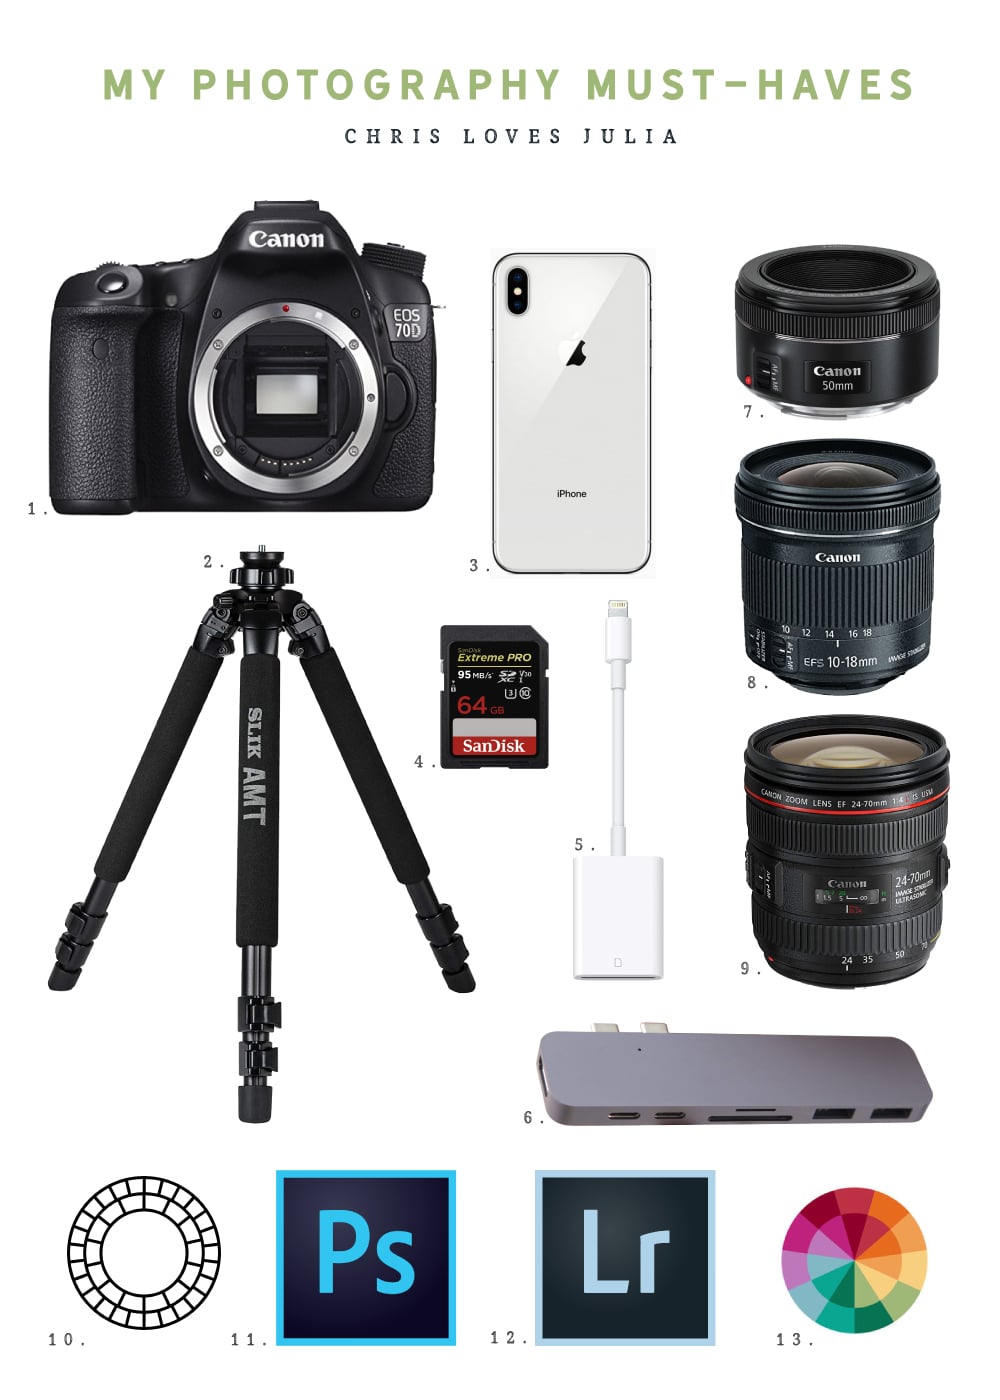
1. Canon 70D : I have only upgraded my camera body (from a Rebel) to the 70D (still a pretty affordable camera) one time and have found the best results by investing in some lenses. This camera body has been a great tool.
2. Tripod : This is one, heavy duty tripod. It has served me well for years. I pull it out every time a room doesn’t have a ton of light or the sun starts setting before my work day is through. A tripod is essential for shooting poorly lit spaces because it keeps your camera really still so you can extend the shutter speed (for sometimes seconds!) and make it look like it’s noon outside.
3. iPhone X Max : The new iPhone camera is everything it’s cracked up to be. I shoot with it about 50% of the time now.
4. Memory Card
5. Lightning to SD Card Reader : This is a great tool if you don’t have a phone with the best camera. Use your real camera and this tool to access the photos from your camera card directly to your phone for editing and posting!
6. MacBook Pro C Hub Adapter : Most laptops these days don’t have a port for an SD card, so one of these comes in handy.
7. Canon 50mm Lens : This was the first extra lens I ever got. It’s reasonably priced and will make SUCH A DIFFERENCE in your photos if you want to create some blur in the background and focus on one thing. Absolutely a must have.
8. Canon 10-18mm Lens : I recently got this wide-angled lens that has very little distortion and it has been a life saver for shooting interiors.
9. Canon 24-70mm Lens : A splurge, but arguable the best lens money can buy.
10. VSCO : As far as photo editing apps go, I have a few go-to filters in the VSCO app I won’t quit. As far as filters go, I always recommend turning them down to at most 60% opacity (if not less). I love A6 and J6 here.
11. Photoshop : We have an Adobe Suite subscription and I use photoshop quite a bit for lens and color correction. I’m self taught, but I would love to take a class to really dive into everything possible here. There’s also a free Photoshop Fix app that comes in handy to edit out rogue dog hair tumbling across our floors from time to time.
12. Lightroom : I use the Lightroom app on my phone all the time. Lots of people are making a killing selling lightroom presets and I’ve purchased a few ones that I love (they are no longer sold, or I would share). Presets are very similar to filters, but with a lot more flexibility when you want to adjust lighting, shadows, highlights and colors after you apply the preset.
13. A Color Story : I love this photo editing app so much and I almost always run a photo through A Color Story even if I used any of the above apps because I can select which area of a photo I want to adjust in their tools. I can make a spot in the ceiling brighter or make a plant a little more green when a filter desaturated it. This is my favorite.
Leave a Reply
What do you think?
Previous Post
Next Post


all the latest
Semihandmade
Our wood grain Shaker cabinet fronts were designed for busy, high-traffic homes like ours. Clad with durable textured thermofoils, this line is compatible with Sektion, Akurum, Godmorgon, and Besta cabinets from IKEA. It's the perfect, practical way to add the warmth of wood to all the rooms of your home.
Collaborations
learn more

next
Loloi
We have teamed up with Loloi to create a line of rugs that are as affordable as they are beautiful. This collection houses a great mix of traditional and modern rugs, in cottage-y colorways, as well as vintage-inspired beauties that you’ll want to roll out in every room.
Collaborations
learn more

next
STUGA
We partnered with Stuga on a line of hardwood floors — The Ingrid is really livable, and the color is very neutral. It doesn’t lean warm or cool, it’s that just right in-between. We have really loved putting it everywhere in our house. It’s the best jumping-off point for design, no matter your interior style. In addition to being beautiful, Ingrid is really durable — we have three kids, and we always have a home construction project going on. Ingrid stands up to it all.
Collaborations
learn more

next


SHop all
What We're Right Now
What We're Right Now
Looking for our favorite things? A place to shop our home room by room, or just catch up on what Julia's wearing / loving right now? Browse the CLJ shop.
Loving


Portfolio


Design
Befores, afters, mood boards, plans, failures, wins. We’ve done a lot of projects, and they’re all here.
BROWSE BY CATEGORY
let's break this thing up
We have a long-standing relationship with DIY, and love rolling our sleeves up and making it happen.
Projects
Even when you don’t want to rip down a wall, you can make that space in your home better. Right now.
read more
read more
read more
02
01
03
looking for inspiration?
A reader recently asked me if I’m starting to fully embrace traditional style and whether we still consider our house to be a “modern Colonial” and why. It was a really great question and so timely — I had really just been thinking about my approach to this home and how my style has changed […]


SEARCH THE BLOG
We've been doing this since 2009 and we've posted a whopping 24145+ blog posts and counting. You might need a little help searching, huh?
looking for something?
find stuff like:
")
Can We Send You Our Love Letter?
Another way for us to stay in touch! Joining our weekly newsletter gives you access to exclusive content, never-before-seen photos, your questions answered, and our favorite DIYs. Sign up below!
Follow Along on Instagram
Welcome to our online community where we've posted home, DIY, style, renovations, and family since '09. Renovating our #cljmoderncottage in Idaho and headed for new adventures in Raleigh, NC. #cljfam #cljtransformations
@chrislovesjulia


Links
Get Around
Make yourself right at home
Portfolio
Design
Casual Friday
Projects
Lifestyle
Gift Guides
All Posts
Shop
Love where you live.
Social
RivrLinks
Links
Get Around
Make yourself right at home
Portfolio
Design
Casual Friday
Projects
Lifestyle
Gift Guides
All Posts
Shop
Love where you live.
Social
RivrLinks
Thank you for the tutorial, Andrea! It was great. I’ve been using Photoshop for years but have never used the Mask feature. I will definitely be using it now. Also, checked out your Instagram and the photos and info there are great also. I’m now a follower. What a talented family. One more thing, it was fun hearing your voice. You and Julia sound so much alike!
Great information. One addition I could add…….. there is an App called Leonardo. You can basically do with it what you can do on PhotoShop, it’s just a lot more convenient on your phone!
Dang that’s good! Thanks for sharing, great post.
Coll tutorial! Call me crazy, but I’d expose for outdoors, and bounce a flash off the ceiling – if white – or otherwise light the interior. Combining aspects of two images in PS is cool – but it’s also a lot of work, compared with exposing the file correctly in the first place. Learning to use lights opens so many doors – whether the lights are camera strobes, professional pack and head strobes, Reflectors, or Photo-floodlights.
Such a great and informative post! Thanks for sharing I love learning about photography ans bts stuff.
I didn’t know the Color Story could do the spot editing you mentioned above. CAn you please send a link to a tutorial for that?
Maybe check out their site?
LOVED this tutorial and I would love to see more like this in the future! Thanks!!
Great tutorial! Love you Andi-girl!
This is so helpful and so interesting. Thanks for sharing!
Great tutorial!
Liz @ ShoppingMyCloset.com
I love this! I am early into Photography and I love that you guys are showing some of your cards! It helps us future bloggers and photographers. Great idea!