


Dreams come true when you DIY. One of my very first pins on my Pinterest account was this light fixture. I fell in love and wanted it for our dining room.


 |
| Is there a more terrible sight? A bad, plastic chandelier, made worse by being off-center. |


We have plans to switch out our white blinds for bamboo ones for warmth and to give the light a contrasting backdrop. But for now, we can’t stop looking at it. It is so rewarding to make something and love it. We love it even more knowing that we spent less than $30 and saved over $2100 AND got rid of our ugly chandy. So, yeah. We’re all smiles over here.
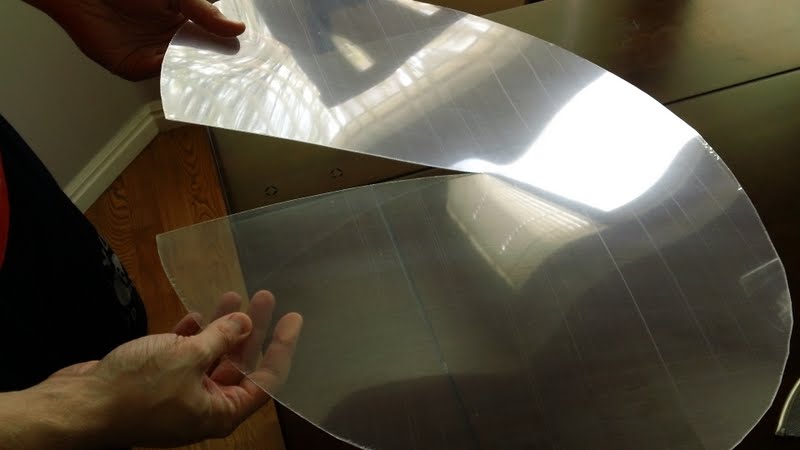
Update: To reinforce the round shape of the light (it’s a lot of stress for just string), we added some thin acetate we found at Hobby Lobby for $5. We cut it into a circle and cut a straight line into the center. Drilled a small hole in the center and fit it in the top of the light. You can’t see it at all, but it is doing its job, FOR SURE.


Leave a Reply
What do you think?


Semihandmade
Our wood grain Shaker cabinet fronts were designed for busy, high-traffic homes like ours. Clad with durable textured thermofoils, this line is compatible with Sektion, Akurum, Godmorgon, and Besta cabinets from IKEA. It's the perfect, practical way to add the warmth of wood to all the rooms of your home.
Collaborations
learn more

next
Loloi
We have teamed up with Loloi to create a line of rugs that are as affordable as they are beautiful. This collection houses a great mix of traditional and modern rugs, in cottage-y colorways, as well as vintage-inspired beauties that you’ll want to roll out in every room.
Collaborations
learn more

next
STUGA
We partnered with Stuga on a line of hardwood floors — The Ingrid is really livable, and the color is very neutral. It doesn’t lean warm or cool, it’s that just right in-between. We have really loved putting it everywhere in our house. It’s the best jumping-off point for design, no matter your interior style. In addition to being beautiful, Ingrid is really durable — we have three kids, and we always have a home construction project going on. Ingrid stands up to it all.
Collaborations
learn more

next


SHop all
What We're Right Now
What We're Right Now
Looking for our favorite things? A place to shop our home room by room, or just catch up on what Julia's wearing / loving right now? Browse the CLJ shop.
Loving


Portfolio


Design
Befores, afters, mood boards, plans, failures, wins. We’ve done a lot of projects, and they’re all here.
BROWSE BY CATEGORY
let's break this thing up
We have a long-standing relationship with DIY, and love rolling our sleeves up and making it happen.
Projects
Even when you don’t want to rip down a wall, you can make that space in your home better. Right now.
read more
read more
read more
02
01
03
looking for inspiration?
A reader recently asked me if I’m starting to fully embrace traditional style and whether we still consider our house to be a “modern Colonial” and why. It was a really great question and so timely — I had really just been thinking about my approach to this home and how my style has changed […]


SEARCH THE BLOG
We've been doing this since 2009 and we've posted a whopping 24145+ blog posts and counting. You might need a little help searching, huh?
looking for something?
find stuff like:
")
Can We Send You Our Love Letter?
Another way for us to stay in touch! Joining our weekly newsletter gives you access to exclusive content, never-before-seen photos, your questions answered, and our favorite DIYs. Sign up below!
Follow Along on Instagram
Welcome to our online community where we've posted home, DIY, style, renovations, and family since '09. Renovating our #cljmoderncottage in Idaho and headed for new adventures in Raleigh, NC. #cljfam #cljtransformations
@chrislovesjulia


Links
Get Around
Make yourself right at home
Portfolio
Design
Casual Friday
Projects
Lifestyle
Gift Guides
All Posts
Shop
Love where you live.
Social
RivrLinks
Links
Get Around
Make yourself right at home
Portfolio
Design
Casual Friday
Projects
Lifestyle
Gift Guides
All Posts
Shop
Love where you live.
Social
RivrLinks
Did you all have any excess glue on the yarn once the fixture was removed from the ball? If so, how did you remove the glue? I created this light fixture but I am having a time removing the excess glue. Please advise.
Just saw this and I love the idea! I will try this with colored string.
Very cool!
: )
Julie M.
Your globe tutorial was a big help as we tackled our own: http://keepsonringing.wordpress.com/2012/06/06/diy-string-globe-chandelier-tutorial/
Thanks!
Wow, amazing!
Love it!
That. Is. Awesome.
Ok, so how did you get the acetate in it after you were done with it? Just fold it through the bulb access?
Love it. I made some christmas baubles a couple of years ago, using this exact same method, I used balloons to adhere the string to, and made different sizes. They look like snowballs and look really modern and contemporary on a christmas tree with coloured lights.
That. Is. Awesome.
Robyn–
Exactly right!
Ok, so how did you get the acetate in it after you were done with it? Just fold it through the bulb access?
Just discovered your blog and this is AMAZING! My husband and I just bought a house that we’ve been fixing up and I’ve been looking everywhere for a new light for our entry way! Might have to give this a try!
Anonymous-
We sliced the ball from the hole we left on the top on the side to change the light bulb. Then once the air was all out, we pulled it through. It was easy!
Sophie-
The bulb that we bought (http://www.ikea.com/us/en/catalog/products/70040371) is a very low burning, energy efficient bulb so it doesn’t get very hot. And it is in the very center of the 48″ globe so there is PLENTY of room on either side. We have had it for a couple weeks now and there is no sign of anything heating up. Because there is so much airflow throughout the whole thing, I don’t think it would ever be a problem.
Hope this helps!
Jules
Hi,
Looks amazing – well done!
I would love to try this but am worried about it getting too hot and catching fire or melting or something.
How often do you have your light on and how long have you had it for now?
Thanks!
that. is. gorgeous!
I might be a little dense, but can’t figure out exactly how the ball came out of the light fixture. Did you pop it or let the air out? Or did you just wiggle it out through the light bulb opening at the top?
Thanks a lot for your beautiful sharing… This is a different technic, using a ball instead of baloon :) I’ll share this technic at my blog with your link…..
this is amazing!! i so want to do it now!!! what a great team project for husband and wife…now to convince my own husband that our new house needs one of these!!
http://christinaprindle.blogspot.com/
Katherine-
Not dumb at all, I should have been more specific in the placement. It is near the top on the back side. You can faintly see it in the pictures through the light. It looks like a tear drop shape.
Hope it helps!
-Julia
This might be a dumb question…but where did you put the hole for lightbulb changing? I don’t see it in the final pictures, which is a good thing, but if I attempt to make this I figure I should know!
Beautiful! Really well done, I’m off to have a go at this light fitting.
Cassie-
I don’t see why it wouldn’t work with twine. I would recommend less water in the glue mixture if you do attempt it with twine because thicker string will need more substantial glue–maybe even try tacky glue with a little water. Love to see it if you try it out!
–Julia
serious genius!
Lovely! I’m wondering if it would work with a thicker material like twine for an earthy look.. whattya think?
OK, that is jaw-droppingly awesome. You are amazing!!
It looks so beautiful all lit up! I saw a similar project once upon a time on Crafty Nest, and wanted to try it out, but I think yours is even better. I love the SIZE. I need one!
That is fantastic! You did a fantastic job. I too love the Moooi light, but not the price. The string/glue combo just wasn’t in my timeline or patience, so I made a wood veneer version: http://ourhumbleabowed.wordpress.com/2011/03/24/chunky-wood-moooi-random/ Not quite the same, but far quicker and less messy. Love yours, though!!!
Julie. You are part inventor part creator part sister. Well, all sister. My favorite is with the light on. It’s fanTAStic.
I knew it!! I love this project! It turned out amazing.
Love it!
this fills me with hope! the most amazing thing ever, great job!!
Oh my gosh. You guys are brilliant!!!!! Wow, way to work together and think things through. This is so awesome!!!
xoxo
Cat@BudgetBlonde
I’m in awe! I was actually thinking – ohhh, I don’t know about that… something about it is off. But your version – ah-maze-balls! I think because your inspiration photo had so much going on, but I like your finished photo with the clean table underneath. Definitely a good job!!
Btw – I clicked over from a comment that you made on younghouselove. Do you have an RSS feed? I’m not seeing it. I don’t want to forget your blog!
Wow, amazing!
That’s amazing!!!! It looks awesome!!
The last 2 are the best, with the light on its just a sight to see, and the window light coming in with your dining room table there, really shows the craftmanship of the fixture. Well done Jules!
Ok, this DIY was seriously amazing. Thanks for this!!
i love. also i don’t know if you knew this but you won one of the prizes on my giveaway last week. if you don’t want it i totally get it, i just wanted to give you a heads up.
WHATEVER, you are one amazing girl, I love it!!!
Wow! You two impress me more and more. :) Nicely done.
julia, i’m checking out your blog for the first time {thanks to meagan winning your giveaway!} and i am obsessed!!! you are one talented lady! that chandelier is amazing.
i have some decorating questions for my living room…if you feel like taking a look at some pics and offering advice, i am all ears :)
…
you guys can’t be stopped!
That thing is GORGEOUS.
I think I need to start my own pininterest. It seems like it is the THANG to do. It is GORGEOUS!. I’m gonna go stare at it again ;-)