


Hey-yo, all of this multi-colored trim is gone:


The real difference between yesterday and today was finding the right paint color to paint the trim. We wanted it to be as close as possible to really achieve a built-in look and as you may know, “Ikea White” is a toughy to match. The first time, I struck out and so I re-gathered all my very-close-to-Ikea-white paint samples to try again.

The first time I used Glidden’s Crisp Linen White (top row, far right) and it was a smidge too bright. This time I used Glidden’s Parchment White (second from the right on top) and it was just about perfect. As you can see, all of these are very, very close matches–I was straining my eyes. In the end, a quart of Parchment White in a satin finish was the ticket.

Onto painting! Now, I never ever tape off my edges–it is so time consuming and I have found with the right brush (I love this one the most) I can easily trim out a room with no issues–last night, since I knew I would probably be doing multiple coats I picked up some painter’s tape in hopes of making the task as swift as possible.
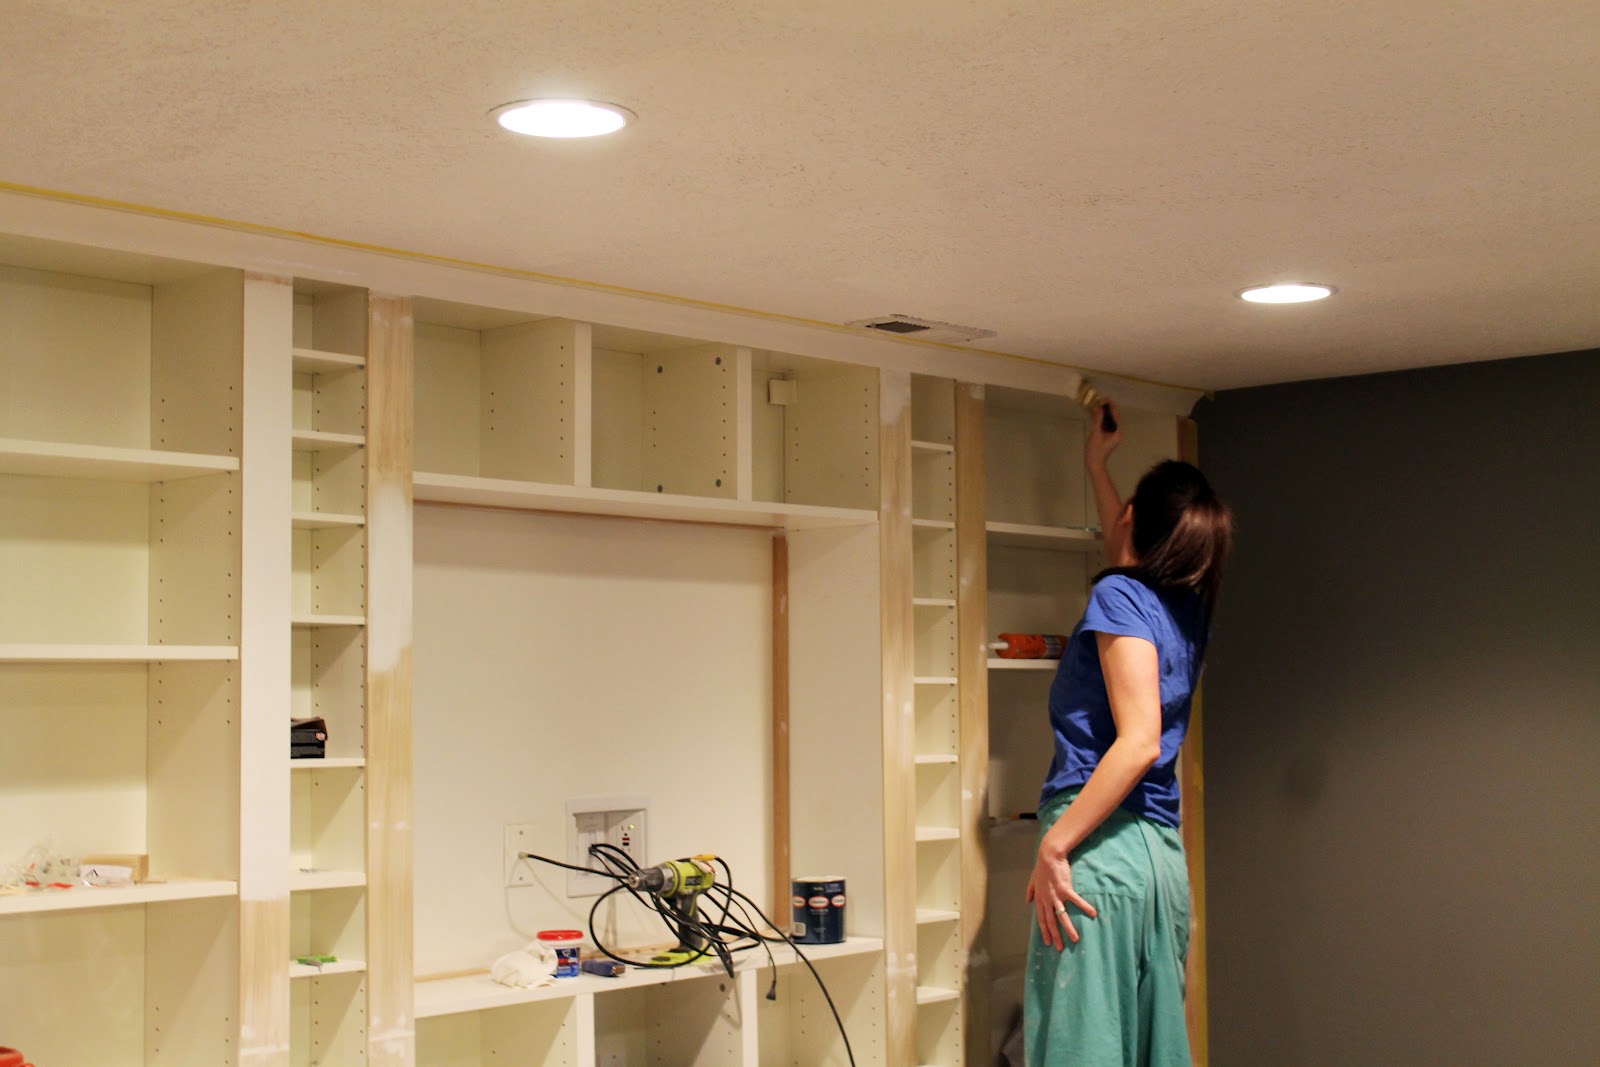
I went with Delicate Surface Frog tape–it’s yellow and relatively new, I think–which is reserved for freshly painted walls. Even though it has been more than 24 hours since we painted our walls and ceiling, I didn’t want to risk pulling any paint off and having to touch up. Well, it’s safe to say I wasted $6 and the 25 minutes it took to tape everything off:

Not only is there a little bit of bleeding, but it also pulled the paint off the wall. So, so disappointed. You live, you learn I guess. Anyone else have issues like this? Besides the few touch-ups in my future, we are so happy with the way the built-ins turned out.

This weekend, we’ll be finishing up the small built-in on the left side of the doors, finally mount our television in the center (yes, inquiring readers, that space where all the wires are coming out is where the TV goes) and then I can start decorating these bad boys which I know we’re all anxious to see.
I am still gathering up lots of things for the shelves. The idea of styling 7 bookshelves is a little daunting and a lot exciting and since we’re nearing our $4000 budget for the entire room, I am having to get more creative as well. Speaking of budget, here’s how the the built-ins break down (this includes the bookcase on the left not pictured):
7 bookcases from Ikea: $309 plus tax
Trim for the faces of bookcases, edges and large boards to frame out television area: $62.40
Paint: $24.48…although if I got it right the first time it would only be $12.24
Crown Molding: Free, thanks to So Simple Crown (normally $53)
Frog Tape: $6…what a waste.
Misc (screws, shims, and all the little things I might be forgetting): $20 conservatively
Total: $421.88 Well spent, right?!
Missed part of the built-ins process? Check out Part 1 and Part 2.
See how they look styled here.
Leave a Reply
What do you think?


Semihandmade
Our wood grain Shaker cabinet fronts were designed for busy, high-traffic homes like ours. Clad with durable textured thermofoils, this line is compatible with Sektion, Akurum, Godmorgon, and Besta cabinets from IKEA. It's the perfect, practical way to add the warmth of wood to all the rooms of your home.
Collaborations
learn more

next
Loloi
We have teamed up with Loloi to create a line of rugs that are as affordable as they are beautiful. This collection houses a great mix of traditional and modern rugs, in cottage-y colorways, as well as vintage-inspired beauties that you’ll want to roll out in every room.
Collaborations
learn more

next
STUGA
We partnered with Stuga on a line of hardwood floors — The Ingrid is really livable, and the color is very neutral. It doesn’t lean warm or cool, it’s that just right in-between. We have really loved putting it everywhere in our house. It’s the best jumping-off point for design, no matter your interior style. In addition to being beautiful, Ingrid is really durable — we have three kids, and we always have a home construction project going on. Ingrid stands up to it all.
Collaborations
learn more

next


SHop all
What We're Right Now
What We're Right Now
Looking for our favorite things? A place to shop our home room by room, or just catch up on what Julia's wearing / loving right now? Browse the CLJ shop.
Loving


Portfolio


Design
Befores, afters, mood boards, plans, failures, wins. We’ve done a lot of projects, and they’re all here.
BROWSE BY CATEGORY
let's break this thing up
We have a long-standing relationship with DIY, and love rolling our sleeves up and making it happen.
Projects
Even when you don’t want to rip down a wall, you can make that space in your home better. Right now.
read more
read more
read more
02
01
03
looking for inspiration?
A reader recently asked me if I’m starting to fully embrace traditional style and whether we still consider our house to be a “modern Colonial” and why. It was a really great question and so timely — I had really just been thinking about my approach to this home and how my style has changed […]


SEARCH THE BLOG
We've been doing this since 2009 and we've posted a whopping 24145+ blog posts and counting. You might need a little help searching, huh?
looking for something?
find stuff like:
")
Can We Send You Our Love Letter?
Another way for us to stay in touch! Joining our weekly newsletter gives you access to exclusive content, never-before-seen photos, your questions answered, and our favorite DIYs. Sign up below!
Follow Along on Instagram
Welcome to our online community where we've posted home, DIY, style, renovations, and family since '09. Renovating our #cljmoderncottage in Idaho and headed for new adventures in Raleigh, NC. #cljfam #cljtransformations
@chrislovesjulia


Links
Get Around
Make yourself right at home
Portfolio
Design
Casual Friday
Projects
Lifestyle
Gift Guides
All Posts
Shop
Love where you live.
Social
RivrLinks
Links
Get Around
Make yourself right at home
Portfolio
Design
Casual Friday
Projects
Lifestyle
Gift Guides
All Posts
Shop
Love where you live.
Social
RivrLinks
Thanks. I would be lying if I said we weren’t patting ourselves on the backs last night. :)
Yes, we used Martha Stewart’s Zinc color matched to Glidden in a flat finish. Could the flat finish be the reason the tape took it off?
Thanks Jessie!
Ahh! I know. I am just WAITING for the call. :)
you guys are amazing julia! i looove these built ins! can’t wait to see the finished product with all your stuff on the shelves!
Looks really good! You guys are amazing!!
Wow! What a difference the painted trim makes. I was feeling like the smaller bookcases would be too small looking after being trimmed out. They look so good painted white! I wish I had a wall in my living room that could work with built-ins. Way to go, Marcums!
These turned out really awesome! I love it!
Those look SO good. A job like that done by a pro could easily have cost you the budget you had for the whole room! They look seamless and I can’t believe you did it for so cheap. I’m virtually patting you on the back right now.
Now, will you do this for me when we eventually have a home? Love me some built-ins. :0
THis looks amazing!!! What great ideas!!! I’m totally blown away!
Amazing!!!!!!!! They look like they have always been there!!!! Well done you guys!!! Ps, we are nearing April…..hollar at you couch!!!
It looks amazing! The white you ended up going with looks dead on in the picture. What finish did you paint the entire room? Flat?
That looks so awesome…Love it!
It looks amazing!! Such a beautiful and custom look. Way to go!!
They look great! Bummer about the tape, though! I agree – it’s usually too much of a hassle to mess with tape when I could get basically the same result by taking my time with a good brush. Can’t wait to see everything all finished!
I absolutely LOVE it!!! Looks so great. That’s too bad about the frog tape…I hate re-touching! Can’t wait to see the room all put together. It’s going to look amazing.
Looks awesome! You guys should feel proud!
Once again – I sit with jaw dropped! Love it! Look how handy Chris is becoming under your tutelage :). Simply amazing.
THis looks amazing!!! What great ideas!!! I’m totally blown away!
Amazing!!!!!!!! They look like they have always been there!!!! Well done you guys!!!
Ps, we are nearing April…..hollar at you couch!!!
this is seriously amazing. only you two would come up with such an amazing way to hide a weird ledge!
Those look SO good. A job like that done by a pro could easily have cost you the budget you had for the whole room! They look seamless and I can’t believe you did it for so cheap. I’m virtually patting you on the back right now.
Now, will you do this for me when we eventually have a home? Love me some built-ins. :0
Looks really good! You guys are amazing!!
Wow! What a difference the painted trim makes. I was feeling like the smaller bookcases would be too small looking after being trimmed out. They look so good painted white! I wish I had a wall in my living room that could work with built-ins. Way to go, Marcums!
These turned out really awesome! I love it!
That looks so awesome… Love it!
Yes, we used Martha Stewart’s Zinc color matched to Glidden in a flat finish. Could the flat finish be the reason the tape took it off?
It looks amazing! The white you ended up going with looks dead on in the picture. What finish did you paint the entire room? Flat?
I absolutely LOVE it!!! Looks so great. That’s too bad about the frog tape…I hate re-touching! Can’t wait to see the room all put together. It’s going to look amazing.
Looks awesome! You guys should feel proud!
It looks amazing!! Such a beautiful and custom look. Way to go!!
Ahh! I know. I am just WAITING for the call. :)
Thanks Elizabeth! Did you use the delicate surface (yellow) frog tape? I have used it a couple times–just going through the roll and I have had bad luck every time. That being said, the green original one is different story–crisp and clean!
you guys are amazing julia! i looove these built ins! can’t wait to see the finished product with all your stuff on the shelves!
They look great! Bummer about the tape, though! I agree – it’s usually too much of a hassle to mess with tape when I could get basically the same result by taking my time with a good brush. Can’t wait to see everything all finished!
Your built-in’s look awesome! We just use some billy bookcases to make built-in’s to flank our fireplace. But we left the backs off of ours and painted the walls behind a darker accent color. And it’s a shame about your Frog Tape. We just used it to paint some horizontal stripes in our half bathroom, and it worked wonderfully. No bleeding, and no problems pulling it up after we were done. (And it had just barely been 24 hours since we had finished painting the background color.) That’s annoying, but you still ended up with some awesome looking built-in’s.
You and Chris amaze me!! I love the finished product!! It looks great! Can’t wait to see what you decide to display on all those shelves. :)
I never had good results from taping, and gave up on it years ago. Last year I learned a new trick, and this completely solved the problem of paint bleeding under the tape. After you get the tape on the trim (using small strips so you don’t stretch the tape) paint right over the edge of the paint with the original color of the trim, or just use a clear coat. After that paint dries, paint the new wall color over it. Anything that seeps will be the color of the trim, and you’ll get a perfectly straight line. HTH.