Yesterday, I mentioned that we bought some countertop paint and I am back to give my first full report. I painted our mauve countertops last night. The whole process was quick! It only took me 2 hours total including a one hour dry time in between. Before I spit out the results, let’s rewind and start the process from the beginning.
First I washed all the counters really well with soap and water. Then, I went over them with a magic eraser. Then I washed them again. The instructions just say to wash them down with soap and water–call me an over-achiever, but I just wanted to make sure they were really clean (!) so I could lower the margin of human error for this whole project.
Then I taped everything off with painter’s tape. Little fact–I NEVER tape things off when I paint. I have a pretty steady hand and use a quality brush and I have never had a problem. But, this paint is an epoxy and totally different than any paint that I have used before. You can’t just wipe it off with water if you get out of the lines, so I would definitely recommend taping off if you decide to do this yourself. I think it made the whole thing go faster, too.

You don’t have to prime with this product. (woot!) So after things were cleaned and taped off, I was ready to paint. The product recommends a foam roller and that’s just what I used–a high-density foam roller for “ultra smooth” application. This paint REALLY smelled. I opened all of the windows and wore a mask. It felt really sticky while I was rolling it on, and the paint is the consistency of nail polish. I was so intrigued because I do a lot of painting and like to try new products….this was definitely new for me. I immediately got excited when I saw the muave getting covered by a grayish-brown paint. For some of the backsplash and the space behind the sink, I had to use a brush, which was anticipated. After I was done with the first coat I waited an hour per instructions and put on the second coat and then IMMEDIATELY removed all of the painter’s tape. This is pretty crucial. This paint is strong stuff and it is supposed to harden and leave an enamel-like finish. You definitely don’t want your tape stuck under it. After I took off the tape, I did a few touch-ups with my brush on the countertops and even had to break out the wall paint and touch up some spots there–from this project and painting the cabinets.
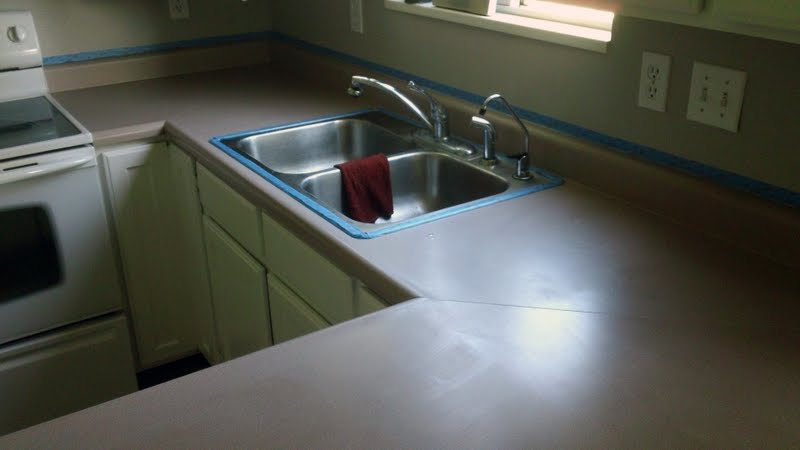
Rustoleum’s countertop paint comes in 16 colors. We went with “Putty.” And this is how it looks now:
Really shiny, right? I wasn’t expecting that. Supposedly it is a satin sheen, but I would definitely call it semi to high gloss sheen. Either way, we are stoked on it. We opened a lot of windows last night and this morning the smell is pretty much non-existant. The counters are dry to the touch and feel very hard and smooth, but the instructions say not to use our countertops for 3 days.
Should we check out some before and afters? ‘Kay. Let’s take it back to the very beginning. When we first moved in, our kitchen looked like this:
Then I made a
roman shade and painted the countertops and now the kitchen looks like this:
While painting the countertops is just an intermediate step to tide us over until we do our full kitchen remodel in the next year or so, you can’t beat $20 for this transformation! It looks SO much better with our decor. What can I say, we are just not pink countertop people. I honestly can’t think of any reason why people are living with laminate countertops they don’t like the color of. $20 and two hours will get you new-looking countertops. In fact, this whole kitchen revamp cost less than $110.
The cabinet primer and paint came to $66. The roman shade cost $22. And the countertop paint cost $20. Making the grand total $108!! A lot cheaper than buying new cabinets and countertops and it definitely makes the space feel more “us” until we DO have the funds for a reno.
I can’t report on the durability of the countertop paint just yet, but I will say at certain angles you can see roller marks. I took a video this morning so you can get a better idea of the paint color, sheen and some of those brush strokes. I also caught a little Greta in the vid:
Overall, we are giddy. We can totally live with these countertops for now. What do you think?


I just did my counter tops and I love them.
I used same product and I have a lot of roller marks. A second coat didn’t help. I used the smoothest roller Lowes had. Any recomendations on how to smooth it out?
What an awesome turn out! I want to do this to our camper countertops! I was just wondering how you tint the color you want? It says you can tint up to 16 colors on the base can, but it didn’t say how to do it. Do you need to buy another color and mix? Could you explain how this is done?
Thanks so much, it really turned out great and is a great price!
-Jessica
We purchased ours at Lowe’s at they had the tint added in less than 10 minutes.
The store you purchase from will tint it just like they do any paint colors!!!
I love your countertops. I am interested in doing mine and am doing some research. I am wondering how they have been holding up after a few years.
Thanks
Hello – do you have any step-by-step pictures of your painted countertops? Are they on another page?