We hung all of our recently painted cabinet doors this past weekend and are here to share lots of photos. We must have adjusted quickly to the new look, because when I was searching through my files to find a before photo to share with you, I was stunned at the wood-riddled kitchen we were living with for so long. Yes, it’s hard to believe that two weeks ago, our kitchen looked like this:

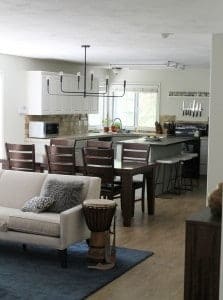
And now it looks like this:

Ahhhh, the magic of paint–and removing our really low microwave and the surrounding cabinets helped, too. In this post, we discussed our paint scheme, but as a refresher we went with Valspar’s Four winds for the upper cabinets and Valspar’s Green-Gray Linen for the base cabinets and pantry.

This wasn’t our first cabinet-painting rodeo. We actually did it twice in our last house. The first time we used Benjamin Moore’s Advance line, the second time (when we decided to paint our base cabinets navy) we used BM’s Aura line and this time we used Valspar. To rate them all, I probably liked the Aura line and this Valspar paint equally. Tie for first! They are both lo-VOC. We actually painted all the cabinets in our basement this time and the smell didn’t hit you or anything, but it was there. The paint went on like a dream. We actually could have gotten away with one coat, but did 2 for good measure. It was amazing. So thick and creamy. I actually didn’t love the Advance line at all. The 8 hour re-coat time and the fact that it took 4 coats after 2 coats of primer turned me off of it. Although the finish was nice, I don’t think it was worth it personally.

This painting experience was a lot more favorable all around thanks to our paint sprayer. I rolled and brushed the cabinet boxes and then used the sprayer (we’re convinced–the best paint sprayer in the world!) for the doors. As for the process:
1. Scrubbed all the cabinets with soap and water. Wood grain hides a lot of dirt. Disgusting.
2. Wipe down all the cabinets with TSP.
3. Everything (doors and boxes) gets a coat of primer. We like Zinsser Bull’s Eye Zero Primer.
4. Start painting. For the doors, we like to do the backs first, so if there are any drips during the painting process, we can catch them, correct them and the fronts which are painted last will be pristine. We didn’t have any drips, but there was an incident where I didn’t realize the tarp had blown up onto a cabinet door smearing paint on the not-yet-painted front. Once I flipped it over, I sanded it lightly and that was that.
5. Let dry a few days before reattaching. The doors were ready to re-coat in 2 hours and we did two coats. We waited 24 hours to flip from backs to front.

Last time, we dragged every paint can we had in the garage to make little stands for the doors to sit on so they were slightly raised as to not stick to the tarp. Considering we had over 40 doors to paint this time, we didn’t have enough paint cans and even if we did, carrying them all to the basement didn’t sound very fun. We looked into these painting pyramids, but around $6 for 10–pass. And then I thought Dixie cups! $4 for 200 and they worked perfectly.

With fresh paint on the cabinets, we were eager to upgrade our barstools, too. I sold our old ones on Craigslist for $50 quick and ordered these ones from Wayfair. We love the white mango wood seats and black iron bases–really chic! We are missing the foot rests all the way around the stools, and the swivel. It’s a weird thing to miss–(haha!) but, I am sure we’ll get used to it. We have already received so many compliments on them.

Everything is so fresh now and looks so much larger. The only downside is, with paint, our cabinet imperfections are a lot more visible to us. That door that doesn’t close all the way. The cracks in almost every door. We noticed during the process how many actual chunks are missing from drawers. It’s bizarre and astonishing! Even though the wood grain hid all those things, we don’t regret painting them at all. We’re currently saving up for a complete kitchen overhaul, so this project was to tide us over until we get to that point–we’re hoping next year.

In the meantime, we’re just waiting for our new hardware to get here (any day now!) to really enjoy our “new” kitchen.
Ps. We installed the new dining room fixture over the weekend, too! Pictures tomorrow!


I’m just wondering which specific valspar product you used to paint your cabinets? Thanks!
I love the cups to prop up the doors. Genius! I have been using paint cans, too, but our master bath has too many cabinet doors.
Hi! It’s amazing what a deference paint makes! Just wondering if you had considered ceramic paint or chalk paint for your cabinets? And what were the pros/cons you came across? Thanks!
What kind of Valspar paint did you use?
Hi Julia!
Curious.. did you paint the insides of the cabinets? Don’t remember seeing a previous comment about this. I’m planning doing my kitchen, but will do a trial with my en-suite cabinet first :) (same type). I’ve been going back and forth “to paint inside”, to NOT paint inside”..
I painted the inside of the doors but not the cabinet boxes. They were actually already white inside, but even if they weren’t I probably wouldn’t have. Paint can scratch easily when you’re constantly putting plates in and out.