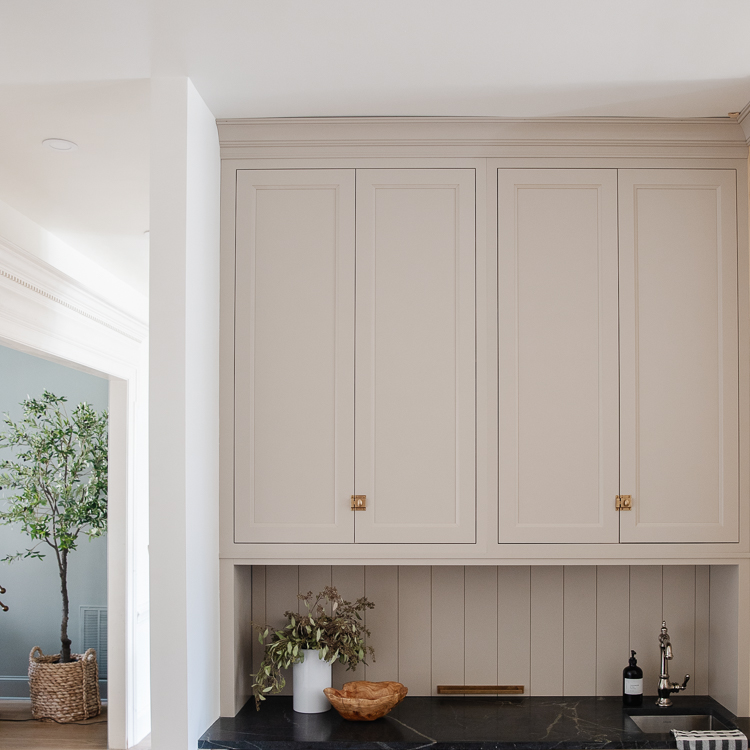
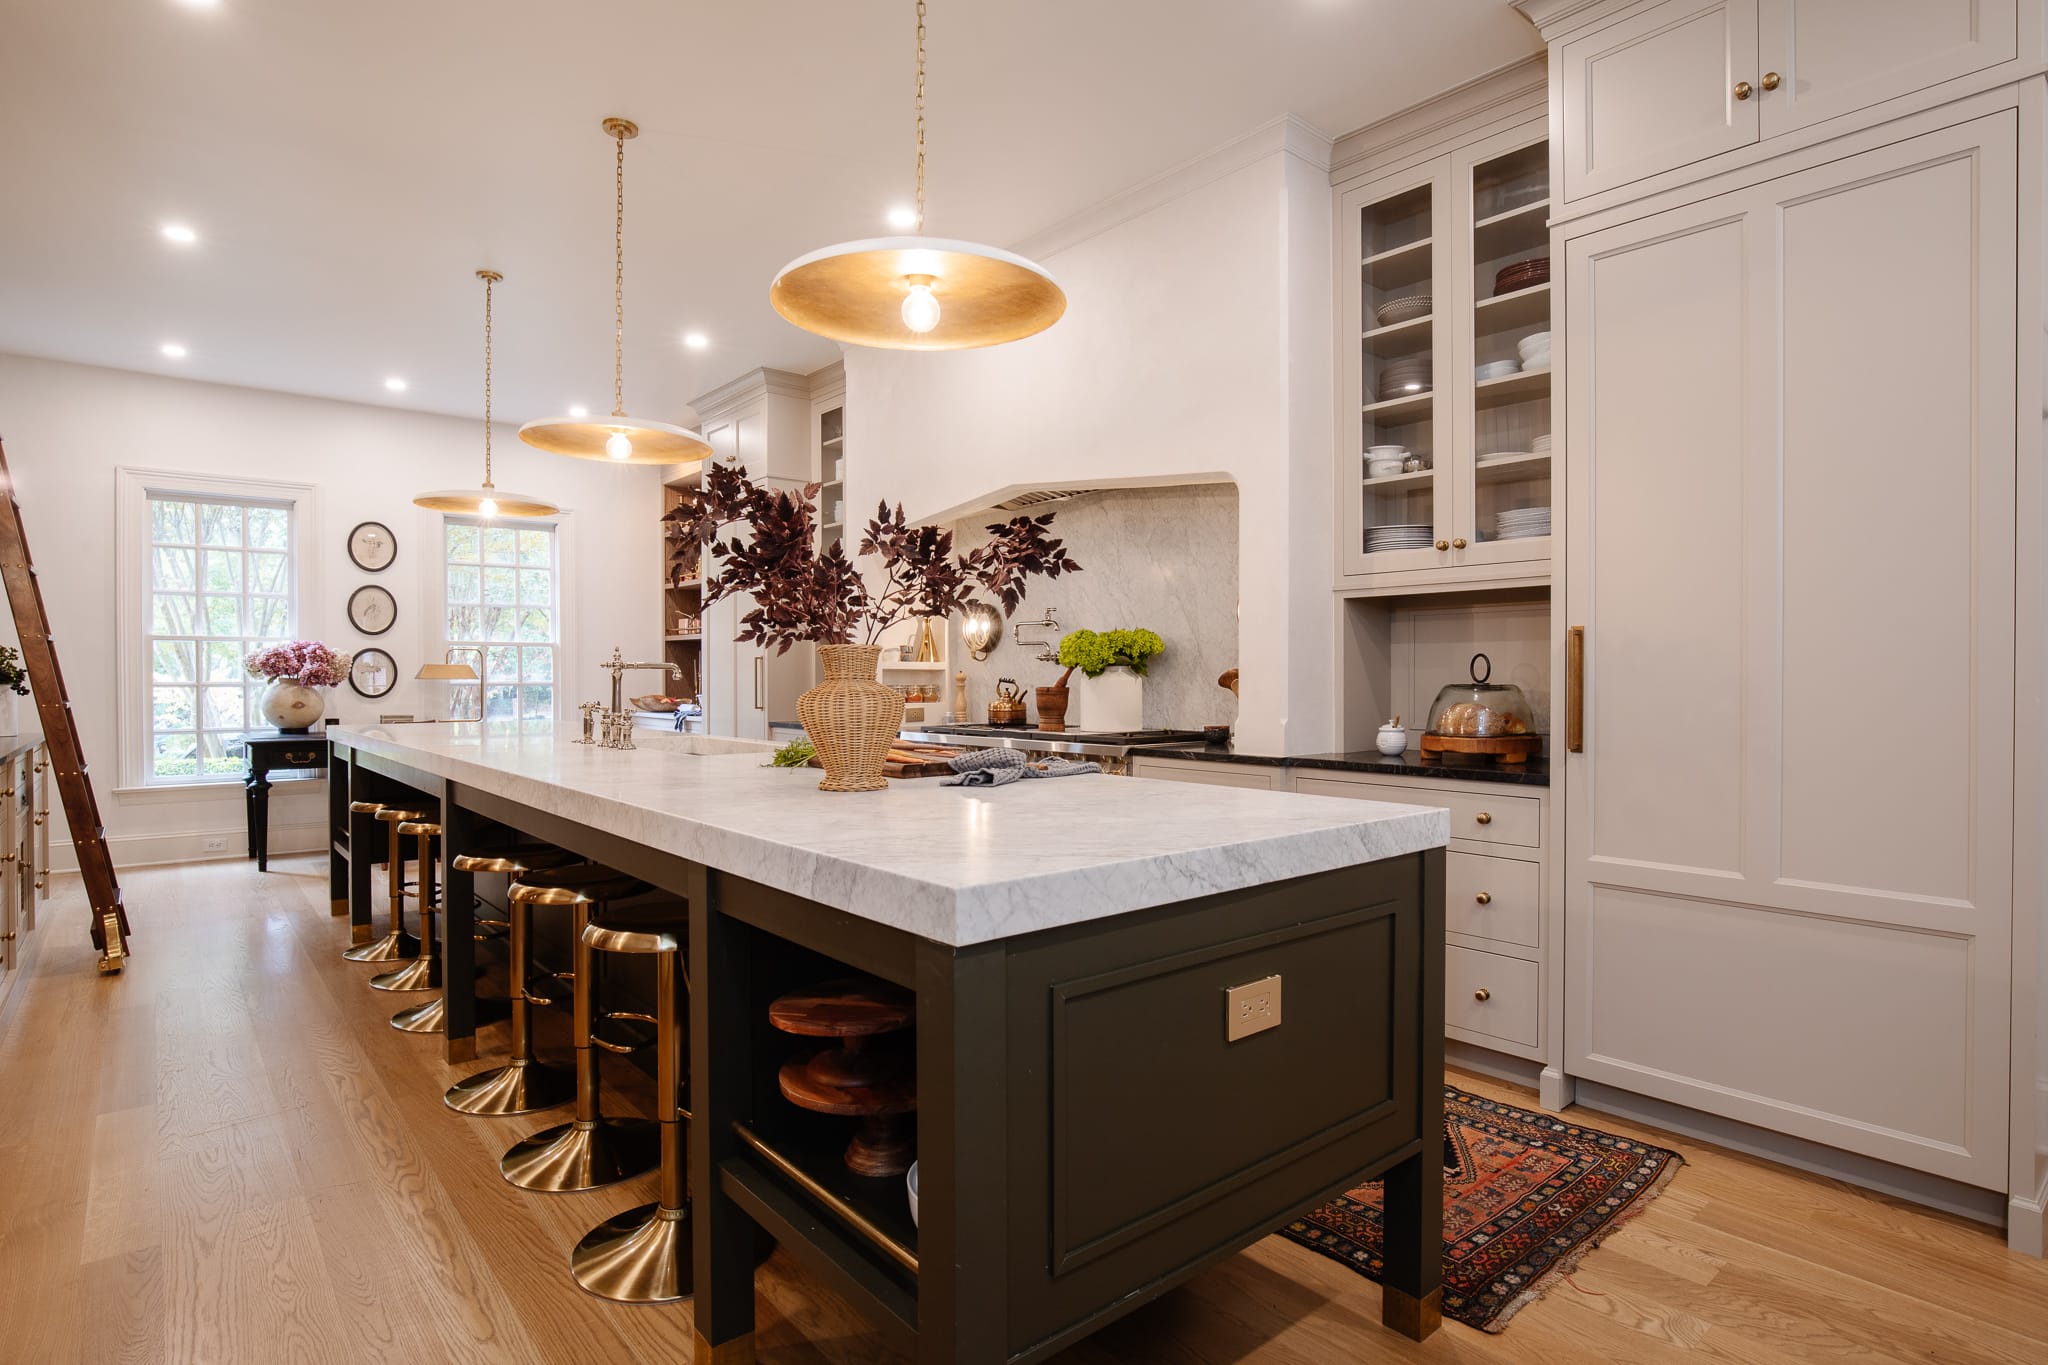
It’s been a minute since we checked in with the kitchen. We still have a LOT of finishing touches to tackle here, but I couldn’t wait another day to share our appliance garage with you. This appliance garage was Stoffer Cabinetry’s brain-child. There used to be a kitchen desk there so it was a very deep-set part of the kitchen. When we were designing this area–our beverage center, Stoffer came up with this idea of creating a “moving backsplash.” At first glance, this looks like a typical standard-depth set of uppers with a paneled backsplash… But the backsplash glides up to reveal all of our every day appliances: toaster, blender, juicer, Ninja CREAMi, electric tea kettle!
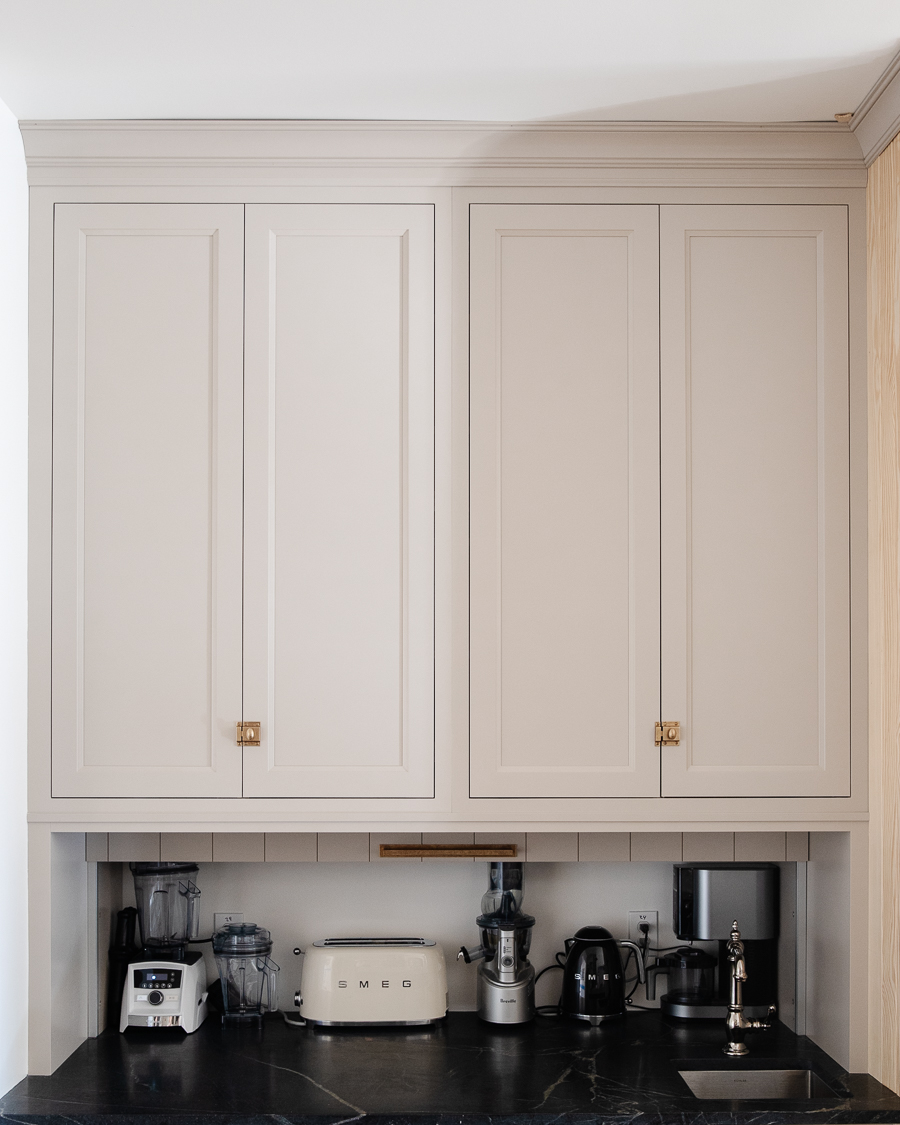
The fact that they’re plugged in, ready to be used, makes this design even more functional and genius!
A couple things!–The initial design didn’t include a pull, but we felt like it makes opening and closing so much easier! The brass pull will also tie into the refrigerator drawers below it, which will be nice to see come together. Another thing–we’re trying to decide whether we want the inside backsplash to be an antique mirror, or some shiny black subway tile. Jean put her stamp of approval on either!
Every time we show it on Instagram, it blows everyone’s mind! Tbh, I didn’t understand exactly how it was going to come together until it actually came together. Here’s a look of what this kitchen corner looked like before demo!
Here’s how they did it!
They first built a frame above the appliance area to mount the upper cabinets to. It had to sit up high enough so that the appliance panel could glide up, in-between the frame and the cabinets.
They then installed the cabinet panels inside of the garage, as well as the vertical sliding hardware, and then attached the appliance panel to it (what you see as the backsplash).
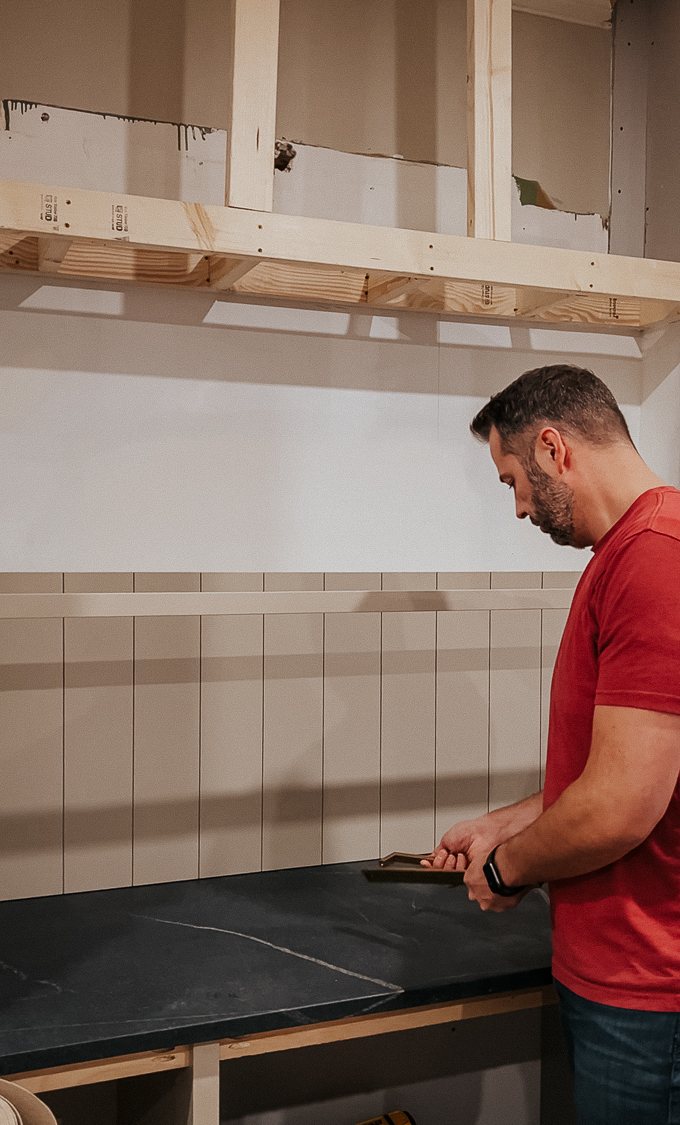
With that in place, the upper cabinets were mounted just in front of the panel to keep it hidden when it glides up. I know its a bit tricky to understand, but hopefully the pictures help!
Glasses | Vintage Glasses | Faucet | Brass Pull | Cabinet Latch
The lift that we are using, has taken some time to get used to. At first it was incredibly hard to open, and easy to close. We played with the tension a bit so that it’s much easier to open, and a hard to close, but it’s getting easier! The tension needs to be tight enough that when you lift the panel up, it stays put, rather than sliding back down. We think it might just need some breaking in. That was another reason why we added the heavy-duty brass pull–because it made it easier to lift! We thought about doing something motorized, but if I’m being honest I don’t trust that kind of technology here!
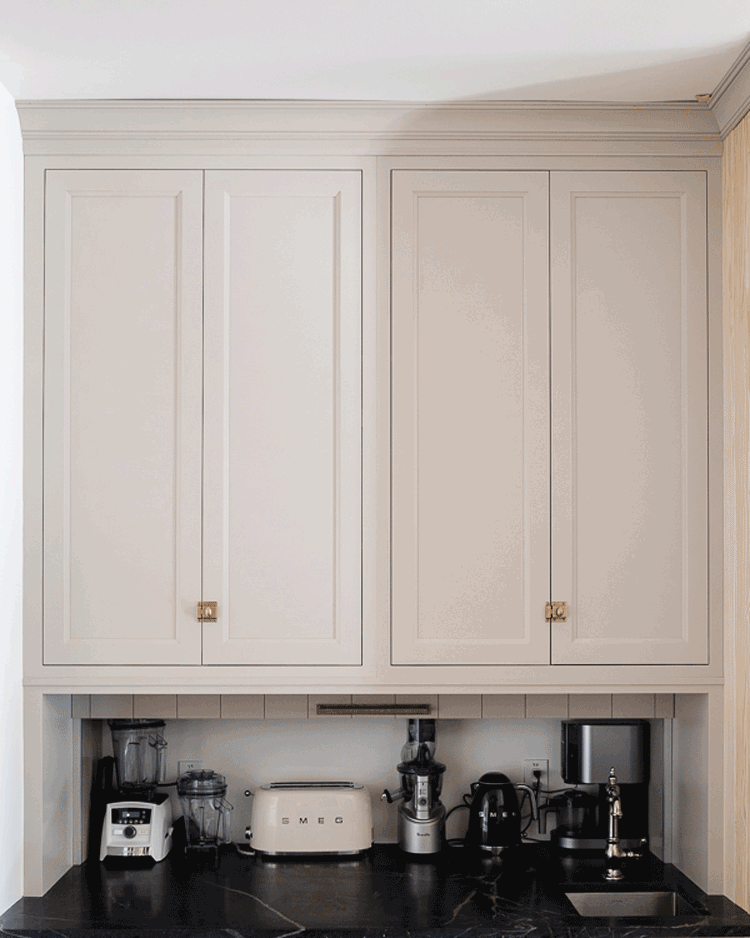
Since we use these small appliances every day, it wasn’t practical for us to keep them stored away and pull them out (and put them back away) for every use. This is less cluttered, and less work! It’s like having them out on the counter every day… but hidden. And honestly, it’s our most used corner of the kitchen!
Our wood grain Shaker cabinet fronts were designed for busy, high-traffic homes like ours. Clad with durable textured thermofoils, this line is compatible with Sektion, Akurum, Godmorgon, and Besta cabinets from IKEA. It's the perfect, practical way to add the warmth of wood to all the rooms of your home.
We have teamed up with Loloi to create a line of rugs that are as affordable as they are beautiful. This collection houses a great mix of traditional and modern rugs, in cottage-y colorways, as well as vintage-inspired beauties that you’ll want to roll out in every room.
We partnered with Stuga on a line of hardwood floors — The Ingrid is really livable, and the color is very neutral. It doesn’t lean warm or cool, it’s that just right in-between. We have really loved putting it everywhere in our house. It’s the best jumping-off point for design, no matter your interior style. In addition to being beautiful, Ingrid is really durable — we have three kids, and we always have a home construction project going on. Ingrid stands up to it all.
SHop all
Looking for our favorite things? A place to shop our home room by room, or just catch up on what Julia's wearing / loving right now? Browse the CLJ shop.
Befores, afters, mood boards, plans, failures, wins. We’ve done a lot of projects, and they’re all here.
We have a long-standing relationship with DIY, and love rolling our sleeves up and making it happen.
Even when you don’t want to rip down a wall, you can make that space in your home better. Right now.
A reader recently asked me if I’m starting to fully embrace traditional style and whether we still consider our house to be a “modern Colonial” and why. It was a really great question and so timely — I had really just been thinking about my approach to this home and how my style has changed […]
We've been doing this since 2009 and we've posted a whopping 24145+ blog posts and counting. You might need a little help searching, huh?
Another way for us to stay in touch! Joining our weekly newsletter gives you access to exclusive content, never-before-seen photos, your questions answered, and our favorite DIYs. Sign up below!
Welcome to our online community where we've posted home, DIY, style, renovations, and family since '09. Renovating our #cljmoderncottage in Idaho and headed for new adventures in Raleigh, NC. #cljfam #cljtransformations
Links
Get Around
Make yourself right at home
Portfolio
Design
Casual Friday
Projects
Lifestyle
Gift Guides
All Posts
Shop
RivrLinks
Links
Get Around
Make yourself right at home
Portfolio
Design
Casual Friday
Projects
Lifestyle
Gift Guides
All Posts
Shop
RivrLinks
Beautiful space! How deep is the counter slab? Trying to figure out if something like this would be feasible for my space.
The countertop is about 36 inches deep. Hope that would work for you!
Can you tell me what lift hardware was used for the moveable backsplash?
Here’s the exact gliding hardware we used. There are more details in this post: https://www.chrislovesjulia.com/beverage-station-and-appliance-garage/
Love this so much! Can you post a link to the lift or at least the name of the generic lift type? Thanks!
Love the moveable backsplash and want to build an appliance garage like this in my new house. Can you share information on the hardware used for the sliding backsplash?
Hi! The brass pull you can find here. Hope that helps!
Thanks Sue,
Can you also tell me the lift hardware that you used?
The lift hardware we used is here.
I love this idea! Can you share a link for the track/hardware?
Thank you!
Sure! You can find it here.
I like the appliance garage. Can you provide a link for the hardware please?
Is the backsplash on a track? Do you have details on how that was installed?
Please share where the hardware was purchased for the sliding door for appliance storage.
I mean what you ordered that allows the door glide up.
Hey Thanks so much
* this comment wasn’t intended for the tick-tock real
It’s a question to you about your post
Hey Carol, we used this lift hardware.
Interested to know what type of rails/guides you used for the moving backsplash.
Hi Julie,
I love this lift idea and want to build on into my kitchen remodel – Can you tell me the lift system you used?
Hi Julia – I am copying this idea for my kitchen renovation. What can of hinge/lift/track did you use to make it happen? I don’t see one linked anywhere. Thank you!!
What hardware for the vertical sliding door did you use? Could you provide a link?
Hi, I’ve seen your IG reel and obviously read this post; So if I understand right, your upper cabinets are standard depth and frames away from the back wall by ~12 in (the depth of the garage)? And so you have a 12” deep air gap or chimney from countertop to ceiling? I don’t think it’s wasted or lost space, just confirming how I think you executed.
Also have yet to see a name, model #, or link to the lifting slide hardware. Please post it.
Where can I find the vertical sliding hardware for this project? My cabinet builder is trying to recreate but having a hard time finding the right material
What the total depth of the counter top including the appliance garage? And then how much room did you leave for that?
The countertop is about 36 inches deep. The upper and lower cabinets were both built out from the wall 12 inches to create the extra space for the garage.
Love this! What is the actual vertical sliding hardware you used for the up/down door?
This is an awesome idea. I’ve been brainstorming something like this for years, but this is a much better version. Do you guys have any links to the hardware you used for the door.
I am about to do this with my kitchen. What hardware did you use to help hold the door up? Does it have any spring assist etc behind the door? Or do you just push it up and latch it?
What hardware lift are you using ?
Can you provide a link for hardware please
Hi CLJ! How deep is the appliance garage itself? Thanks so much! Love this idea so much and trying to figure out how to incorporate in to our reno.
12″
This is amazing! What lift did you use? Convincing my husband to do this in our house!
This idea blew my mind!! I showed my installer to ask “HOW DO WE DO THIS” and the first thing he commented on was the shim left in your crown… MEN!
Ha! Yeah…trim is NOT finished yet hahaha.
These are illegal in Canada. My electrician can’t legally install appliance garages and it makes me so sad! Get on that, Canada!
Love this feature. Custom cabinetry should operate smoothly, without being motorized. Perhaps, the cabinetry maker could add hidden tracks on either side of the panel to help it glide up and down easier?
This is GENIUS!!! It is the most gorgeous combination of form and function! Thank you for inspiring each and every day!!
This reminds me so much of the long stretch of “faux backsplash” appliance garage that was designed into the kitchen I grew up with! The panels moved up to reveal all the small appliances – from the mixer to the toaster and blender and even the slow cooker. When the panels were down it looked just like the backsplash too.
What do you think the actual depth of the counter needs to be to make it look like a backsplash? I love this idea but would love actual dimensions to see if it’s doable.
Ours is 36 inches deep. The upper and lower cabinets were both built out from the wall 12 inches to create the extra space for the garage.
What a wonderful idea! Did you guys also do an extra deep bottom counter? I’m wondering if when the backsplash is closed if the visible counter looks standard, or if it looks more like a shallow coffee bar counter situation. Either way it’s brilliant!
The bottom counter is 36 inches deep and the upper and lower cabinets were both built out from the wall 12 inches for the garage. So it’s a good 24 inches deep with the backsplash closed.
This is the perfect appliance garage!
Brilliant! But I notice the especially clunky ones are absent, the instant pot, the Kitchen Aid, the toaster oven, the air fryer. FYI I’ve made similar good use of that usually useless corner lazy Susan, where small appliances are out of sight and easy to grab if not plugged in like yours.
It’s beautiful!! If you did anything unique with your kitchen aid mixer or your food processor, I’d love to hear about it. We bake a lot, and the kitchen aid is heavy to be lugging in and out of cupboards. My mother once had a custom lower cupboard where the mixer would rise up!?
Hi! Beautiful kitchen julia! Swwwwooooon~. I’ve been toying with some kitch of kitchen appliance also but was told by my cabinet maker that using appliance inside a cabinet or under an upper cabinet can cause damage over time due to steam and heat. I’ve been advised to have a rollout for the appliance to prevent this. Have you heard about this?
I hadn’t heard that, but we definitely pull them out farther when in use!
The cabinet door above my parent’s toaster has warped from the heat. Now they always pull it out farther when it’s in use.
Can you give some info or a link on the track set up? I want to do this in our laundry room to hide plumbing above the washer and dryer. Will be very similar with counter and cabinets above.
Just a safety thought – one of our friends is a fire marshal and he told us house fires can often originate with toasters and that they should never be left plugged in after use!
I ALWAYS left my toaster plugged in until he made this comment, but it was a Gretchen Rubin “lightning bolt” – moment. Literally. Since that day almost a decade ago I have never left my toaster plugged in. As soon as we’re finished using it gets unplugged and stored out of sight. Just a thought…
You could always plug them into a power strip that you turn off after use too!
When I was in high school a friends house burnt down from a fire caused by their toaster, they lost all their photos and heirlooms, it was a core memory for me. Now if an appliance can be left unplugged I always unplug it even 20 years later
I think you have created the perfect kitchen and adding the appliance garage is brilliant!
This is pure genius! Beauty + function is always a win-win in my book! And I love the idea of the antique mirror inside too!
This is so convenient- what a great idea!
The kitchen has come together beautifully!
This is really clever and I’d love to have appliances hidden away like this. I’m curious…in day to day, how good are you at actually putting them back in the garage and closing the cover?
I’m also interested in where your microwave is…just because I know you’ll have come up with something genius for hiding or blending in the microwave as well!!
So far, we’re REALLY good at closing the cover. It’s always closed when not in use probably because it’s just so easy. Everything is plugged in so open the cover, use it, close it like you would close a cabinet door you’re not using. Our microwave (speed oven) will be built into the island as soon as it arrives! This is not quite deep enough for our temporary one