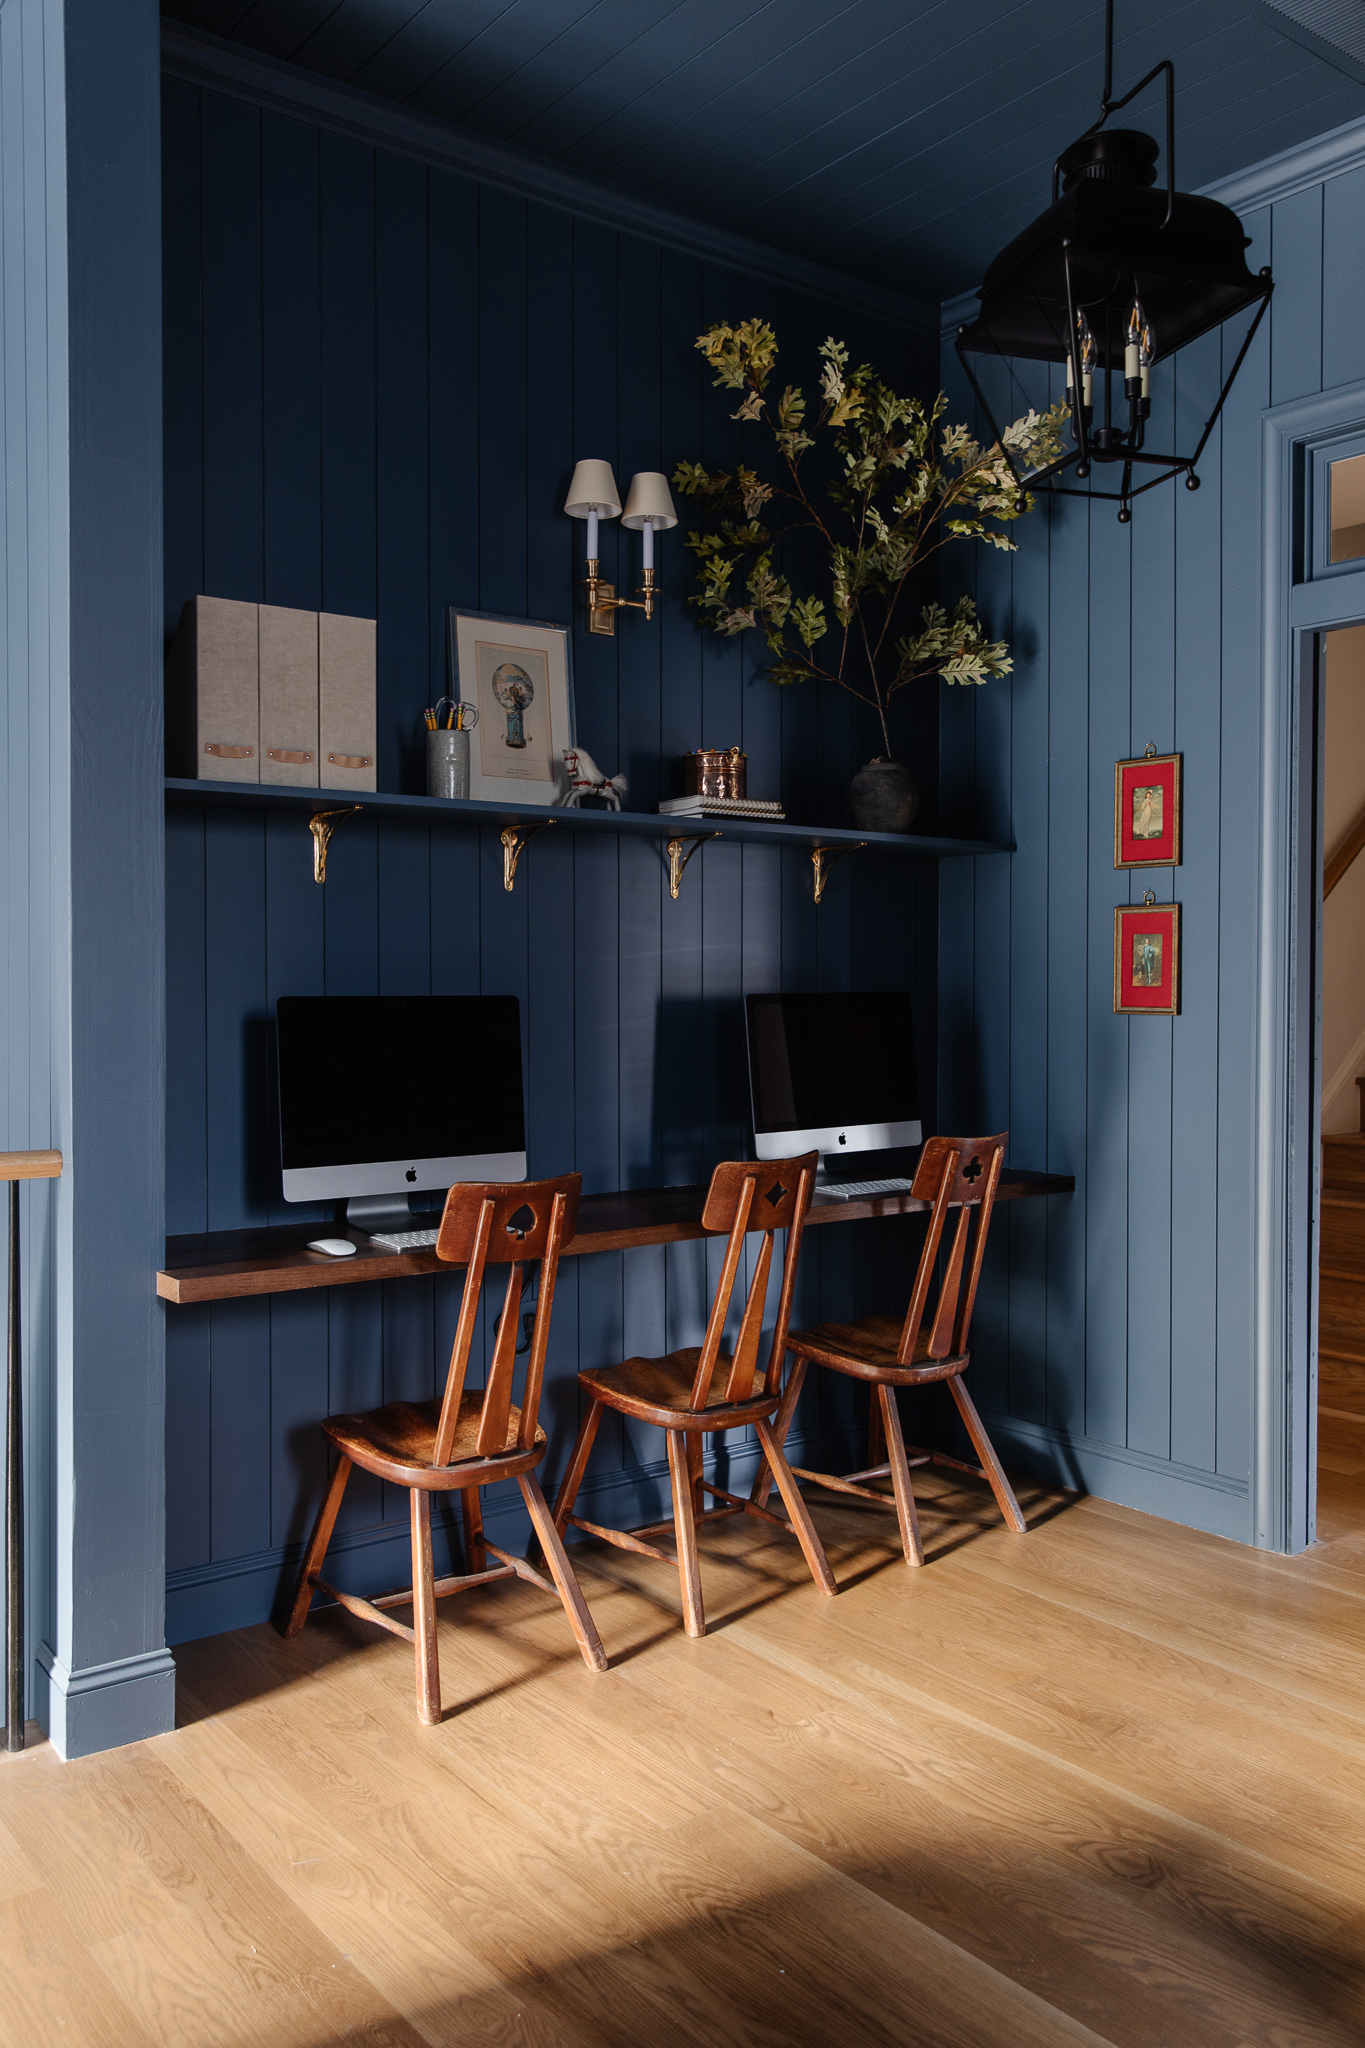
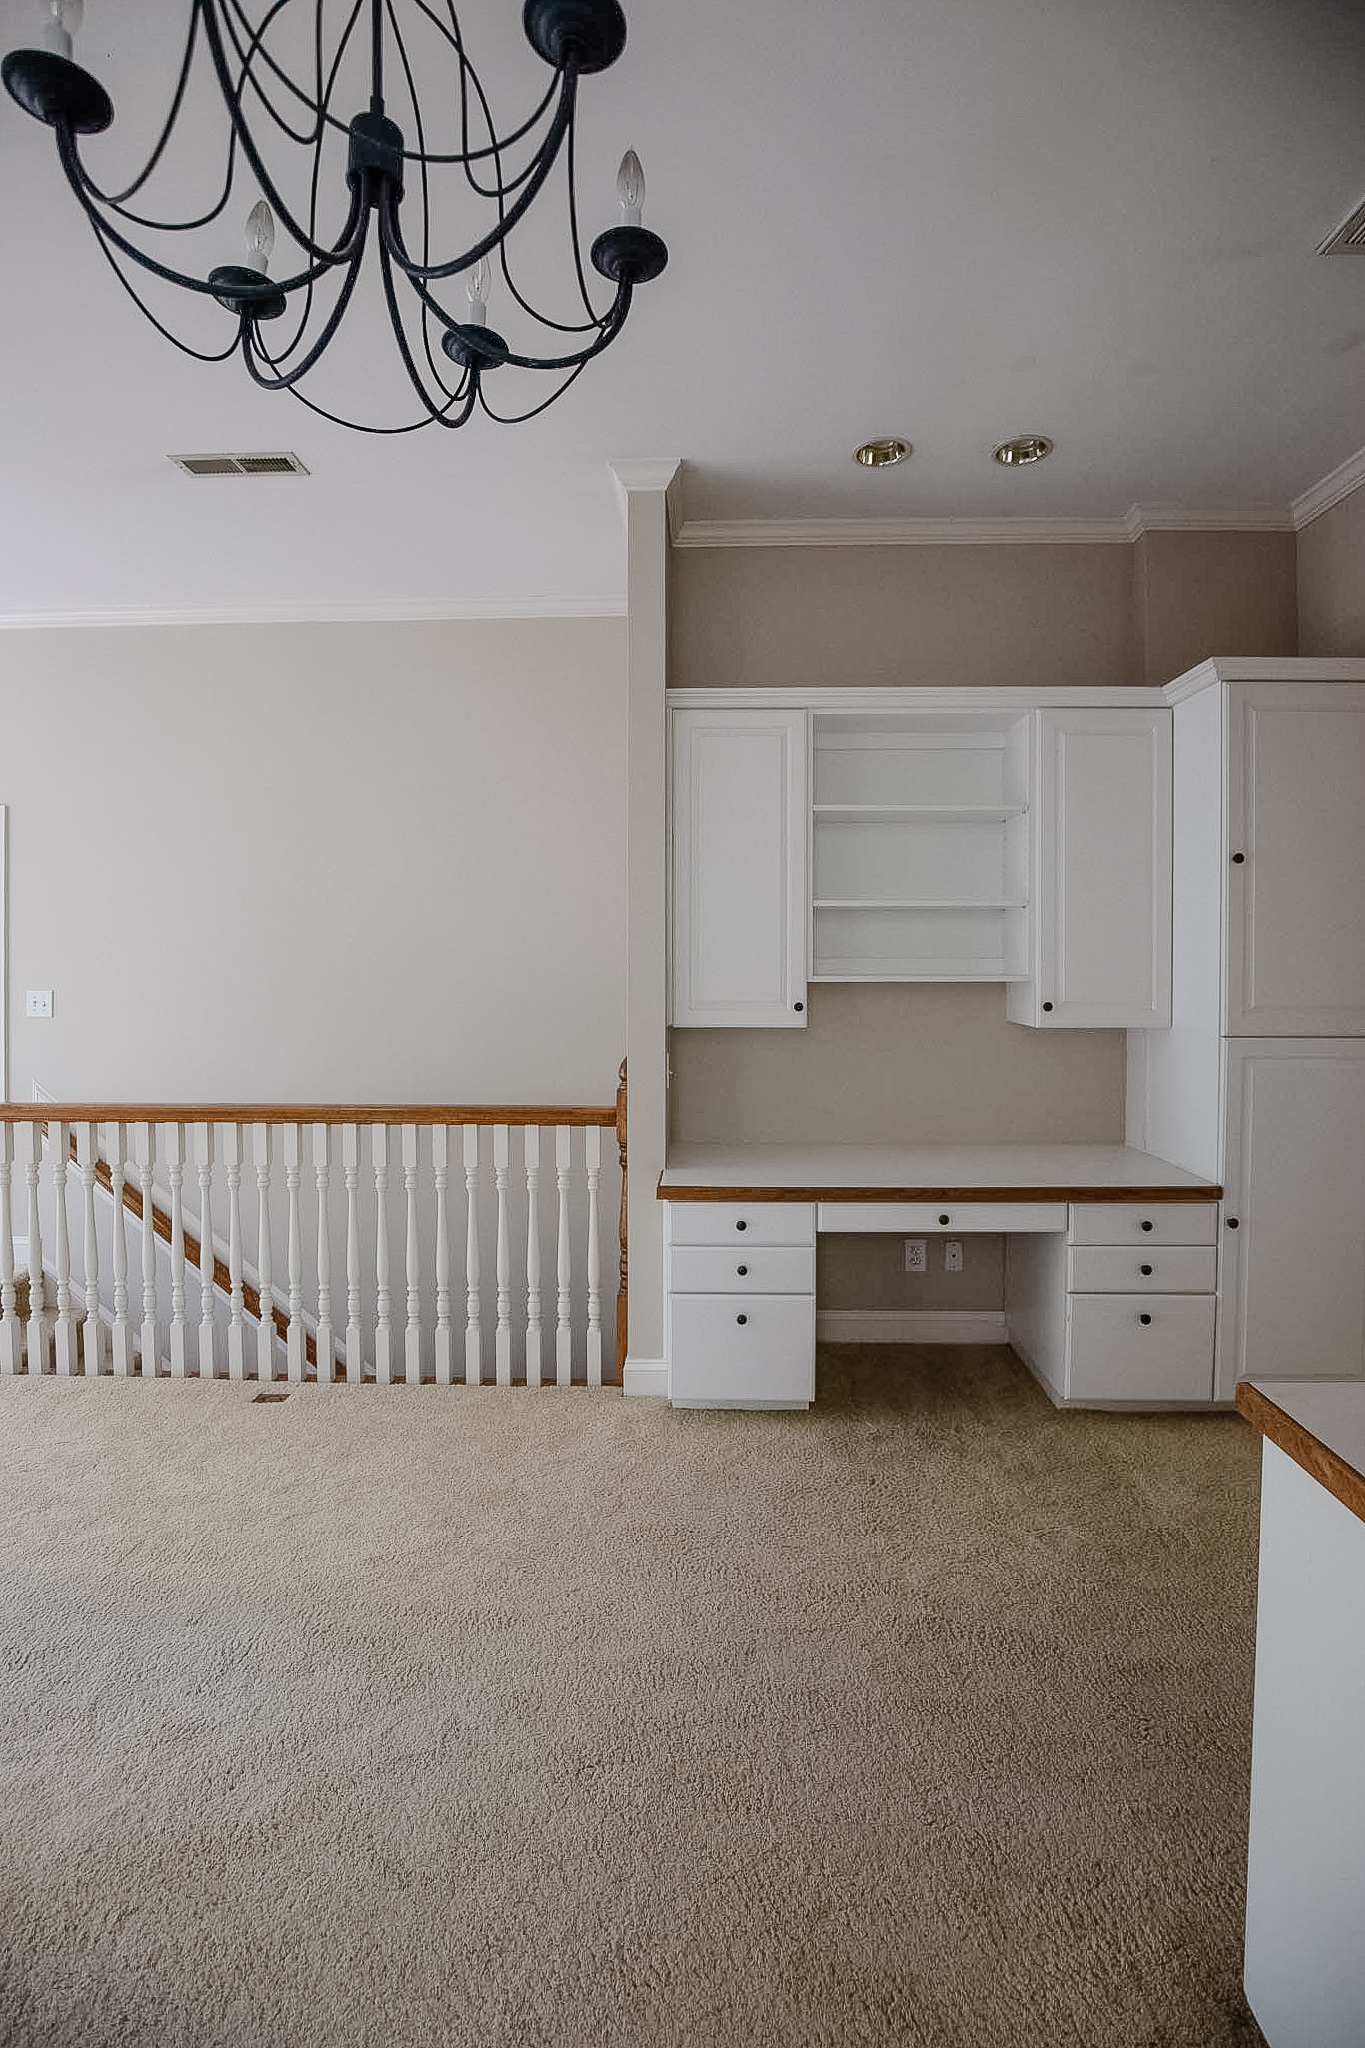
The bonus room is wrapping up over here! Today we wanted to share more about the floating desk area we DIYed for the girls’ computers that turned out so well! We wanted to give the girls their own little corner of the room to have for playing computer games, doing homework, and storing their backpacks and school papers. There was already a built in office nook situation happening in this corner, but it was bulky and so we rethought everything to make it work a little bit more for our needs, and to fit the style of the rest of the room. With one entrance into the room being in the desk nook, one goal was to make it less crowded, which is one of the main reasons we thought a floating desk would be a good solution.
Before
After


Shop The Desk Nook

Before

After

There’s been a lot of projects between that before and after and many of which we have shared. In case you missed it:
How we installed a pocket door and transom window to remove the need for a swinging door.
How we paneled all the walls and ceilings in the bonus room.
DIY Hidden Door
Choosing Art for A Frame TV
But DIYing the floating desk, started before paneling! Here’s what we did:
Building out the wall
You can see in the before picture above that there’s a little wall that jutted out that was actually a closet on the other side, but I wanted that all to be flush so we built out the inset wall using 2x4s for a nice straight wall. Keep in mind that we planned to install paneling on this wall (and the rest of the room), so it didn’t need to be drywalled in our case.
Add the brackets
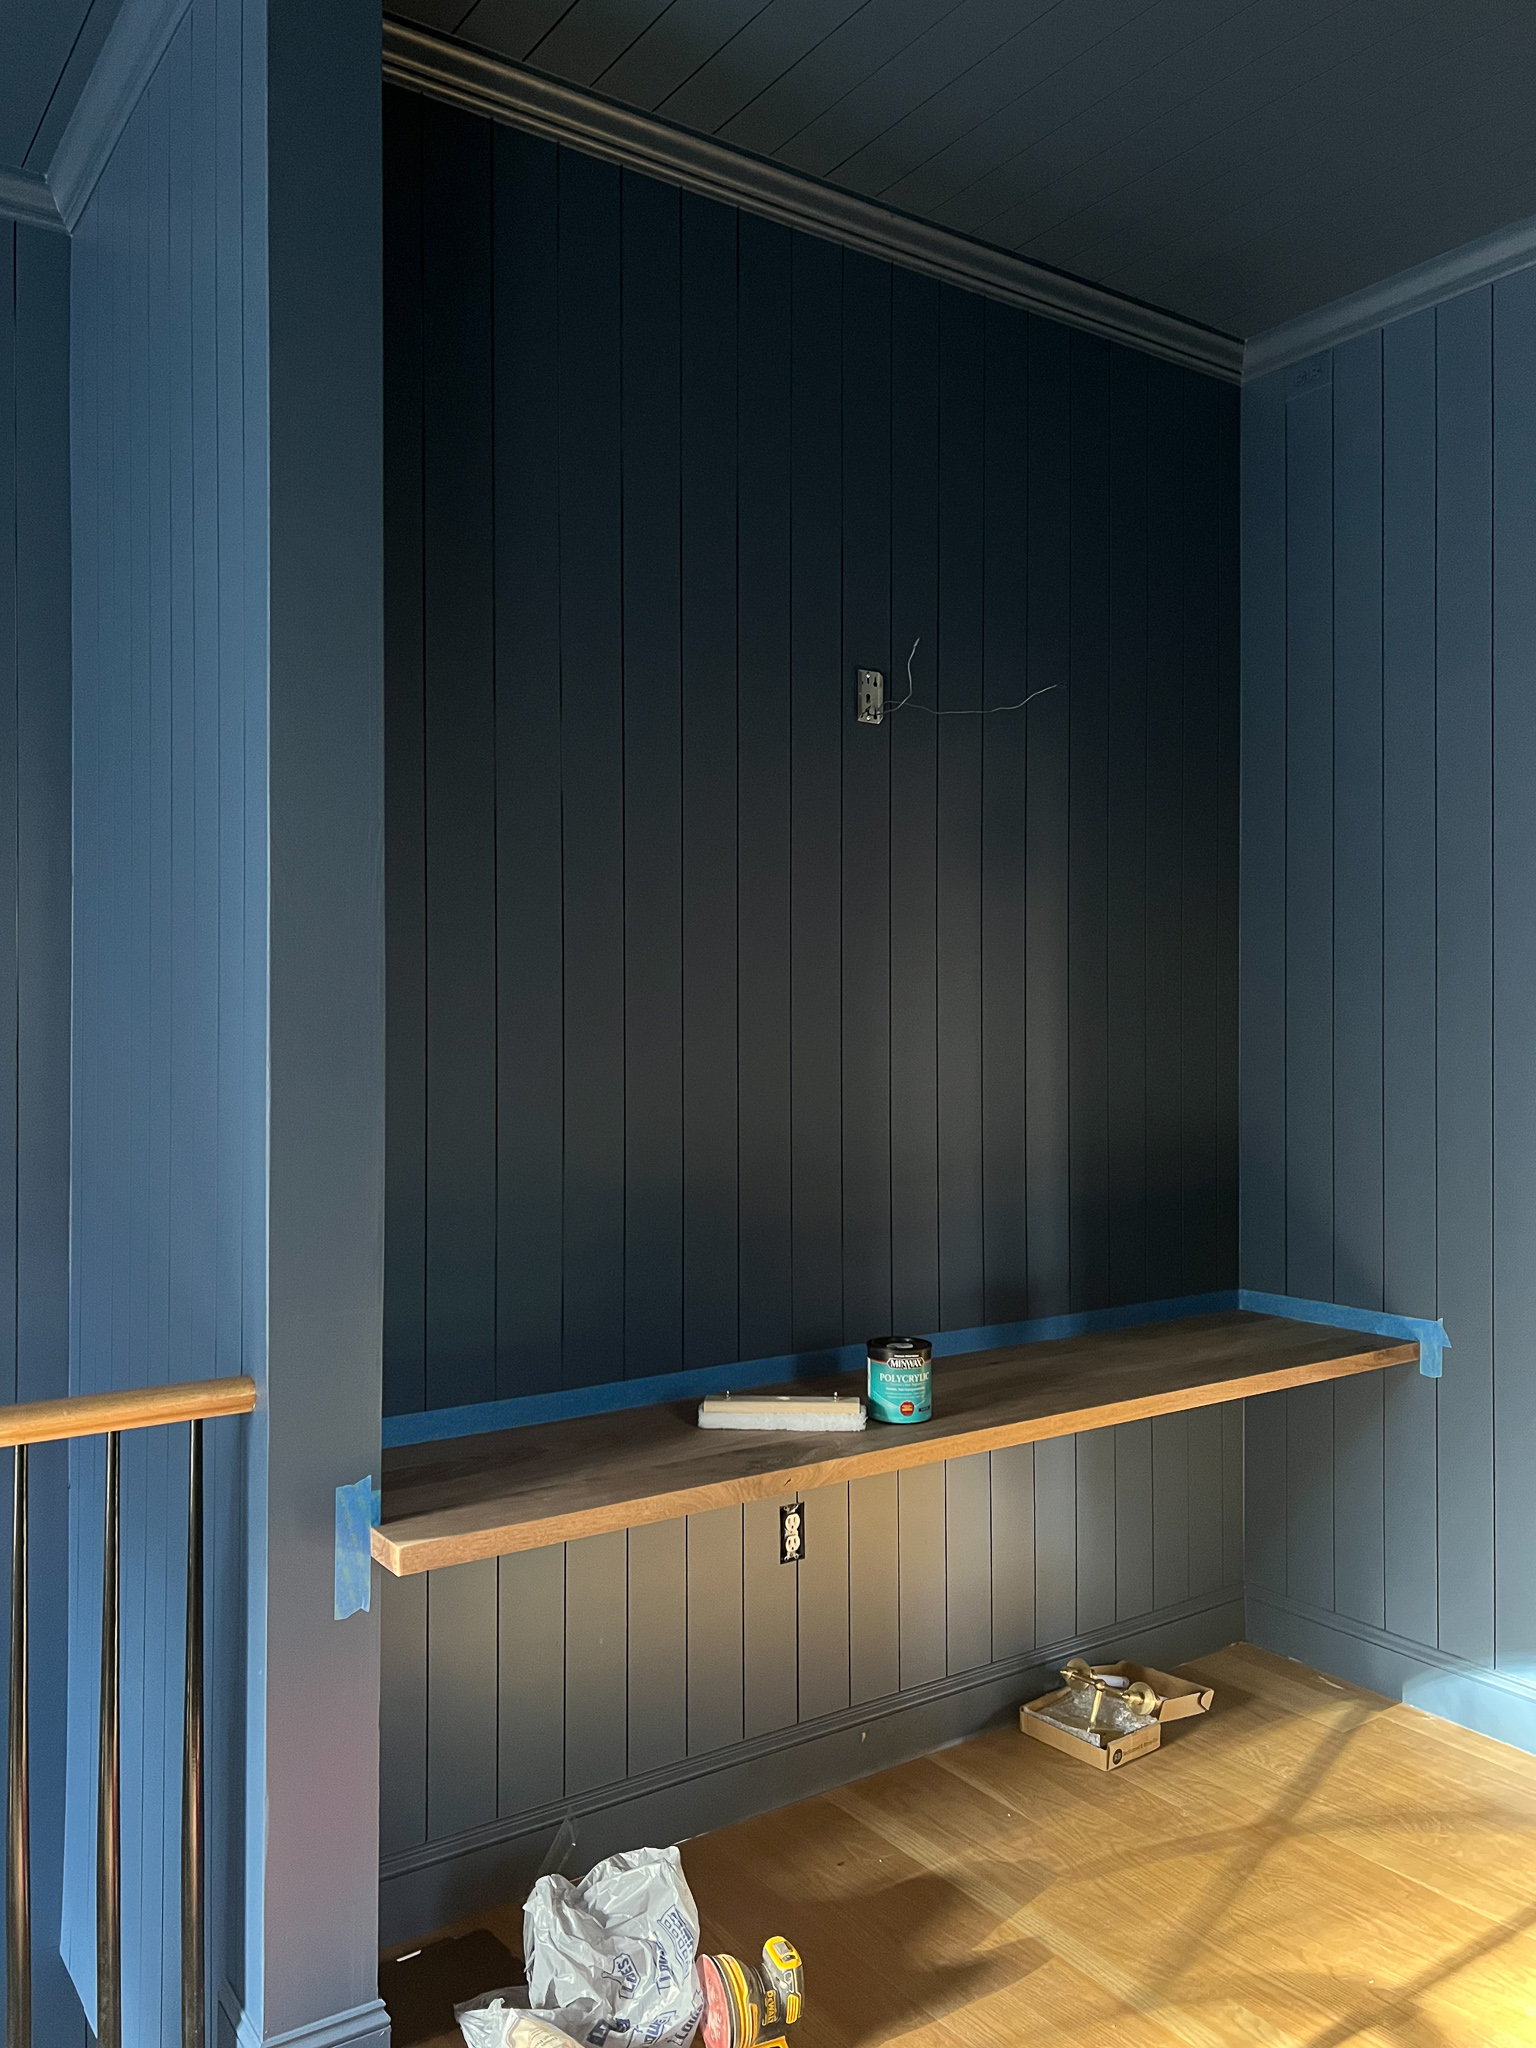
After building out the wall, we installed these heavy duty steel brackets to hold up the weight of the desk. Since these brackets will be mostly hidden (you’ll see), we installed them directly onto the studs for ensured security. Also, this is way more brackets than you need, but just in case I look down the hall and see a girl standing on the floating counter–I wanted my mind to be at ease.
Add some furring strips
Once the brackets are attached, we added some furring strips (those smaller pieces of wood), below and in-between the brackets. The furring is the same depth as the brackets (1/2″), which will allow the panelling to be installed overtop the lower brackets. Covering those vertical parts of the brackets with paneling will achieve the floating desk look we’re wanting!

Install the desk
We actually hired a local wood-worker from The Hardwood Store of North Carolina (that’s the real name!) to build the desk top! We gave him the dimensions and our specifications, and he built and delivered it to us! The slab of black walnut was $479 for an 84″x18″x 1.5″. The wood used is black walnut and has a beautiful richness and color to it when sealed–no stain required which is really nice for a desk especially because there’s no chance of scratching off the finish.


Attach the desk to the brackets
The brackets we used allowed us to screw directly into the desk. Just be sure the length of screw isn’t going to go through the other side of the desk!

Add the paneling & painting
Once the desk is installed, it’s time to add the paneling around the desk! In our case, we paneled this whole room. If you’re not adding paneling and don’t want to see the brackets below, you might consider covering the bottom half of the desk with beadboard, or a sheet of MDF if you want something flat.
We painted the entire room Farrow and Ball Stiffkey Blue, which is a beautiful true blue. I’ve done muted tones for so long, I really wanted this blue to be classic BLUE. It teeters between navy and royal blue and is such a beautiful backdrop to our bonus room, which is really a media room. It’s where we watch TV and the girls play on computers and we play VR as a family. We wanted a darker color, but this blue still has so much life!
Seal the desk
To prep for sealing, tape off the the surrounding walls so you don’t get any finish where you don’t want it! We applied 3 coats of Minwax Polycrylic in Clear Matte, lightly sanding with 220 grit sandpaper in-between coats. You want to scuff it up a bit to even out imperfections, and to allow a grippy surface for the next coat to stick to. The great thing about Polycrylic is that it’s water-based and won’t yellow over-time. We applied it using a stain pad, brushing in long, slow strokes. This will prevent any air bubbles from appearing.

We allow it to cure for a few days before we set-up the computers. Behind each computer, we drilled a hole and put in some cable grommets to thread the computer cords through to the plug under the desk to keep the countertop clear of wires.
The Upper Shelf

The lockers behind the desk area provide a lot of closed storage for bags, jackets, books and papers, but I wanted to put a traditional shelf on the wall for easy access to pens, markers and scissors and a few other supplies. This shelf was a lot more straightforward. I found these beautiful brackets on Etsy and wanted the shelf itself to blend in more with the wall so the walnut desk could be the star. We picked up a 1 x 12 x 8ft piece of paint grade pine at Lowe’s that we cut down to 10″ depth. Primed and painted the same color as the walls (Farrow & Ball Stiffkey Blue) and secured it to the brackets.
The desk is wide enough for three computers, but our youngest (4) doesn’t use a computer just yet and we’ll keep just 2 here until there is a need. Times have sure changed since I was in school (wow! how old am I?!) and I would say 95% of their homework is on the computer. But our girls are also really into computer games, too (scratch, prodigy, Animal Jam, etc), so I have a feeling this will be as much as a play station as it is a homework station…maybe more. Ha! Either way, having a space set up where we can all hang out as a family feels like such a gift for each one of us.

You can also peek into how we built in (and painted!) the girls’ lockers on the right side of the desk nook. We’ll share more of the bonus room soon–we’ve come so far! But I still have a big punch list of things to finish up and I want to hunt down to complete the room. However, last night, our family unwound here after dinner and finished or not, I could already tell this is going to be a memorable place for our girls and family.
Shop The Desk Nook


Hello! So obsessed with this space I think we are going to copy your shelf above our bar. Any chance you can share what size bracket you used?
Thank you for all the stunning inspiration – always excited to see what your trying out!
Thank you! This is a 7”
This is really gorgeous. I wish you would show the underside of the desk. I’d love to see how you handled the cords. I absolutely HATE seeing a mess of cords and am always looking for ways to reduce the visuals on them.
Can you link the paneling/shiplap? :)
You can find a direct link to what we used in this post!
This turned out GORGEOUS!!!! I am looking at the same Holborn lanterns over my kitchen island. I am having such a hard time deciding on size. Which size is this small or large? Also, about how tall are your ceilings in this room? This may help me determine the right scale for my kitchen island lanterns to have the right balance in the room.
This is the small and we have 10′ ceilings
Where are the chairs from?
They’re vintage!