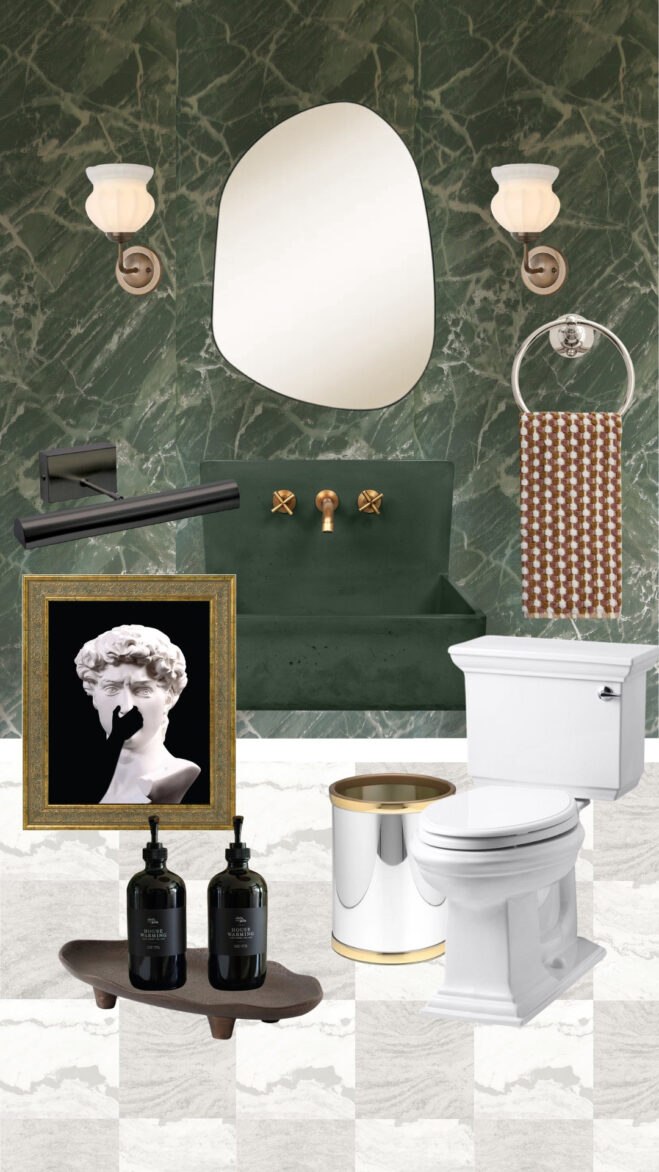
We’ve done quite a bit this year, but we wanted to share one last project we completed before signing off for the year: the upstairs powder bath in the playroom! We finished it! The project started for a silly reason because I really wanted to try Roman Clay somewhere in our house and I really prefer to try something in a small dose before committing to a large area. The small untouched bathroom seemed like the perfect candidate.

Shop the Playroom Bathroom

Before we started the small powder room, with just a toilet and pedestal sink, was stenciled with leopard print. (Even I thought it was wallpaper for the first few months we lived here!) The plan was to cover the existing floor tile with our new Lawrence peel and stick flooring from Floorpops and then paint the walls with a rich burgundy roman clay.

If you followed along in real time on Instagram, you know that we did things ALL out of order on this project, we had a good laugh over it. But the result is such a sophisticated glow-up, “all’s well that ends well” definitely applies here.
The order we tackled this room: Flooring, then walls, then swapping the sink and patching the walls (luckily the floors didn’t need patched). The order I’d recommend: Removing the sink! (Obviously, only if you’re going to replace it. Which we actually weren’t planning on replacing it, so I’ll throw us a bone there. But after we painted the walls, we realized how bisque the sink was and how much it truly didn’t match the toilet and we decided to replace it.) Okay, then I would paint the walls and trim. Then I would do the floors. Then I’d put the sink back.
We shared the process of applying the roman clay to the walls in this post if you missed it! It’s a beautiful color from Portola Paints called Meritage with a matching satin traditional paint for the trim in the same color. The depth and interest the roman clay brought to this tiny room is so difficult to capture on camera, but it’s truly breath-taking in person. I love it!

Sink Top | Pedestal Sink | Faucet | Light Fixture | Mirror (original to house) | Lawrence Floorpops | Towel Ring | Hand Towel | Brass Switch Plate
While the toilet was white, we truly didn’t realize how not white the sink was until the new wall color was finished. It was looking so yellow. I originally planned to skirt the sink to disguise it a bit, but we both agreed it would be best to just have the sink and toilet both white. And I’m so glad we did! It feels very fresh in here now and works a lot better with the new floors. We paired the new sink with a faucet from the new Studio McGee x Kohler line in polished nickel. It’s so stunning I wouldn’t mind using it in our primary bathroom renovation coming up!

We used our Lawrence peel and stick floors right over the existing tile in here. These are semi-permenant, meaning they can be removed, but it’s not easy. They come in a 12×12 size, but we thought it would be fun to try and cut them down to smaller squares and do a border. Even though they are very rigid tiles, you can cut them with a razor blade relatively easily. The only complication was getting them all the exact same size because any variance and the squares would not line up correctly. There were a few bumps in project, but once we figured out the best practice it was pretty straightforward. (Let me know if we should do a whole post on this!)

I love mixing metals, so I brought in brass with the waste bin (I’ve had it for years) and switch plates and kept the plumbing, light fixtures, towel ring and toilet paper holder in polished nickel. Polished nickel has a warm undertone so it pairs so nicely with brass. Unlike Chrome, which has a cool undertone.


I hung a black and white striped hand towel to tie into the floors and the original oval mirror, along with two pieces of art I had on hand. It was a small makeover in a small room (that ended up being a little more work than we initially thought–ha!), but we’re so pleased to check this space off our list and use it over the holidays!!


Where did you source the gold frame for the Diana Brambila floral print?
Question – I really want to do a bold color like this is one small half bath. But what do you do with the ceiling? I didn’t see any pictures including the ceiling. Is it the same deep burgundy color? Thanks! This turned out lovely
We did the whole thing in the same color!
The walls look like suede and I adore it! another great job CLJ 👏🏼
Hi! What a fun (and easy?) transformation! Can you feel the old grout lines beneath the new tiles? We have a bathroom with 4″ tiles we’d love to convert to 12″ but worry about the floor feeling “bumpy”. Thanks!
It’s lovely. I would have a hard time not stroking those walls every time I went in. They look like such a soft suede!