DIY

New Floors at the Fullmer Kitchen Reno!

May 1, 2019

We believe we should all love where we live.

We’re a couple of homebodies, working to uncover the home our home wants to be. And we’re so happy to have you here. 

Portfolio

Projects

Design

We're Chris + Julia

read more

What we're                   right now

Loving

browse the shop

Befores, afters, mood boards, plans, failures, wins. We’ve done a lot of projects, and they’re all here. 

We have a long-standing relationship with DIY, and love rolling our sleeves up and making it happen. 

Even when you don’t want to rip down a wall, you can make that space in your home better. Right now.

browse all

browse all

browse all

02

01

03

Popular Posts

1.

2.

3.

Top Categories

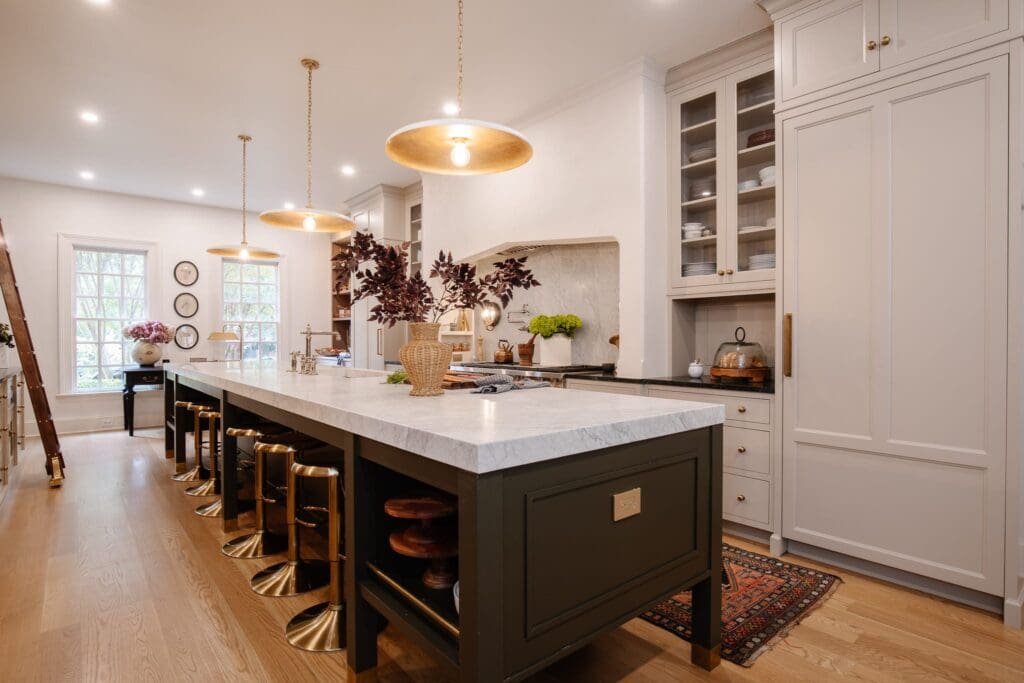
The new, engineered wood floors, from Stuga Studio are in at the Fullmers and we’re all in love. We ordered a bunch of free samples from Stuga to compare them with the cabinet fronts we had chosen and pick a good coordinating one. We originally landed on Oak Portofino, but it was backordered a little too long for our timeline. So we ordered another round of samples and fell for their Oak Muse at just $5.75/sq ft. (we needed about 550 square feet).

The 5″ wide boards are timeless, incredibly smooth with a matte lacquer finish that eliminates most of the glare. The muted grey-white tones in this oak floor have so much character, I already want to use them again and again.

The home’s original kitchen flooring (that tested positive for an asbestos underlayment) couldn’t be disturbed. It was already under a few layers of flooring that made the kitchen and living room floors uneven. To even them out, we had to add plywood sub flooring to the living room area and then a thin layer of luan over all of it to make it extra smooth and even out the transitions.

If you missed last week’s update filled to the brim with tips on installing an IKEA kitchen, you can go back and read it here. We installed the flooring right up to the cabinet legs (once the toe kicks are on you won’t be able to even tell!), but through the area where the range, dishwasher and fridge will be since those areas are more open.

We rolled out this underlayment first and then the install process of these floors is relatively easy. They lock togeher really tight. In fact, Stuga says you could hang a car from them–the gaps are so tight. You can float, staple, or gluing them down. We thought we were going to have to float them due to the asbestos, but because of the sub-flooring we added, we were able to use 3/4″ staples (driven right into the lip of each piece) so the flooring is very secure.


The end result is an absolute dream! It’s warm but neutral. And smooth And even! For the first time there’s not a significant difference height difference between the spaces which has really unified their home. We have countertops and cabinet fronts on their way (and then we can tile the backsplash!) and appliances will be here next week!

Leave a Reply

Your email address will not be published. Required fields are marked *

This site uses Akismet to reduce spam. Learn how your comment data is processed.

What do you think?

  1. Lucy says:

    These floors are gorgeous. Why do the boxes of flooring say Kahrs and not Stuga? Are they the same company.
    Thanks.

  2. Alexis says:

    Love this! We are considering a kitchen reno that likely will require that we refinish the hardwood floors.

    Do you know if it’s possible to install something like what you did in this example ON TOP OF the existing hardwoods? Or would we have to rip it out? Just seems easier to do this than redo the existing, super narrow plank hardwoods from the late 60’s…

  3. Shaun says:

    Hi Chris and Julia,
    I love your ikea kitchen blogs! We are going with ikea cabinets for our kitchen remodel, and was hoping you could help answer a few questions I have about how you did the flooring and installation of the cabinets. We are choosing a floating floor with vinyl planks, so we can’t install the flooring under the cabinets, correct? How did you accommodate the height of the flooring to be able to slide the appliances in and out w/o being trapped: Did you add plywood under the cabinets to make up the height difference or just twist the ikea legs longer than 4.5″? And what height did you hang the base cabinet rails at? Is it still 34.5″, or do you go higher to accommodate the flooring being added? I’ve also been debating on whether I should build toe kick bases or use the ikea legs. We have a pony wall that the base cabinets will butt up to for a small section, and don’t know if it will be strong enough to support the base cabinets with the rails. What’s your personal opinion about the ikea legs vs wooden bases? I really appreciate all the wisdom you guys have shared, it really does help! Thanks

    • Julia says:

      We added flooring under appliance, just not under cabinets. We hang the base cabinets at a height to accommodate a 5″ toe kick so we didn’t have to cut it down at all. For the island we build a base, but for the perimeter cabinets we used the suspension and legs

  4. Jen says:

    Hi Chris & Julia!
    Those floors are gorgeous! And I saw your home is off the market, congratulations! My husband and I are renovating an old home in the ISU neighborhood…. just a few towns away from you, thanks for all your diy inspiration! These floors, did you install them? We’re picking flooring and debating on options of wood type and installing. Thanks!

  5. Rachel says:

    Beautiful work!! I’ll be doing a similar project soon, but likely with a floating floor, and I am unsure what to do at the base of the cabinets. Did you go right up to the cabinet leg (I’ll also be using the IKEA legs), or did you leave a small expansion gap? I tried looking at the pictures but it’s just too hard to tell for sure. Thank you for always putting out such great (and relevant) content!

  6. Joanie says:

    I’m so glad you went with a 5” hardwood. When we renovated our home and were looking to do the entire house, the flooring store said that if we went with anything wider than the 5”, they could not guarantee it. They said anything over 5” can be prone to “cupping”. So, we went with the 5”. Then in magazines I’m seeing all the 7-10” in hardwood (or I think it’s hardwood) and kind of regretted it, even though I still like my floors. Have you ever heard about this cupping thing? These are hardwood floors, not engineered floors.

    P.S. Love your site/posts and following your journey!

  7. Heather says:

    A little nervous about the fridge situation in these progress shots. Is that the fridge that will be used? Is it going to stick out like that with gaps on the sides and top?

    • Julia says:

      No, no, no! Haha, I should have probably addressed that. This was their old fridge that is extra small because their old cabinets were so low. New fridge on the way that will fit in seamlessly!

  8. Claudine says:

    Oooooo…that floor is gorgeous!

  9. Jenni Shaver says:

    I love these floors! They are beautiful. How will you go about addressing the height difference when you get to the door jams? We did something similar in our house, but due to the extra height, I have no room for entry rugs by the doors. Do you plan to raise the jams and trim the door?

  10. Lauren says:

    This whole space is gonna be amazing! Love the floors!

  11. Sara says:

    I have really enjoyed following along on this reno as we are having to do a lot of the same in our own home. Thank you so much for sharing. Wondering what size plywood subfloor you went with here?

    • Chris says:

      There are several layers, where we needed to raise parts of the floor to match and couldn’t rip up parts because of asbestos flooring. There’s plywood, then particle board, then OSB and 1/4in luan.

  12. Jill says:

    It looks SO good! So excited to see you guys do another IKEA kitchen. You guys have given us the confidence to undertake our own IKEA kitchen hopefully sometime in the next few months – eek!

    Do you happen to know what paint color the Fullmer’s used on their walls? Thank you!

    • Chris says:

      Not sure what the gray was, but they just painted over it using the same color as our Master bedroom – BM Olympic Mountains.

  13. Linda says:

    What is the durability like for stains and scratches etc?

    • Chris says:

      Each species is a little different, but most of their flooring is oak (this one included) which is a hard wood and holds up really well.

  14. Hayley says:

    I’m into these floors; they are similar to the waterproof/scratch proof Mohawk Revwood plus elegant craft (color Sandbank Oak) but they may be too pricey for our new build. Is the $5.75/sf all in (time + materials) or just material?

  15. Miranda says:

    Hi!

    We’re shopping for flooring to update our 1930s farmhouse! Is there a reason you wanted to secure the flooring vs. letting it float? I’ve had experience previously installing laminate flooring, but have never secured using staples – i’ve always let it float. This kitchen remodel series absolutely could not have come at a better time for us. We’re learning so much! Thank you!

    • Julia says:

      Floating floors are a great solution in so many cases! And would have worked fine here, but if given the option to secure it down with staples (it’s so easy to add that extra step!) I always recommend it so that the floor is more secure. There are places in a floating floor where you can sometimes feel a bounce.

all the latest

We believe we should all love where we live.

We’re a couple of homebodies, working to uncover the home our home wants to be. And we’re so happy to have you here. 

HI! We're Chris + Julia

read more

Load More

Reader Faves

SHop all

What We're                     Right Now

What We're                 Right Now

Looking for our favorite things? A place to shop our home room by room, or just catch up on what Julia's wearing / loving right now? Browse the CLJ shop. 

Loving

looking for inspiration? 

A reader recently asked me if I’m starting to fully embrace traditional style and whether we still consider our house to be a “modern Colonial” and why. It was a really great question and so timely — I had really just been thinking about my approach to this home and how my style has changed […]

Can We Send You Our Love Letter?

Another way for us to stay in touch! Joining our weekly newsletter gives you access to exclusive content, never-before-seen photos, your questions answered, and our favorite DIYs. Sign up below!

Follow Along on Instagram

Welcome to our online community where we've posted home, DIY, style, renovations, and family since '09. Renovating our #cljmoderncottage in Idaho and headed for new adventures in Raleigh, NC. #cljfam #cljtransformations

@chrislovesjulia