Drilling into freshly laid tile is a little bit scary, even for seasoned DIYers like us. In fact, last year after we finished the girls’ bathroom, we thought we’d bypass the whole project and just put a tension shower rod up and call it good. Fast forward and every two weeks since finishing, we were dealing with a rod that would come crashing down! Eventually we decided, a shower curtain is always going to live there–might as well make it permanent. Here’s how we did it!
We bought this Moen Shower curtain rod (in chrome) for about $20 and you buy the flanges separate (here) for about $7. $27 total is a steal for the minimalist and slightly utilitarian design.
1. Find the right height.
We had purchased this extra long shower curtain from Restoration Hardware, so the first thing we did was hold the curtain up to mark an appropriate height. Since it’s a bathroom, we opted to hang it about 3″ from the ground.
2. Mark and drill the holes.
Drilling through tile is a bit tricky. Chris uses a hammer drill with a masonry bit. Some have said they would worry that the hammer action is too aggressive, but Chris promises he has found the opposite to be true. The drill does most of the work so you end up pushing on the drill with a lot less force. Do what you feel comfortable with, but I’ve never had a tile chip on me when using a hammer drill to make holes (and I’ve done it a lot).
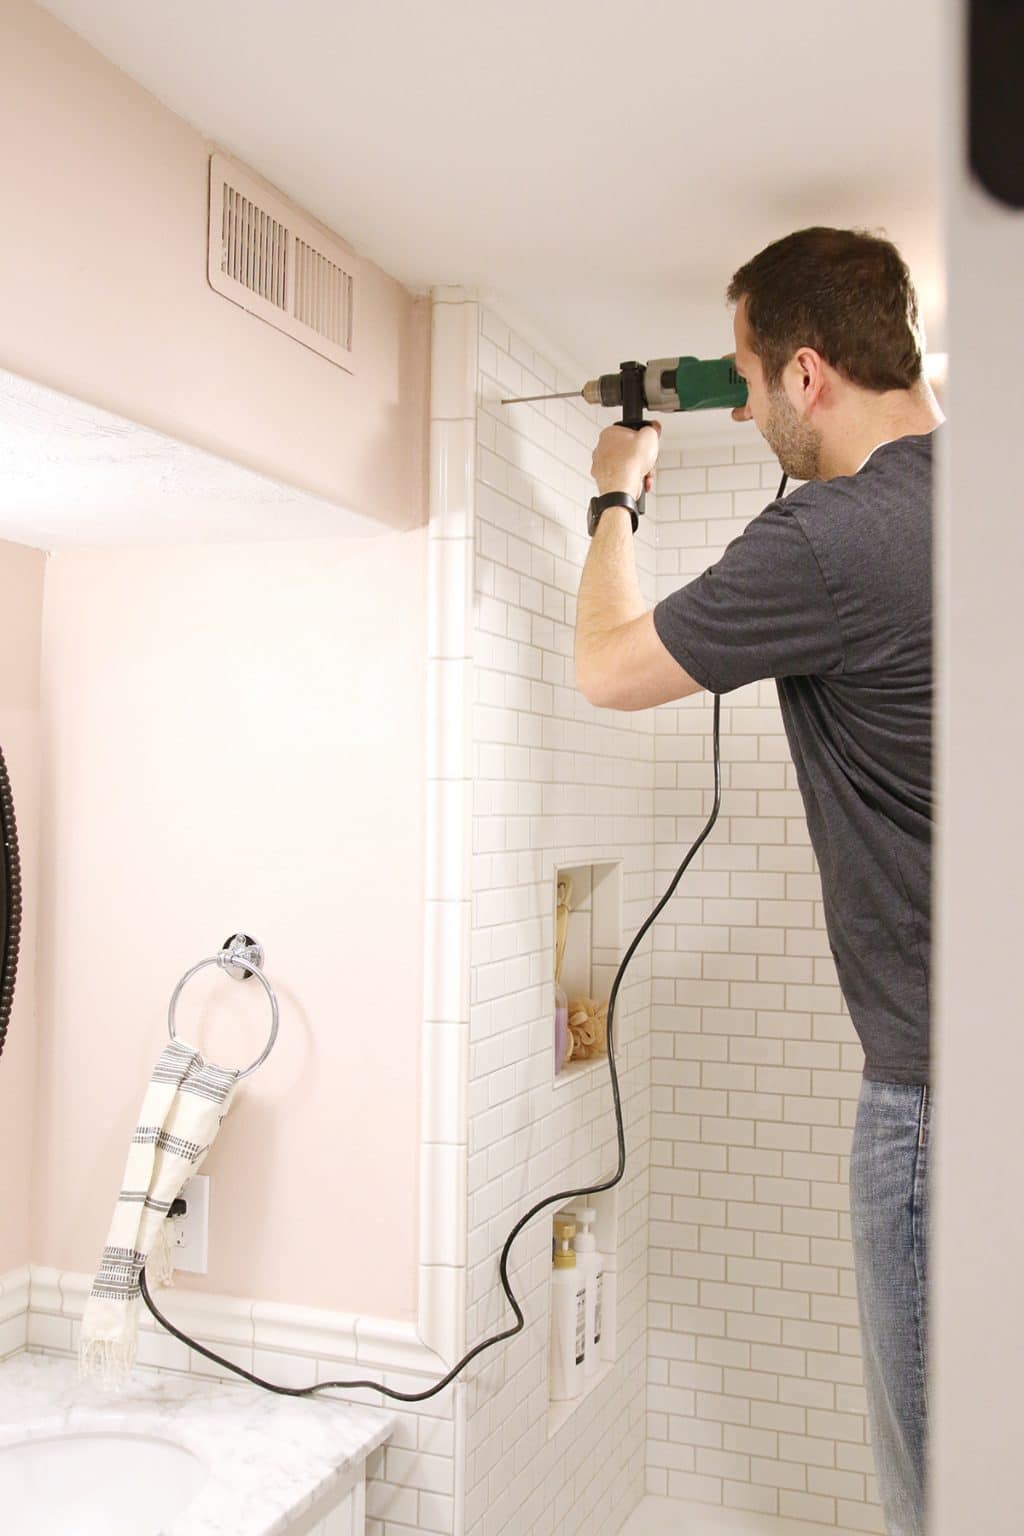
3. Measure the space and cut the rod.
If you have a standard 60in tub, your rod will likely be a bit too long. Measure the space, mark the bar and cut it using a metal-cutting blade on a miter saw or angle grinder.
4. Mount the end supports and hang the bar.
Mount one end support first, slip the bar into that side, slide the other bracket onto the opposite end, then raise the bar into place and mount the second support.
This was one of those tasks that was hanging over us, and only took about 30 minutes to execute once we got the rod in! And now it’s not going anywhere which gives us a lot of peace of mind when it comes to our girls bathing in here. Hopefully this gives you some confidence to do something similar in your home!
Check out their full bathroom reveal right here!
And here are all the sources:
Wall Color: Farrow & Ball Calamine
Double Wall Sconce: Schoolhouse Electric
Single Wall Sconce: Schoolhouse Electric
Mirrors: Target
“Mask” by Jennifer Ament: Serena & Lily
Sink Faucet : Delta Faucet
Faucet Handles: Delta Faucet
Towel Bar: Amazon
Shower Head: Delta Faucet
Shower Curtain Rod: Amazon
Towel Ring: Amazon
Toilet Paper Stand: Amazon
Drawer Knobs: Rejuvenation
Tub Spout:Delta Faucet
Shower Valve:Delta Faucet
Cabinet Pulls: Rejuvenation
Toothbrush Holder: Pottery Barn
First Aid Box: McGee & Co
Bath Towels: Target
Basket: McGee & Co
Hand Towel: McGee & Co
Subway Tile: Wayfair
Floor Tile: Cle Tile
Vanity: Wayfair
Linen Closet: Pottery Barn
Soap: McGee & Co
Brushes: McGee & Co
Striped Linen Tray: McGee & Co
84″ Shower Curtain: Restoration Hardware
Over-The-Door Hook: The Container Store
Stool
Grout: Warm Gray
Tile Chair Rail
Our wood grain Shaker cabinet fronts were designed for busy, high-traffic homes like ours. Clad with durable textured thermofoils, this line is compatible with Sektion, Akurum, Godmorgon, and Besta cabinets from IKEA. It's the perfect, practical way to add the warmth of wood to all the rooms of your home.
We have teamed up with Loloi to create a line of rugs that are as affordable as they are beautiful. This collection houses a great mix of traditional and modern rugs, in cottage-y colorways, as well as vintage-inspired beauties that you’ll want to roll out in every room.
We partnered with Stuga on a line of hardwood floors — The Ingrid is really livable, and the color is very neutral. It doesn’t lean warm or cool, it’s that just right in-between. We have really loved putting it everywhere in our house. It’s the best jumping-off point for design, no matter your interior style. In addition to being beautiful, Ingrid is really durable — we have three kids, and we always have a home construction project going on. Ingrid stands up to it all.
SHop all
Looking for our favorite things? A place to shop our home room by room, or just catch up on what Julia's wearing / loving right now? Browse the CLJ shop.
Befores, afters, mood boards, plans, failures, wins. We’ve done a lot of projects, and they’re all here.
We have a long-standing relationship with DIY, and love rolling our sleeves up and making it happen.
Even when you don’t want to rip down a wall, you can make that space in your home better. Right now.
We recently painted our study a dark, moody green color. This is after we first painted it a muddy green, then repainted it a blue-gray. I guess what they say is true; third time’s a charm! The journey was worth it, though, because I’m so in love with this glossy green in contrast with the […]
We've been doing this since 2009 and we've posted a whopping 24145+ blog posts and counting. You might need a little help searching, huh?
Another way for us to stay in touch! Joining our weekly newsletter gives you access to exclusive content, never-before-seen photos, your questions answered, and our favorite DIYs. Sign up below!
Welcome to our online community where we've posted home, DIY, style, renovations, and family since '09. Renovating our #cljmoderncottage in Idaho and headed for new adventures in Raleigh, NC. #cljfam #cljtransformations
Links
Get Around
Make yourself right at home
Portfolio
Design
Casual Friday
Projects
Lifestyle
Gift Guides
All Posts
Shop
Is this rod straight or slightly curved? I ordered the same model, but on build.com, and it has a subtle bend to it. Thanks!
Ours is straight
What did you screw into? Were you lucky enough to screw directly into a stud? Did you use a wall anchor? What kind?
We just used a simple plastic wall anchor.
Why not turn the end brackets to were you still holes in the grout lines instead of the tile
It’s not as strong. Grout is basically sand.
Also, you can sometimes pop tiles out doing that if the screw is even the smallest bit larger than the space between tiles.
Ha! Maybe I should be worried because I bought the tension rod you guys linked to in the reveal! At least now I know what “permanent” rod to get if the tension rod fails.
We had a tension rod in the shower in our last house and it didn’t fall down once the entire time we lived there! Maybe they just don’t make them like they used to. :/
We had the same issue with the tension rod in our guest bath falling every few weeks- the walls of our builder grade home are definitely not straight : ( We decided to use support brackets on either end that are mounted to the ceiling. It felt like a safer choice in case we wanted to change the shower curtain length down the road or switch to a glass enclosure. And the thought of drilling into our new tile is enough to make me break out into a cold sweat :’D
Perfect timing – I actually have plans to hang a shower rod this weekend!
Thank you.
Thanks for the tips! I’m looking to cover wall-to-wall windows in my girls’ room with blackout curtains to help with light leak from the shades…but I’m having trouble finding the right hardware. Do you think something like this shower bar with inside mounts would work? Or is there an easier solution I’m missing? I thought if mounting the curtain bar on the ceiling but it’s concrete and we don’t have the right drill bit for that. Thanks!
We used a ceiling mount curtain rod for our daughters’ room and it worked like a charm!
Do you own or rent your hammer drill? We’ve rented one once and I’m curious if it’s worth it to just buy one vs renting. Same question for a tile saw- do you own one or rent it?
We own, but we use it all the time! And when we use our tile saw too (all of our wood floors upstairs are actually faux wood tile). But I think it’s really smart to assess if it’s something you may only use once or twice and then renting is the way to go. The other positive about renting is you likely get a higher quality tool that might have been out of your budget.
Why did I not know this was even an option?! I’ve never had a problem with the tension rod in our master bath, but the guest bath is another story. Every once in a while it will go through a phase where it falls a couple times a week. SO ANNOYING. Definitely going to look into this for our home!
What kind of shower curtain liner do you use? I have tried to find a good fabric one, but they tend to get yucky even after washing them. Thanks! Love the bathroom! Perfect for growing girls!
We have a clear plastic shower liner. It’s just a standard 72″ one.
Haha – still laughing about your wedding photos – too funny! What if a photographer was asking for those poses now – you would be like “Don’t think so”
He took our engagements, too. ????????♀️
This is so feminine and sweet, but something they can really grow into. I love that it won’t look dated and they won’t tire of its overall design. Need to do the same for my boys’ bathroom. Did you keep/use the original countertop that came with the Wayfair set?
Yes, but we got different hardware on the doors and different faucets/handles.