Yesterday Jules mentioned a little surprise we discovered at the cabin that really ended up making the entire FrogTape® Paintover Challenge™ project and this post is about that incredible discovery. As a reminder, here’s a look at the space we’re doing.

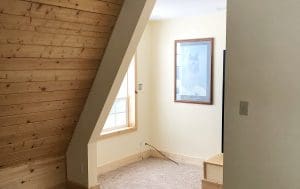
As we’ve worked on this project, we discovered a couple things about this cabin. First, the nook is actually where the stairs leading up to the loft used to be, with a wall on this side of the beam in the picture above (covered with sheetrock). The window was actually added on at some point. We discovered this when I was taking out the can lights with the plan of putting a small chandelier in the middle of the space. After getting the first can out, I poked my head into the hole to see where the floor joists fell (to plan for wiring) and this is what I found (apologies for a couple of blurry pictures – they were taken before the ceiling came down and the camera had trouble focusing):

The sheetrock was a drop ceiling, covering up a small area where the roof peaked and was partially paneled. It looked like the original plan was to panel the entire area and have a light above the window, but for some reason (either time or being unsure how to handle the varying ceiling heights) they changed direction and covered it all up. But we knew this area needed some “cabin character,” and incorporating this slightly vaulted ceiling above the reading nook was the only way forward in our eyes.

After taking down the sheetrock, we found that only a portion of the ceiling raised. The rest was brought down by floor joists, which weren’t going anywhere because they were supporting the loft above. On one side of the vaulted area, the ceiling also angled with the original slope of the a-frame roof, creating a nice landing place for all the dust you can imagine (blurry picture 2).


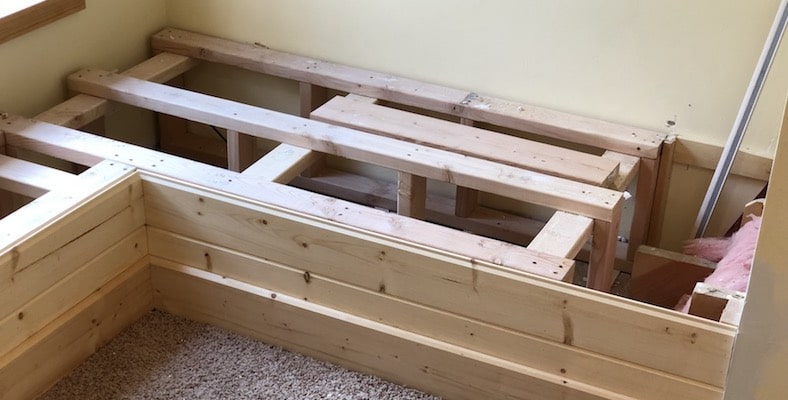
In order to help the nook ceiling feel cohesive we decided to frame out both sides of the vaulted area so they were straight, and panel both the vaulted and dropped areas. In order to do this I first reinforced the support beams with joist clips (for my own comfort) and added some nailers to the vaulted area. Since these weren’t structural but just to attach paneling to, there were no real conventions to follow, just making sure there was sufficient support behind the paneling.


I then paneled the dropped area and vaulted area sides, and built out a faux beam to transition between the sheetrocked ceiling and the paneled ceiling. The beam was just two 2×4’s stacked, screwed into the joists in the ceiling, and surrounded with the same pine paneling.


Our plan was still to have a chandelier, but now we wanted to hang it down from the vaulted area. Since there was no light box I made one using some paneling remnants and a junction box.


After running the wire to the junction box and attaching the whole thing to the ceiling, I mitered some smaller pieces of paneling and added them to the peak to hide the electrical wire and add some symmetry. If doing something similar in one of your spaces, be sure to take care not to shoot any nails into your wire – that’s how houses burn down. I used short brad nails, angled toward the sides, away from the wire.

I also applied some cove moulding to all of the seams and some small crown to transition from the sheetrock to the vaulted area, then turned my attention toward framing out the bench seating in the nook. I made the structure of the bench using 2x4s, then put them in place.

One thing about building a house on the side of a mountain – you get a lot of shifting in the first few years, and you can end up with some pretty uneven floors in places. This nook is one of those places. So I shimmed the bench as needed until level, and attached it directly to the floor with construction screws.

I then added paneling to the front and reattached the original baseboards I had saved from this area during demo. You can see the original stair supports poking through the wall on the right. We built the bench to be flush with the top of where those come out of the wall, then ran plywood across the whole top to create one structure.


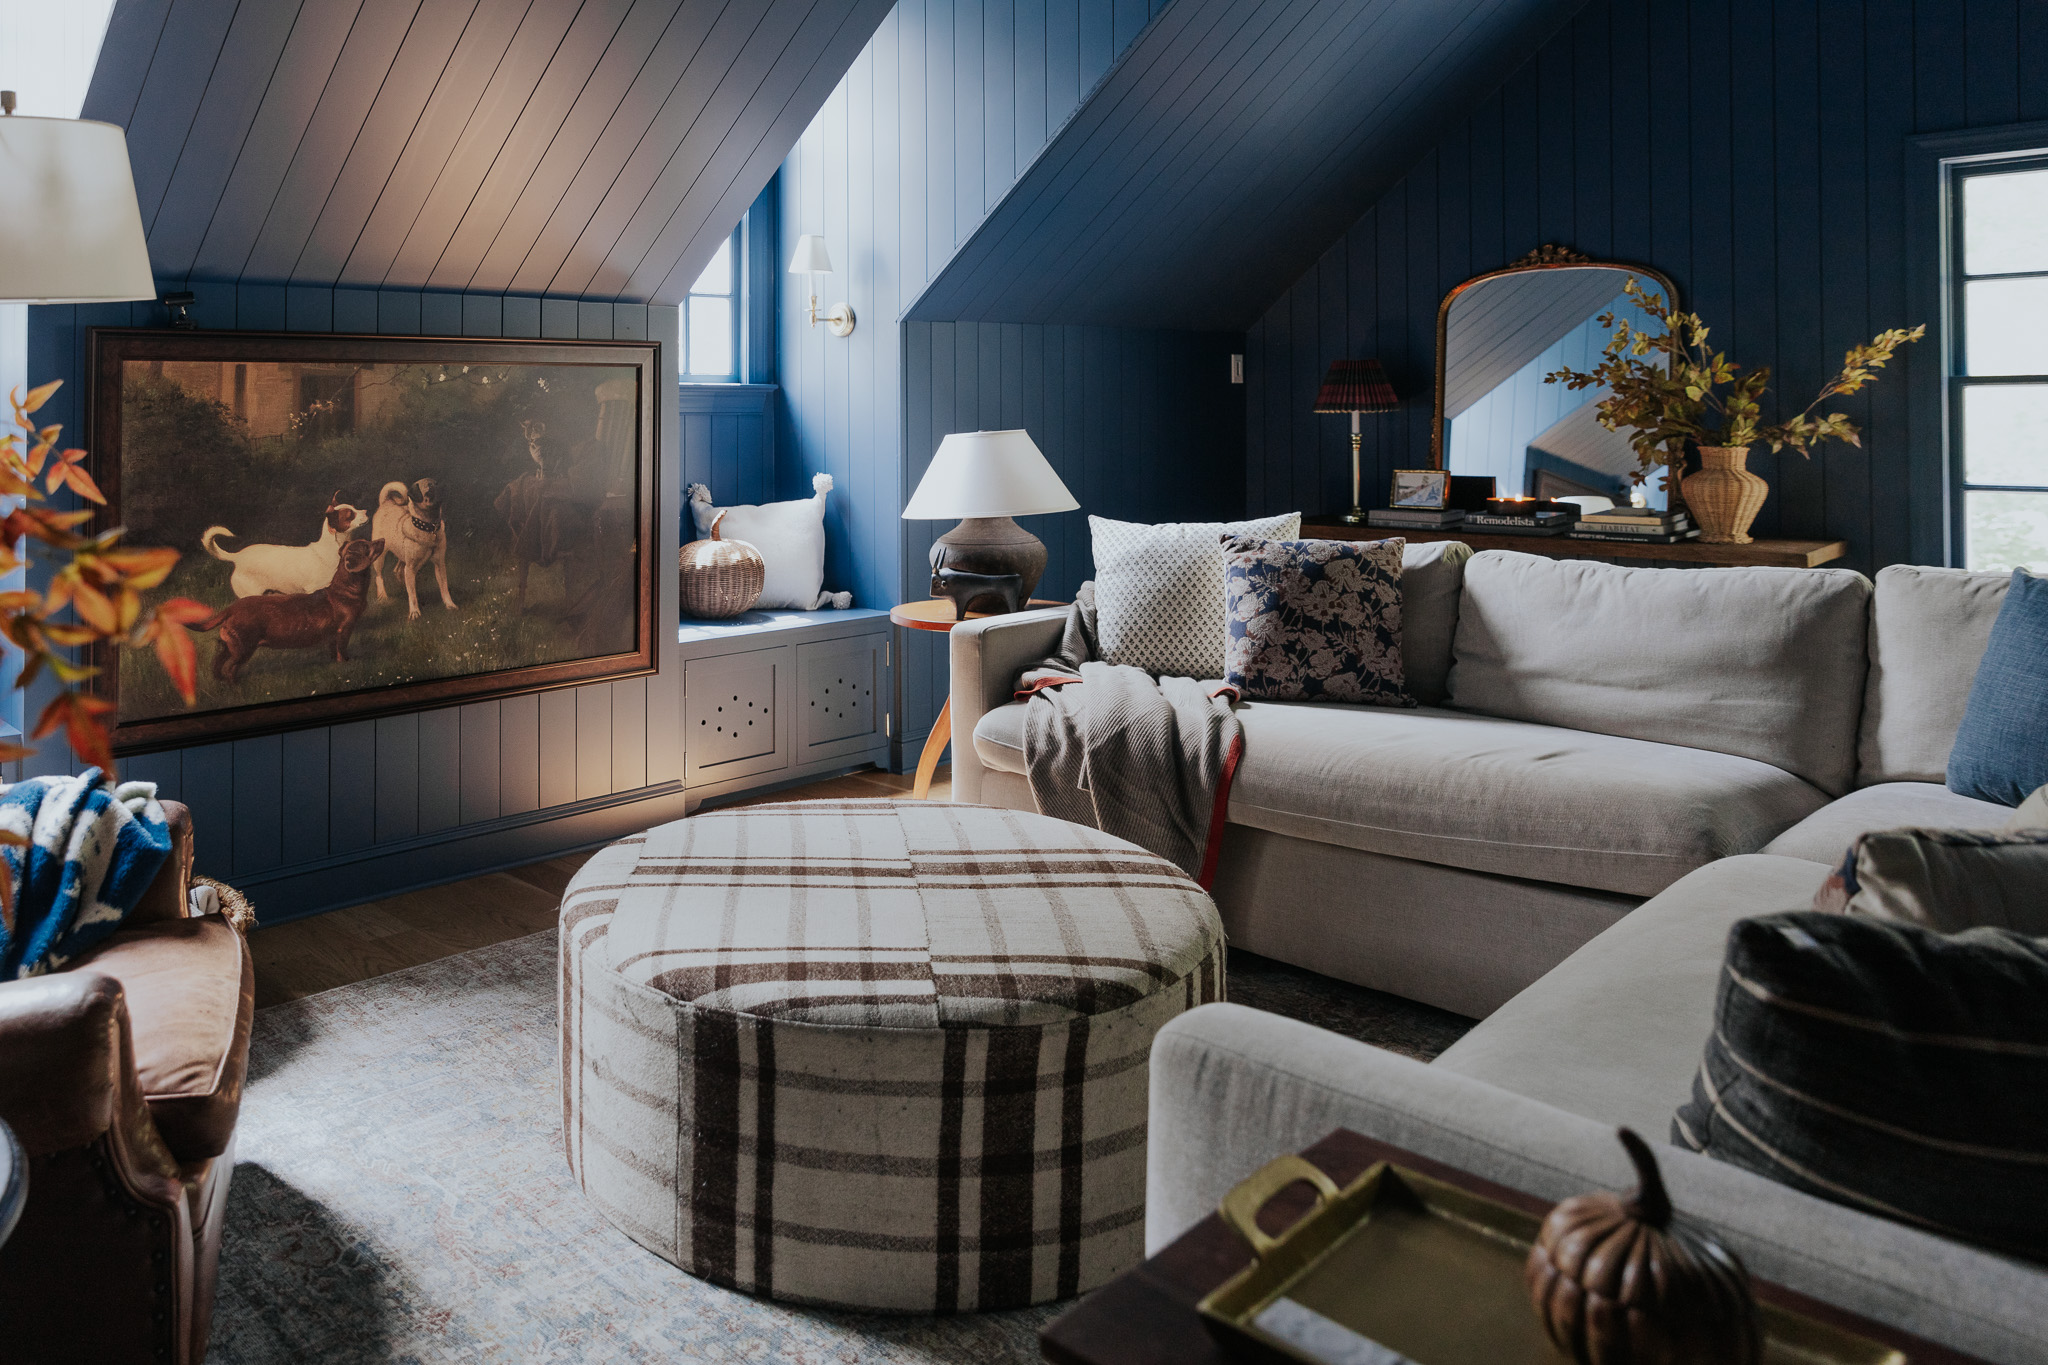
The construction elements of this space I think are my favorite, because they really add so much character, as well as function. This space was essentially nothing before. Maybe just a place to put stuff so it was out of the way, or you could go stand at the window for a minute and look outside. But by creating this bench and finishing the ceiling the way we have, it’s now an actual place we want to spend time. And while you’ll have to wait until Monday to see other details (like adding the shelves and how amazing the paint job turned out), I think this already shows such an improvement in this tiny area, and really gets us excited for the cabin improvements we’ll be making in the future.
Full product list and cost breakdown will be shared in our final reveal post of this space.


I love it already! What a great way to take a sort of awkward little nook into a space that feels like an intentional design choice…somewhere you could sit with your coffee in the mornings and enjoy the view. Curious if it’s an east-facing window – can you see the sunrise?
It’s actually north. But the decks face east which is very, very nice.
With the window seat there now, I’d definitely recommence adding some sort of child proof locks To that window, limiting its ability to be opened fully. We have casement windows near window seats and there’s a large drop outside, so we had window limiting locks put in.
That’s a great idea!
Total newbie question since I’d love to add a window seat in my son’s room but scared with changing the carpet… Do you just carefully remove the baseboard, pull back the carpet, cut it to fit the new area, staple?? it back into place, and then add back the baseboard?
I first measured out on the carpet where the bench would be, then cut it with a razor blade knife and pulled the carpet out. Then, I carefully pried up the tack strip around the edges of the wall and nailed it into the floor underneath the new edge of the carpet, and pushed the carpet onto it. Then built the bench and added the original baseboards to the front of the bench.
Loving where you are taking this area! So clever and I cannot believe you found such an amazing ceiling hidden away!!! I mean!!! What a great spot to take in the gorgeous scenery!! Any idea why the moved the stairs to its current location?!
Can’t wait to see the reveal!!!
The stairs now kind of wrap around the fireplace in the living room instead of running into the wall, so I get it.
Looking good – I like how you resolved dealing with that staircase issue.
Just curious about the gun safe. Since you mentioned seeing animals and your place seems to be remote, did you just move it to a less obvious spot? You may not be interested in having a rifle around, but with little kids, it seems that having a safe spot, even to store other items, would be a good thing.
That thing must have been a heavy pain to remove as well as move to another location!
We currently still have the gun safe, just moved out of the way. We have seen a lot of bear tracks, but for now, are stocking the cabin with bear spray.