Everything You Need To Know about Using Semihandmade Fronts with Ikea Cabinets (And our Cove Line in the Fullmer Kitchen!)
May 22, 2019


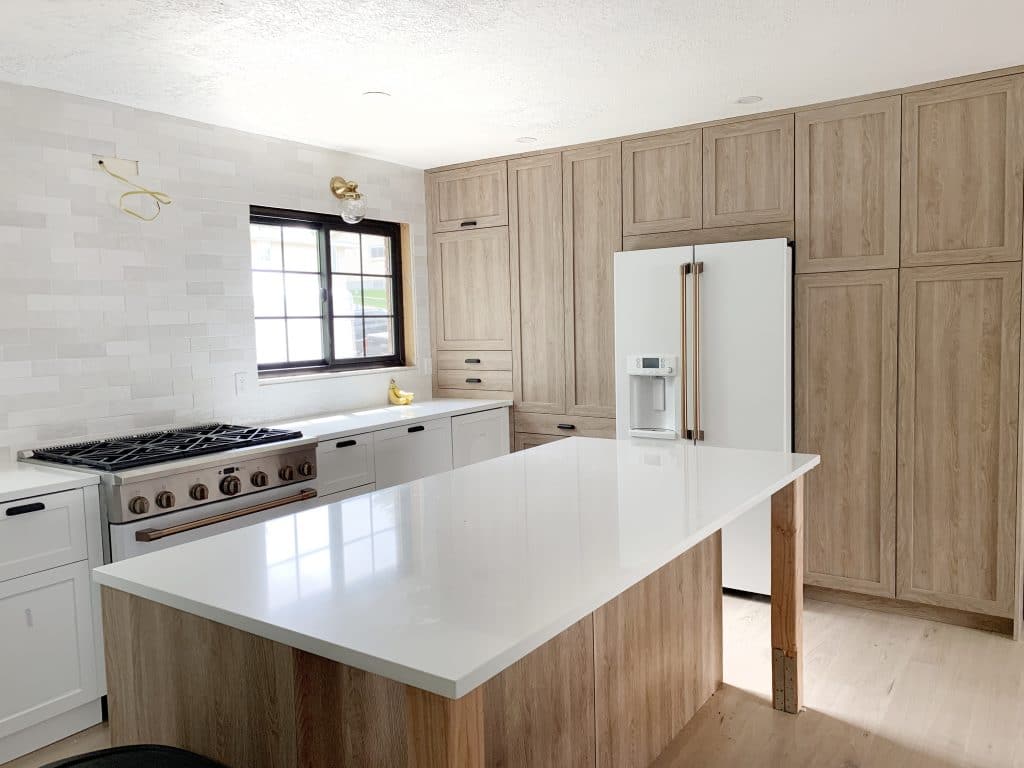
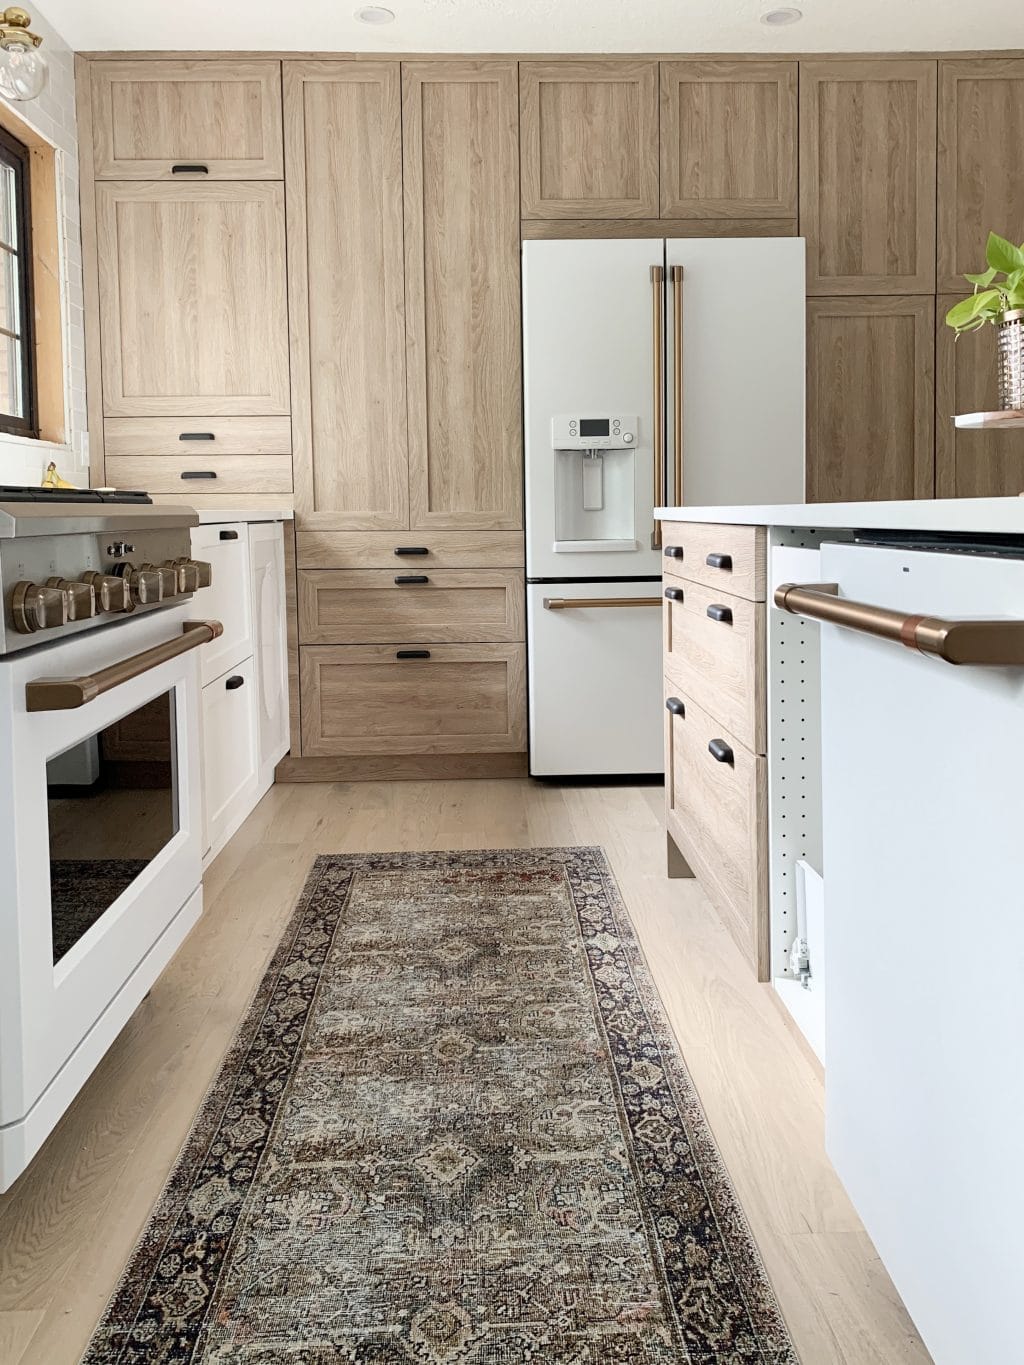
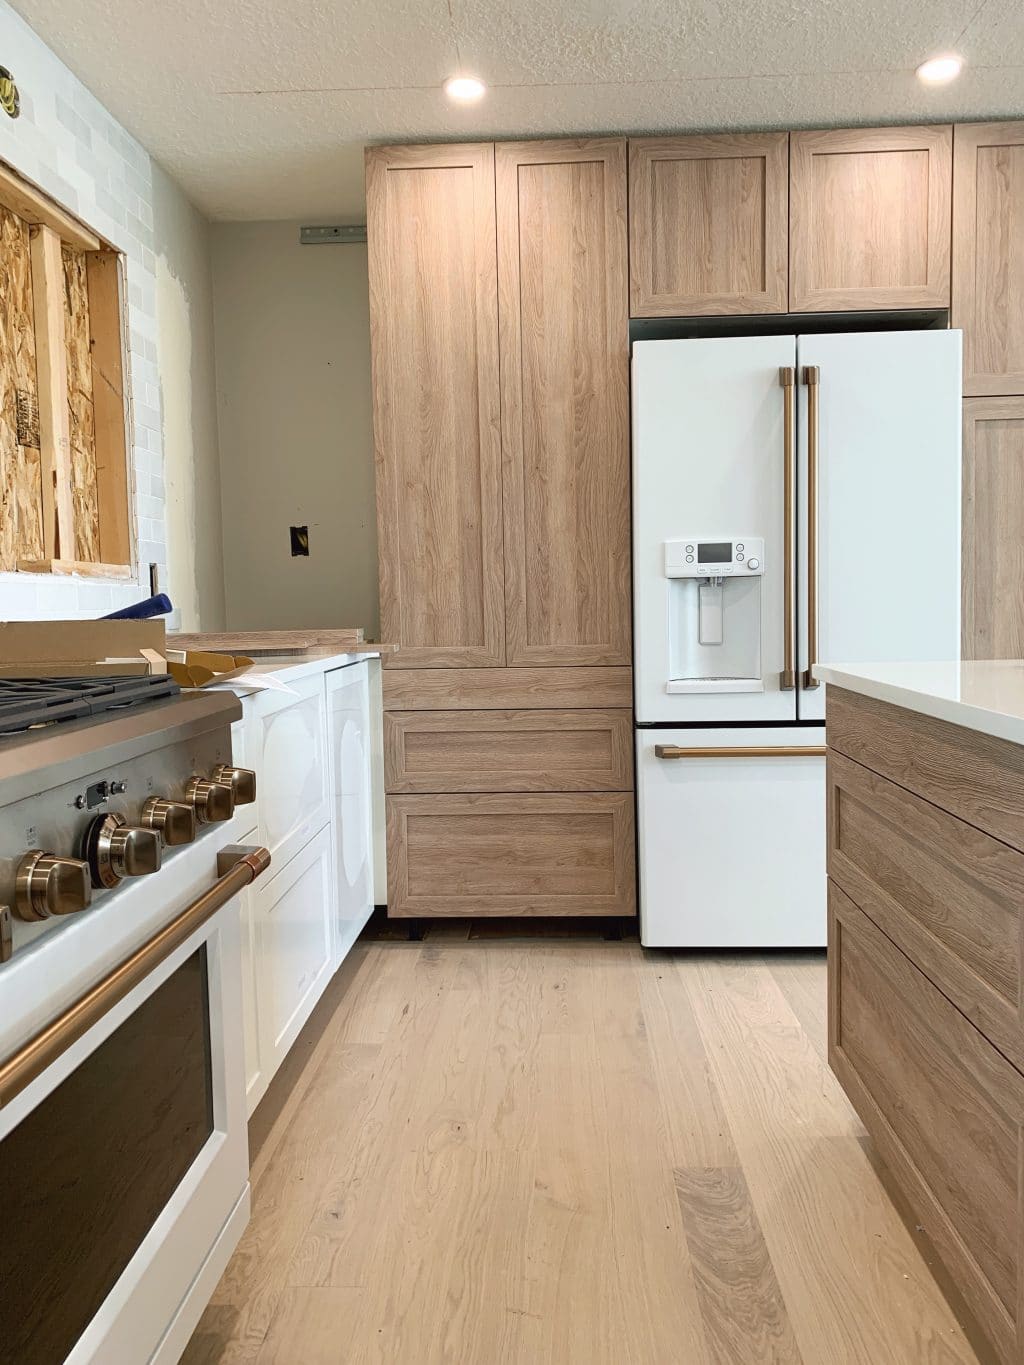
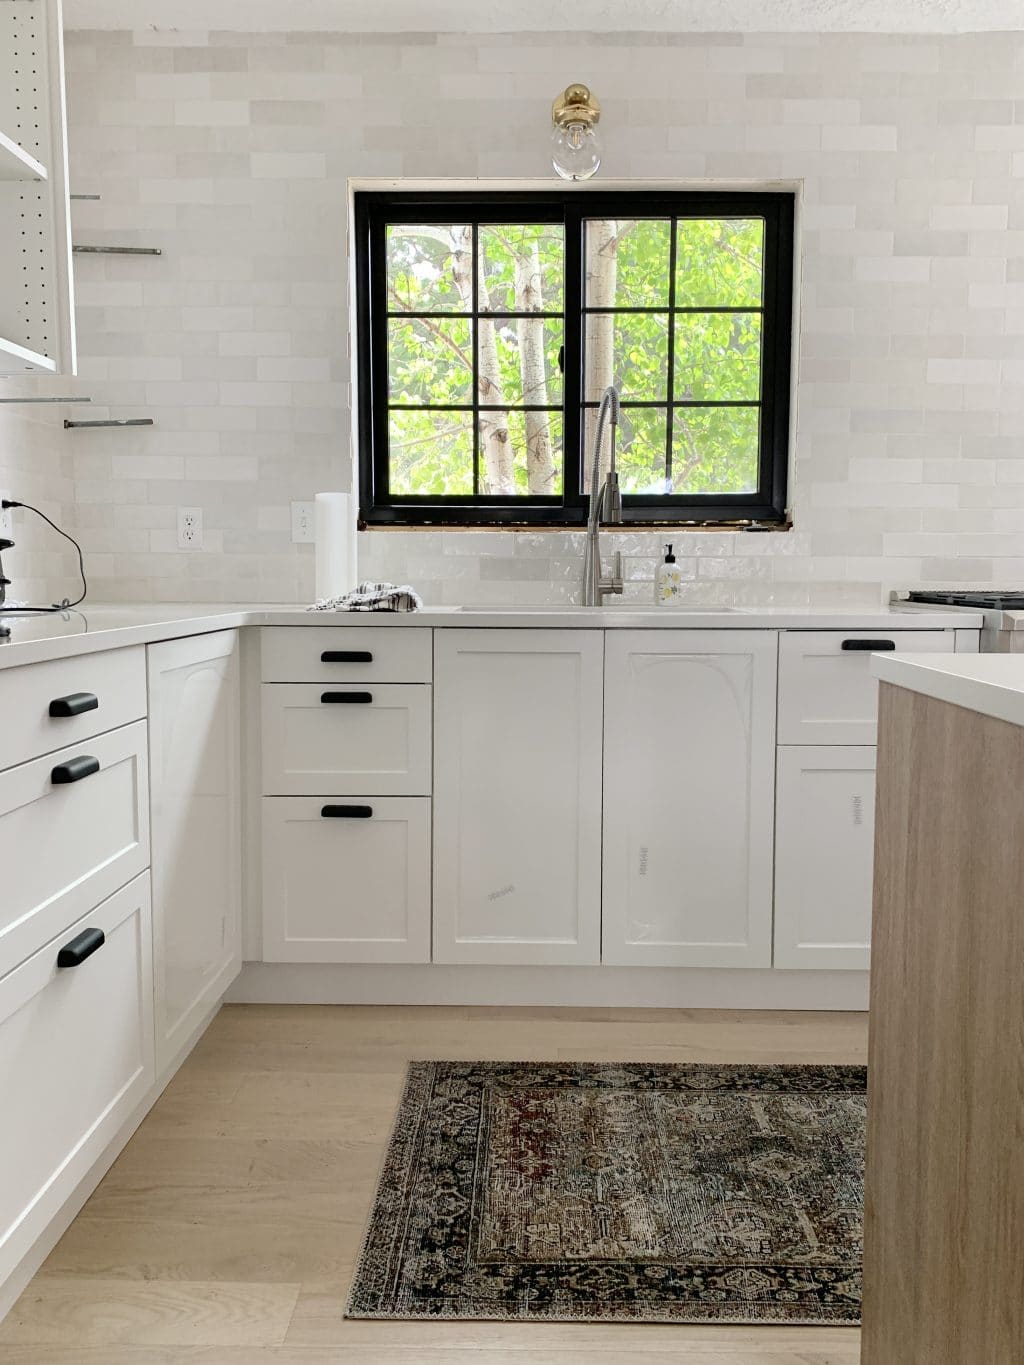
Earlier this year, we launched our own line of cabinet doors with Semihandmade that consists of three wood tones: A walnut tone called Saddle, A grayish brown tone called Dusk (we used that one at the cabin!) and a light oak looking option called Cove–that’s the one we’re using in the Fullmer kitchen and I’m obsessed with how it’s all coming together.
But first, a quick run-down on what exactly Semihandmade cabinets are. Semihandmade is a company that makes beautiful and customizable cabinet doors for Ikea cabinetry (both the Sektion and older Akrum kitchen systems, as well as cabinet fronts for bathroom vanities, wardrobes and media units!). It’s a great way to get custom looking cabinetry at an affordable, DIY-friendly price. We actually first used Semihandmade cabinetry back when we renovated this kitchen in Pittsburgh in 2016. The collaboration was so fun and successful that last year we got together to design our own line with the brand. After brainstorming and researching for some time, I noticed that wood cabinetry was starting to trend again. I wanted to bring it back in three, no-fail tones, at an affordable price point with sleek shaker profiles in an extremely durable finish (the cabinets are made from textured thermofoil, which is very durable and low maintenance). You can check out the whole line here.
How You Order Semihandmade Cabinetry
For the Fullmer Kitchen, we used the Cove doors mixed with Semihandmade’s Supermatte White Shaker doors and the mix is so fresh. If you’ve ever done an Ikea kitchen, the Semihandmade install process is exactly the same. If you’ve never done an Ikea kitchen (or even if you have), check out this post we wrote a couple weeks ago about the process and things you should know when planning an Ikea kitchen. Even if you’re using Semihandmade cabinet doors, you still plan out the entire kitchen using the Ikea kitchen planner. The extremely helpful people at Semihandmade will ask you for your plans so that they can triple check and send you everything you need in your order.
You’ll still use Ikea’s hinges and toe kicks (the Semihandmade toe kicks attach to the front of the IKEA ones and are so much more sturdy and beautiful) so when you are picking up your cabinetry at Ikea, you will need everything BUT the cabinet fronts, cover panels and filler pieces–all of those things are available through Semihandmade.
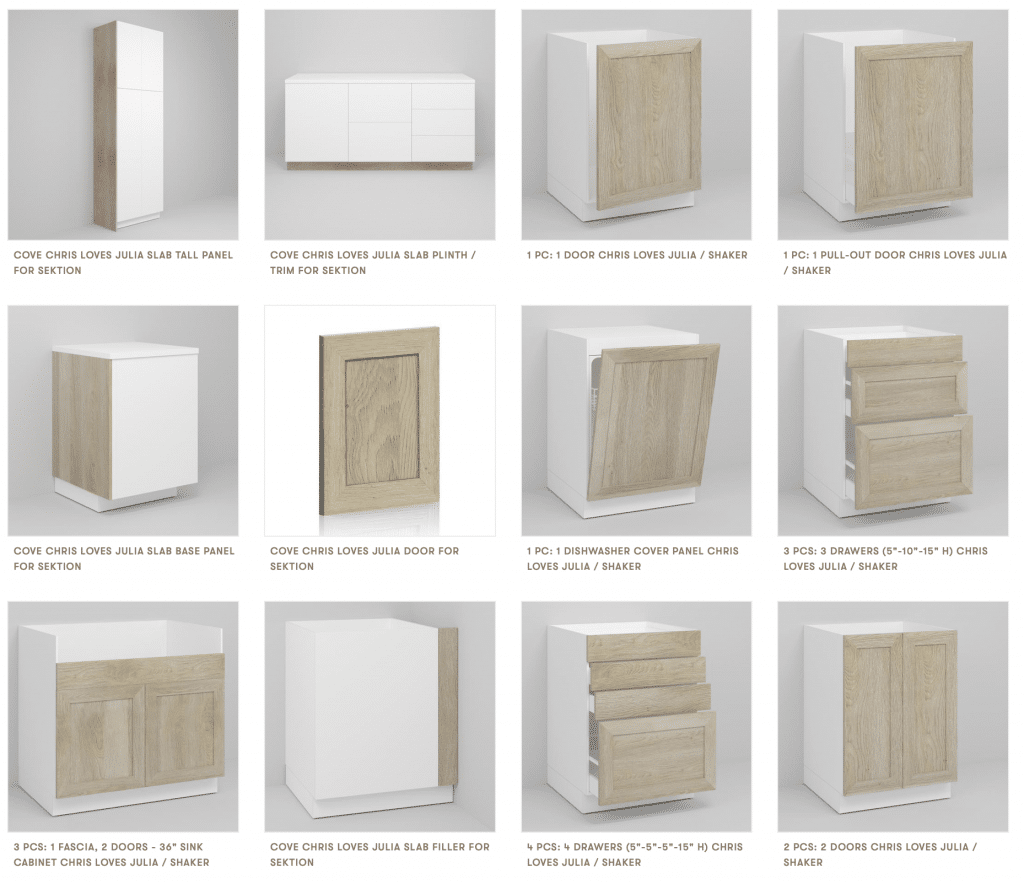
Once you have your Ikea kitchen planned out, head to Semihandmade’s site. Each drawer, door, filler piece, cover panel and toe kick will have an option to click on, customize size and add to your cart. If you take it cabinet by cabinet, it’s quite simple and straightforward. Often times, after you submit your order (especially if it’s a large order like a whole kitchen!), they will reach out to you and ask for your plans to triple check and make sure you get everything you need. If you feel unsure at any part of the ordering process, there is a help button in the bottom left hand corner of the site where you can chat with someone and even attach images right there! It’s such a nice feature and they are extremely helpful and want you to succeed.
What is the Cost Comparison of Semihandmade vs. Ikea Cabinet doors?
Semihandmade doors are thicker and more durable and will cost you a little bit more than Ikea’s doors, but not that much more. And are absolutely worth it, especially if you want to customize your cabinets and don’t want to be limited to what Ikea offers. Or! If you have an Ikea kitchen currently and want to change up the look–Semihandmade is perfect for that.
Ikea doors run anywhere from about $70-$120 and Semihandmade doors run from about $120-$185 (this is the price for a 24×30 door across a variety of styles). The smaller Pittsburgh kitchen we did a few years ago, all of the Semihandmade cabinetry came to $2764 (the Ikea Sektion cabinet boxes and interior fittings and drawers were $1517).
The Fullmer kitchen is quite a bit larger. The Ikea cabinet boxes, drawers and interior fittings came close to $4000 and the Semihandmade Supermatte White and Cove doors, drawer fronts, cover panels and filler pieces came to $7216. For a grand cabinetry total of just over $11K.
The same kitchen with all doors and fillers from Ikea would be $9,100. For less than $2000, having a higher quality, more durable door that’s customizable to the look you want seems like a complete no brainer, right!?
In contrast, custom cabinetry for this kitchen was estimated over $20,000!
Installing Semihandmade doors
If you can read Ikea directions, you can install Semihandmade cabinetry. The process is 100% the same as adding and using Ikea cabinetry and you’ll even follow the same instruction manuals (hold on to them!) Your order will arrive within a few weeks and during that time, put together and place the cabinet boxes (refer to this post) and drawers. The drawers you’ll stop shy of adding the drawer fronts since you’ll be using Semihandmade fronts for that step. I shared the full, easy process of adding a drawer front right here in my Instagram highlights. Like any Ikea drawer, depending on its location and size of the drawer, the interior drawer hardware will be attached in slightly different holes (they all come from Semihandmade pre-drilled!), so just follow the instructions and you’ll be golden. Check out the story highlight here.
Here’s the kitchen with just the Ikea cabinet boxes in place (the tile had also not been grouted yet, new windows hadn’t gone in–it was still a bit rough but the new kitchen was definitely taking shape here.
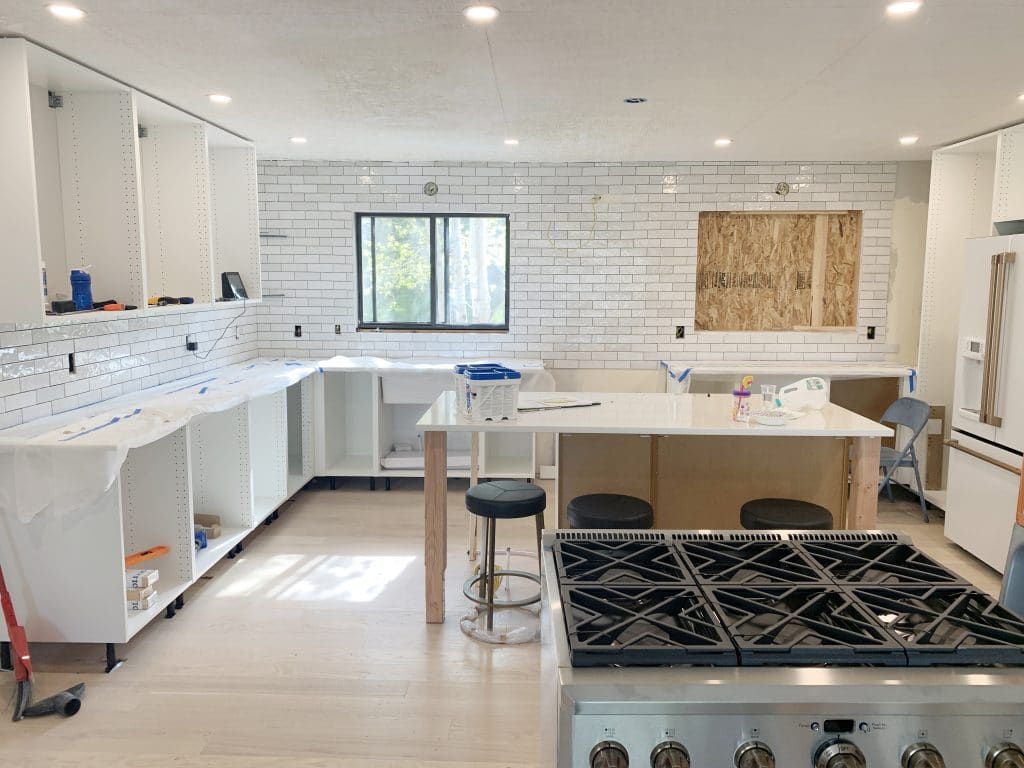
From this point, we had one 8 hour day where I finished putting together every last drawer (remember you’ll have to attach the drawer fronts on) while Chris installed the rails and doors (the doors are fast to install, while the drawers take a little more time). While we aren’t pros, we have done this a few times so if you’re doing a similar kitchen size (this one is about 17 x 15) it may take longer. Another entire day was devoted to toe kicks and cover panels–which really makes a kitchen shine. Here’s how it looked at the end of our 8 hour door install day. And maybe we’re weird, but it was an extremely fun and satisfying day. Each door and drawer is motivating because of the instant gratification of seeing it in place.
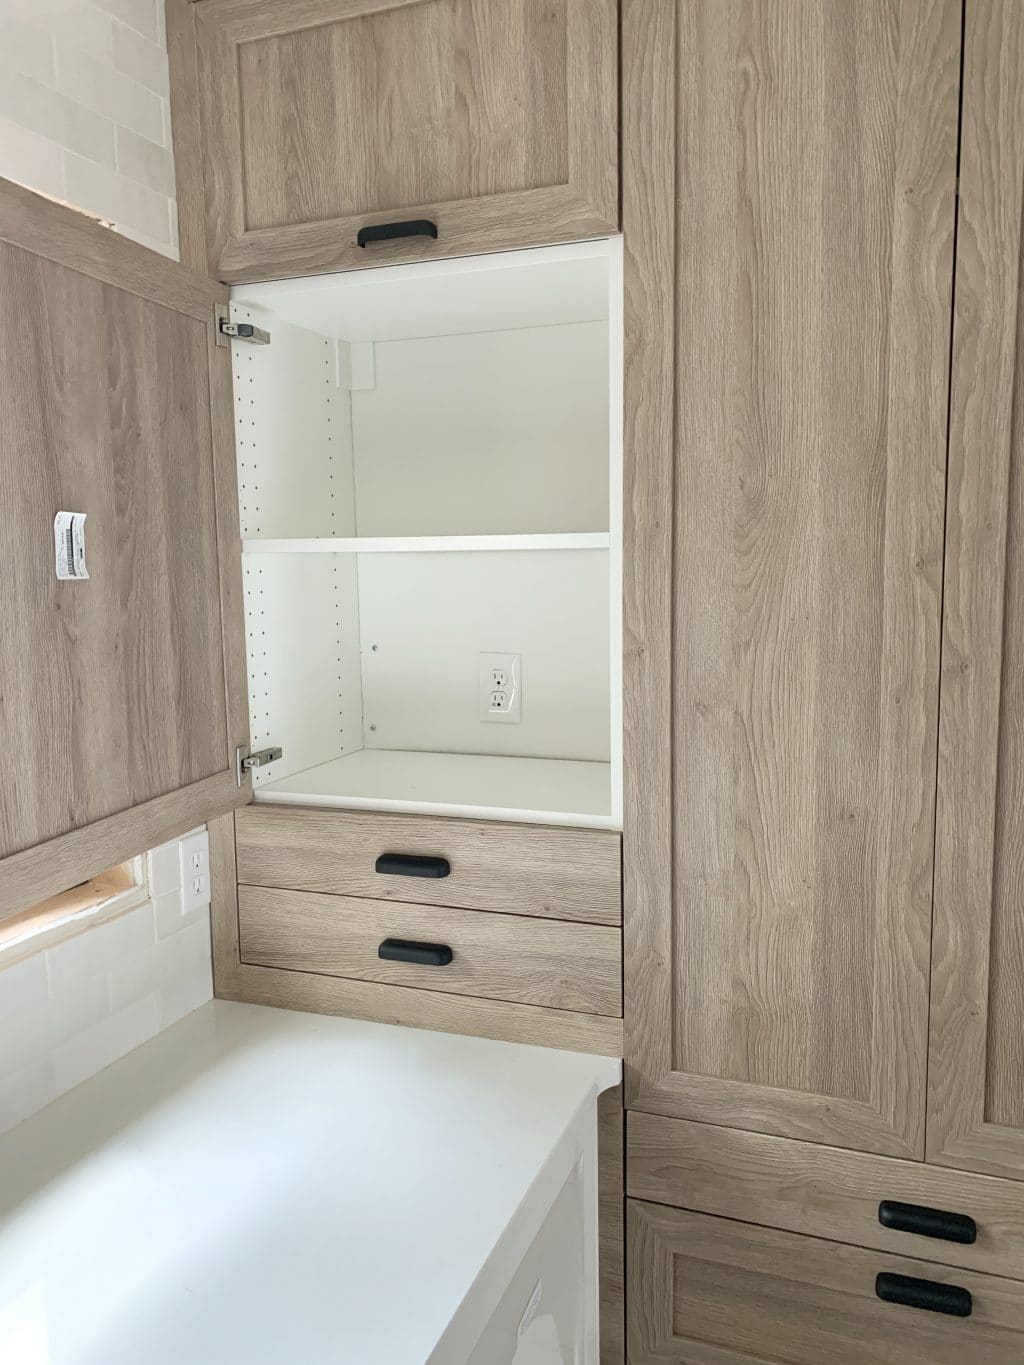
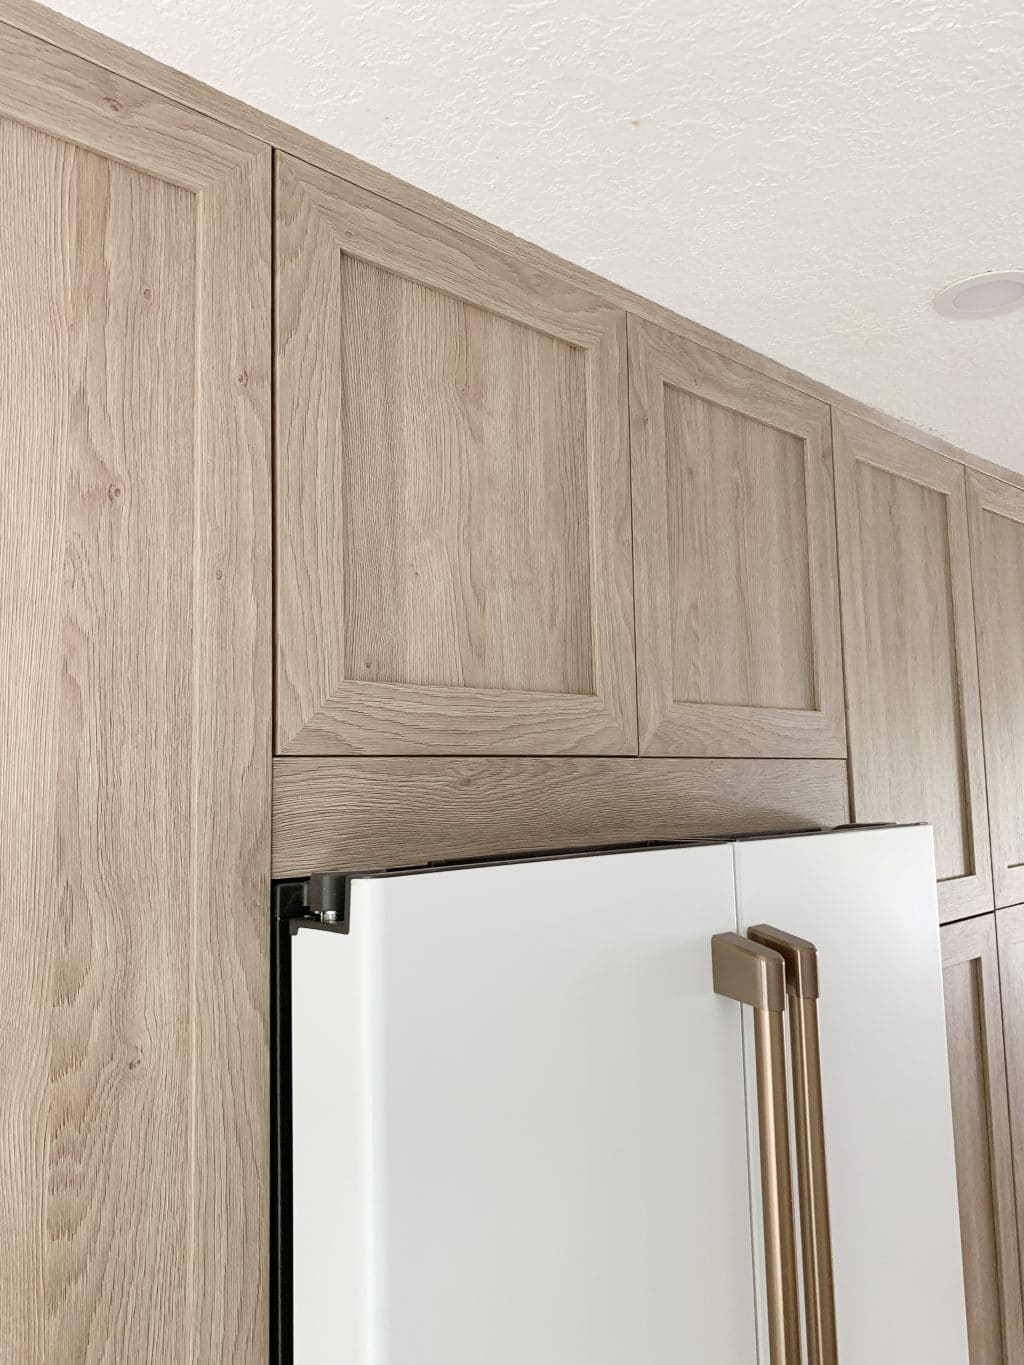
Sidenote Above: That open corner was only open on top. The bottom was a corner base cabinet that extended all the way back (Ikea has amazing cabinet options, honestly.) But the top, we didn’t want to make too deep and we wanted to extend the pantry wall over. So we used Ikea’s wall cabinets (there’s an option with two drawers at the bottom) with a upper cabinet mounted on the very top that hinged upward to open. It’s more shallow than the tall pantry cabinets (12″ deep vs 24″) and we planned for electrical so this would be a perfect appliance garage! We envision the blender, toaster and all the breads, jams, butters and protein for smoothes on the shelf above it!
Trimming out Semihandmade Cabinetry
Trimming out the cabinetry will. change. everything. It’s how you get from this look:
To this look:
Every crack and gap and side is covered so it all looks seamless.

Above : There used to be a floor vent under this cabinet, so Chris built a chanel to direct the air out the front of the cabinet’s toe-kick and added a white register. Also note that what you’re seeing on the door above is the plastic covering that Semihandmade puts no for shipping.
There were SO many questions about how to fill the gaps and how to trim out cabinetry, SO MANY, so we thought it would be best to put together a brief, but instructional video on the subject of Semihandmade. The entire video is 10:00, but the trimming out part starts at 6:00 and goes until the end. It’s definitely worth a watch (it’s a fun watch either way!). Check it out below or on our Youtube Channel here.
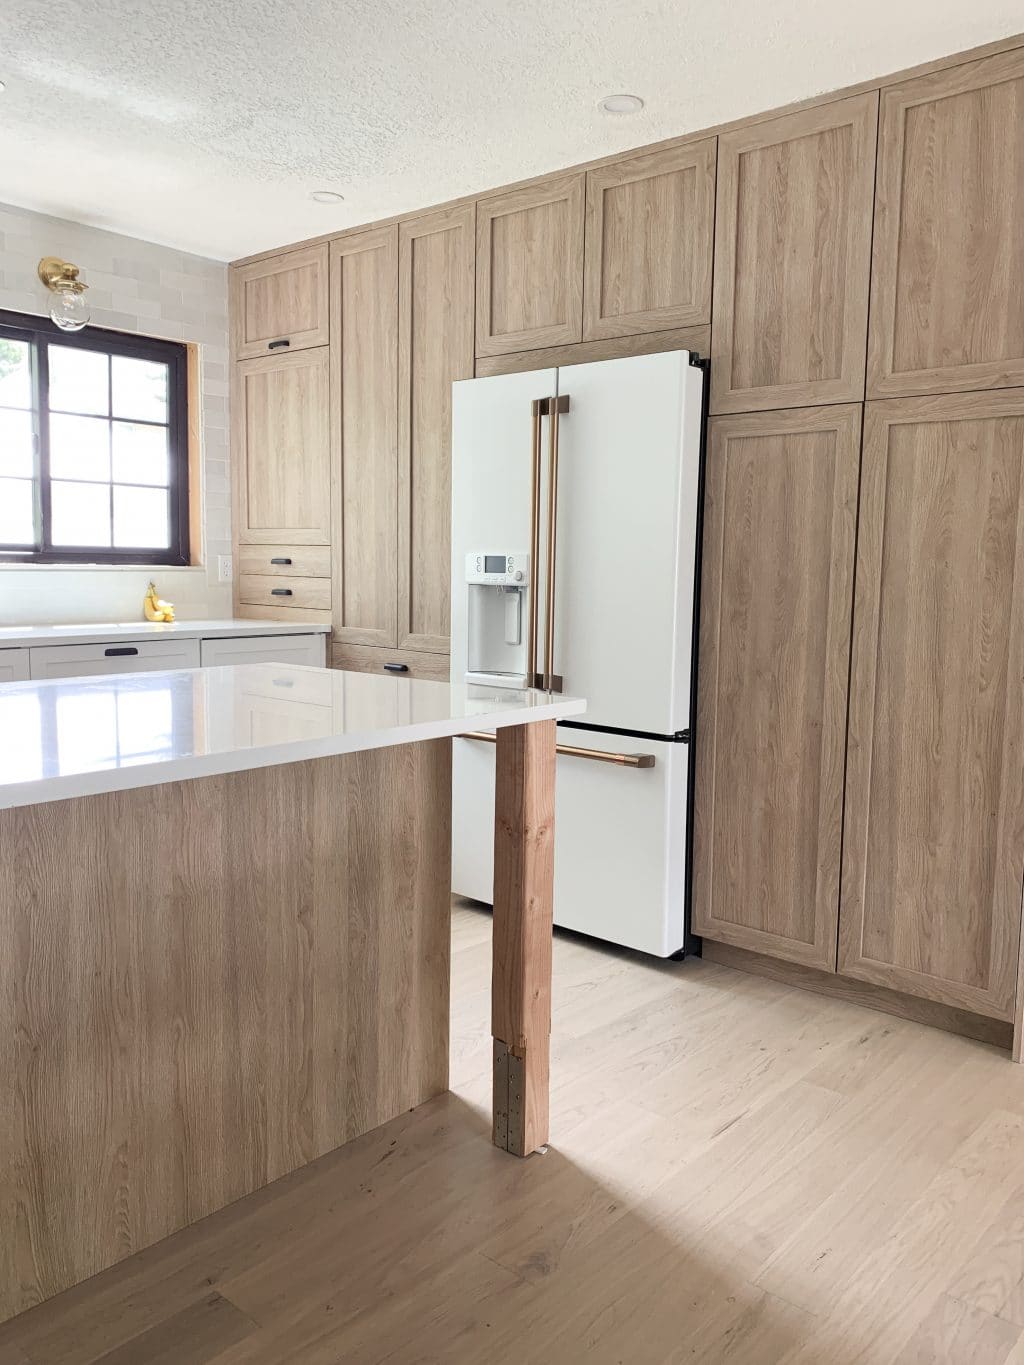
We still have a few doors to add (we switched to solid from glass front at the last minute) and need to trim out the island legs, too. But, we’ve already started adding hardware to the drawers so they can be used, but we’re this close. THIS CLOSE to completion in here.
And to be honest, it’s shaping up to be our favorite kitchen we’ve ever done. I’d copy and paste it in our new house in a heartbeat. Let me know if there are any other questions about Semihandmade or the process you have and I’ll be sure to answer them in the comments below!
SOURCES
Refrigerator
Range
Dishwasher
Tile
Grout
Sconces
Bin Pulls (4″)
Cabinets : Ikea Sektion boxes with Semihandmade X Chris Loves Julia Cove cabinet doors mixed with Semihandmade Supermatte White doors.
Flooring
Runner
Leave a Reply
What do you think?


Semihandmade
Our wood grain Shaker cabinet fronts were designed for busy, high-traffic homes like ours. Clad with durable textured thermofoils, this line is compatible with Sektion, Akurum, Godmorgon, and Besta cabinets from IKEA. It's the perfect, practical way to add the warmth of wood to all the rooms of your home.
Collaborations
learn more

next
Loloi
We have teamed up with Loloi to create a line of rugs that are as affordable as they are beautiful. This collection houses a great mix of traditional and modern rugs, in cottage-y colorways, as well as vintage-inspired beauties that you’ll want to roll out in every room.
Collaborations
learn more

next
STUGA
We partnered with Stuga on a line of hardwood floors — The Ingrid is really livable, and the color is very neutral. It doesn’t lean warm or cool, it’s that just right in-between. We have really loved putting it everywhere in our house. It’s the best jumping-off point for design, no matter your interior style. In addition to being beautiful, Ingrid is really durable — we have three kids, and we always have a home construction project going on. Ingrid stands up to it all.
Collaborations
learn more

next


SHop all
What We're Right Now
What We're Right Now
Looking for our favorite things? A place to shop our home room by room, or just catch up on what Julia's wearing / loving right now? Browse the CLJ shop.
Loving


Portfolio


Design
Befores, afters, mood boards, plans, failures, wins. We’ve done a lot of projects, and they’re all here.
BROWSE BY CATEGORY
let's break this thing up
We have a long-standing relationship with DIY, and love rolling our sleeves up and making it happen.
Projects
Even when you don’t want to rip down a wall, you can make that space in your home better. Right now.
read more
read more
read more
02
01
03
looking for inspiration?
A reader recently asked me if I’m starting to fully embrace traditional style and whether we still consider our house to be a “modern Colonial” and why. It was a really great question and so timely — I had really just been thinking about my approach to this home and how my style has changed […]


SEARCH THE BLOG
We've been doing this since 2009 and we've posted a whopping 24145+ blog posts and counting. You might need a little help searching, huh?
looking for something?
find stuff like:
")
Can We Send You Our Love Letter?
Another way for us to stay in touch! Joining our weekly newsletter gives you access to exclusive content, never-before-seen photos, your questions answered, and our favorite DIYs. Sign up below!
Follow Along on Instagram
Welcome to our online community where we've posted home, DIY, style, renovations, and family since '09. Renovating our #cljmoderncottage in Idaho and headed for new adventures in Raleigh, NC. #cljfam #cljtransformations
@chrislovesjulia


Links
Get Around
Make yourself right at home
Portfolio
Design
Casual Friday
Projects
Lifestyle
Gift Guides
All Posts
Shop
Love where you live.
Social
RivrLinks
Links
Get Around
Make yourself right at home
Portfolio
Design
Casual Friday
Projects
Lifestyle
Gift Guides
All Posts
Shop
Love where you live.
Social
RivrLinks
This install is so good.
Question regarding that corner… do you happen to know the dimensions for those cabinets?
The sizing is throwing me for a loop when trying to figure out what fits (I’m building a very similar set-up)… the width of the cabinets to fit over the depth of the countertop.
Dang it, just found the cabinet, so never mind on that!
I meant to ask before, how did you mount those shallower corner cabinets?
Thanks!
I am planning to replace Ikea cabinet draw fronts and doors. It is for a house near the water and each year the cabinets need to be cleaned with a bleach based produce to remove mold/mildew. Would your cabinets withstand that cleaning? Also, is there a style door that might be best to clean? I would like to take advantage of your Memorial Day sale.
Thank you,
Mary
Thank you for this!! So helpful!
I don’t know if you’re still answering questions about this or not, but do you guys have any experience with the IKEA dishwasher and a panel cover for that? We are going to do an IKEA kitchen soon, and I’m having trouble finding info on that, reviews for the panel (one place I saw said it stuck out from the cabinets next to it, and she used IKEA fronts, which are thinner than Semihandmade.) Any opinions you guys have on this would be helpful. Thank you!
We have yet to install the dishwasher fronts, but would love your review!
Thank you for this! It is so helpful! We are also planning an island that will have the countertop extend past the cabinets like in this kitchen. However our countertop will extend about 4 feet out. Since we have to build a custom support for that I thought we would have to go the DIY route and paint it all to match… but it looks like you covered your island legs with a panel or filler? Did you just cut them at an angle with a table saw and wrap the legs? Did you use anything in the corner gap between the panels (like caulk?)? I wondered if this would be possible! Would love to learn more about how this came out for you! Thanks for any insight you can provide!
Beware the if the drawers are too close to your oven/stove they will melt. I am having that issue and they don’t want to do anything about it. They say it’s not under warranty but it is and they use defected material. Has anyone ever heard of your oven being to hot it will melt drawers next to yet? Well these do and that is what they are saying. Very poor customer service regarding this matter.
Which wall cabinets did you use in the corner? I love this creative idea to solve a problem for our small kitchen, but I cannot figure out the wall cabinets you used with the ikea planner. Any help? You guys are so creative and talented.
Love this. But what happens to the IKEA boxes if your dishwasher or sink leaks?
I love the idea of using these cabinets, but even if easy I know I won’t have the time to do myself. Are there recommended vendors I could look for in my area?
Yes! I know that there are companies out there that do.
This kitchen is amazing! With the Semihandmade toe kicks, did you trim them since they are 5” instead of IKEA’s 4 1/2” or did you raise the cabinets/suspension rails?
We raised all the suspensions. It’s nice to have taller cabinets when you’re taller anyway.
Where did you get your door hardware from?? Literally the exact hardware I am looking for
My eye keeps stumbling over the photo of the sink. It looks like the cabinet and faucet aren’t centered on the window and aligned with the light. What’s going on there?
Must be the angle? It’s centered! :)
Question about the cabinet pulls – it looks like you have combination of 1 centered pull on some drawers and 2 on others (like the island). How did you decide which spots to use 1 vs 2? And will you be adding knobs to doors? Thanks!
We decided drawers 36″ or longer got 2 pulls—knobs coming!
Which Ikea hinges did you buy?
Utrusta!
Absolutely gorgeous kitchen!! It is now my inspiration kitchen!! Those cove cabinets are amazing!! Curious what flooring you used in the kitchen!? I’m struggling to find a flooring that won’t clash.
Check out this post on the flooring!!
Are there any coordinating crown molding pieces that go on the top of the cove cabinets to match?? Looking to use these but just want a bit of a different look on top than this by adding the molding. Thanks so much!
We used Semihandmade filler pieces.
This kitchen is gorgeous. Has such a light, yet warm, feeling. Plus, that stove makes me drool.
Question about the backsplash. How did you ‘end’ it? I am about to do my backsplash in the Bedrosians Cloe too and I’m not wild about the way that a quarter-round tile trimmed border looks. But, one of our walls ends without a wall to butt up against. I was thinking about just doing a really clean grout line, but I haven’t been able to find any photos of what that would like. Got any suggestions?
Hi Julia – I have a similar corner in my kitchen and have spent countless hours on the IKEA design software to make it less awkward. When I went in for our IKEA design meeting last week the salesperson said that the 47×24 IKEA lower would look odd next to a tall 18×90 cabinet because it’s meant to wrap to another lower cabinet and the countertop will have a “lip.” He didn’t have any examples of what it would look like though (so serendipitous the timing of this post for me!). I thought about putting a lower cabinet on top of the 47×24 cabinet to get the full 24 inch depth, but I can’t figure out if that’s possible. Do you know? When you say 12 inch deep wall cabinet – I only see 15 inch wall cabinets on their site. Am I missing the 12 inch? If so why 12 inch and not 15? Thanks for the video as well, very helpful!
It’s the 15 deep, not the 12. But you could put a 24 deep base cabinet if you wanted. The base cabinet boxes are 30in tall without legs, so you’d just need to factor for that. We used the less deep versions because these kinds of corners can be a little awkward and we didn’t want people to have to reach back so far.
I absolutely love it :)
Thank you so much for the video! It is so helpful for the filler pieces. Now I have to go back and fix my butlers pantry area that needs trim!
I’ve read this post twice today and watched the video. Everything is so well done. It’s so exciting to have seen such an amazing change – it’s hard to believe it is even the same space. I thought you had mentioned at some point that these are regular 8’ ceilings, but they look so much taller in these photos! Honestly and truly, such super work.
Extending the cabinets all the way up to the ceiling (and ditching soffits) has really visually heightened the room!
How was the installation process with the 8’ ceilings? Any difficulty with the floor to ceiling look?
Not at all! Went very smoothly.
Thank you for all the helpful tips and the beautiful inspiration, this kitchen is STUNNING! This isn’t really a semihandmade question but I love how you added electrical in that corner cabinet, we are hoping to do the same in two cabinets in our Ike’s/semihandmade kitchen Reno. Is there any space requirements necessary to accomplish that, or can we just cut directly into the back of the ikea box to line it up with the switch? Both outlets will be new installs as well. Thanks for any feedback!!
You just need to make sure you follow code. So the outlet and any electrical connections (like with wire nuts, for example) need to be housed inside a junction box. For our switch, I secured mounting posts behind the cabinet and anchored a junction box to it which holds all the wiring. The back of IKEA cabinets is a bit flimsy and not sufficient for the wear and tear of inserting and withdrawing plugs day after day.
Thank. You. For. This. Post.
I’ve been following Semi-Handmade for a few years now and have been a little confused as to how exactly it works. Look, I get it, I’m not naturally handy. That’s why I love DIY bloggers like you guys because ‘handyness’ is a skill that I would love to build! Semi-Handmade probably has NO idea how daunting their system seems to non-handypersons. They’re probably like wait, you just, like, do it. Like, just put it together. Meanwhile, my husband and I are just over here slamming pieces of wood together like apes and hollering at each other.
Thanks to this post, (and John and Sherry’s one on Ikea cabinet boxes recently) I think we could actually maybe even do this.
And your point about being able to upgrade the doors/drawer fronts in future to another Semihandmade front is GENIUS.
THANK YOU
This comment cracked me up!! Hahahhaa Thank you for that.
Do you think you can mix Ikea & Semihandmade fronts, or do you think the quality difference would be too glaring? Thank you! This kitchen has given me so much inspiration & empowerment!
Sooo glad! You can definitely mix and match if you wanted as long as they were two distinctly different materials not right next to each other. Because the Semihandmade fronts are a little thicker so the filler pieces might not line up. But different materials on different walls or upper vs. lower cabinets would totally work!
Let me first just say how beautifully this kitchen came out. Stunning! Design question for you though in regards to making flooring work with new cabinets. Say I wanted to replicate this kitchen in our open floor plan similar to how you’ve created here. We have dark hardwood floors all over the house from when we bought it and the kitchen is tiled. What kind of alternate flooring would you suggest to go with these color cabinets? I don’t know that it would be reasonable to replace all the floors (they extend all the way up to the second floor and the entire house is done in the same) but figured two wood floors next to each other (once you hit the living space) would look funny, right? Did y’all consider any tile options for this kitchen? If not, could you envision any particular tile playing nicely with the colors chosen for the cabinets? And when you extended this flooring into the Fullmers living area, how did you decide where to stop the floors before hitting a hallway or something? Can you show that when you do the big final reveal? Hope my question makes sense! Thank you!
We extended the flooring from the kitchen to the living room and down the hallway (but not into the bedrooms), but the whole area was under 600 square feet so it wasn’t a huge deal. For your space, you could extend the wood flooring into the kitchen (I think dark hardwood would look just as good with the cabinets! Another option would be to do a fun patterned tile floor!
Hi Ashley – just wanted to way in quickly. You wouldn’t necessarily have to replace all of the wood floors. If the floors are in good shape a flooring guy should be able to tooth-in new flooring with the old for a seamless transition. It would require refinishing all of the floors but that gives you an opportunity to choose a new stain color for a fresh look and you honestly couldn’t tell where the old floor ends and the new floor begins! It’s just another option to consider!
My parents had hardwood floors in their living room and linoleum in their kitchen. They were able to seamlessly extend it to carry the hardwoods in their kitchen because the transition from living room to kitchen was parallel to the hardwood planks. It was a long time ago, so it’s hard to remember but I think they did refinish all the floors when the new kitchen flooring was added. They’ve since added hardwood to their hallway and didn’t refinish the existing floors for that.
Thank you all for the suggestions! Appreciate the design collaboration! Again, Julia, a beautiful kitchen!
I would love to know more about what Ikea configuration and Semihandmade fronts you used for the island, or is that more of a custom piece that you came up with? That’s what I struggle with figuring out the most when designing our kitchen with Ikea. This island is literally exactly the size and style we would need in ours. Love everything about this kitchen is absolutely perfect. I also want to copy paste it into my home :)
There is one 36in wide base cabinet and one 18in base cabinet, with the dishwasher next to that (which is an additional 24in). It’s a great size for an island!
Wow! I am such a big fan of these kitchen cabinets! Thanks for sharing!
Maybe I missed it in the video but how did Chris affix the filler piece on the top of the cabinets? Thinking about using semihandmade for my kitchen.
Similarly to the other filler pieces. I cut nailers to fit above the cabinets, nailed into them, then glued and pin-nailed the trim to the nailers.
Hi! I’m a long time fan but never commented. My contractor want me to place my drawer pulls in the middle of the drawer because otherwise it will stress the front of drawer too much and eventually pull it from drawer box. But I want to do what you have done and put the pull on the top center of the shaker face. What do you think about contractor concerns re: placement of pulls?
It’s totally personal preference so don’t let anyone tell you otherwise. We have had ours like this for 3-4 years with no issue.
That is one GORGEOUS kitchen! Loving the combo of Semihandmade fronts.
This kitchen! Beautiful. Thanks for the continual inspiration.
Can I ask about the shorter corner pantry cupboard. When you say it is 12″ deep does that mean you set it forward from the wall so it sits flush with the rest of the pantry wall cabinets?
Thank you so much! It looks great.
Yup! We go into more detail in the video (around the 5 min mark!) If you’re interested
Hi!
I still have a question about the appliance garage. To confirm, it doesn’t attach to the wall (because its pushed forward) but it’s been screwed from the bottom onto the 2×6’s and from the right (into the pantry) correct?
exactly correct!
i find semihandmade’s website very difficult to use and confusing. luckily they have live chat to help (and everyone has been very helpful) but it needs to be more user friendly. for example, in choosing trim, i have no idea what plinth / trim means. instead of having a picture of it or actually explaining what it is, it’s just a picture of the whole cabinet with the trim and a general description of their products. they need to better explain what each piece is in the listing for those who are not cabinet experts. and include pictures of the actual product! i’m excited to use their products for my upcoming reno (and really appreciate your post which better explains it), but they need to do a better job with the website to avoid any further confusion. i realize you can pay $99 for them to set it up for you (and they can check your final order for free) but i have a feeling they are losing a lot of people before they get to that point.
Great feedback!
Loved the video. I don’t even need a new kitchen (I actually love mine), but I still felt like it would be fun to install an Ikea/Semihandmade kitchen. ;)
I love the white countertops. I did not see a link/source for where those are from. Can you share please? Thanks!
These are quartz countertops. Ariel by Silestone.
I heard you have to reinforce lower ikea cabinets for stone tops- due to the sheer weight. Is this true? If so, any tips on how to do that?
Nope!
I just did a semihandmade/ikea large vanity and my contractor differed in opinion. He felt for a very large counter it’s better to build a 4” box type structure for the cabinets to sit on. It wasn’t sold on two, basically just a frame for each cabinet to sit on. The cabinets went on that and were leveled with shims. Then he used finishing nails to fix the kick right up the front of the box. I would definitely do it if you feel the little ikea legs aren’t up for the challenge of a large slab.
The cabinets are suspended by a rail that goes into multiple studs. The legs are just for extra support and it has a support rail at the top front of the cabinets for extra EXTRA support. It’s not necessary but you can absolutely do what you feel comfortable with
Thanks for this post – loving following along! I’m working on a small apartment kitchen and coincidentally am considering the same Semihandmade door options – White shaker on upper cabinets and your Cove on the bottom ones. I noticed on the Semihandmade site that the rails/stiles are 2.5″ for the Cove doors and 2″ for the white shakers. I’m worried about the differences in thickness looking ‘off’ – do you feel it’s noticeable in this kitchen? I can see you don’t have them stacked on top of one another. Just curious what you think! My alternative would be doing your Cove on the bottom, and the Supermatte white on top (not shaker).
It’s true but completely undetectable. We had the same debate and are so glad we went with Shaker all around
I’m going to come back and read the full post, but the video was so good and so enlightening to me about how Ikea cabinets work and work with the Semihandmade doors and cover panels. I started to entertain an Ikea kitchen before we redid ours last year but was a bit overwhelmed with how unconventional the installation and structure compared to standard cabinets. The toe kick situation itself confused the heck out of me! We went with RTA store after seeing YBH use them and I LOVE them, but now that I understand a bit more about how these are installed I would consider it for a future project for sure.
Absolutely stunning kitchen! So open, light and airy and the wood accent from your cabinet line adds so much warmth!
So glad to hear this take away!!
Those appliances are drop dead gorgeous but did the homeowners really pay $7k for a stove? I don’t see that being in most peoples budgets.
Check out this post for more info on the appliances. People have all sorts of budgets and this line is half the price of wolf or Viking and about a quarter of the European lines that are popping up in everybody’s home.
We are doing a kitchen reno and seriously considering Semihandmade/Ike. Love what you did! But here’s my question: we have a fairly new fridge and dw which we really like. They are black stainless. But I have my heart set on the matte white Cafe. Do you think we could pull that off if we treated the range as a design element in itself? It would be on a different wall than either the fridge or DW. Thanks for your input!
Absolutely! These days ranges often serve as a statement piece. GO FOR IT!
I was thinking about this the other day, how much I’d be willing to pay for appliances. I hate hate hate the big stainless steel box trend so I’d prefer panel-ready appliances… except that the stove obviously. For that one thing that can’t be covered, I’d probably budget a splurge, yeah, even though it would mean compromising somewhere else. I think it all comes down to your goals, budget, and what you want to prioritize.
My son would totally pay that much or more for a kitchen appliance that he wanted; me, not happening! I keep telling him that I want a “Mother’s Suite” in his next house, with kitchen privileges, as I know he’ll have all the fun stuff. :D
The kitchen is beautiful, and I love the wall of cabinets and how you managed the connecting corner. Something I will be looking at in my kitchen (since my son isn’t ready for his next house yet!).