


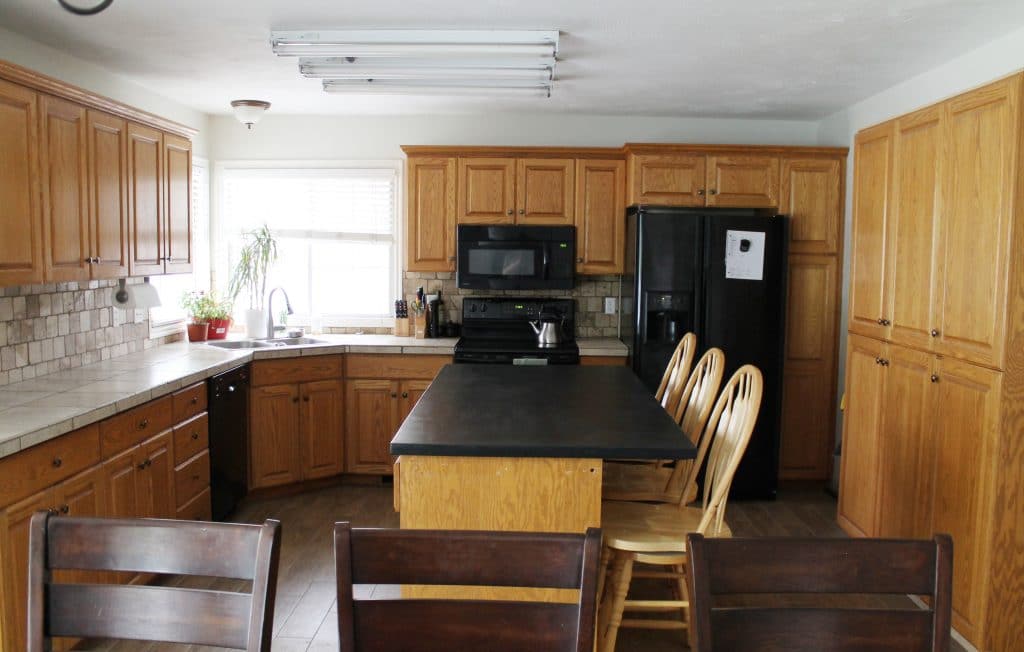
We hung all of our recently painted cabinet doors this past weekend and are here to share lots of photos. We must have adjusted quickly to the new look, because when I was searching through my files to find a before photo to share with you, I was stunned at the wood-riddled kitchen we were living with for so long. Yes, it’s hard to believe that two weeks ago, our kitchen looked like this:
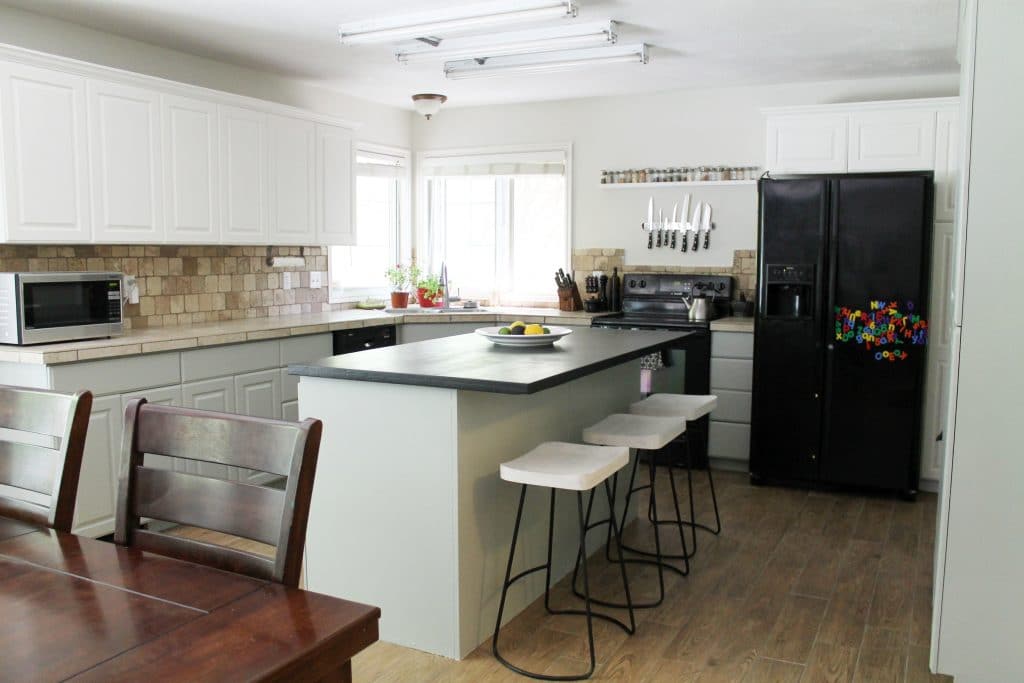
And now it looks like this:
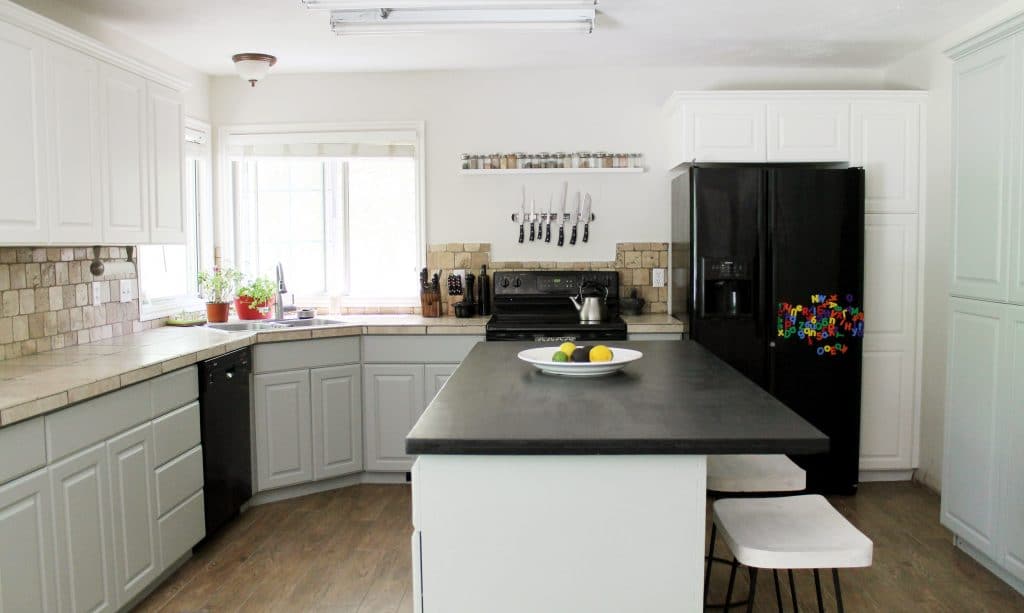
Ahhhh, the magic of paint–and removing our really low microwave and the surrounding cabinets helped, too. In this post, we discussed our paint scheme, but as a refresher we went with Valspar’s Four winds for the upper cabinets and Valspar’s Green-Gray Linen for the base cabinets and pantry.
This wasn’t our first cabinet-painting rodeo. We actually did it twice in our last house. The first time we used Benjamin Moore’s Advance line, the second time (when we decided to paint our base cabinets navy) we used BM’s Aura line and this time we used Valspar. To rate them all, I probably liked the Aura line and this Valspar paint equally. Tie for first! They are both lo-VOC. We actually painted all the cabinets in our basement this time and the smell didn’t hit you or anything, but it was there. The paint went on like a dream. We actually could have gotten away with one coat, but did 2 for good measure. It was amazing. So thick and creamy. I actually didn’t love the Advance line at all. The 8 hour re-coat time and the fact that it took 4 coats after 2 coats of primer turned me off of it. Although the finish was nice, I don’t think it was worth it personally.
This painting experience was a lot more favorable all around thanks to our paint sprayer. I rolled and brushed the cabinet boxes and then used the sprayer (we’re convinced–the best paint sprayer in the world!) for the doors. As for the process:
1. Scrubbed all the cabinets with soap and water. Wood grain hides a lot of dirt. Disgusting.
2. Wipe down all the cabinets with TSP.
3. Everything (doors and boxes) gets a coat of primer. We like Zinsser Bull’s Eye Zero Primer.
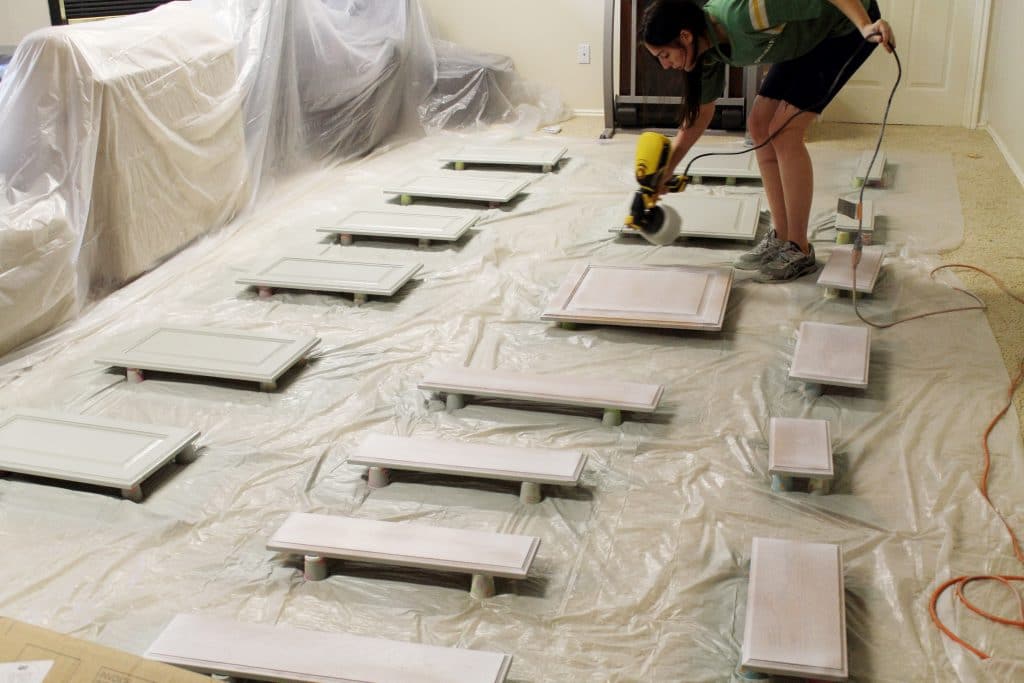
4. Start painting. For the doors, we like to do the backs first, so if there are any drips during the painting process, we can catch them, correct them and the fronts which are painted last will be pristine. We didn’t have any drips, but there was an incident where I didn’t realize the tarp had blown up onto a cabinet door smearing paint on the not-yet-painted front. Once I flipped it over, I sanded it lightly and that was that.
5. Let dry a few days before reattaching. The doors were ready to re-coat in 2 hours and we did two coats. We waited 24 hours to flip from backs to front.
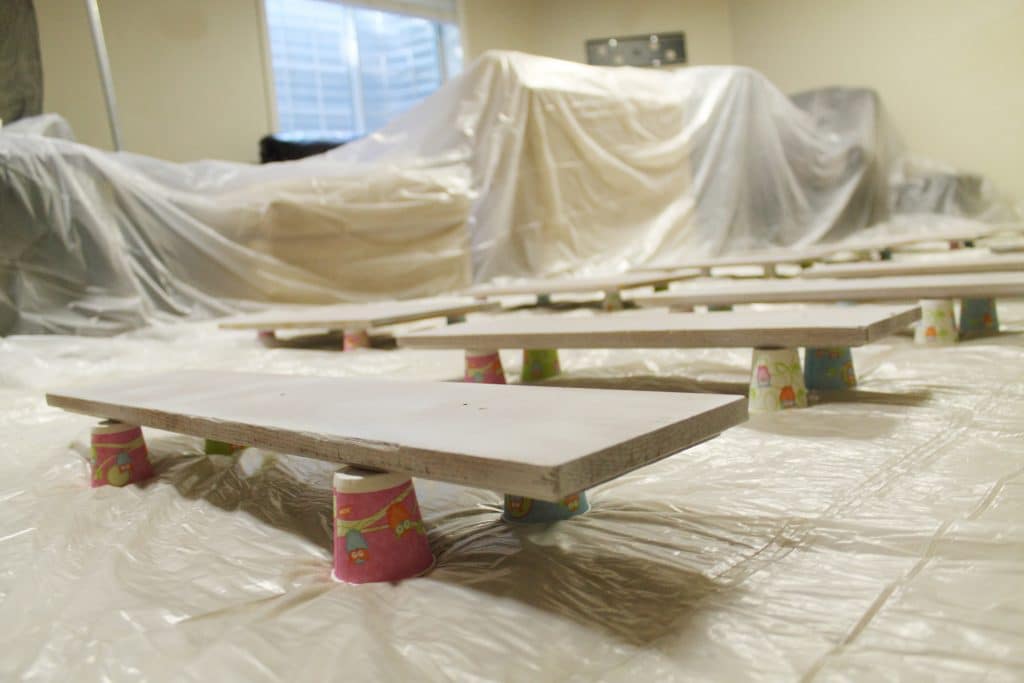
Last time, we dragged every paint can we had in the garage to make little stands for the doors to sit on so they were slightly raised as to not stick to the tarp. Considering we had over 40 doors to paint this time, we didn’t have enough paint cans and even if we did, carrying them all to the basement didn’t sound very fun. We looked into these painting pyramids, but around $6 for 10–pass. And then I thought Dixie cups! $4 for 200 and they worked perfectly.
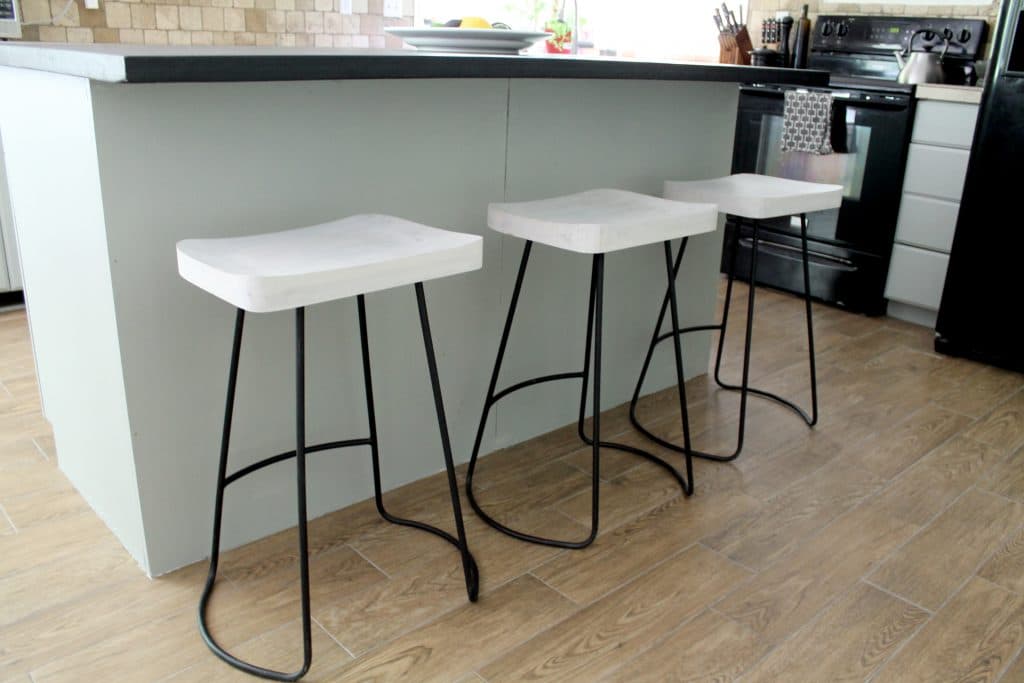
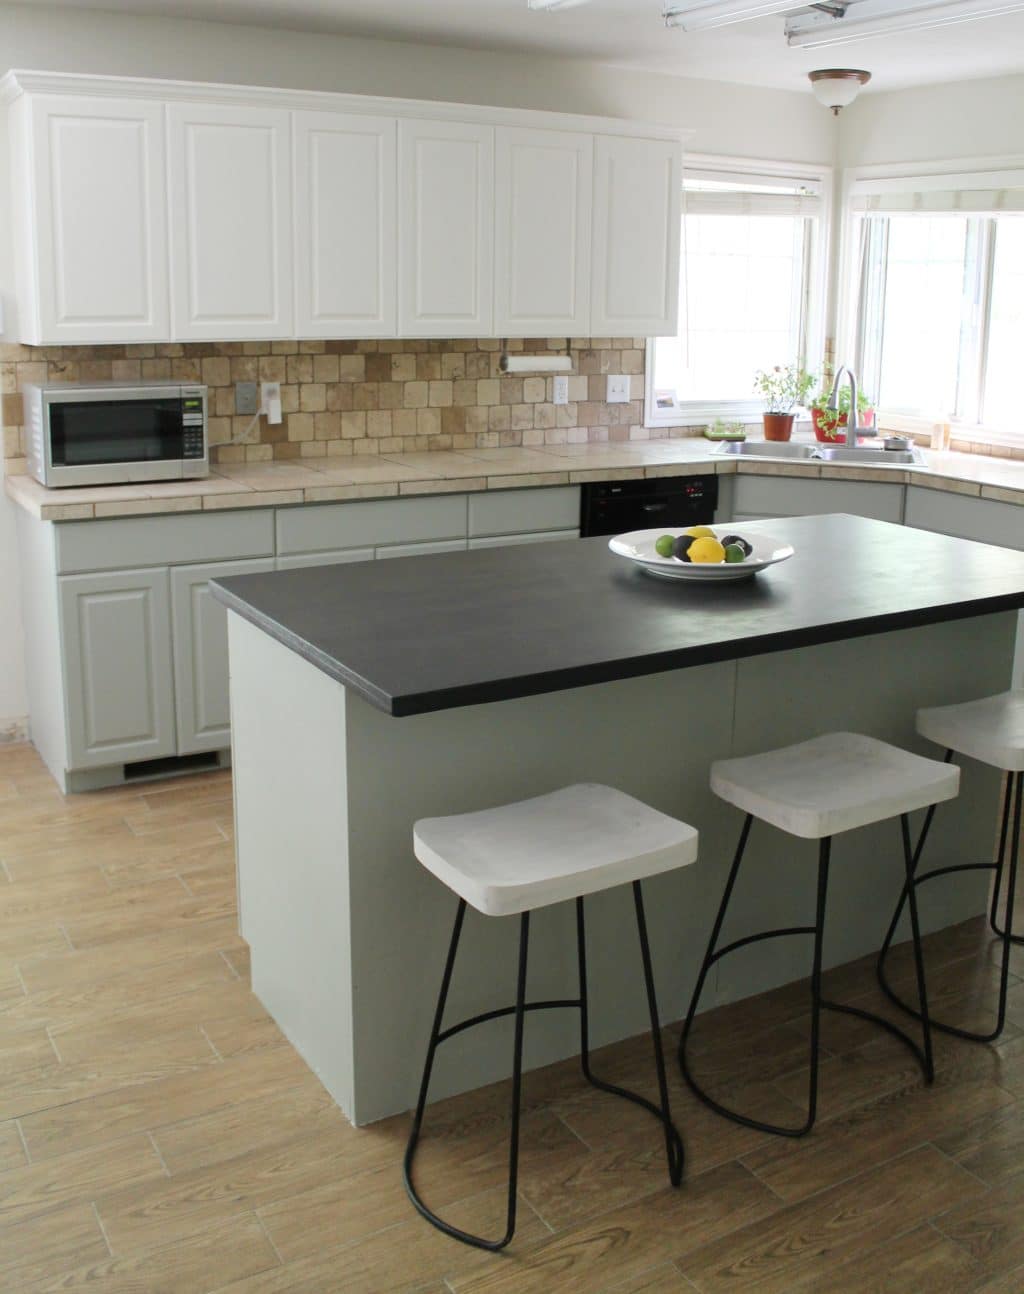
With fresh paint on the cabinets, we were eager to upgrade our barstools, too. I sold our old ones on Craigslist for $50 quick and ordered these ones from Wayfair. We love the white mango wood seats and black iron bases–really chic! We are missing the foot rests all the way around the stools, and the swivel. It’s a weird thing to miss–(haha!) but, I am sure we’ll get used to it. We have already received so many compliments on them.
Everything is so fresh now and looks so much larger. The only downside is, with paint, our cabinet imperfections are a lot more visible to us. That door that doesn’t close all the way. The cracks in almost every door. We noticed during the process how many actual chunks are missing from drawers. It’s bizarre and astonishing! Even though the wood grain hid all those things, we don’t regret painting them at all. We’re currently saving up for a complete kitchen overhaul, so this project was to tide us over until we get to that point–we’re hoping next year.
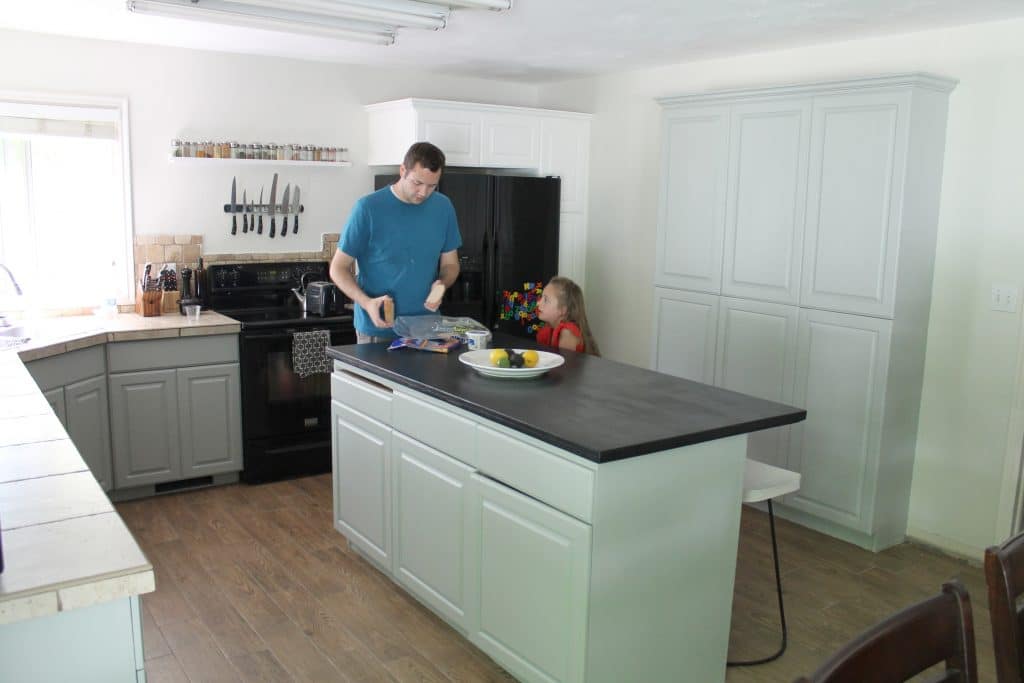
In the meantime, we’re just waiting for our new hardware to get here (any day now!) to really enjoy our “new” kitchen.
Ps. We installed the new dining room fixture over the weekend, too! Pictures tomorrow!
Leave a Reply
What do you think?


Semihandmade
Our wood grain Shaker cabinet fronts were designed for busy, high-traffic homes like ours. Clad with durable textured thermofoils, this line is compatible with Sektion, Akurum, Godmorgon, and Besta cabinets from IKEA. It's the perfect, practical way to add the warmth of wood to all the rooms of your home.
Collaborations
learn more

next
Loloi
We have teamed up with Loloi to create a line of rugs that are as affordable as they are beautiful. This collection houses a great mix of traditional and modern rugs, in cottage-y colorways, as well as vintage-inspired beauties that you’ll want to roll out in every room.
Collaborations
learn more

next
STUGA
We partnered with Stuga on a line of hardwood floors — The Ingrid is really livable, and the color is very neutral. It doesn’t lean warm or cool, it’s that just right in-between. We have really loved putting it everywhere in our house. It’s the best jumping-off point for design, no matter your interior style. In addition to being beautiful, Ingrid is really durable — we have three kids, and we always have a home construction project going on. Ingrid stands up to it all.
Collaborations
learn more

next
SHop all
What We're Right Now
What We're Right Now
Looking for our favorite things? A place to shop our home room by room, or just catch up on what Julia's wearing / loving right now? Browse the CLJ shop.
Loving


Portfolio


Design
Befores, afters, mood boards, plans, failures, wins. We’ve done a lot of projects, and they’re all here.
BROWSE BY CATEGORY
let's break this thing up
We have a long-standing relationship with DIY, and love rolling our sleeves up and making it happen.
Projects
Even when you don’t want to rip down a wall, you can make that space in your home better. Right now.
read more
read more
read more
02
01
03
looking for inspiration?
A reader recently asked me if I’m starting to fully embrace traditional style and whether we still consider our house to be a “modern Colonial” and why. It was a really great question and so timely — I had really just been thinking about my approach to this home and how my style has changed […]


SEARCH THE BLOG
We've been doing this since 2009 and we've posted a whopping 24145+ blog posts and counting. You might need a little help searching, huh?
looking for something?
find stuff like:
")
Can We Send You Our Love Letter?
Another way for us to stay in touch! Joining our weekly newsletter gives you access to exclusive content, never-before-seen photos, your questions answered, and our favorite DIYs. Sign up below!
Follow Along on Instagram
Welcome to our online community where we've posted home, DIY, style, renovations, and family since '09. Renovating our #cljmoderncottage in Idaho and headed for new adventures in Raleigh, NC. #cljfam #cljtransformations
@chrislovesjulia


Links
Get Around
Make yourself right at home
Portfolio
Design
Casual Friday
Projects
Lifestyle
Gift Guides
All Posts
Shop
Love where you live.
Social
RivrLinks
Links
Get Around
Make yourself right at home
Portfolio
Design
Casual Friday
Projects
Lifestyle
Gift Guides
All Posts
Shop
Love where you live.
Social
RivrLinks
I’m just wondering which specific valspar product you used to paint your cabinets? Thanks!
I love the cups to prop up the doors. Genius! I have been using paint cans, too, but our master bath has too many cabinet doors.
Hi! It’s amazing what a deference paint makes! Just wondering if you had considered ceramic paint or chalk paint for your cabinets? And what were the pros/cons you came across? Thanks!
What kind of Valspar paint did you use?
Hi Julia!
Curious.. did you paint the insides of the cabinets? Don’t remember seeing a previous comment about this. I’m planning doing my kitchen, but will do a trial with my en-suite cabinet first :) (same type). I’ve been going back and forth “to paint inside”, to NOT paint inside”..
I painted the inside of the doors but not the cabinet boxes. They were actually already white inside, but even if they weren’t I probably wouldn’t have. Paint can scratch easily when you’re constantly putting plates in and out.
I noticed you didn’t sand your cabinets before you added primer. Do you think it isn’t needed to sand before adding the primer? We have sold oak cabinets. Thanks! Great tutorial.
How are your cabinets holding up after 2 years? Did you put any top coat/poly on after painting? I painted my oak cabinets about 6 years ago – Ivory with a brown glaze. I sanded/primed/painted/glazed and put on about 3 coats of poly. They have held up incredibly well – I am just ready for a change. I want to paint them pure white but it was such a long hard process last time I was researching to see if I could cut out some steps!
Knowing I have 3 coats of poly on these cabinets – do you think I should sand or just degloss and prime? Should I use poly again? Am thinking of trying the Valspar you used or BM Aura.
Thanks for your input!
We have since renovated our whole kitchen. Check it out here.
Did you have to dilute paint before using it in the sprayer?
Nope!
Okay, that’s it! I am officially chalk painting some ugly old wood furniture in my kitchen! Thanks!
[…] Wagner Flexio 590: I’ve sung its praises before when we painted our crib and cabinets and I will again and again. We’ve tried several other paint sprayers with horrible results […]
Would the painting work on pressed wood cabinets? They are about 25 years old. If so, what adjustments would you make?
I think it should work perfectly!
Hi Julia! Ok so we’re in the process of giving our kitchen a makeover and we’re going to get new cabinet fronts and paint them ourselves. Just wondering if the paint you used was oil-based or water-based? I think I’ve heard that oil-based holds up a lot better over time but wanted your opinion. Also, how much paint/primer did you actually need to complete your kitchen? I’m at a loss as to how much to get … Thanks so much! I know this post is several months old, so hopefully you see this comment :)
Our last kitchen, I bought one gallon (when we just did all white the first time) and I didn’t even use it all. This time, I did two colors, so I bought two gallons and definitely could have gotten away with just a quart for the white. I think a gallon is plenty for our size. I’m not sure what size your kitchen is. I have never tried oil-based paint on cabinets, so I can’t speak from experience, but I too have heard it holds up very well and is very hard to the touch. Some things to keep in mind though is oil based paint will smell–I mean, hit you in the face smell!–for a long time. The drying time is also a very long time. A few different brands have what is called a water-based alkyd that acts like an oil (self-leveling, hard as a rock, very durable) without the smell. The dry time is still longer than your general latex paint, but it is a really good option. Benjamin Moore has a line like this (Advance) and I heard Sherwin Williams does too.
looks great! i am wanting to paint my island, so i wanted to ask if you had any tips about the proper way to paint cabinets (without a sprayer)…i, of course, know to use either a brush or roller, but i just thought it couldn’t hurt to see if you had any tips to get the smoothest application possible!
I like cutting in the insets (if you have inset panels) with a 2″ angled brush and then rolling everything else with a smooth roller (it will say on the package for cabinets/doors etc.). Another tip I can give you is if you want to minimize brushstrokes, a lesser sheen paint will also help with that. Go for a satin or eggshell instead of semi-gloss.
[…] see, when I painted the kitchen cabinets just over a month ago, I chose the colors I did partly to get it out of my system. I missed our two-toned cabinets from […]
[…] took us about an hour total and we woke up to a new kitchen. The hardware ties in nicely with our new stools and chandelier in the dining room, […]
One more question. :) did you hand paint the island and the non-cabinet part of the wood? Or does the sprayer work for those areas?
I love the two tone cabinets! The green grey is beautiful. I’m excited to see what hardware you chose- dark to match the light fixture or a lighter option? Or are you keeping it a secret? :)
Ooooo, we’ll keep it a secret for fun. :)
Looks AMAZING!! You guys did a wonderful job!
Looks great! Is the wood grain visible?
In the right light, you can see it a little bit. But, it’s not noticeable at all!
I thought for a second that you guys re-did the counter tops too! I can’t believe how much they blended in before! Great job!
I looove the painted cabinets! They look amazing! Who knew that cool stone backsplash was even there? The white really makes it stand out. Looks great!
It looks so much bigger and brighter! Great color choices!
They look fabulous such a great transformation. I can’t wait to see the final hardware selection as well.
Looks good! We have painting cabinets on our to-do list for this fall. The transformation of paint is so huge and I can’t wait to see what it does to our kitchen space!
It never ceases to amaze me what a difference paint can make – it looks awesome!! So much more airy and bright!!
It looks absolutely fabulous. Great choices and great execution, as always!
It looks like a completely new kitchen – looks great! I love the stools too.
Love this- can’t wait to paint mine! you guys are giving me motivation!
Julia! that kitchen looks AMAZING!! what a huge difference. Loving it and can’t wait to see the new lighting.
Looks fabulous–congrats! Can’t wait to see the hardware. I had to laugh out loud when I read this–our kitchen was similarly wood-riddled until a couple weeks ago. Now it’s fresh and bright, too. We drew a lot of inspiration from your first makeover–but we used BM Calm on the uppers and Midnight Dream on the lowers. (Yep, Advance, but we used Aura upstairs on the bathroom cabinets and I agree with you–so much easier to use and I also think it’s more durable.) We love our kitchen now– but yes, we have noticed too how painting cabinets points out all of their imperfections. (In order to get one door–which was really warped–to hang properly, I had to shim it out about a third of an inch!) Nevertheless, we are thrilled with the new look. Our “quick and dirty” has to last about ten years (we’re saving up for a whole house redo) so we’re very happy with this. (And I guess I should finally post our kitchen on my own site. Thanks for the push.)
It looks awesome. I’m totally inspired.
They look great, Jules! We are closing on a house in 3 week (yay!) and I plan to paint the cabinets first thing. I’m thinking of using Rustoleum, but it didn’t have the color I wanted. Your tutorial was perfect timing! The cabinets we will have are cheap laminate. Same thing, want to make them pretty until we can redo the kitchen. Would you change anything in this process for laminate cabinets? Also, do you use the paint sprayer for other projects… like walls?? Just checking to see if it’s worth the investment now ;)
We just got this paint sprayer a couple months ago after a series of bad luck with paint sprayers in general. This one–we love! We have only used it to paint our cabinets and crib, but have loaned it to friends and family to paint their walls and even re-stain a fence. Worth it, I say! As for laminate cabinets, the same process will work. The most important step in painting laminate is primer! I’ve had good luck with Ben Moore’s fresh start on super shiny surfaces. If they aren’t really shiny, any good primer (kilz, zinger) will work. Good luck! Excited for you!
It looks amazing! I love how the two tone is subtle. And those stools!!
Looks amazing!!!! Was sanding at all apart of the process? We are looking to do something similar in a few short weeks at a home we just purchased. Love the tutorial!
We didn’t sand! Although you just reminded me of a step I left out. Before I primed, I filled all the old hardware holes with wood filler and then sanded that smooth.
Thank You so much for the feedback. :) I will let hubs know. I’m so excited to get started. The change in cabinetry color really changed the look of your countertops and backsplash. Great work!
Dude, looking sharp! Interesting what you said about the Advanced line. We used that for ours, but now that you point out the uber long dry time, you’re right! Just assumed they all took that long.
Stools are too good. Really love the them and the low profile. And, excited to see the new lights because I wanna know if I guessed right! Ha!
Such a fantastic transformation! Amazing – the power of paint right? I love how open and large your kitchen looks. And the stools are lovely. A big job very well done : )
What a change! Your kitchen looks twice the size now. Are you wanting to do anything with the backsplash now or are you waiting until the big kitchen overhaul to tackle that project? I love that shelf with your spices…I wish we had space to do that! Good work!