


Granted, the gallery wall was short-lived and we didn’t even share it with you until after we took it down and moved the majority to the laundry room. And for a real shocker, here’s how the room looked a couple months ago before we decided to embark on this revamp.


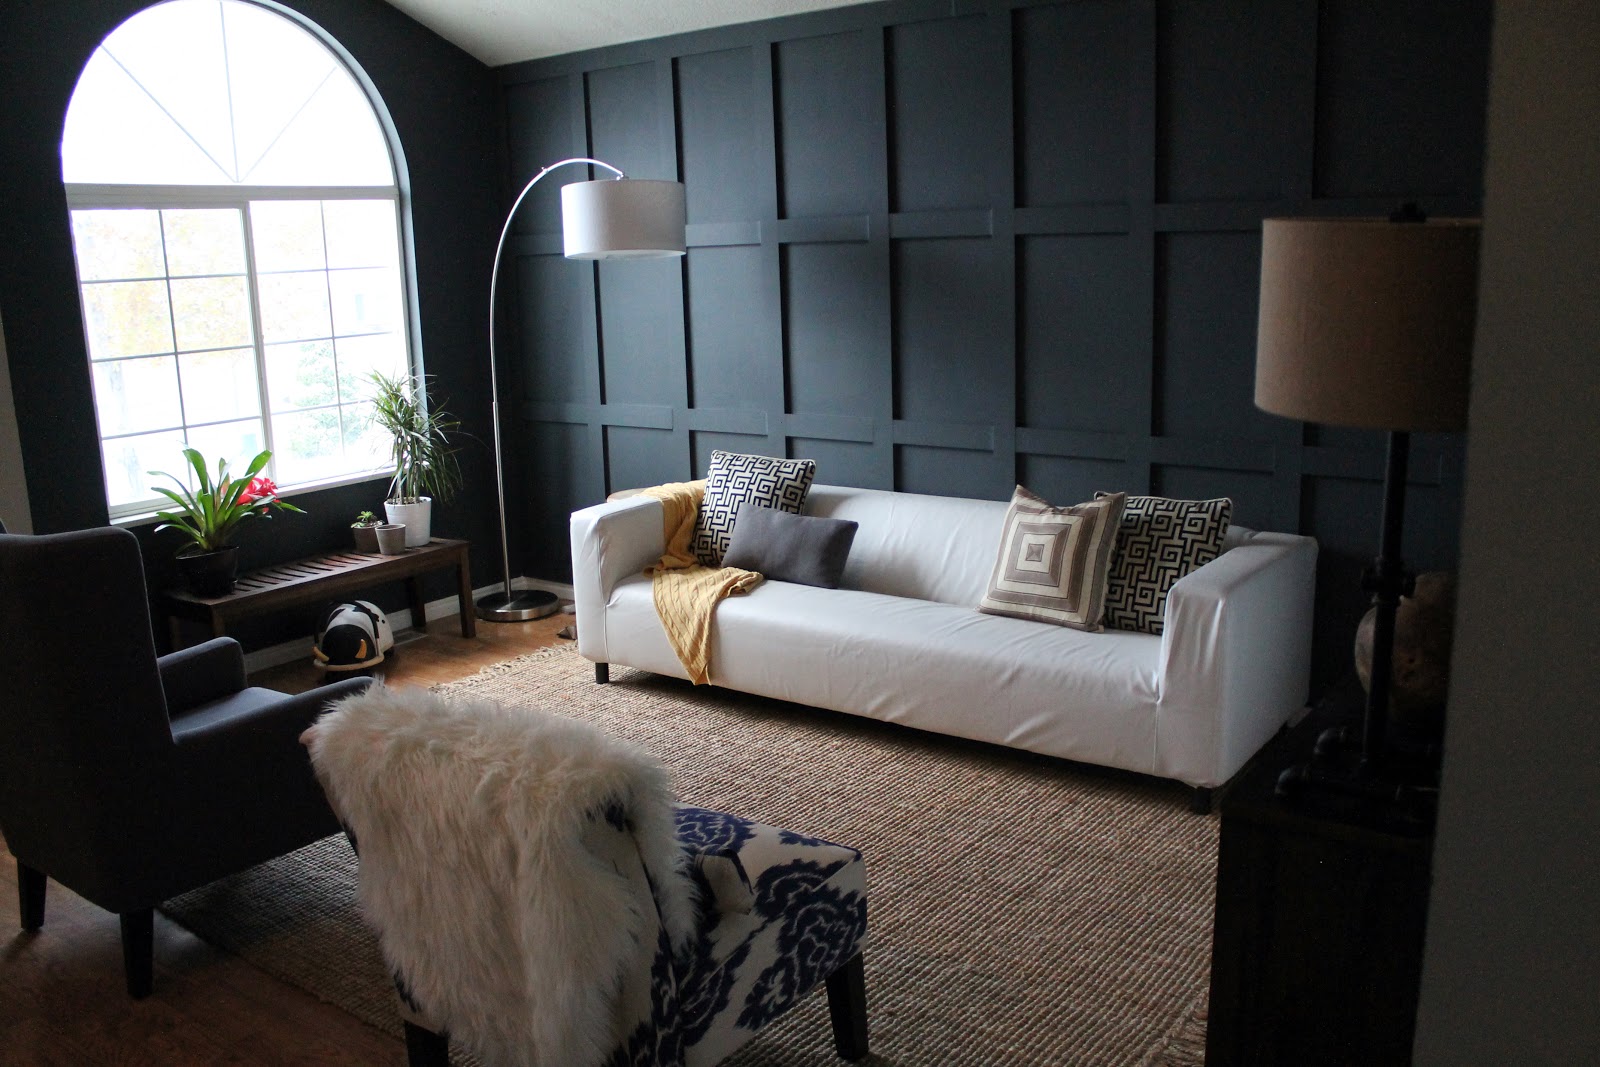
Ha! I can’t help but think, after looking at that picture snapped in August, that we have crossed over to the dark side. Although, I think we prefer “sophisticated.” Here’s how our living room is lookin’ today, donning its new wainscoting :

The room feels so much larger. And…taller. And more sophisticated with a casual twist–which is how we like it. When it came to painting the panels, I used a small foam roller for all of the fronts and my handy Wooster shortcut brush to get in the inside edges.
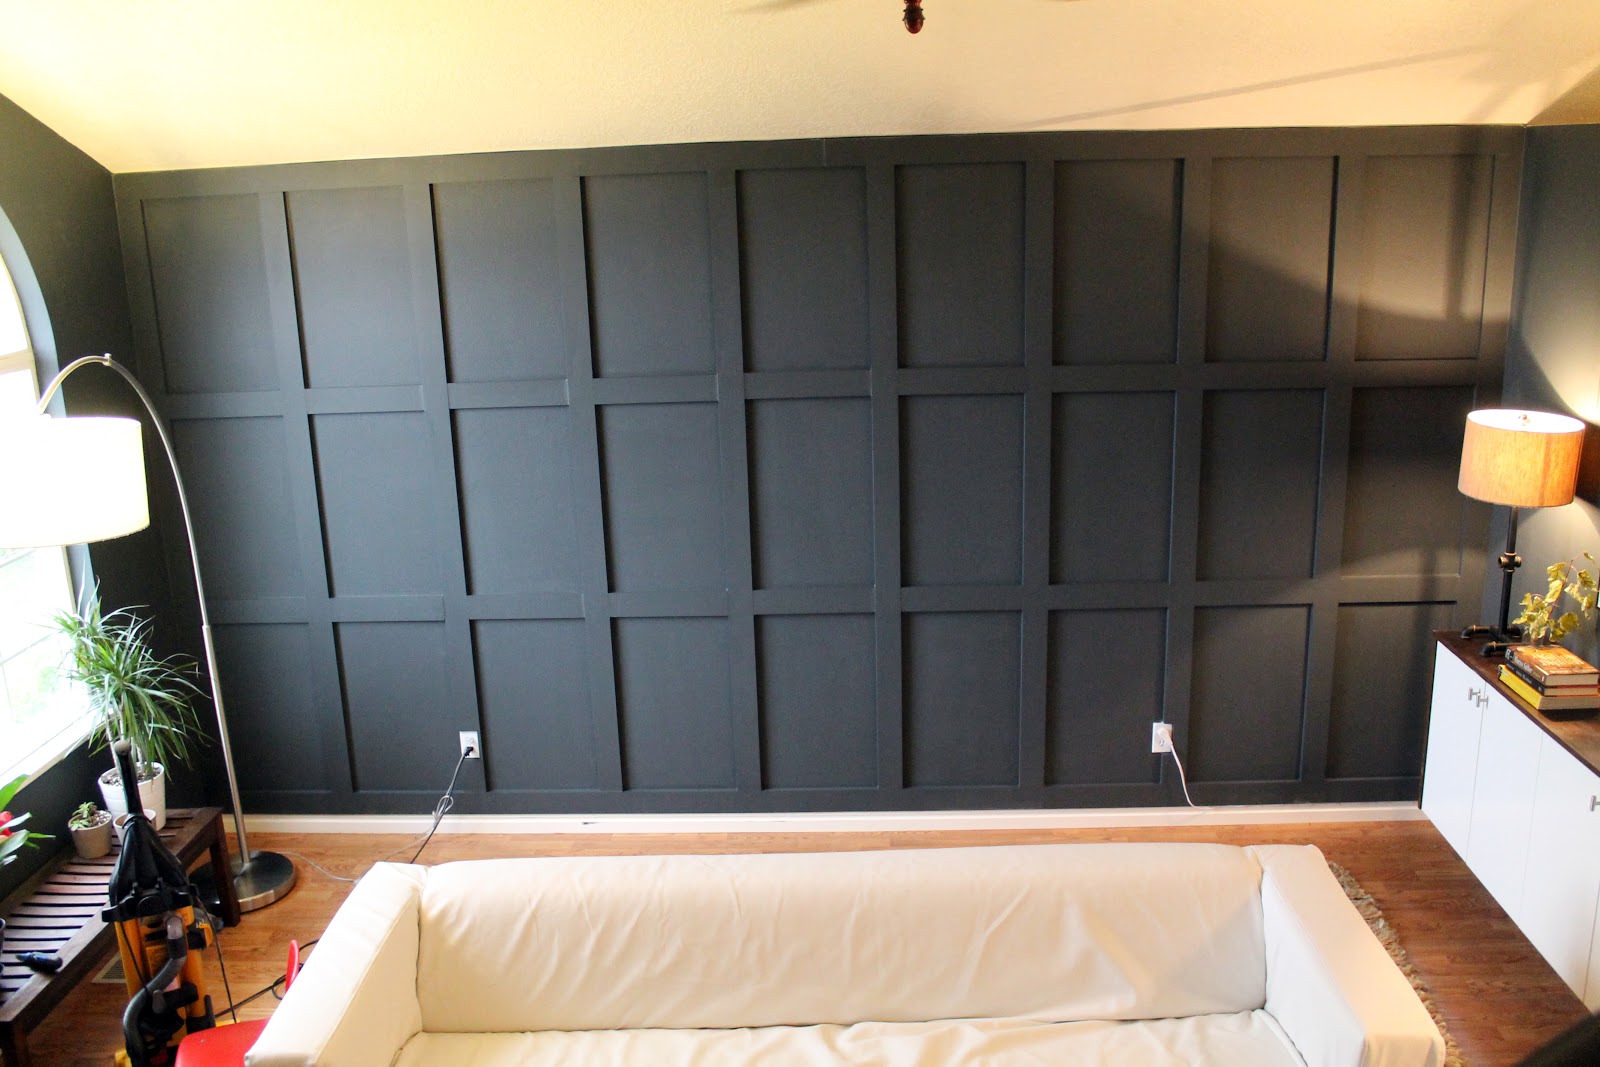
Luckily (and magically) we still had enough in the gallon of paint we purchased when we painted the room to cover the wainscoting–all 2 and a half coats it took. For reference sake, the color is from Kwal Paints and it is called Crave. We went with a matte finish which gets bonus points for hiding wall imperfections–we especially love it because it disguises the slight orange peel texture of our walls.

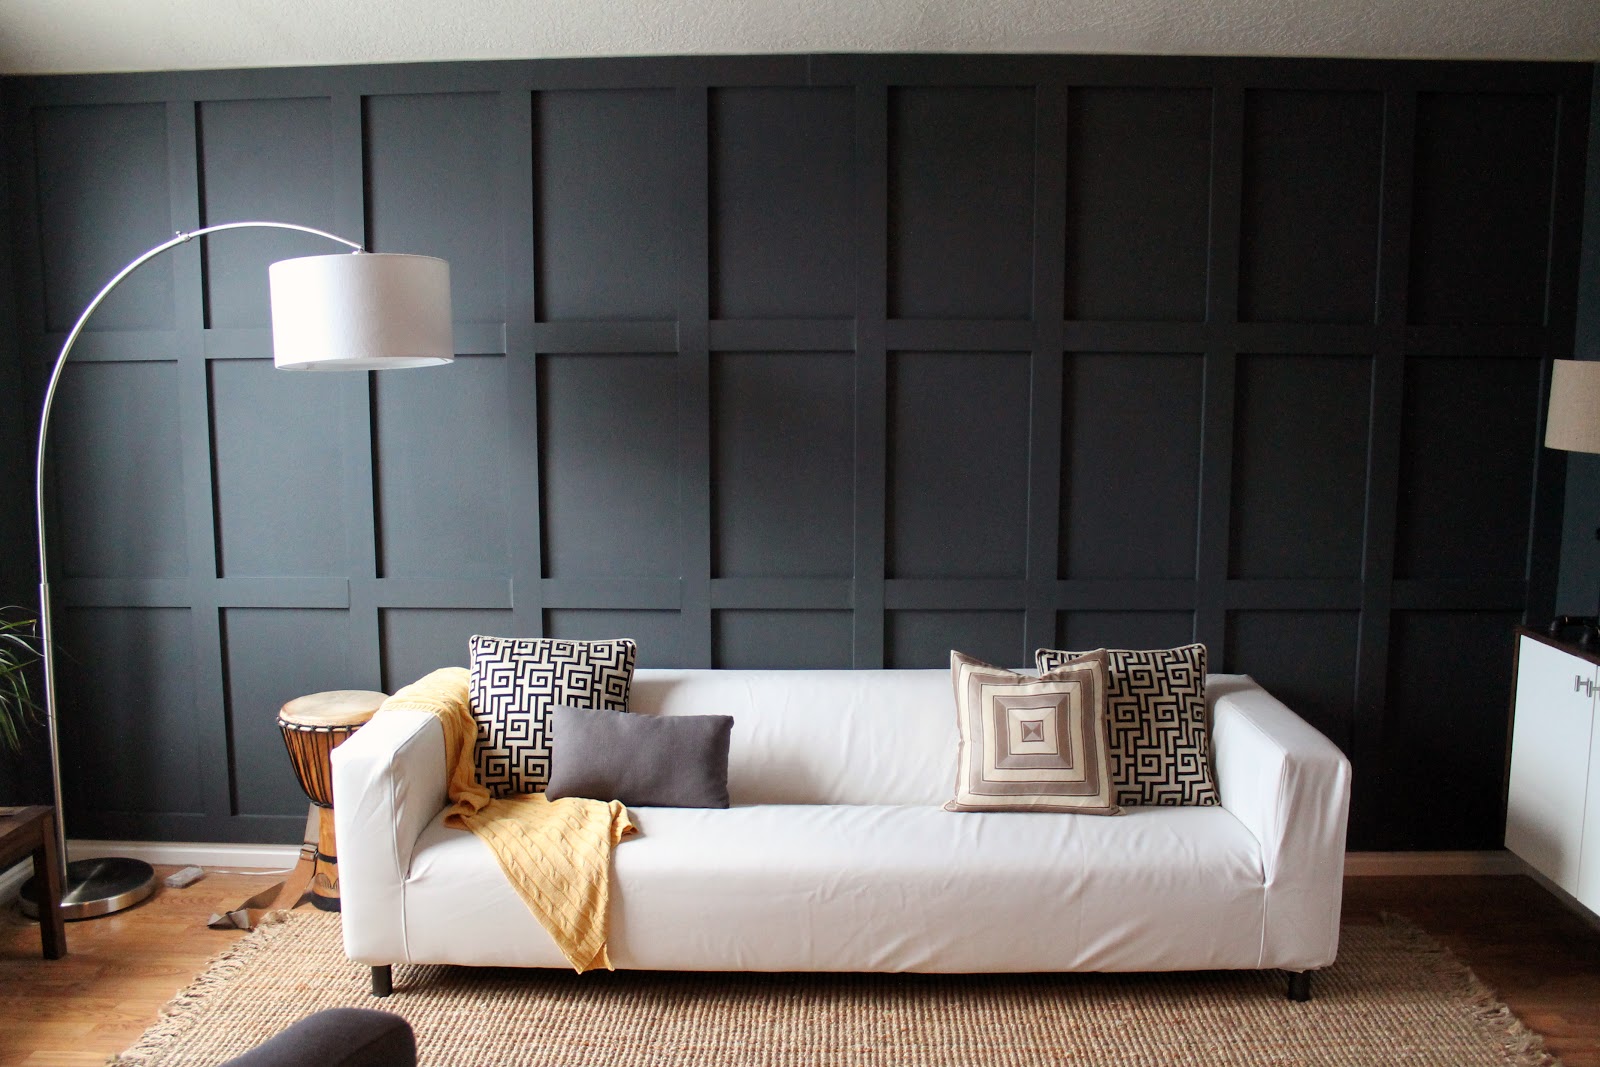
At night, the paint transforms into a soft black and between our lamps on the fauxdenza and our arc floor lamp, the wainscoting is well lit and the details are still very much present. We worried about the details getting lost in all of the shadows with such a dark paint color, but maybe (we don’t really have anything to compare it to) the darker paint color accentuates the wainscoting and makes for a bigger contrast? Who knows. Point is–it works and we have zero regrets going dark in this room. In fact, we may just start advocating for dark paint. Too many white walls in this world (says the girl who painted her studio white this summer)!!!

Budget wise, the project cost us $117.86. That includes all the lumber and the bottle of liquid nails we used to adhere the boards to the wall before following up with a nail gun. Everything else, including the nail gun, paint, spackle and caulk we had on hand.

Leave a Reply
What do you think?


Semihandmade
Our wood grain Shaker cabinet fronts were designed for busy, high-traffic homes like ours. Clad with durable textured thermofoils, this line is compatible with Sektion, Akurum, Godmorgon, and Besta cabinets from IKEA. It's the perfect, practical way to add the warmth of wood to all the rooms of your home.
Collaborations
learn more

next
Loloi
We have teamed up with Loloi to create a line of rugs that are as affordable as they are beautiful. This collection houses a great mix of traditional and modern rugs, in cottage-y colorways, as well as vintage-inspired beauties that you’ll want to roll out in every room.
Collaborations
learn more

next
STUGA
We partnered with Stuga on a line of hardwood floors — The Ingrid is really livable, and the color is very neutral. It doesn’t lean warm or cool, it’s that just right in-between. We have really loved putting it everywhere in our house. It’s the best jumping-off point for design, no matter your interior style. In addition to being beautiful, Ingrid is really durable — we have three kids, and we always have a home construction project going on. Ingrid stands up to it all.
Collaborations
learn more

next


SHop all
What We're Right Now
What We're Right Now
Looking for our favorite things? A place to shop our home room by room, or just catch up on what Julia's wearing / loving right now? Browse the CLJ shop.
Loving


Portfolio


Design
Befores, afters, mood boards, plans, failures, wins. We’ve done a lot of projects, and they’re all here.
BROWSE BY CATEGORY
let's break this thing up
We have a long-standing relationship with DIY, and love rolling our sleeves up and making it happen.
Projects
Even when you don’t want to rip down a wall, you can make that space in your home better. Right now.
read more
read more
read more
02
01
03
looking for inspiration?
A reader recently asked me if I’m starting to fully embrace traditional style and whether we still consider our house to be a “modern Colonial” and why. It was a really great question and so timely — I had really just been thinking about my approach to this home and how my style has changed […]


SEARCH THE BLOG
We've been doing this since 2009 and we've posted a whopping 24145+ blog posts and counting. You might need a little help searching, huh?
looking for something?
find stuff like:
")
Can We Send You Our Love Letter?
Another way for us to stay in touch! Joining our weekly newsletter gives you access to exclusive content, never-before-seen photos, your questions answered, and our favorite DIYs. Sign up below!
Follow Along on Instagram
Welcome to our online community where we've posted home, DIY, style, renovations, and family since '09. Renovating our #cljmoderncottage in Idaho and headed for new adventures in Raleigh, NC. #cljfam #cljtransformations
@chrislovesjulia


Links
Get Around
Make yourself right at home
Portfolio
Design
Casual Friday
Projects
Lifestyle
Gift Guides
All Posts
Shop
Love where you live.
Social
RivrLinks
Links
Get Around
Make yourself right at home
Portfolio
Design
Casual Friday
Projects
Lifestyle
Gift Guides
All Posts
Shop
Love where you live.
Social
RivrLinks
What a fantastic transformation! I love the added texture it brings to the room and I adore the sophisticated intrigue that the darker colour introduces in the room. You guys did a stellar job.
[…] Chris Loves Julia […]
[…] PROJECT #1 – Guest Room Accent Wall (based on Chris Loves Julia’s old living room!) […]
[…] To see more on their project, click here. […]
Hi,
Love your dark full wall wainscoting design and featured it on our list of fabulous wainscoting design ideas here:
http://visualresistance.org/20-fabulous-wainscoting-ideas.html
Do drop by and let us know what you think. :)
This is so beautiful. I would like to know about the long white cabinets along the right hand side of the room? Is this a hack of some kind? Almost looks like plain cabinets that you painted and put a top on. Would love to know.
This is so elegant! I love a good dark wall. Mercer by Ralph Lauren is my favorite, we’ve used it several times throughout the house.
This is really fabulous! I love that it makes the entire room look dramatic and a little moody.
Why are you redoing it…it looks fantastic to me
So dark and moody, I love it!! I can’t believe you did it so cheaply too :)
Love this! You guys made the perfect choice!!
Stunning!! I agree it adds sophistication to the room. Great job!
Can I say…WOW!!! Really beautiful job. The room is absolutely stunning. Version:1.0
I would LOVE for you to link this up at my Ginger Jamboree Link Party!!
WOW! This is one of our next “big” projects around here and I love your finished wall. The dark color looks great! Thanks for some new inspiration and motivation to get on that!
What a dramatic addition to the room. Loving it.
I love the dark wall. it makes the room feel cozy.
I just discovered your blog from Younghouselove’s Pinterest Challenge! I am seriously in love with this idea! Love the beautiful, dark wall color too, it definitely adds sophistication!
Ashli
thegrayhouseontheleft.blogspot.com
Wow I just found you on Younghouselove for the Pinterest Challenge and I am seriously in love with this idea! Beautiful dark color too!
Oh Em Geee I freaking love this. Fantastic.
Allison @ houseofhepworths.com
Stunning! I love this transformation!
http://boyplusgirldesign.com
Woweee, looks good, lady!
Thanks Janine. You made my day.
So simple. Thanks Melinda!
Yessss! Thanks so much.
Can’t wait to see/hear how it turns out!
Lucky girl!
Thanks Andi-girl! You little sweetie. That window was a challenge when we first moved in. How do we dress it?! But we have loved making it a valuable part of the room.
Thanks dude! :)
Ditto! Sometimes we have to go crazy with ideas before we settle in on one that feels like us.
Oh Lexy. You crack me up daily.
I think it could look great as long as you used similar boards. For instance, if we were to do a treatment elsewhere, we’d use the same width of boards with the straight shaker-style edges. Go for it!
this looks AMAZING. Not sure if you can help me work this through… but we did a board and batten effect in our kitchen along the back wall. We have a smallish townhouse. When sitting in the living room looking at the tv, you can see a portion of the kitchen back wall. Having done this wainscoting yourself, do you think it would be too much to do this in our living room knowing the board and batten look is nearby? This may make no sense without photos… :)
Holy. Crap. The room looks HUGE! Fantastic job, you guys. I can’t believe it cost $117. I thought a job like this would be, like, $800! I’m in trouble when we buy a house someday…
This looks amazing!!! You guys did a great job.
Oh, it looks fantastic! The living room is really coming together – love it so much more than the purple.
Dude. LOOOOOVVVEEE!!
Julie…it is SO STRIKING with the size and shape of the window too. (I don’t know what that shape is even called…) And You know what I was thikning…to do that kind of a room right, I think window light is everything. You nailed it. No pun intended. And love how it transforms day to night, I’m sharing this with friends here in Mexico! So proud to call you sister
wow. It looks amazing! I love it!
This looks AWESOME. Yes we have DIY-ed wainscoting (or at least my hubby has) in our dining room and one of our bathrooms. He also did beadboard with trim in our office. I am lucky to have a carpenter for a hubby! xoxo http://www.styleoyster.blogspot.com
Wow – you all are on fire lately with the makeovers! I hope you are so so so pleased with your room! As I mentioned in the comments here yesterday, we’re adding wainscoting to our house this weekend. Pretty sure it’s going to take more than 3 days start to finish :)
This looks SO awesome!!! It definitely adds a level of sophistication and architectural detailing that kick this room up a notch. I loooooooooove it!!!!
I had a feeling this was going to turn out amazing and it did. What a transformation. That wall is fantastic. I love how the light bounces off all the different angles and although it seemed like a fairly simple process the overall look, looks very expensive and complicated. I love it.
What a great job you guys have done…this looks amazing!! Love the changes you are making. Also, while I read quite a few design blogs, I rarely comment but wanted to take a minute to tell you i agree 100% with what Sarah B has said about your blog content etc. I don’t ever leave here disappointed! Enjoy your upcoming party.
Oh Sarah, you just validated a lot of decisions we have made in the past few months. Thank you for recognizing and reading! As for the coffee table….you didn’t miss anything. We moved it to the garage for the project and then I may have put it up on the online classifieds. Hahahaha. We’ll keep you posted.
It looks so good! I can’t believe how fast y’all did that. What happened to the coffee table? I might have missed that somewhere along the line…
I also wanted to say thanks for being so authentic and real. I love how you don’t have a lot of “filler” posts or sponsored stuff. I can always count on wanting to read your whole post when you pop up in my reader! So, thanks!
i LOVE how you’ve done this living room! that wall is incredible! i am always impressed how you guys tackle a project and get it done. inspiring for sure. it is a gorgeous space.
Thanks Lily!
I don’t know how many of our guests read our blog, but we’re definitely celebrating the time-crunch-successes!
Ahhhh!!! I’m officially blushing. Thanks lady.
Oh thanks, Cassandra. We’d love to tackle the kitchen SOON! But we don’t want to have the chaos during the holidays. Maybe first project of 2013? It NEEDS it!
This is absolutely beautiful and unique… so amazed you pulled it off in such a time crunch. I swear you’re super woman! Love this room. I can’t wait to see what project you tackle next! Kitchen remodel perhaps??????????
Oh my gosh it is faaabulous!! I cannot believe how different the room looks, and it’s starting to look soo put together! Wow. Awesome job! That first ‘after’ photo especially looks straight out of a magazine!
Gorgeous! I love it! I bet your guests are going to be amazed at how far this room and your laundry room/bathroom have come in such a short period of time!
This room looks absolutely fabulous!
It looks absolutely FABULOUS!!! I think I’m in love! Wow, just wow!
Awww, thanks. Yes, I heard that bug is contagious. ;)
Yours looks amazing!! Wow! We actually have a paint sprayer but because we only had about a quart of paint left and paint sprayers guzzle paint like crazy, I thought I had better just do it the old fashioned way so we didn’t have to go buy more paint.
Yes, I hopped over to yours the other day and it looked so nice! Well done!
Thanks so much, Linda!
Thanks Meggan. We were on a deadline, so that definitely lit a fire under us. Haha.
Looks good! Is it weird of me that I like that the left outlet sits right in the middle of the board? It sounds like you made pretty quick work of painting, but did you ever consider buying/using a sprayer? I’ve been looking for an excuse to buy one and this might have put me over the edge to actually make the purchase.
As for wainscoting in our house…Yep! And we love it! We did it on our main staircase and built an integrated handrail at the top of it. We then continued the same look for wainscoting into our guest bathroom that is right next to the stairs. Here’s the post where we covered it.
http://www.oldtownhome.com/2011/6/1/Hold-On-Tight-Staircase-Wainscoting-and-Handrail-Project/
We’re also considering a very wide beadboard, or possibly even a tile wainscoting in our master bathroom. Only time will tell on that one.
Love it! It looks great!!
This is AMAZING!!! Way to take a risk!! I would be so scared to paint a room this dark, but with the natural light and great lighting… I can’t imagine it any other way! AWESOME AWESOME AWESOME!
LOVE!!!! It looks amazing. We’ve done the same thing in our bedroom (paint color: Martha Stewart Zinc–because of you! haha) and I’m sold. It totally transforms the room.
I must admit that I was skeptical when you first floated the idea, but wow! I am sold. I agree with all other adjectives used in previous comments. It really does add an element of richness and sophistication! Great job!
That’s fantastsic! Even better than I expected! Like I mentioned before, we did a similar look in our bedroom in white and it was the best thing ever. I took me a lot longer for a MUCH smaller wall, I’m definitely a novice DIYer. :) I think it’s great!
lovely and elegant
Stunning!!!!!!!!!!
Amazing!
Absolutely gorgeous. Well done!
Dude that is awesome! Like really awesome. You totally gave me the wainscoting bug and I need a place to do that in my house!
Get around to it. You’ll love it.
Haha. Thanks, Kate!
Thanks so much, Anne! Good point about the art, too. I’ve seen great examples of paintings hung on wainscoting, but for now, we’ll let the architectural details shine alone.
Oh that’s good. Really really good.
Fave project of yours to date. This takes your house from basic builder to something much, much more awesome! I could see some chunky ornate antique framed oil paintings on it down the road if you ever want to switch it up but I like it the way it is now. Great work!
looks great – super sophisticated and chic! i’m hoping to do a similar project in my bedroom, if i ever get around to it!