


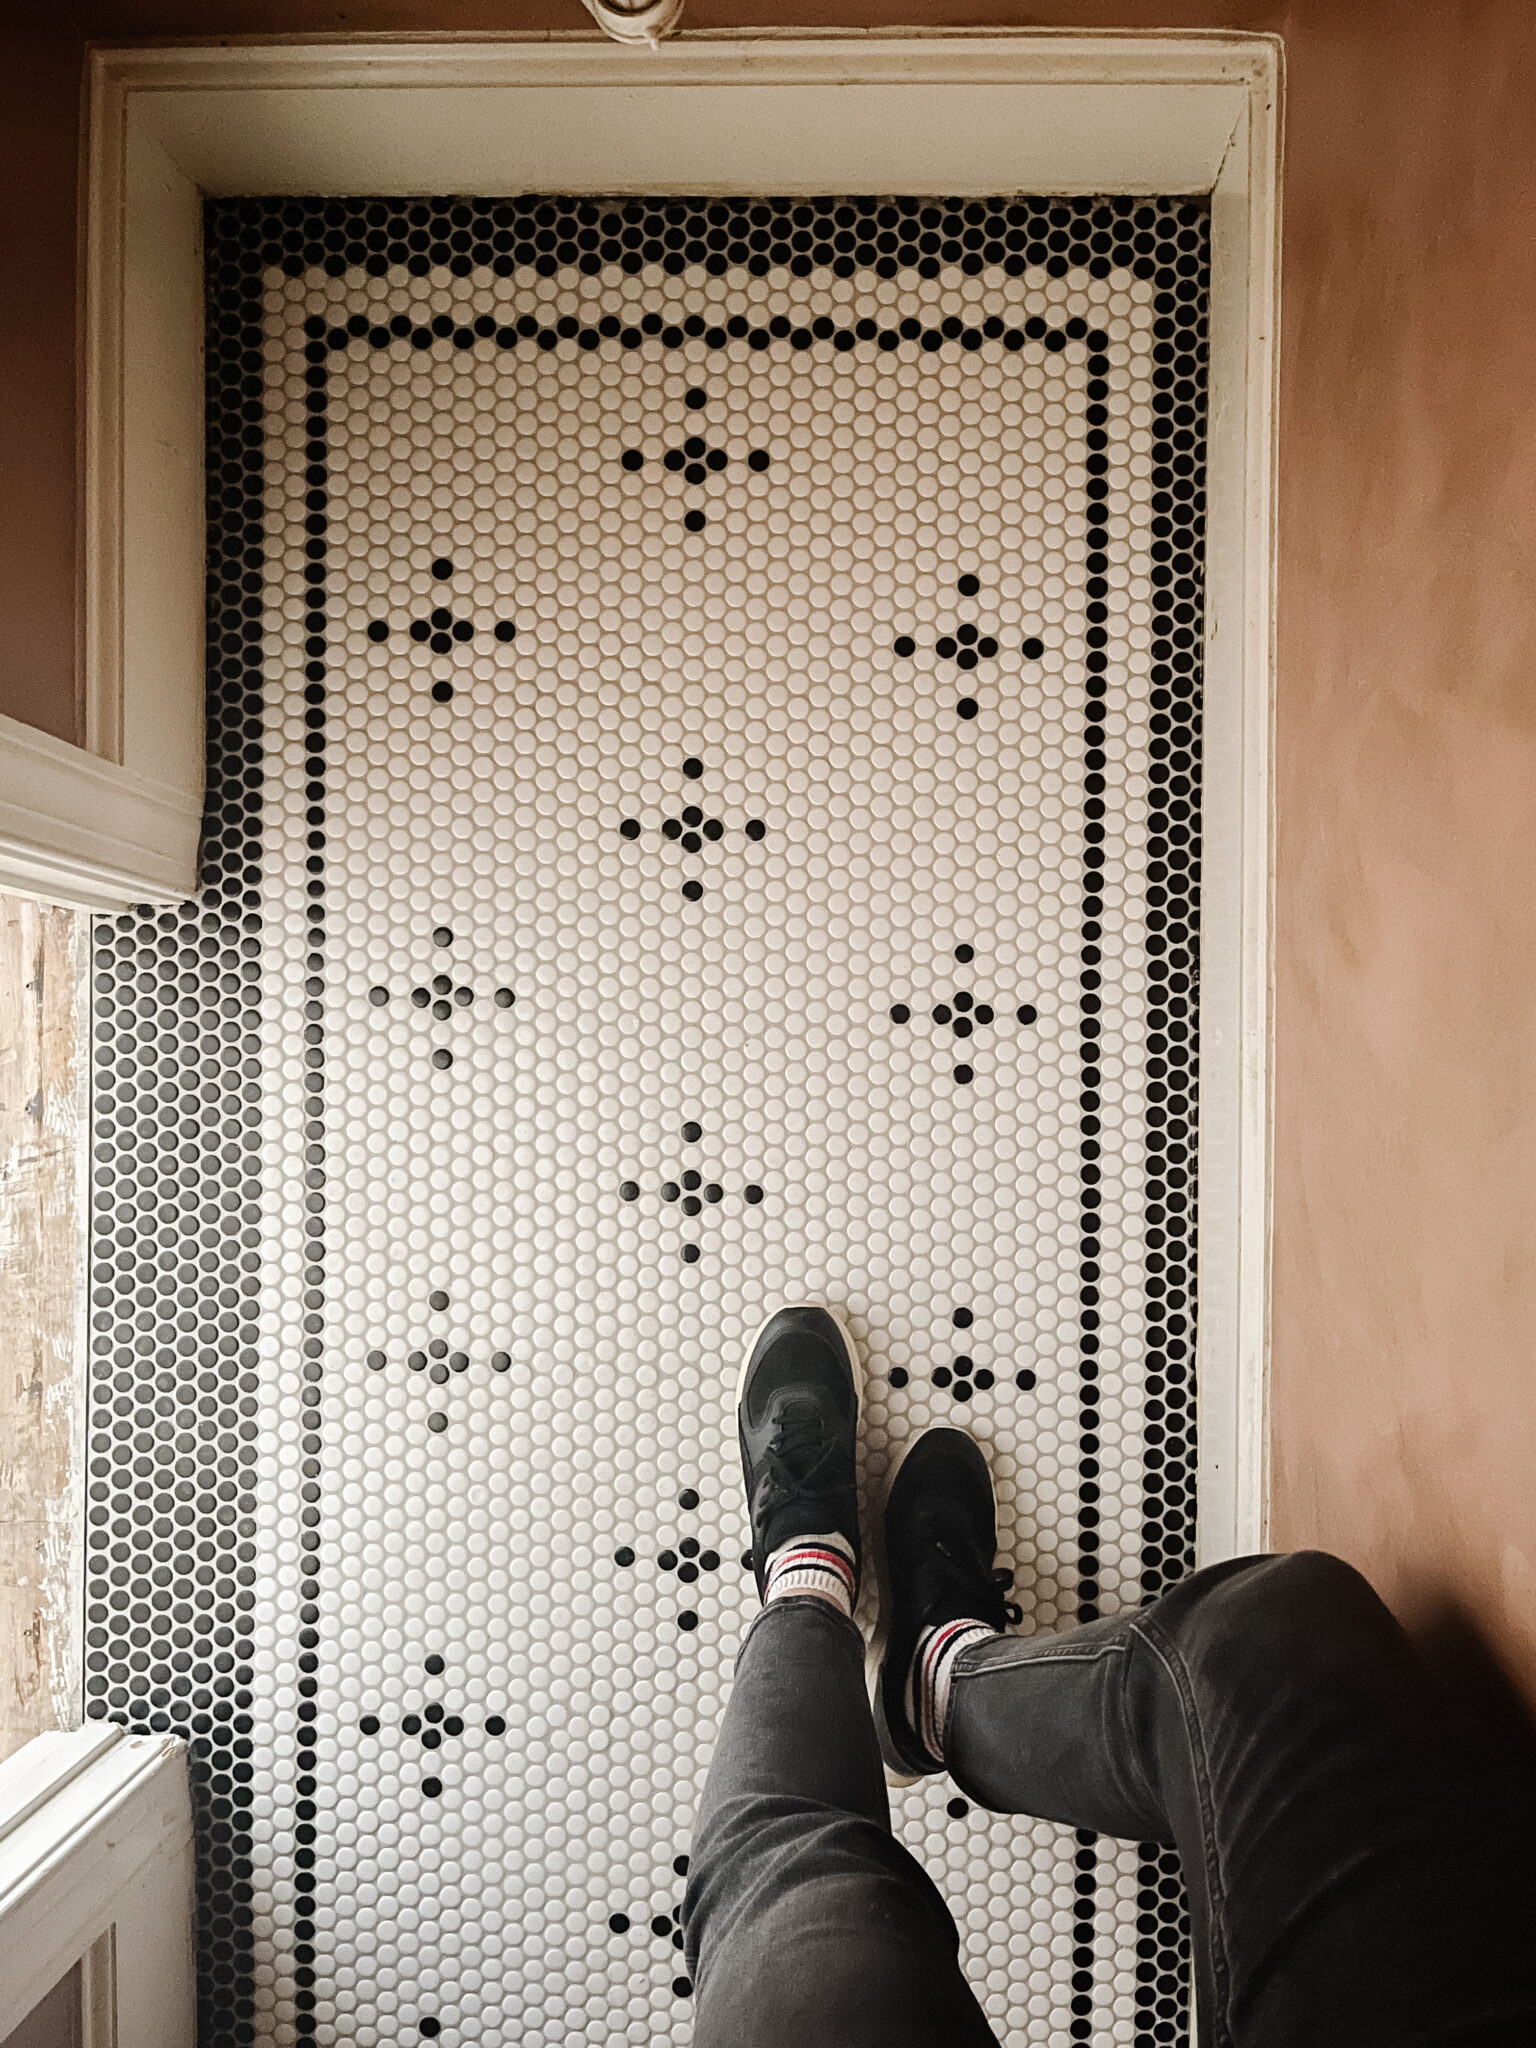
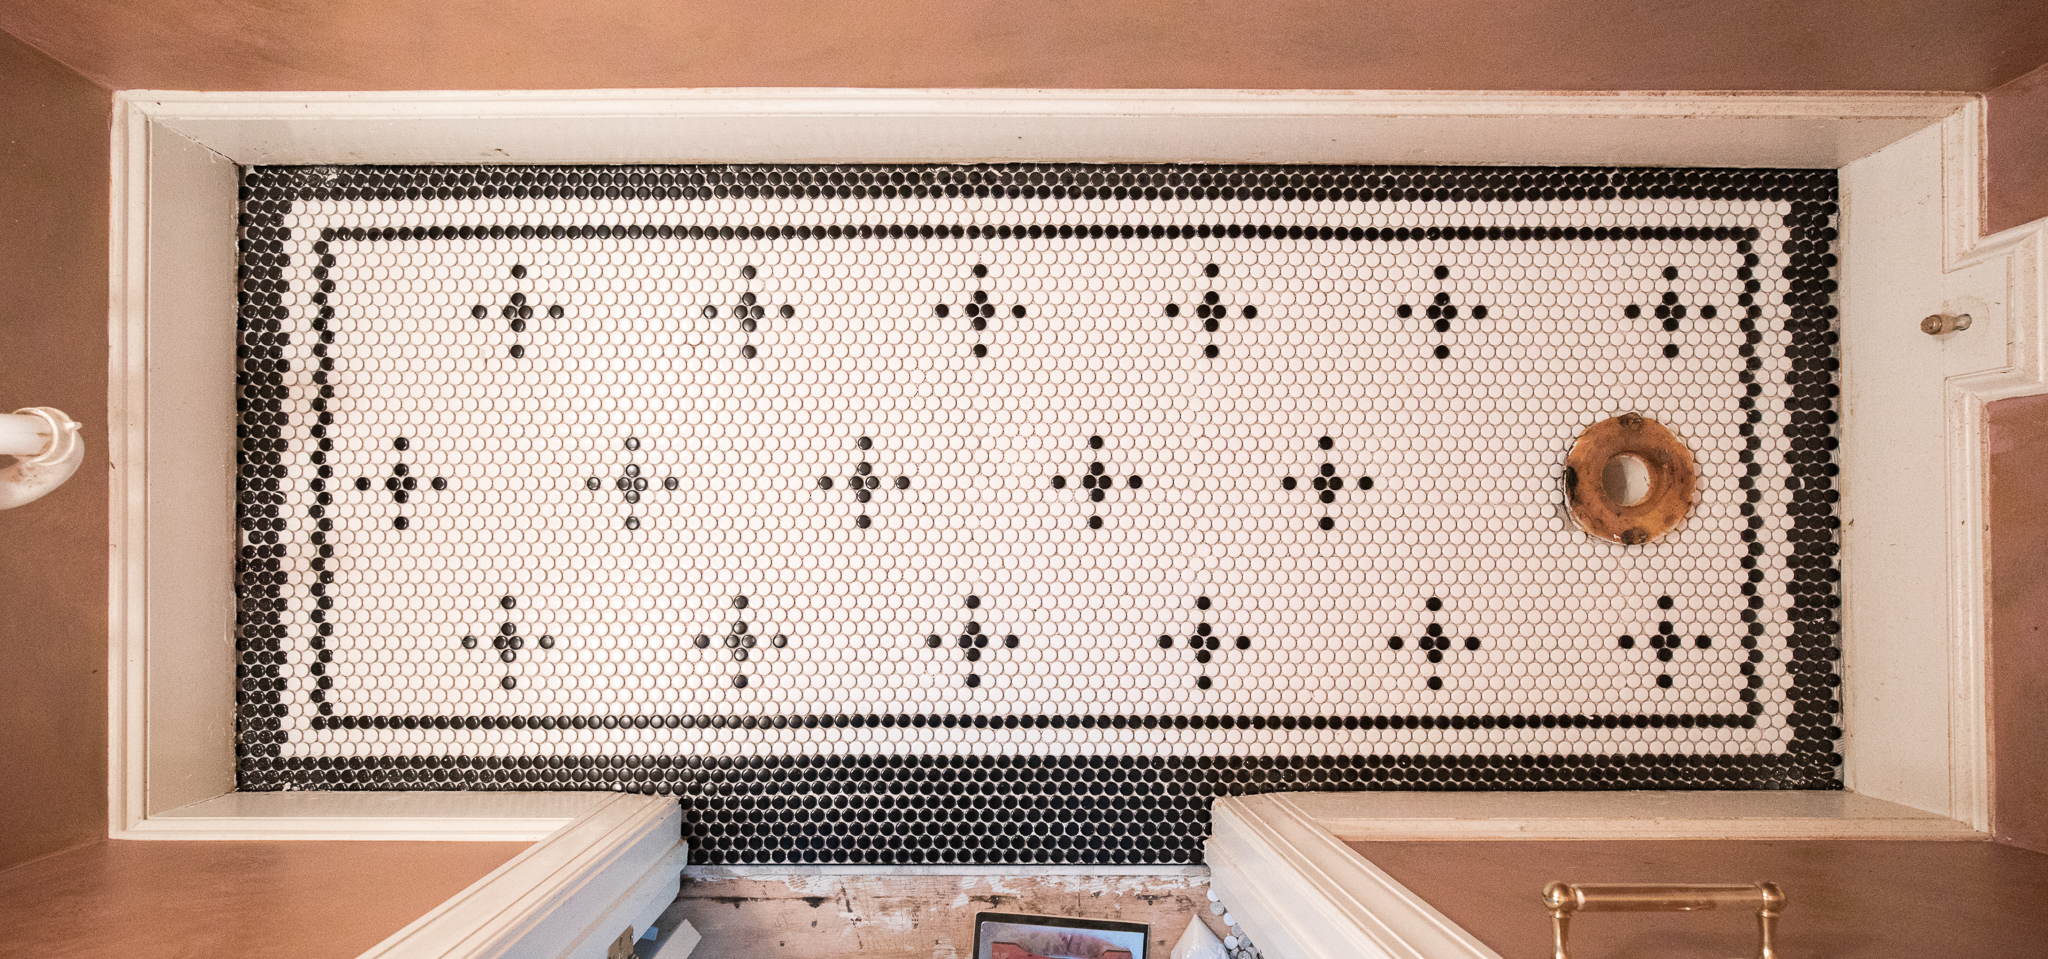
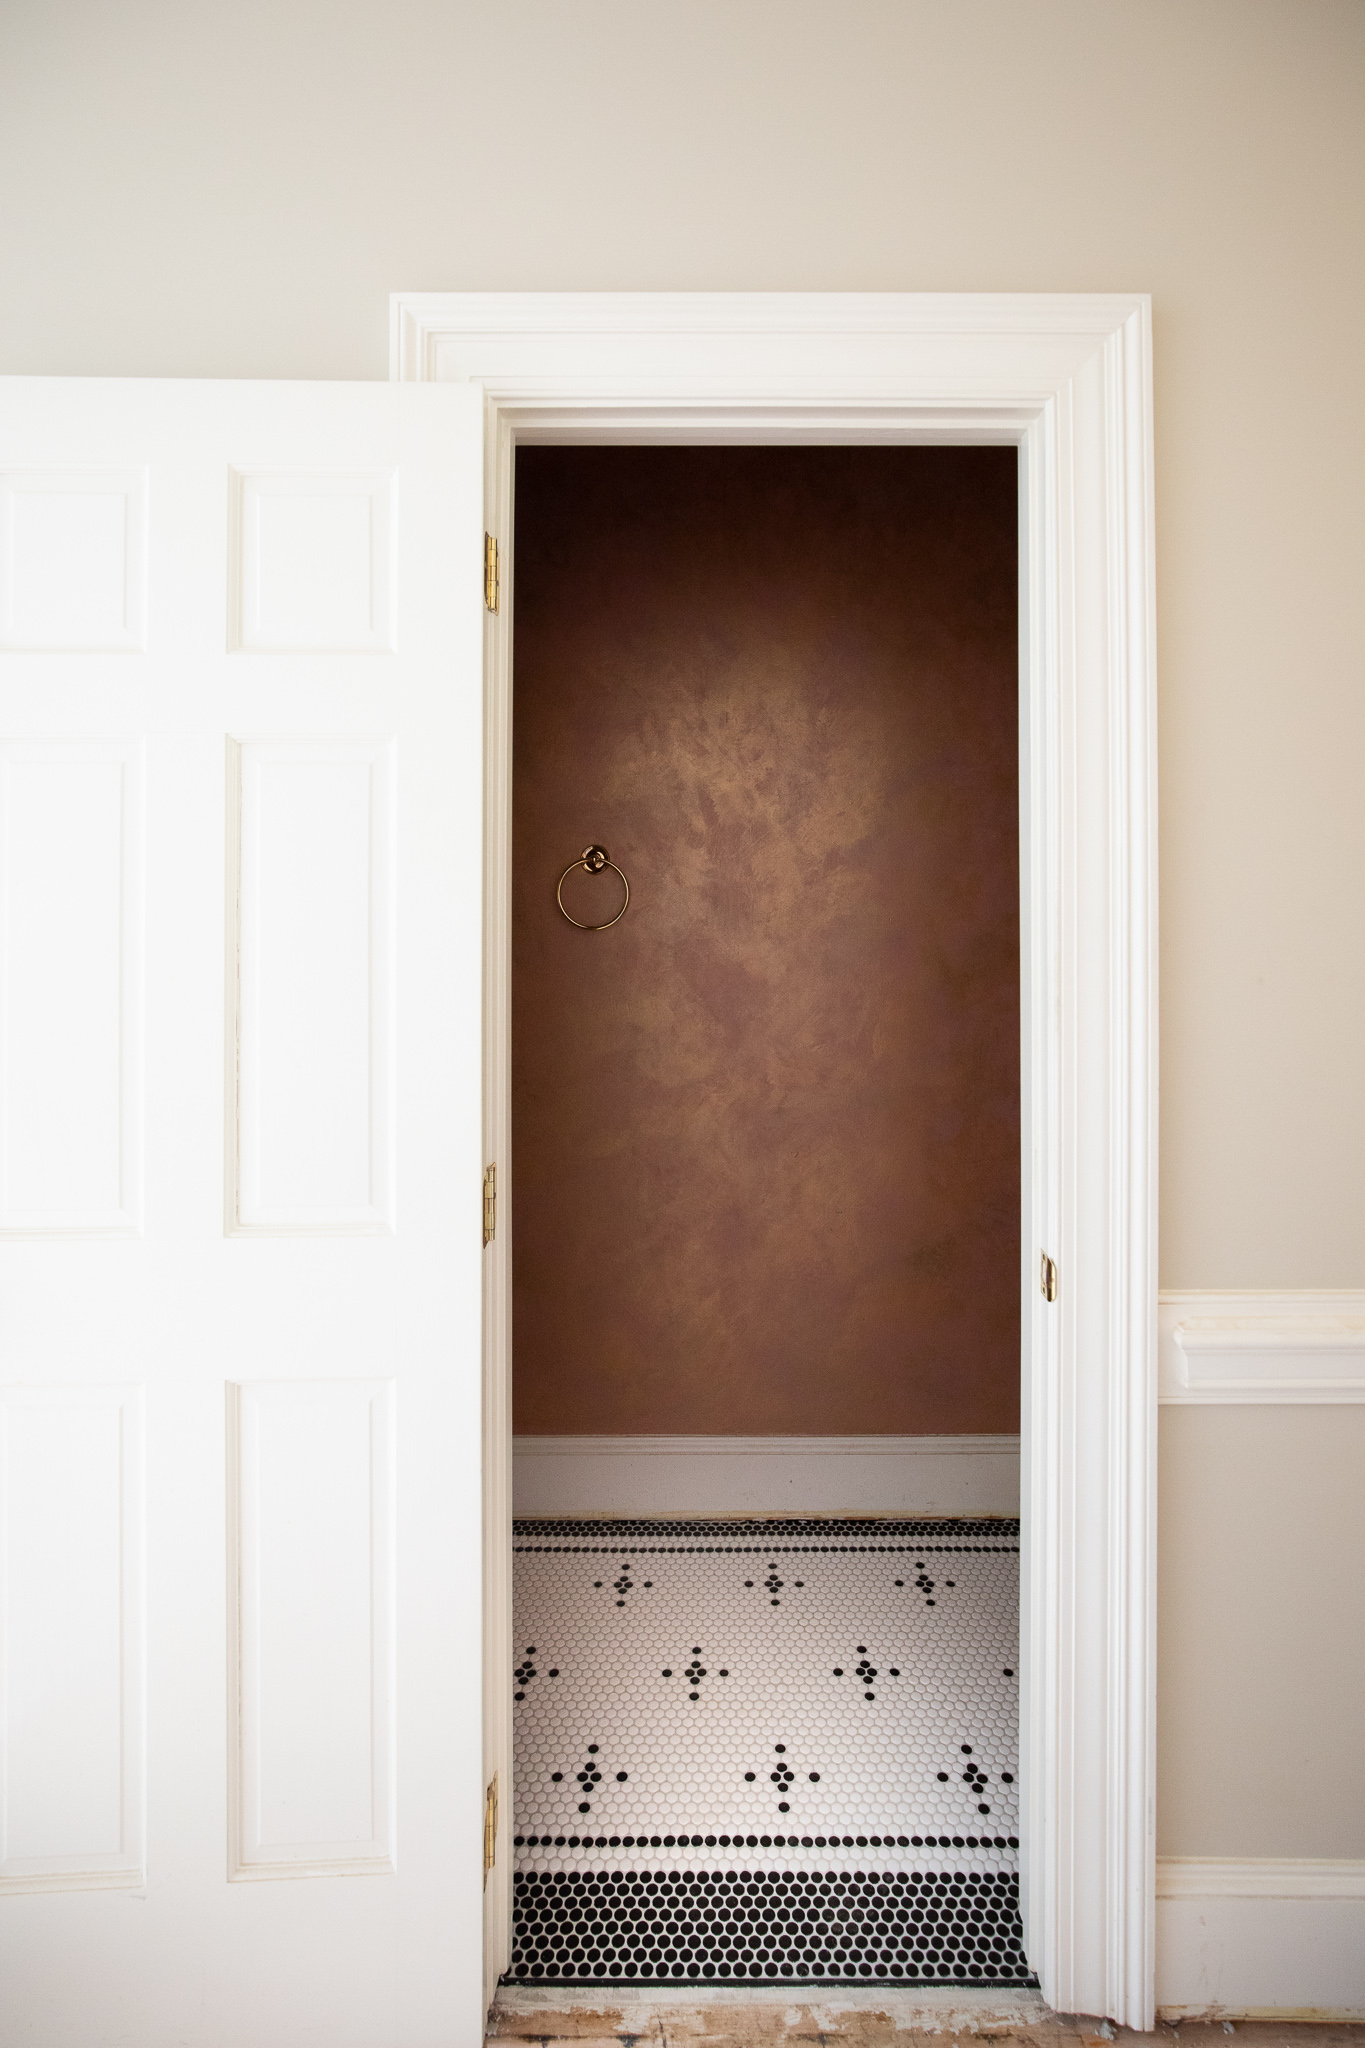
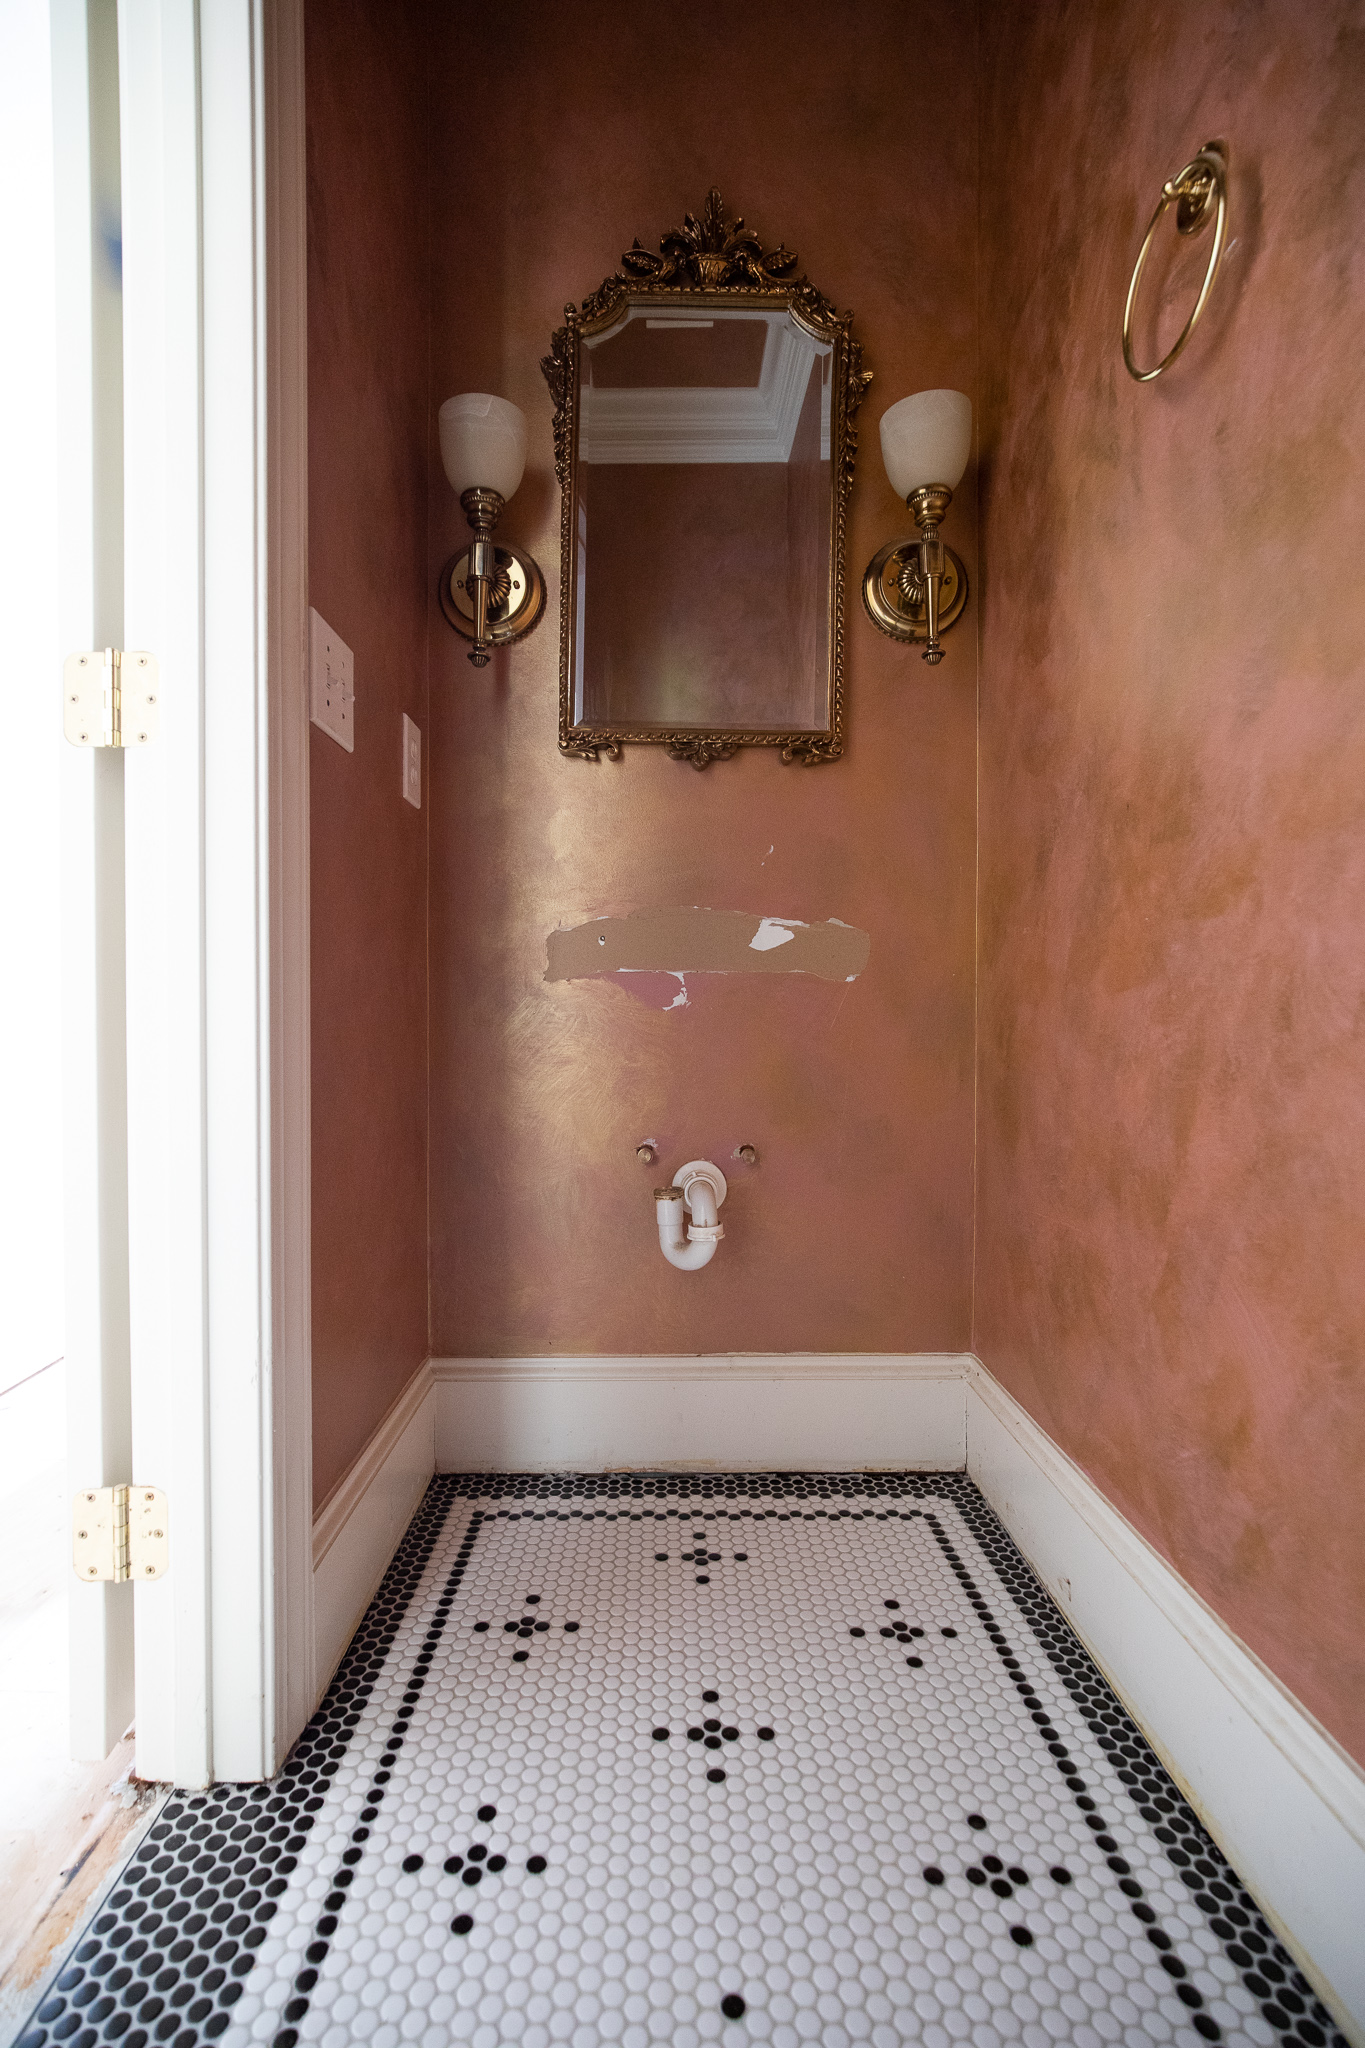
I’m so excited to share with you our powder bathroom floor today! We’ve been working on laying a cute little pattern in penny rounds over the last week and we’re so happy with how it turned out! The powder room is really squared off: At 22 square feet, it’s small, so the angles feel especially sharp, and the room seems especially rectangular. Also, the wallpaper we chose is striped (see all the plans here). Tiny round tiles felt like the perfect, soft, charming touch.
We got all of the supplies we needed for this project at our local Tile Shop. Which is, actually, SURREAL to say because we have been working with The Tile Shop since 2012 in our VERY first kitchen. (see that marble backsplash here!) and then again for our wood tile floors in our rambler, and we most recently used all of their pretty limestone in the primary bathroom in our Modern Cottage–and we never stepped foot in one of their showrooms until this project. It honestly felt like Disneyland. The associates were really helpful and knowledgeable and it was a one stop shop for everything we needed for this project. And more. Meaning…I already started eyeing tile for future projects. :)
Here’s everything we needed for this project!
Hardie Backer Board
Trowel for Hardie Board
White Penny Round Tile
Black Penny Round Tile
Trowel for Tile
Mortar
Grout Float
Scrubbing Sponge
Neutral Cleaner
Grout Sealer
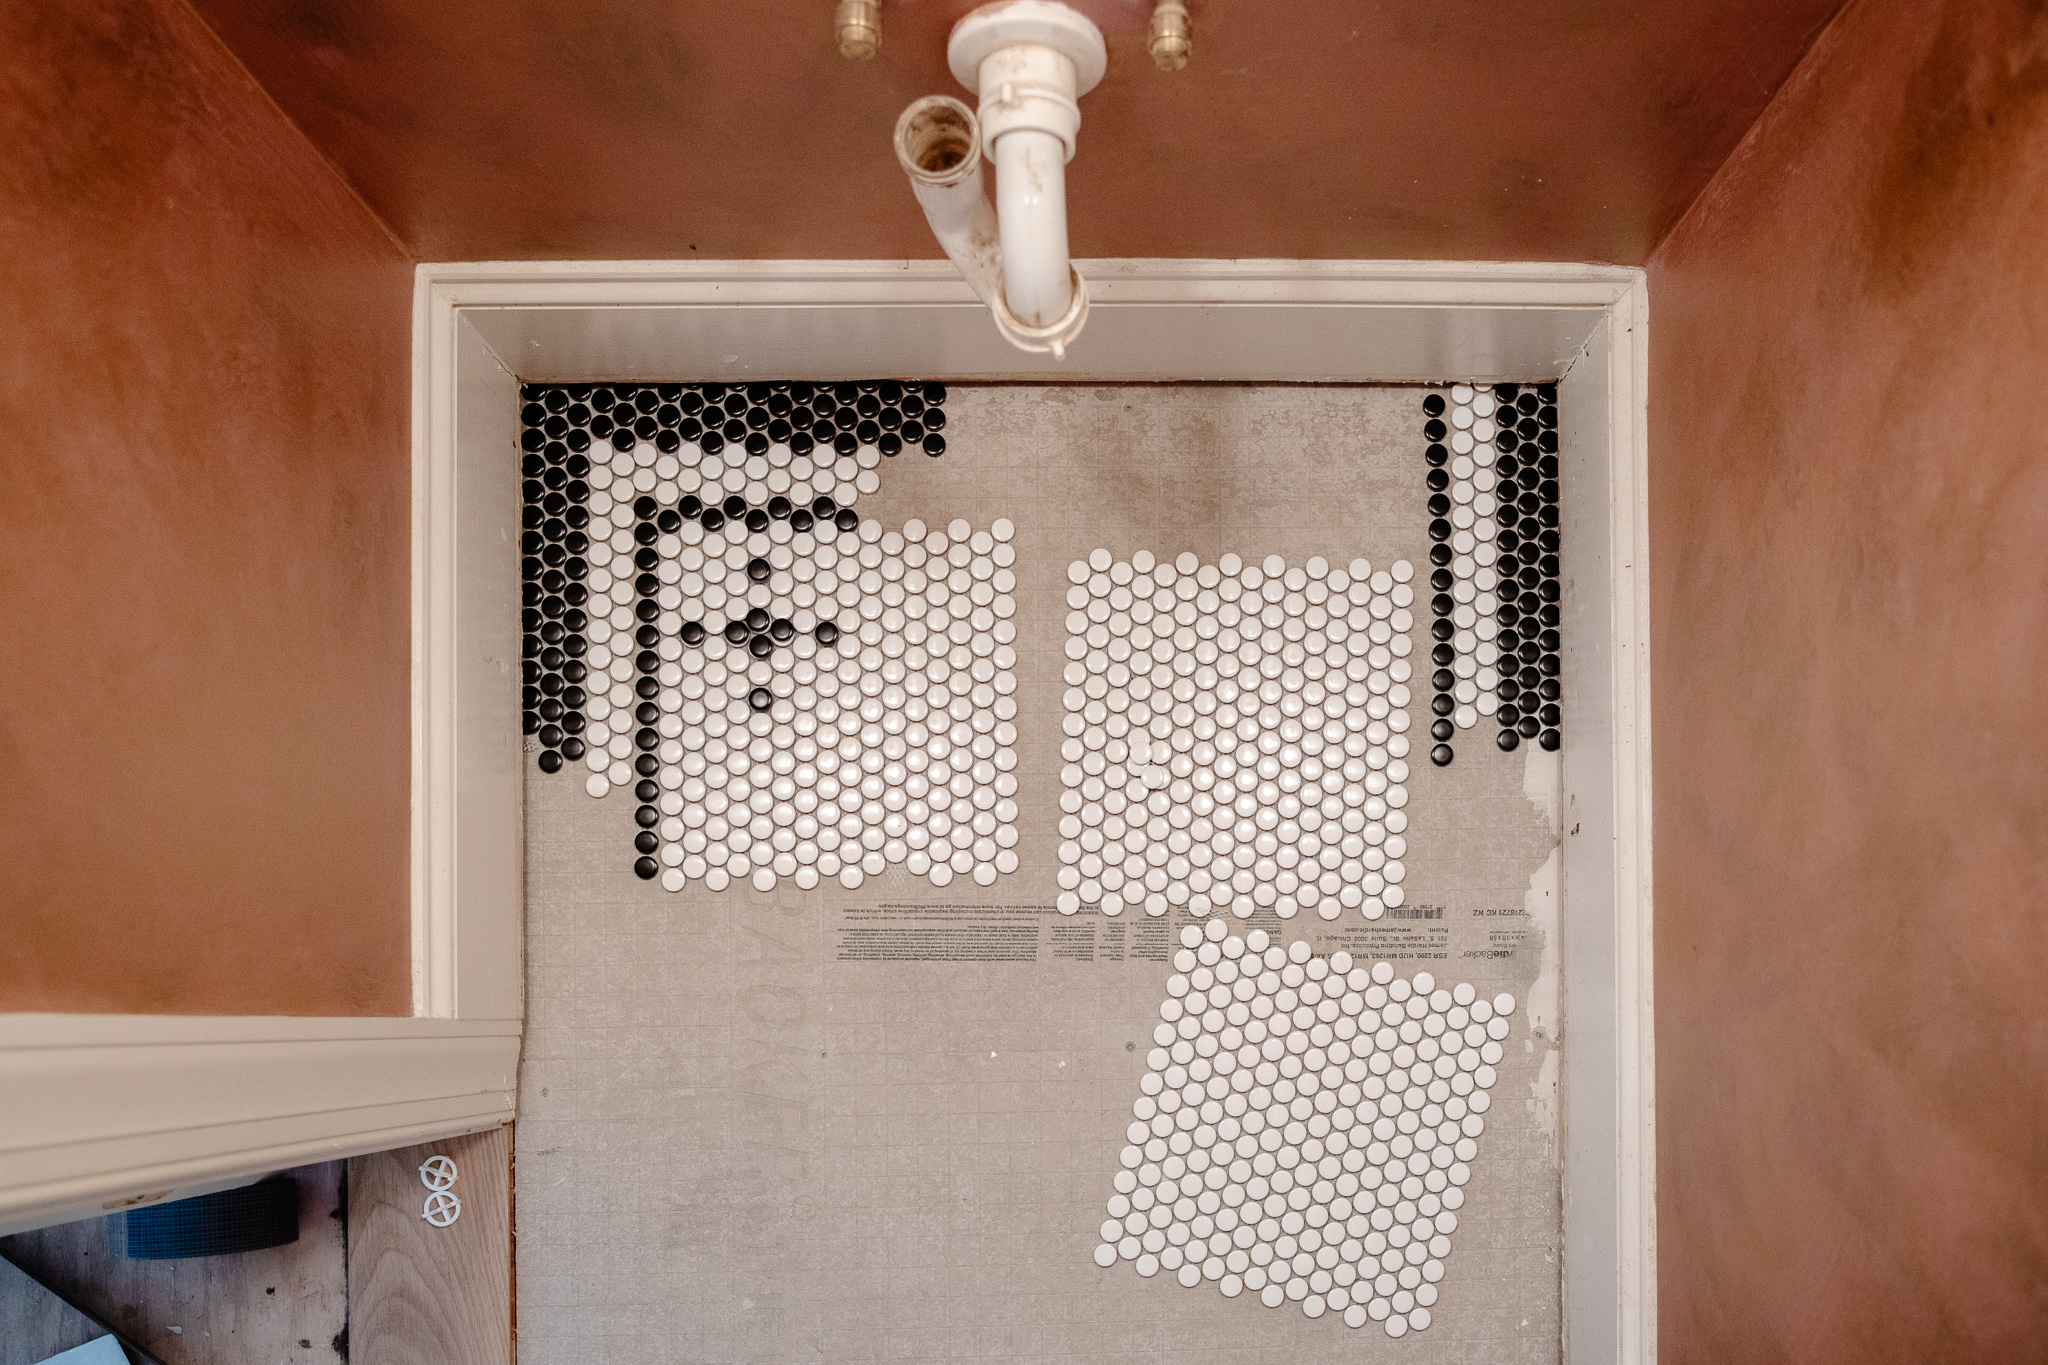
The Tile Shop actually had some really cool ready-made mosaic options for penny rounds and beyond, but since it was such a small room, it felt like a good time to try something creative and try my hand at my at a custom pattern. I printed out a white sheet of paper with true-to-life sized penny tile, and I started coloring in different blocks. This was such a great first DIY project in our new home because it’s really not a heavy lift. There’s no power tools or tile cutting involved. You can easily cut the mesh backing of tile sheets with sheers to whatever size you need, all the way up to the border of your room.
First things first!
- Lay down a subfloor
Our contractors removed the wood flooring that was in the powder room previously, and we started with a plywood subfloor. You can’t lay tile on plywood because wood is a living material, and it “breathes” through the seasons, causing tiles to crack and break away from the floor. So we installed 1/4-inch Hardie board. It’s so easy to cut, you don’t even need a saw. Just score it with a razorblade knife and snap it. Using a 1/4-inch trowel, apply mortar to the plywood and then secure the Hardie board. For additional security, screw down the board every 12 inches. Apply mesh tape to all of the seams and, using a spackle knife, run an extra layer of mortar on top of that. Smooth it out, and let this dry for at least eight hours, or overnight.
- Plan your border
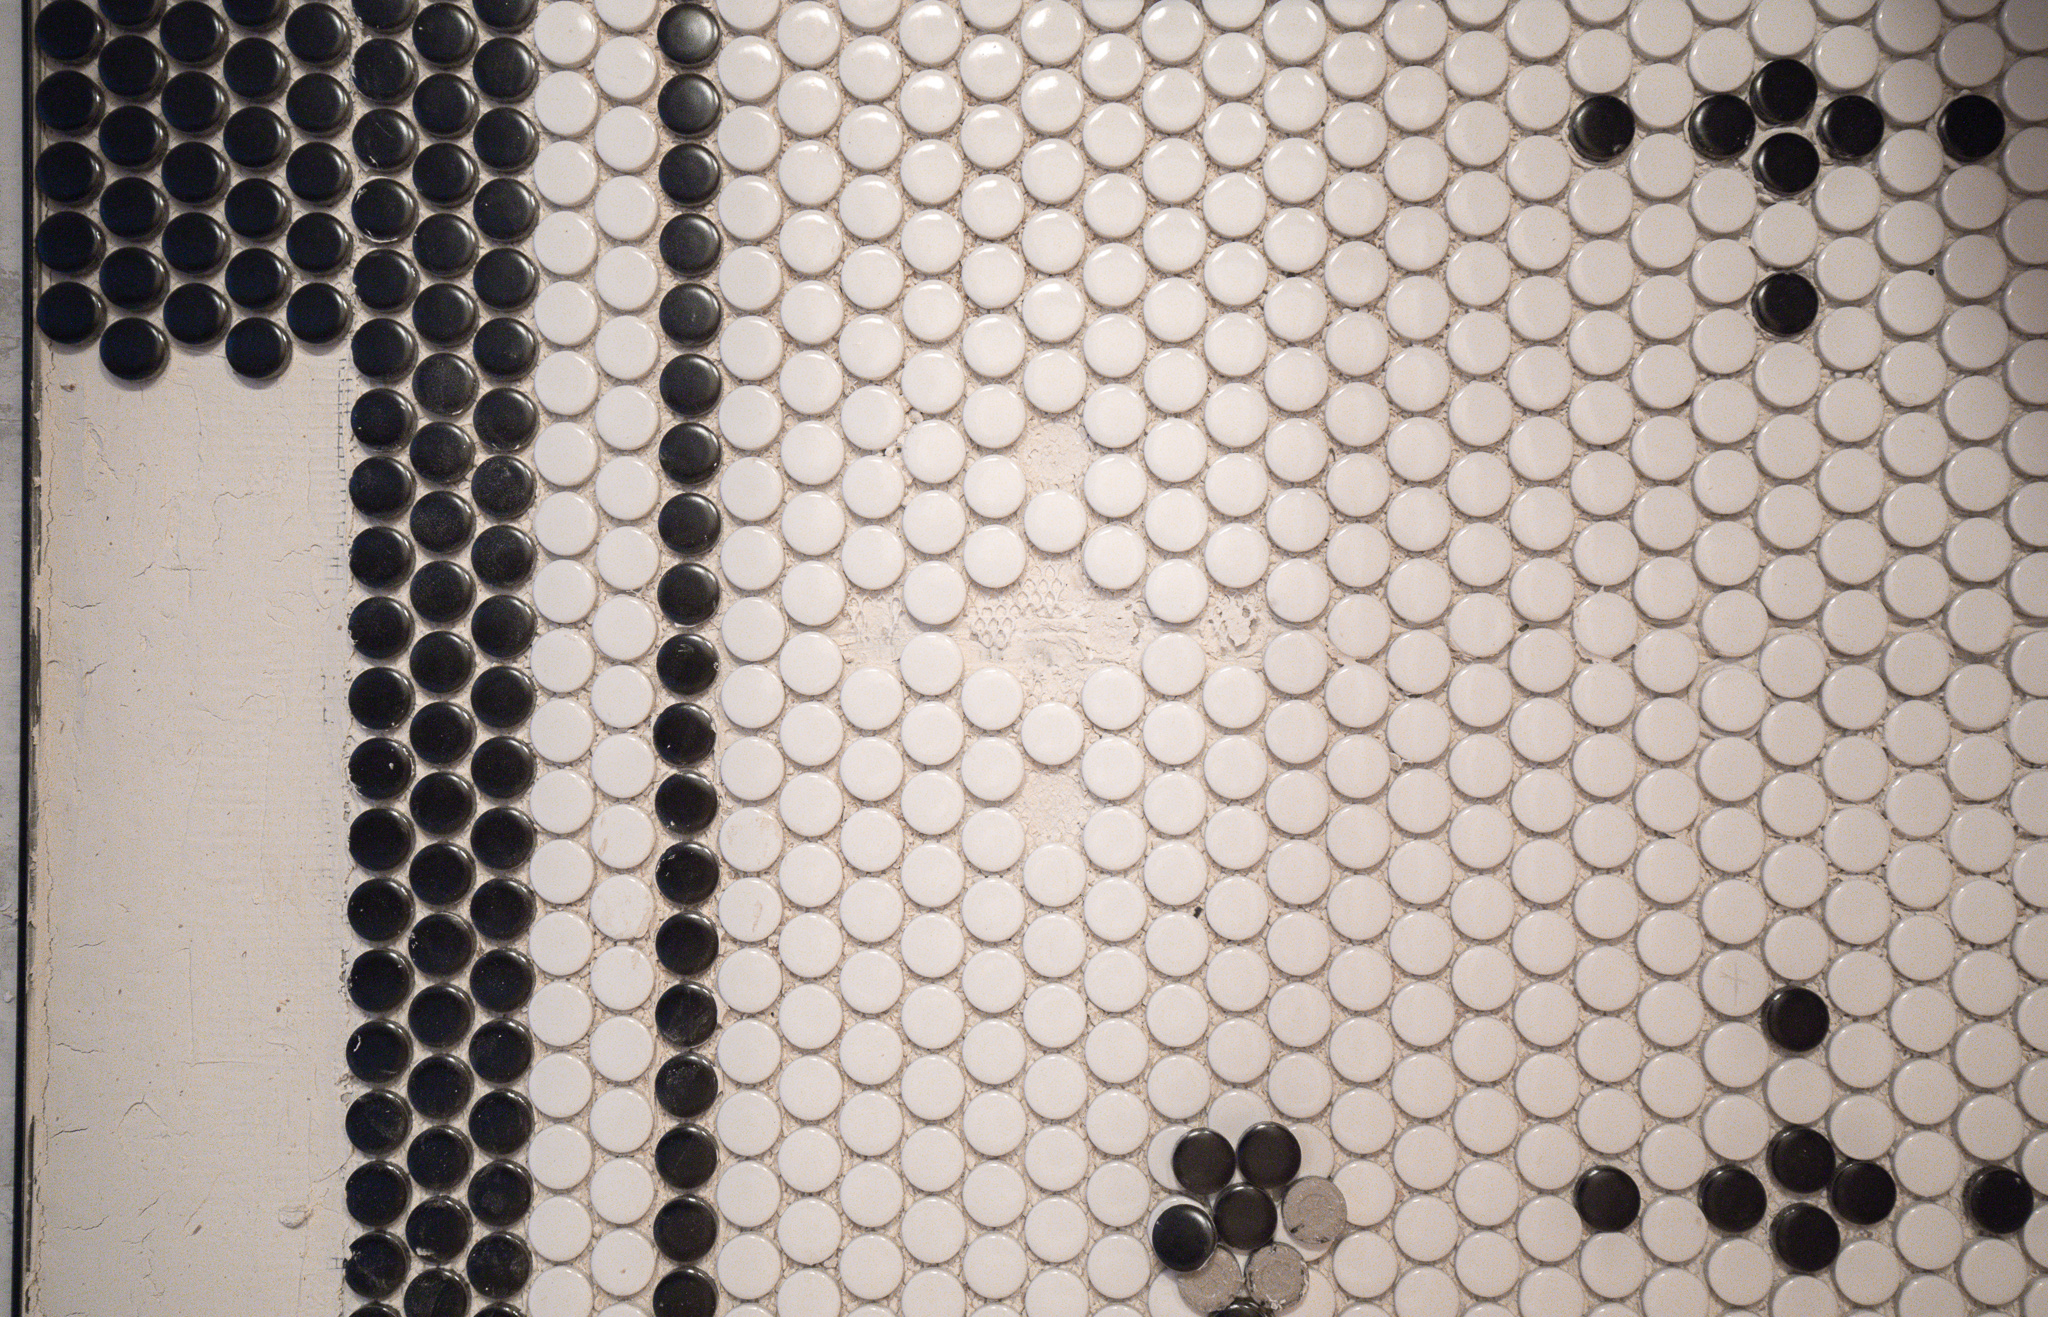
When you’re ready to lay your tile, dry-lay your border, and play with the white tile sheets on the interior (or inverse it if you’re feeling spunky!). One thing to note: There’s a straight side of penny tile, where the pieces align perfectly, and then there’s an offset side, where a “straight” line is more …toothy. Don’t fight it! Once I embraced how the tile lays and fits into each other, the pattern-making got really fun and easy. We applied the straight border on the long side of the room and the offset border on the short side of the room.
Practice with the placement of the “straight” side of the penny tile mats and the offset side until the corners are sharp and the border is exactly how you want it. Hold off designing your interior pattern for now…if you can. I should note here: –we finished the edge of the tile where it meets with the hallway, with a black Shluter edge that will meet our wood floors going down in the hall this week!
- Mortar the tile in place
Working in sections, remove a portion of the tile. Apply a thin layer of mortar using a narrow-tooth trowel. (The smaller the individual tile, the smaller the teeth on the trowel.) To ensure you’re not applying too much mortar, make sure the trowel teeth scrape on the floor. Lay the tile border and sheets in sections, pressing each piece into the mortar. Allow to dry for at least eight hours.
- Design your interior pattern
After all the tile is laid and has dried, you are ready to start laying the pattern inside. Pop a few black tiles out from the mesh sheets, and begin placing them (dry) over the mortared-in-place white penny tile. Place all of the black tiles, planning the entire pattern and its spacing to make sure you’re happy with where it starts and finishes. Use a dry erase marker to mark the location of black tiles, if you wish. When the pattern is exactly the way you want it and the spacing is right, use a screwdriver to pop out the mortared white tiles, replacing them with black tiles. We used a plastic bag with a tiny hole in one corner (like a pastry bag!) to apply a tiny dollop of mortar on the back of the black tiles. I call this the pop-and-place method :) Let the black tiles dry/set overnight.

Below is before grout.

- Grout your tile
We decided to go with a warm gray grout.
Using a grout float, skim a layer of grout over the tile. Hit your grout lines at every angle — pushing and pulling the grout backwards and forward until grout is tightly around every circular tile. Scrape off any excess. Using a sponge and warm water, continue to wipe the tiles clean of grout. Important: Work in five-minute sections. The grout dries over the tile quickly, making it hazy.

- Acid wash the tile
Even if you work quickly, you’ll likely have SOME grout haze over the tile. Let the grout dry overnight, and then, wearing gloves and using the abrasive side of your sponge, scrub the tile with an acid cleaner (a mix of vinegar and water also works). Pro tip: Don’t use the acid cleaner on anything but ceramic tile – it’s too abrasive for natural stone materials.
The end result is a double black border around the perimeter of the room and then 17 black “diamonds” arranged in the interior. — They’re not really diamonds. They’re… asterisks?
Such an easy and impactful DIY. If you have a small space, I hope you try your hand at designing your own custom pattern. It’s really the most fun you can have with penny tile.
I’m honestly so in love with how it turned out and think it’s going to be the perfect little bathroom for all of our guests to freshen up in over the coming years. And with such a small space, the extra work required to make it happen was definitely worth it.
Next up! Paint and wallpaper!
Check out the finished powder bathroom here :)
Sources
Hardie Backer Board
Trowel for Hardie Board
White Penny Round Tile
Black Penny Round Tile
Trowel for Tile
Mortar
Grout Float
Scrubbing Sponge
Neutral Cleaner
Grout Sealer
Special thanks to The Tile Shop for sponsoring this project!
Leave a Reply
What do you think?


Semihandmade
Our wood grain Shaker cabinet fronts were designed for busy, high-traffic homes like ours. Clad with durable textured thermofoils, this line is compatible with Sektion, Akurum, Godmorgon, and Besta cabinets from IKEA. It's the perfect, practical way to add the warmth of wood to all the rooms of your home.
Collaborations
learn more

next
Loloi
We have teamed up with Loloi to create a line of rugs that are as affordable as they are beautiful. This collection houses a great mix of traditional and modern rugs, in cottage-y colorways, as well as vintage-inspired beauties that you’ll want to roll out in every room.
Collaborations
learn more

next
STUGA
We partnered with Stuga on a line of hardwood floors — The Ingrid is really livable, and the color is very neutral. It doesn’t lean warm or cool, it’s that just right in-between. We have really loved putting it everywhere in our house. It’s the best jumping-off point for design, no matter your interior style. In addition to being beautiful, Ingrid is really durable — we have three kids, and we always have a home construction project going on. Ingrid stands up to it all.
Collaborations
learn more

next
SHop all
What We're Right Now
What We're Right Now
Looking for our favorite things? A place to shop our home room by room, or just catch up on what Julia's wearing / loving right now? Browse the CLJ shop.
Loving


Portfolio


Design
Befores, afters, mood boards, plans, failures, wins. We’ve done a lot of projects, and they’re all here.
BROWSE BY CATEGORY
let's break this thing up
We have a long-standing relationship with DIY, and love rolling our sleeves up and making it happen.
Projects
Even when you don’t want to rip down a wall, you can make that space in your home better. Right now.
read more
read more
read more
02
01
03
looking for inspiration?
A reader recently asked me if I’m starting to fully embrace traditional style and whether we still consider our house to be a “modern Colonial” and why. It was a really great question and so timely — I had really just been thinking about my approach to this home and how my style has changed […]


SEARCH THE BLOG
We've been doing this since 2009 and we've posted a whopping 24145+ blog posts and counting. You might need a little help searching, huh?
looking for something?
find stuff like:
")
Can We Send You Our Love Letter?
Another way for us to stay in touch! Joining our weekly newsletter gives you access to exclusive content, never-before-seen photos, your questions answered, and our favorite DIYs. Sign up below!
Follow Along on Instagram
Welcome to our online community where we've posted home, DIY, style, renovations, and family since '09. Renovating our #cljmoderncottage in Idaho and headed for new adventures in Raleigh, NC. #cljfam #cljtransformations
@chrislovesjulia


Links
Get Around
Make yourself right at home
Portfolio
Design
Casual Friday
Projects
Lifestyle
Gift Guides
All Posts
Shop
Love where you live.
Social
RivrLinks
Links
Get Around
Make yourself right at home
Portfolio
Design
Casual Friday
Projects
Lifestyle
Gift Guides
All Posts
Shop
Love where you live.
Social
RivrLinks
Dear Julia & Chris,
My name is Kingdon and I am undertaking a renovation of a studio apartment here in NYC that is earmarked to be the 1st home for our 21 yr. old daughter Olivia. Its located in the Cobble Hill section of Bklyn. which is a lovely area and community. Olivia is in her final semester of college and her mom and I want this space to be hers someday so I’m working on it as we speak. Lots to do! Its an old pre-war building built in the early 1900’s and has tons of charm & potential but is in rough shape currently. I like and prefer a pre-war building here in NYC if possible as in some provides you with high ceilings, large windows and lots of character. The place has been neglected so tons of work to be done but my latest focus is the shower floor. I’ve seen bigger bathrooms in submarines lol but hey, it is what it is. There was a tub originally but I decided on a shower instead. Tight space for sure but hopefully enough. Shower is approx. 30″ x 59″ so yes, tight but should work. I solicited the advice at the outset of my wife and daughter on design aspects but OMG, forget about it, each wanted something different and our budget is tight so I’m pressing on. t. I was never really a fan of the “Penny Round” tile until I discovered your post. First of all congratulation on an amazing design for your bath floor, its awesome and you guys did a great job, its beautiful!
My daughter spent her Junior year of study in France and speaks the language fluently, she was hoping for some “French Inspiration” in her eventual home. Your design speaks to that if I’m not mistaken and so I have adopted your vision to Olivia’s bath. Just got started but we will be using “Penny Round” as well. If I may, I borrowed your lovely design for Olivia’s shower floor and will incorporate same to the main bath floor as well, with your permission.
My install will most likely not be as beautiful as yours but we’ll do our best. The kid wanted a “Parisian Flair” incorp[orated wherever possible in the space, this design imo speaks to that. I’m using Greek Thassos white marble penny rounds with Spanish “Nero Marquina” border & accents for the “Flowers”. The Field tile in the shower surround is earmarked to be 3″ x 6″ Thassos “Honed” subway type tile. Any suggestions on the color grout? Again, you guys gave me inspiration and I hope to pull it off, its for my girl nd I know she will love your design, thank you. :))
This couldn’t be more stunning! I am looking to do flooring just the same for my powder room. And it just so happens that my powder room is the same square footage as yours. Can you share how many boxes of the white penny tile needed for your space and how many of the black? Thank you!
Stunning!
Incredible ! I love it 😍
LOVE IT! The pattern you came up with is so fun, but still classic. Can’t wait to see it all come together!
I love it!! Although, admittedly, I stared at this for such a long time and felt perplexed. And then I figured out it was the thick black line of tile in the doorway. It makes absolute sense in order to center the pattern in the bathroom, but there is zero chance if I were doing this, that I could have figured out that solution. I would have probably given up and not done the border at all. This is absolutely why you are great at what you do. I imagine you thought about it for awhile, though it seems effortless!! I’m excited to see it all come together!
I adore how this turned out! So talk to me about cleaning… I’ve always avoided penny rounds because the grout maintenance seems out of control, but this has me rethinking my life choices!
Like everything else you do…. Absolutely beautiful! Can’t wait to see what you do with the rest of the room and house and so excited that you will have one room finished!
What a special pattern you created! Love the idea of creating a “unique to you” design with these tiles. Thank you for the step-by-step process and method for installation, it’s so helpful. Saving this for a future DIY.
This looks great – love the pattern you invented. One thing I found really helpful when laying penny tile was to use a flat piece of scrap wood (a little larger than one sheet of tile is ideal) to push down on the tile and get it all evenly embedded in the mortar.
This floor is amazing! I paid a professional to penny tile my bathroom and you can clearly see the grid outline of the sheets. I HATE IT, but he is standing by the work. Some of the sheets are pushed so close to another there is barely any grout between tiles and others are further apart you can see big fat grout lines. Was there anything you did to get yours so perfectly spaced each time?
We have a MUCH smaller floor, so that definitely worked in our favor. But I kept squinting to make sure everything looked uniform throughout the process. I have heard penny tiles are notorious for that, though!
That’s a bad tile job. You’re supposed to stagger the sheets to minimize this, and you have to pay really close attention to spacing to make sure everything is even. I felt like my eyes were going nuts when I did a large bathroom floor in penny tile, but the attention to detail paid off.
I love how this turned out, the penny tile looks like it has been there forever and always!
So cute, and so glad that you are getting back to your DIY roots. I felt so disconnected once you did your kitchen at the last house.
You missed a lot of great DIY! Hope you try this. :)
Love the pattern. I got so sick of our old linoleum floors that I ripped them out. Now stuck at the hardie backer step. How did you cut around the toilet opening? Or do rounded cuts?
We cut it into four parts with a razor blade and then pieced it together.
Hi! So cute! It looks like the pieces on the side aren’t full tiles, but you said you didn’t have to cut any – how did that work? Thx!
Thank you!! They’re full tiles, they just go under the wall a little bit so you can’t see part of them.
What a charming little bathroom!! And a fun nook to do something creative + likely a surprise when you walk in!! Love it – taking notes for the house we’re HOPEFULLY going to buy here soon…
I love it! It turned out so beautiful. Is the pennytile glossy?
Yes it has a gloss to it
What did you all use to separate the tile from the main flooring? I remember you mentioned it in your stories but it expired before I could go back for the info.
Also, cannot wait to try this in our half bath!
It’s called a Schluter edge!
It’s name is a Jolly
A Schluter Jolly is for tile edging on walls. A Schluter Schiene is for tile edging on flooring 👍
Beautiful!!!
Hope to do this in our main bath of our new build!
Love it!!
Looks amazing! I want to do some now!😄