Projects

Full-Wall Wainscot Part II

October 24, 2012

We believe we should all love where we live.

We’re a couple of homebodies, working to uncover the home our home wants to be. And we’re so happy to have you here. 

Portfolio

Projects

Design

We're Chris + Julia

read more

What we're                   right now

Loving

browse the shop

Befores, afters, mood boards, plans, failures, wins. We’ve done a lot of projects, and they’re all here. 

We have a long-standing relationship with DIY, and love rolling our sleeves up and making it happen. 

Even when you don’t want to rip down a wall, you can make that space in your home better. Right now.

browse all

browse all

browse all

02

01

03

Popular Posts

1.

2.

3.

Top Categories

I am going to attempt to make this a quick post so I can try to get more of this paneling painted before Greta wakes up from her nap.  It’s always a race against nap time over here, I tell ya.  Yesterday, we left you with our baseball-hall-of-fame-esque paneling.
 

Last night we continued the quicky project and tackled the horizontal pieces which required a little more measuring and cutting.  In an ideal situation, since we measured and leveled all of the vertical pieces, it seems like all the horizontal ones should have been all the same length. Bada bing. Bada boom.  But, no.  There were slight variations.

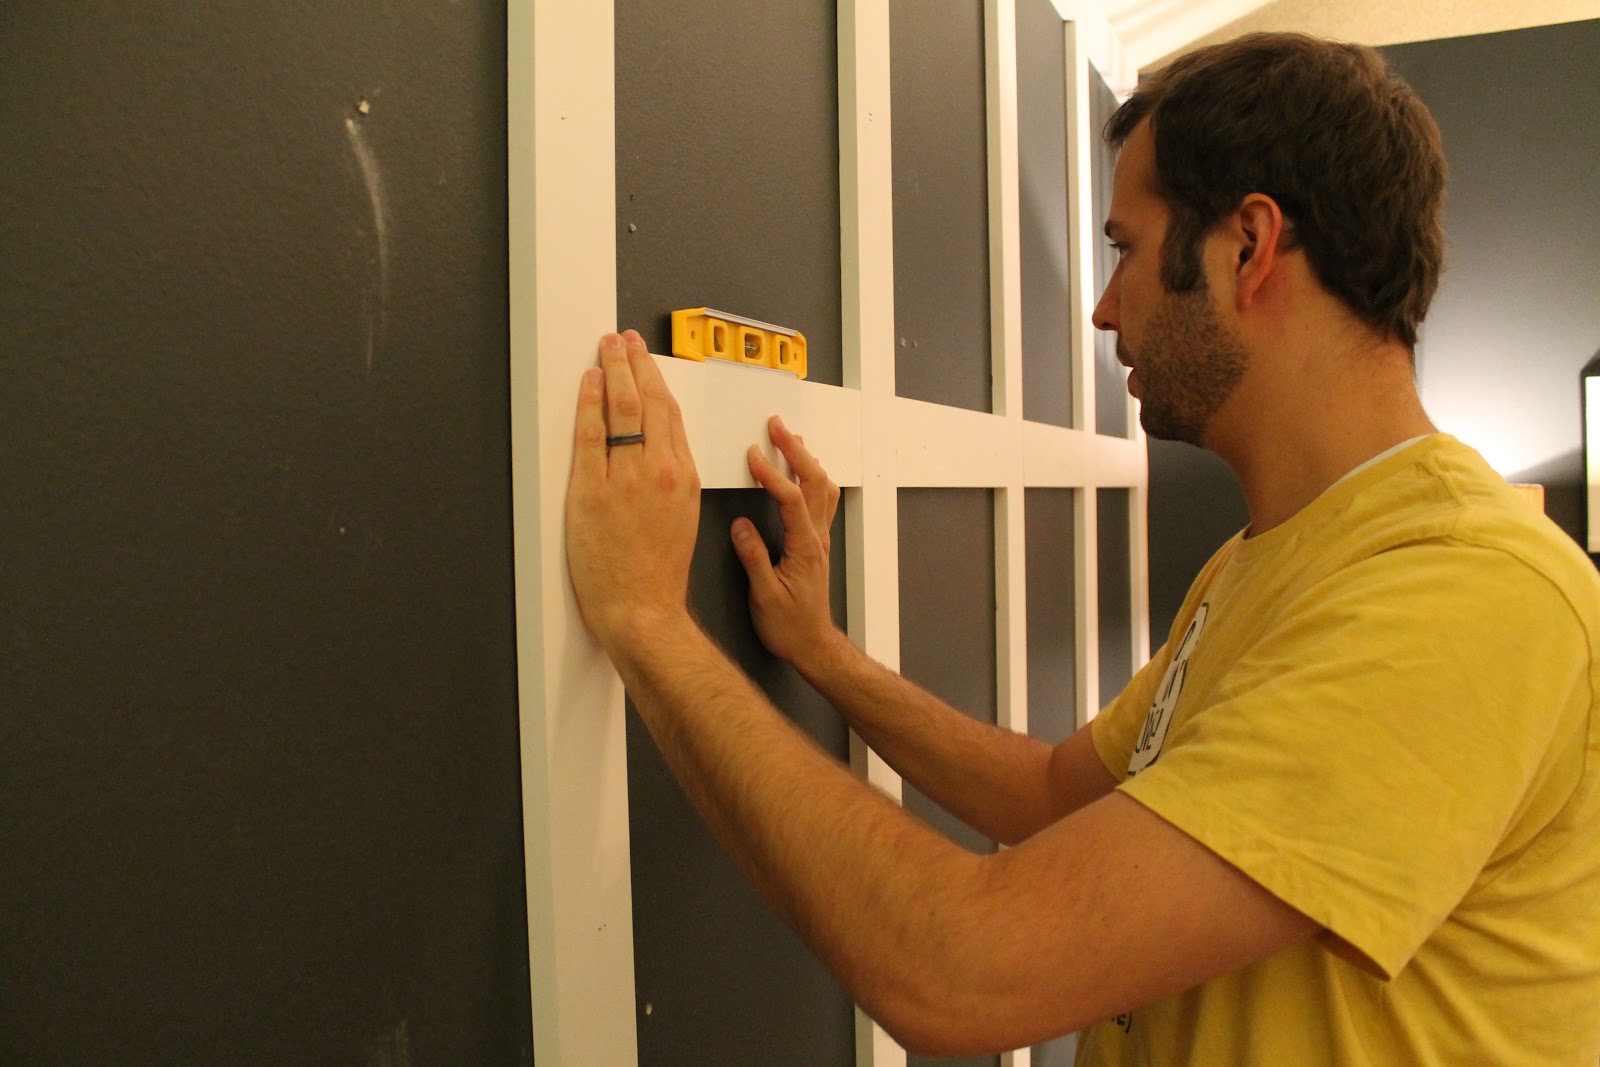
We decided to measure all of the width’s between for the top row, first and I wrote them down in a little hand-drawn graph of the wall and then we busted out all of those cuts at one time, writing down the measurement on the back of the cut to correspond with my little chart.  And if you’re like me, it is just easier to write 16 3/4″+1 (meaning one line to the right of 16 3/4″) than figuring out what that measurement actually is.

Even though every horizontal piece got nailed into at least one stud, we also secured it with a squiggly of Liquid Nails.  After they were hung, leveled and nailed, we repeated the whole process for the second row.

That whole process–the measuring, cutting, leveling, hanging, yadda yadda–only took us about an hour and fifteen minutes.  Which we were stoked about because that gave us time to caulk and spackle–which ended up taking just as long.

This next picture is for my mom, and anyone else that might not think I do any of the work around here.  Granted, I am usually behind the camera, but when I’m not–I’m holding a caulking gun, in this case, or paint roller or staring at a measuring tape trying to figure out measurements. I get down and dirty, too.  I promise.

This morning, Greta “helped” me sand everything down, which ended up to be the perfect job for a toddler to help with because there really is no damage to be done.  We sanded and sanded and sanded until the whole room was covered in dust, or “snow” (according to Greta) and the boards were nice and smooth.

Everything was covered.  And while I still need to vacuum and dust the furniture and credenza, I did get all of the “snow” off the paneling ledges and gave it a good wipe down–and cracked open the can of paint.  Speaking of which, I better get back to it.  Can’t wait to show you how everything turns out tomorrow!

Update: See the finished results here!

Leave a Reply

Your email address will not be published. Required fields are marked *

This site uses Akismet to reduce spam. Learn how your comment data is processed.

What do you think?

  1. We are all ready to this panelled wall in our master bedroom. I noticed that you painted the wall first. Would you still recommend doing that or paint it all after the panels are all done? Anything else you’d do differently? Your wall looks amazing.

  2. Kevin says:

    Hey. Looks awesome! Can you tell me the color of that wall please!

  3. Val says:

    Hi! I just came across this post and realize that quite a bit of time has gone by but had some questions regarding your construction process.
    Where did you use caulk? Did you do that to close in the slight gap between the boards and wall? And what was the spackle for?

    Thanks and this looks fab!

  4. It’s looking so good! I absolutely love it and cannot wait to see it painted!

  5. Kim @ Yellow Brick Home says:

    Loving it!!

  6. Oh good! We’re in good company, then!

  7. Lisa P. says:

    That’s hysterical about the +1….I thought my husband was the only one that measured that way.

  8. Ha! I may have ousted myself as the worst DIYer with that one. But, gotta keep it real!

  9. It looks so good, I can’t wait to see it painted! I do the +1 thing too — glad I’m not the only one haha

  10. We just put the paneling right on top of our existing baseboards. Good luck on yours! What a beautiful difference it makes!

  11. meaganbriggs3 says:

    Oh miss Greta. I love her.

  12. Patty says:

    the +1 line is so funny.

  13. Kate says:

    Wow – it looks great! I can’t believe how quickly you all got the boards up. We’re adding wainscoting to our house this weekend, and one of the tricky things we’re trying to figure out is how to deal with the existing baseboards. Did you just put a piece of paneling above the baseboards? It looks great whatever you did! We’re trying to decide if we should do something like that or just cut a notch into the decorative top of the baseboard so its flush. I don’t even know if that made sense :) Anyway! Looks great!

all the latest

We believe we should all love where we live.

We’re a couple of homebodies, working to uncover the home our home wants to be. And we’re so happy to have you here. 

HI! We're Chris + Julia

read more

Load More

Reader Faves

SHop all

What We're                     Right Now

What We're                 Right Now

Looking for our favorite things? A place to shop our home room by room, or just catch up on what Julia's wearing / loving right now? Browse the CLJ shop. 

Loving

looking for inspiration? 

A reader recently asked me if I’m starting to fully embrace traditional style and whether we still consider our house to be a “modern Colonial” and why. It was a really great question and so timely — I had really just been thinking about my approach to this home and how my style has changed […]

Can We Send You Our Love Letter?

Another way for us to stay in touch! Joining our weekly newsletter gives you access to exclusive content, never-before-seen photos, your questions answered, and our favorite DIYs. Sign up below!

Follow Along on Instagram

Welcome to our online community where we've posted home, DIY, style, renovations, and family since '09. Renovating our #cljmoderncottage in Idaho and headed for new adventures in Raleigh, NC. #cljfam #cljtransformations

@chrislovesjulia