


This post is sponsored by Zabitat.
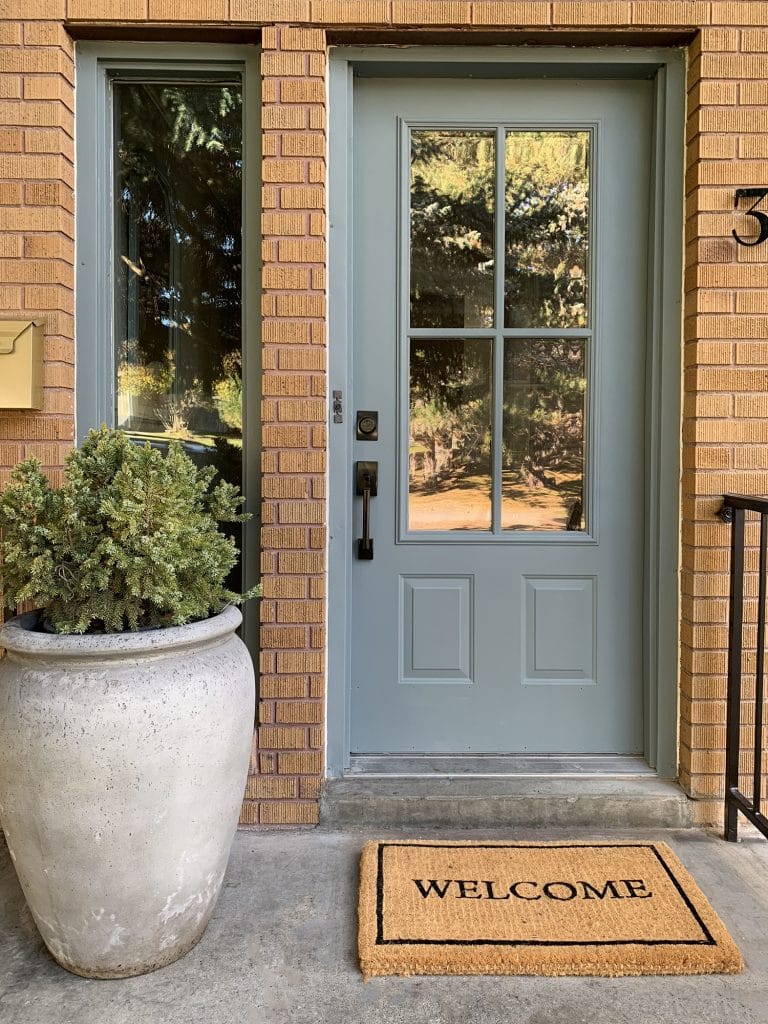
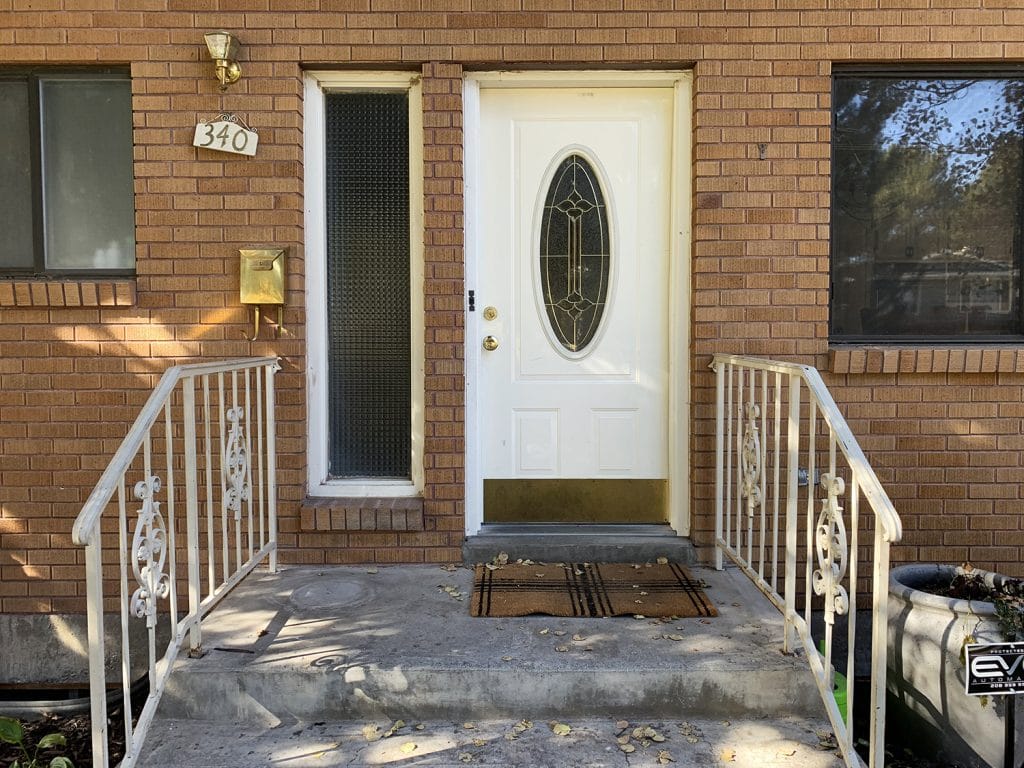
Our friends were struggling with the exterior entry to their house. They weren’t crazy about painting the brick (this is actually his childhood home), but they are also young and hip and they were wanting their home to reflect that a little more, while keeping the brick in its natural state. We were 100% up for the challenge and over the course of a few hours, we were able to take their front porch from this:

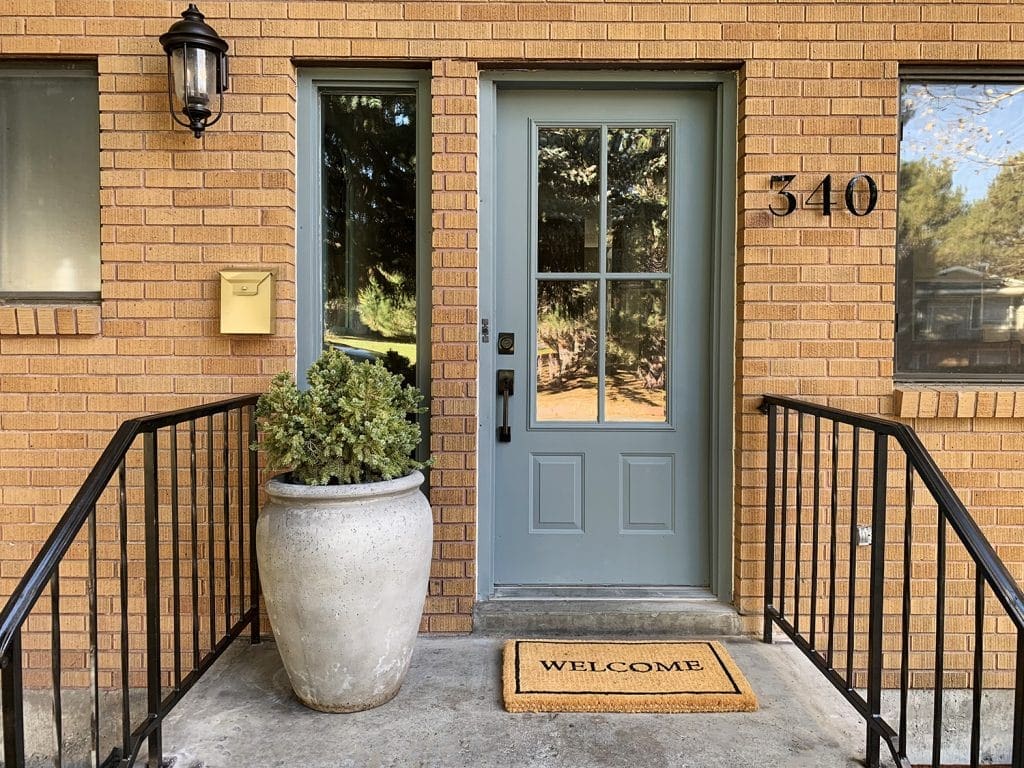
TO THIS!!
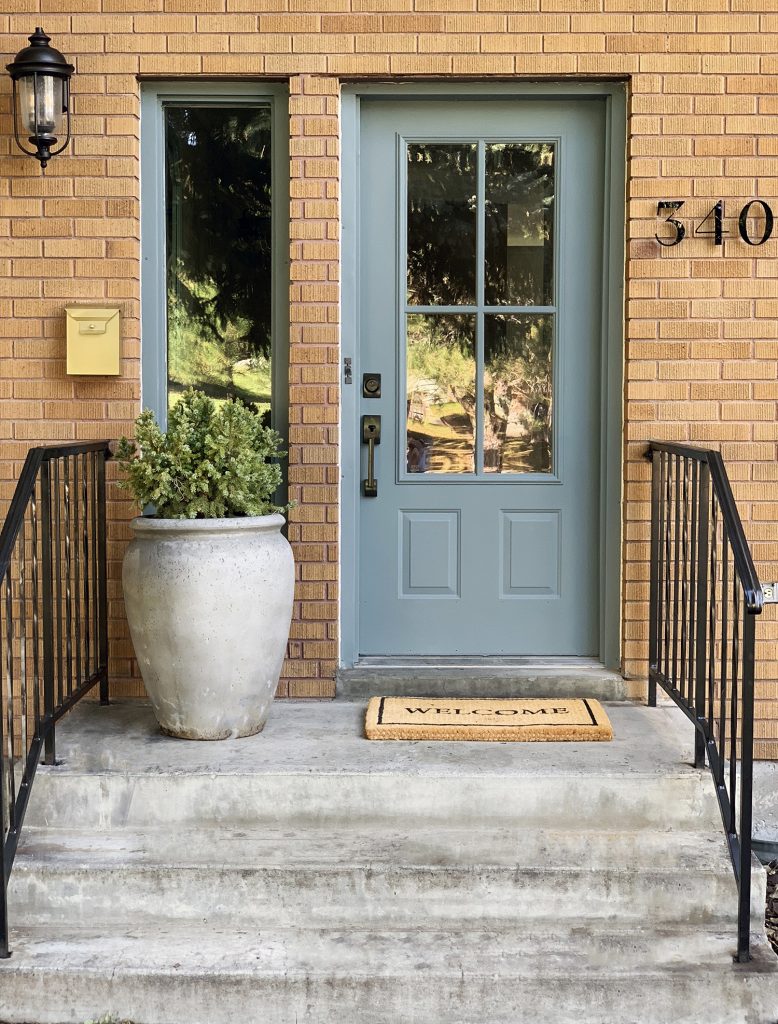
Here’s a before and after gif to save you a scroll up and down.

It looks completely different, right?! But the truth is, it was just a lot of easy, budget-friendly changes despite the wish list being long: door, railing, mailbox, house numbers, light! Here’s how we tackled each one.
Updating the Existing Door
The homeowner loved the door(s) in this inspiration photo (via) below and I agreed that ditching the ornate oval glass would do wonders for their facade.
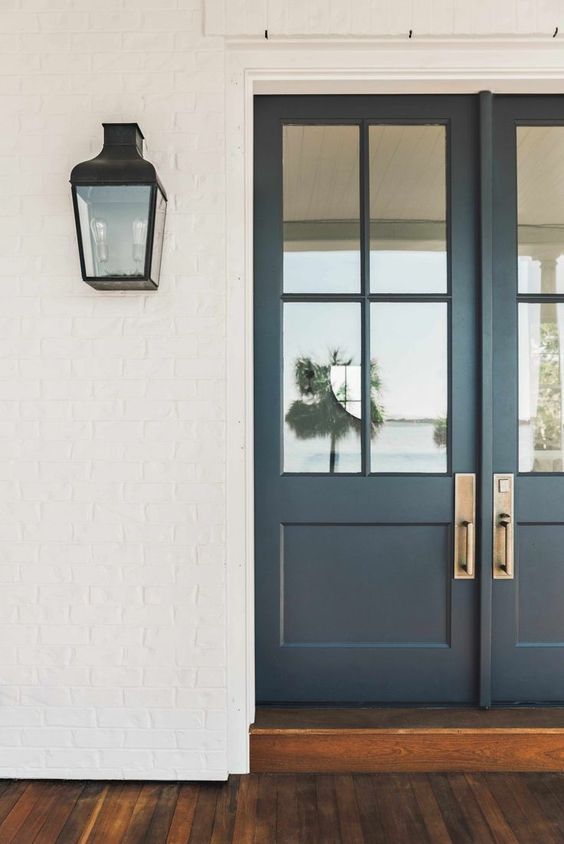
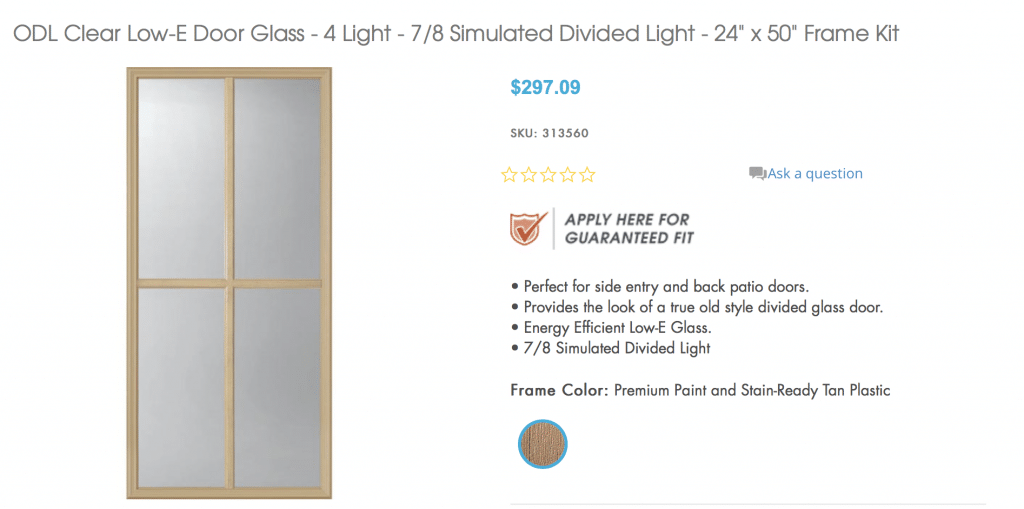
A brand new 4 light grille door like this is drool-worthy, but also costs thousands. We were able to create the same look, using their existing fiberglass door with an insert from Zabitat. Have you heard of them? It’s honestly a life-changing product. They sell really beautiful and affordable door inserts–in EVERY STYLE, including dozens of decorative door glass options!–for updating your existing door. After measuring how big we’d ideally like the window to be, we found this 24×50 4-light frame kit on Zabitat for $297! (Here’s a 24×38 for $188)
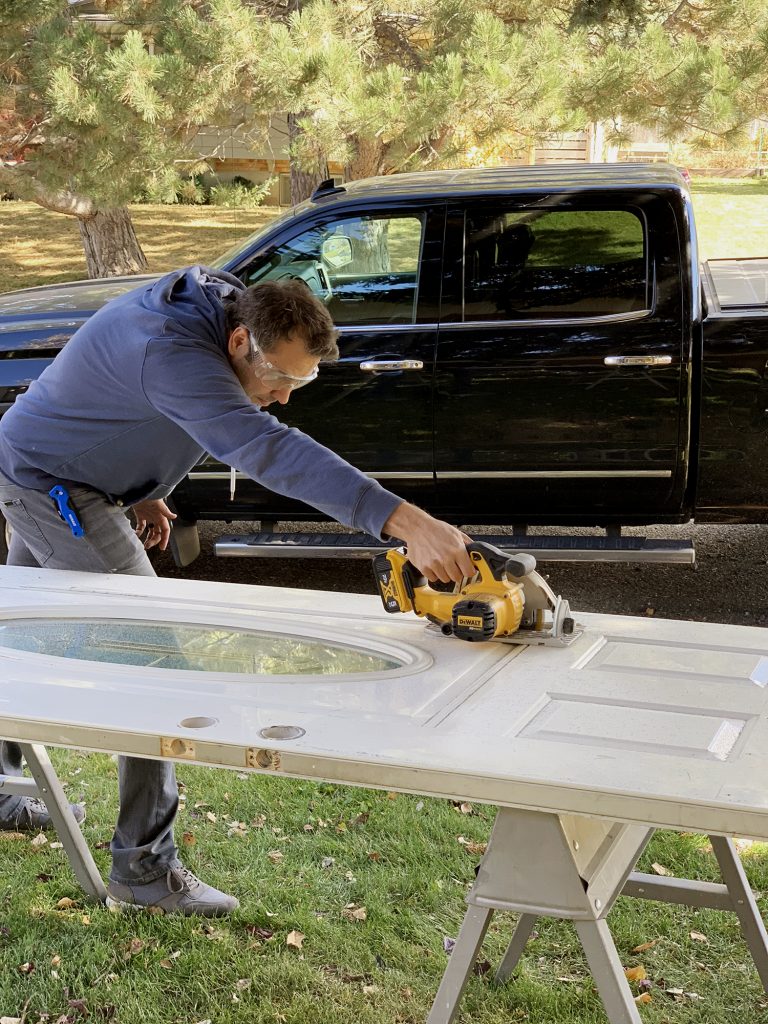
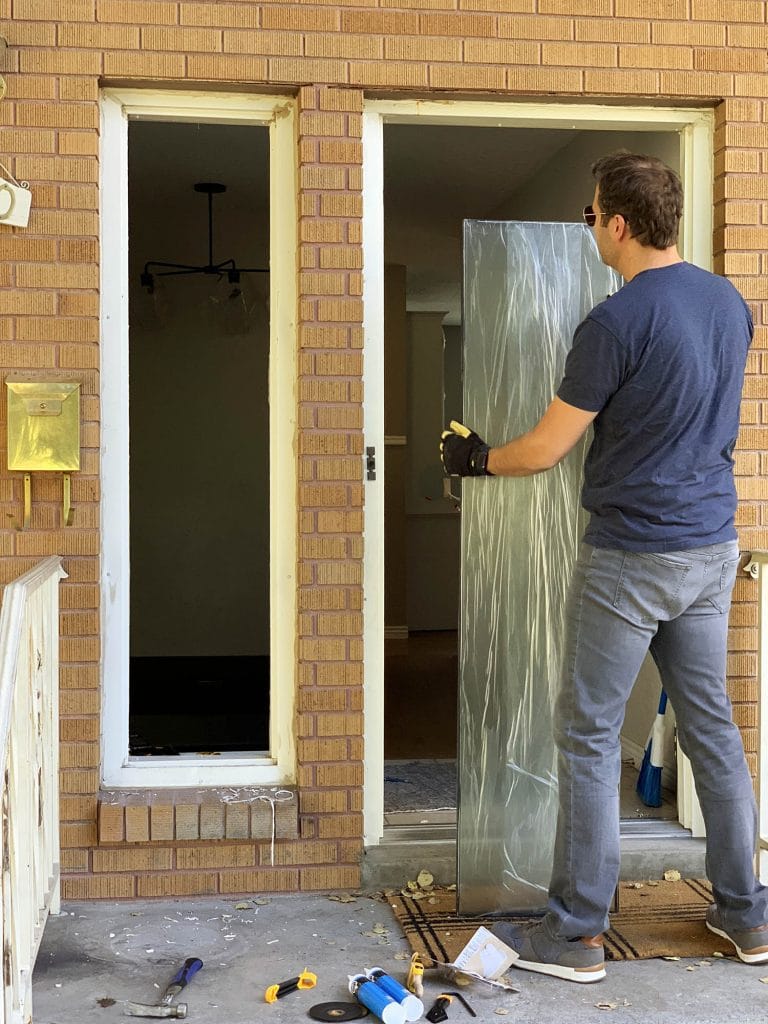
We knew that the thinner trim and 4 tall windows would give their door the same high-end look of the inspiration photo. Chris removed their front door from the hinges and marked off the dimensions of the insert–Zabitat tells you exactly what size hole you’ll need–and cut it out using a circular saw.
The insert comes in three pieces. The interior frame (meaning the frame that will be on the inside of your home), the glass, and exterior frame. Installation is easy, but it’s nice to have two people since the door needs to be upright to install the insert.
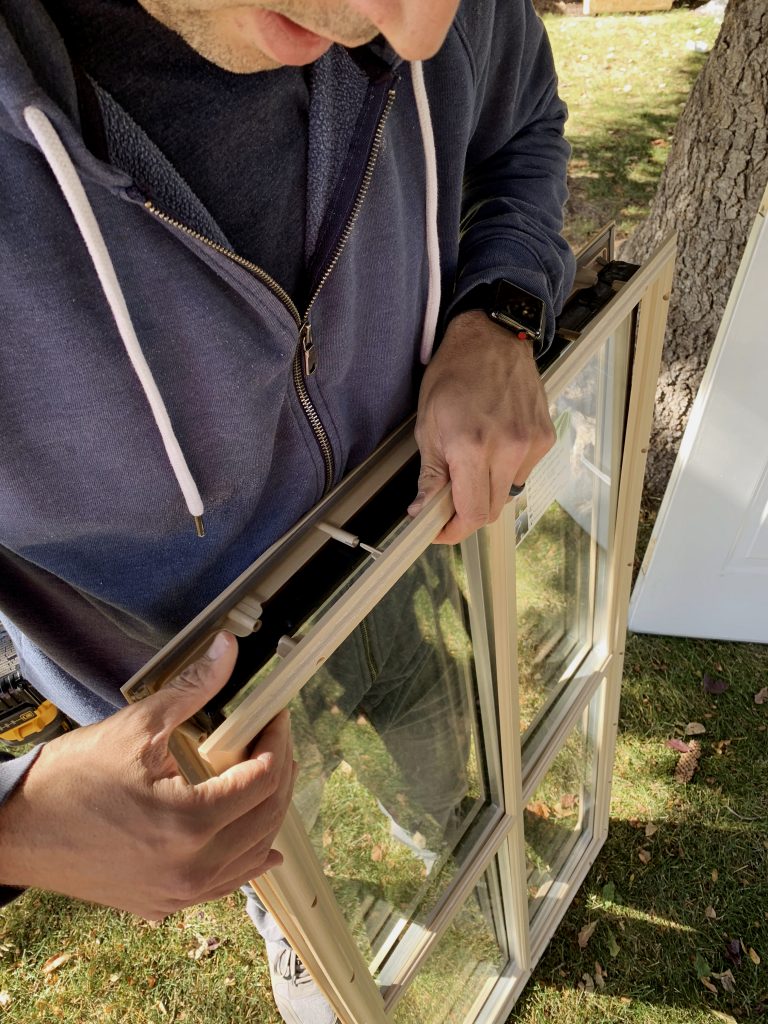

Set the interior frame, then the glass into it. Then the exterior frame and screw them all together from the interior side. They also send caps to cover the screw holes so they’ll be invisible. The whole process took us 30 minutes. It was painless!
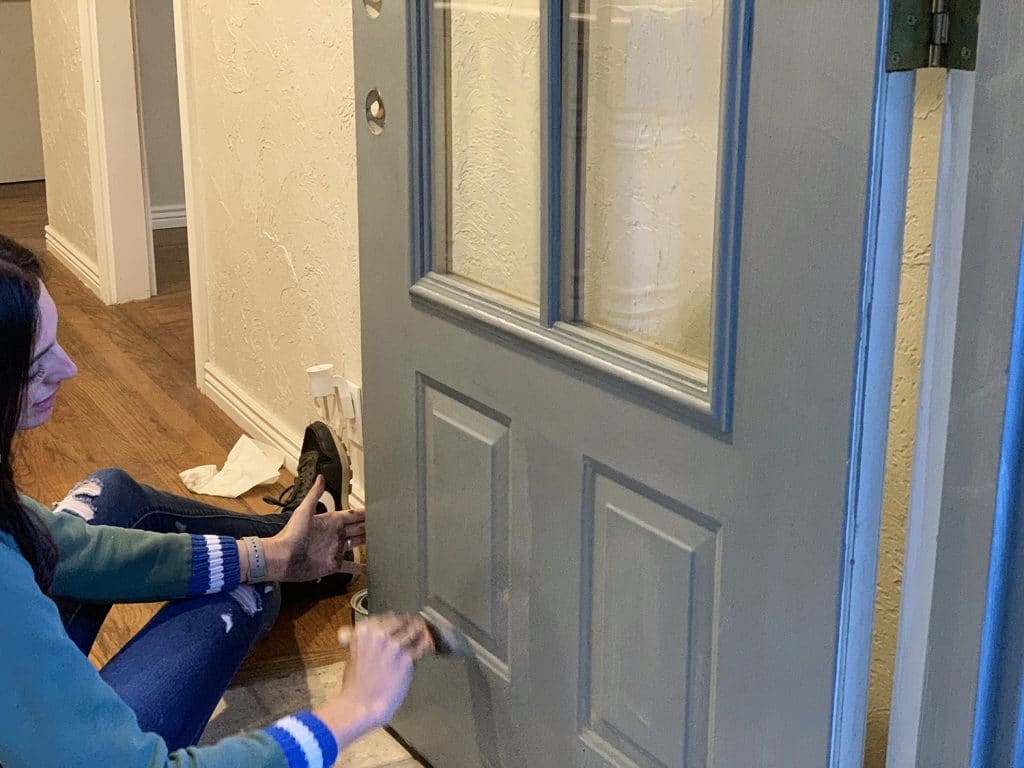
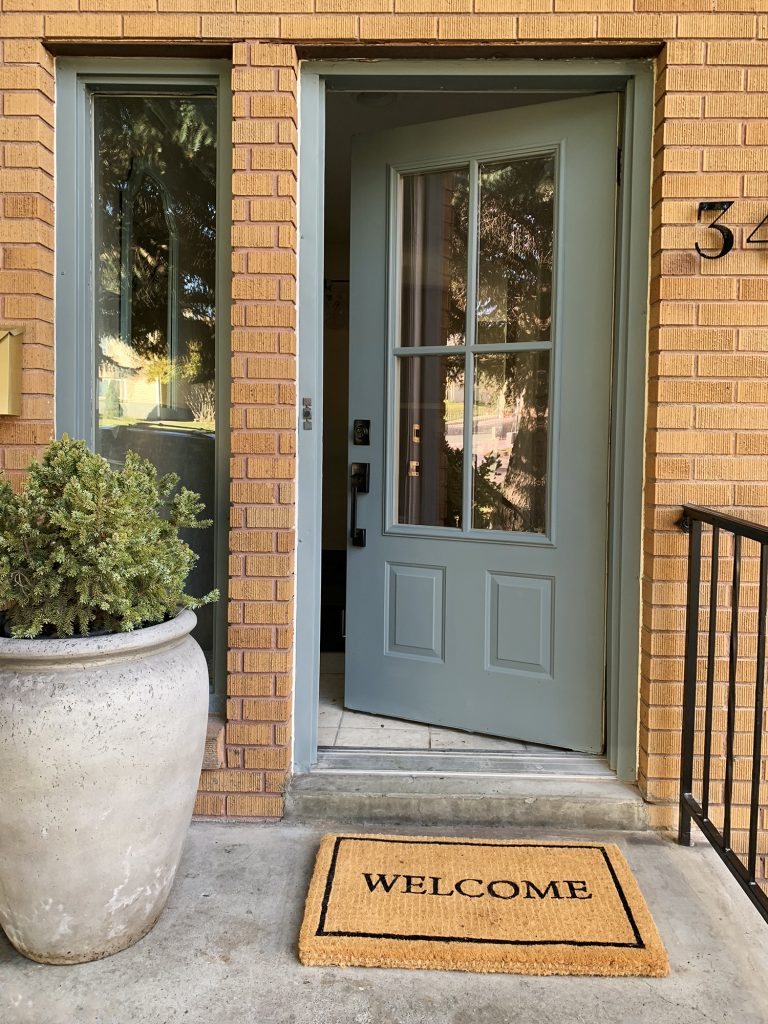
Chris re-hung the door and I got to painting. My goal when choosing a paint color was to enhance and complement the color of their brick. If the brick is here to stay, then work with it! Make it look its best! It had orange-red undertones, so I looked for something in the blue family since blue and orange are complementary colors. I decided on a beautiful muddy blue-green gray–Benjamin Moore’s Templeton Gray in Exterior Matte. It’s a similar value to the brick, meaning although they are different colors, they have a similar lightness to them or low contrast, so it creates a really serene look.
While we were at it, we replaced their sidelight with a clear pane, also from Zabitat, so everything was clean and fresh. (Note: Zabitat is happy to do custom sized inserts if your door or sidelight requires it!)
Railing and Mailbox, Minus the Curly Cues
Ornamental curly cues on a metal railing, a rusting metal railing, will kill a modern vibe faster than you can say “grandma’s house.” But that doesn’t have to mean a whole new railing! Chris took an angle grinder with a metal cutting blade to the embellishments and cut them right off!
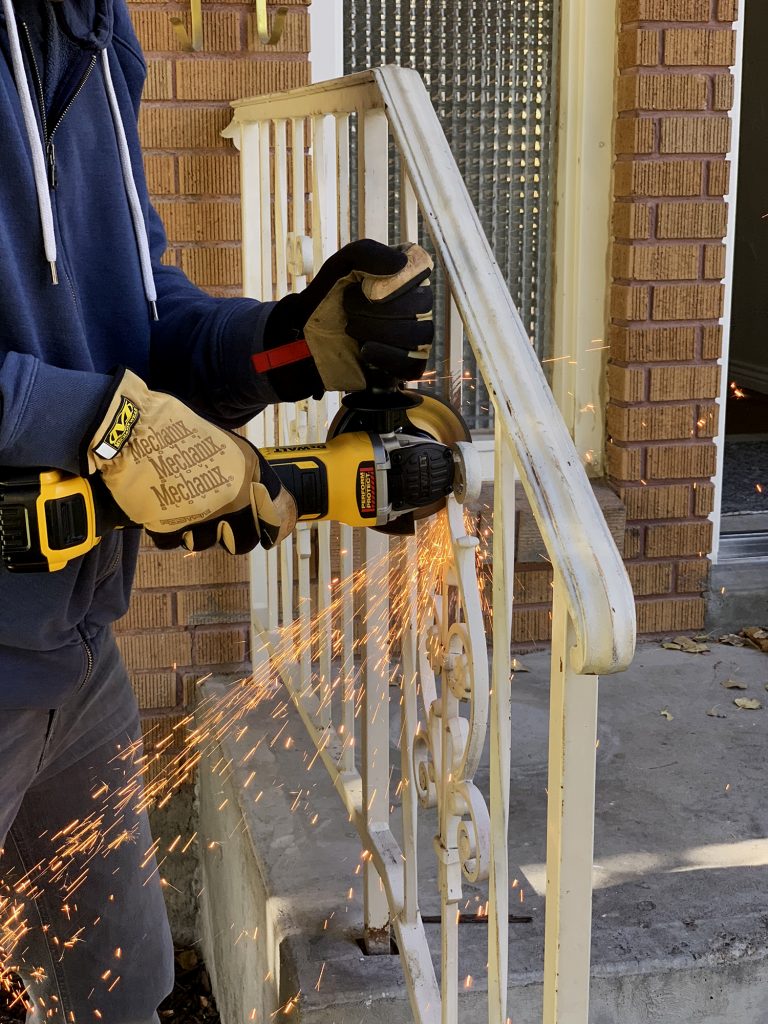
![]()
I followed up with Rustoleum’s Carbon Mist spray paint to give the railings an iron look and they were good as better than new!
The mailbox also had some curly cues, although they generally hold newspapers. Or used to, when this home received the paper. I asked them if they used it, before removing the screws holding the two bent out of shape paper holders. With its new, cleaner profile, I gave the mailbox a few coats of Rustoleum’s Metallic Pure Gold spray paint and it modernized the 80s brass in no time.
Custom House Numbers
Remember the house numbers before? Probably not–they were pretty unmemorable. House numbers can make a house. For this house, we knew we wanted something that kind of connected the old to the new.

This home holds so many memories and traditions for this young family, and we didn’t want to strip the house of that in this makeover. So we really wanted numbers that felt classic and traditional with a modern spin. Our friends started the brilliant company, Dropcap Studio and they make custom house numbers and letters. In any font, size, material, color you can think of! They even mocked up a few different options that they would suggest (so helpful!!) and we decided on their Valuta numbers in a glossy acrylic that has a lifetime guarantee!
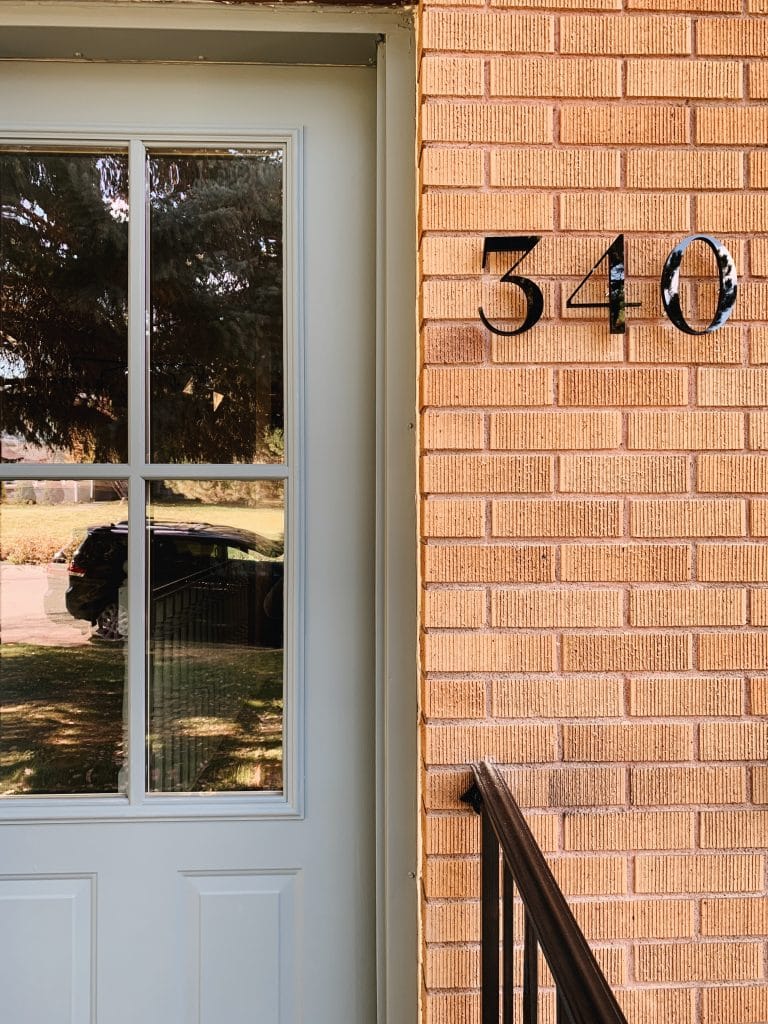
It comes with an easy-to-use template that shows you exactly where to drill holes. Chris used a hammer drill with a masonry bit to drill the holes about an inch or so deep. We put a drop of silicon in each hole and stuck the numbers in. They float off the brick (swoon) and nearly steal the show.
High Light
Their previous light was high and tiny. There wasn’t much we could do about the location, but choosing a larger fixture that was more bottom-heavy really helped balance out the height, not to mention illuminate the whole area a lot better.
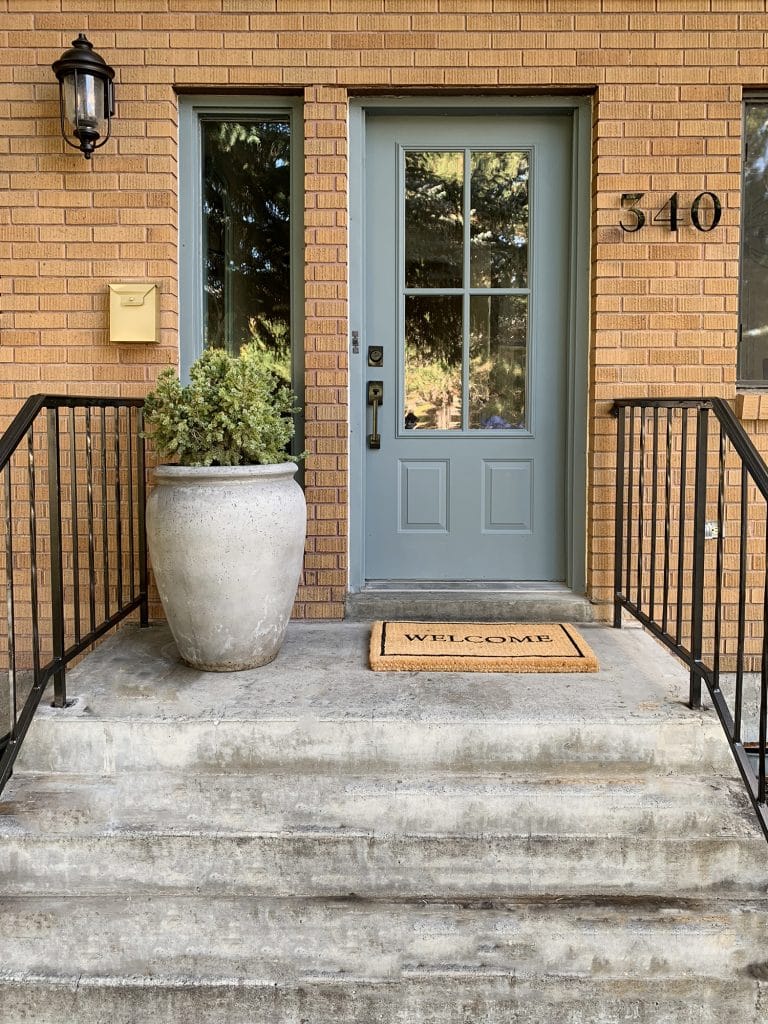
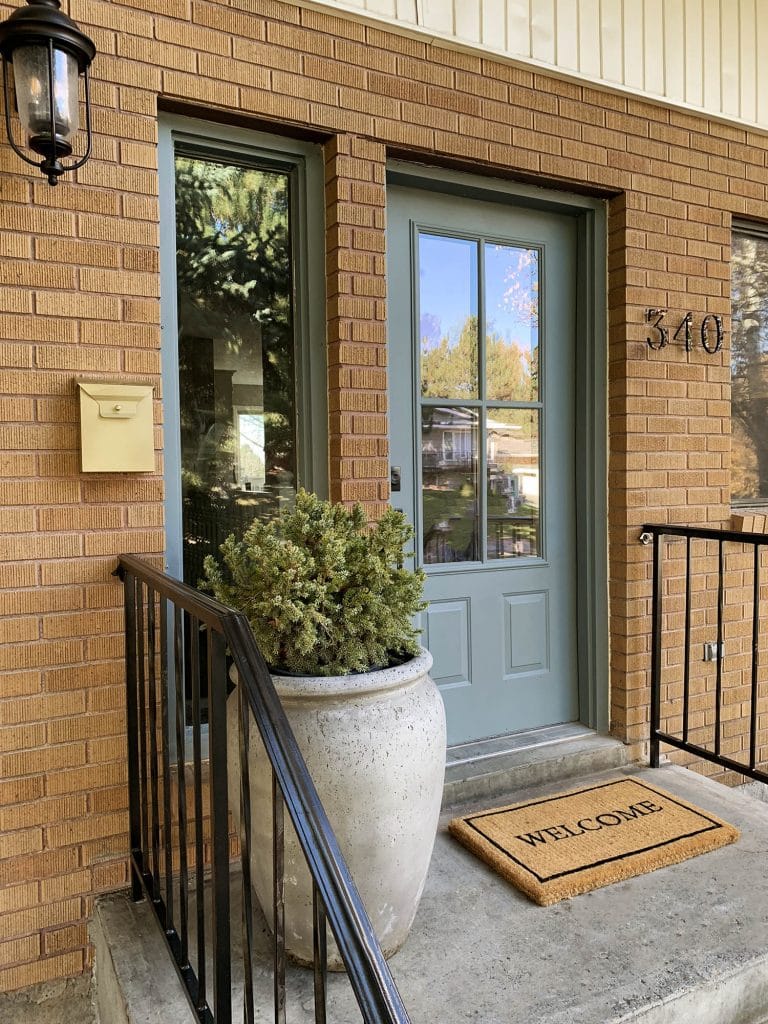
A fresh doormat, handleset and spruce (in the prettiest cement planter they had!!) were all the finishing touches this space needed.
Here’s one last before and after. You can see that pretty cement planter they had in the bottom right of this photo.
My favorite part of this whole makeover was seeing how excited the homeowners were about their house now–even, and maybe especially, the brick! And also how we were able to do it on a dime. (Budget breakdown below!)
Does your exterior look more like the before? A makeover may be in reach for you! Here’s how this quick makeover breaks down cost-wise:
Zabitat 4-Light Low-E Insert $297
Zabitat Clear Glass Side Light $133
1 Quart Templeton Gray Paint $20
3 cans of Carbon Mist Spray Paint for the Railings $21
1 can of Pure Gold Spray Paint for the Mailbox $7
3 House Numbers $83
Doormat $34
Spruce $15
New Handleset $167
Exterior Light (purchased at a local lighting store) $45
TOTAL $822
For a third of the cost of the drool-worthy 4 Grid doors the homeowners were originally eyeing, we were able to give the whole area a makeover! Let us know if you try something similar at your home and be sure to check out Zabitat’s awesome door insert and sidelight options.
Leave a Reply
What do you think?
Previous Post
Next Post


Semihandmade
Our wood grain Shaker cabinet fronts were designed for busy, high-traffic homes like ours. Clad with durable textured thermofoils, this line is compatible with Sektion, Akurum, Godmorgon, and Besta cabinets from IKEA. It's the perfect, practical way to add the warmth of wood to all the rooms of your home.
Collaborations
learn more

next
Loloi
We have teamed up with Loloi to create a line of rugs that are as affordable as they are beautiful. This collection houses a great mix of traditional and modern rugs, in cottage-y colorways, as well as vintage-inspired beauties that you’ll want to roll out in every room.
Collaborations
learn more

next
STUGA
We partnered with Stuga on a line of hardwood floors — The Ingrid is really livable, and the color is very neutral. It doesn’t lean warm or cool, it’s that just right in-between. We have really loved putting it everywhere in our house. It’s the best jumping-off point for design, no matter your interior style. In addition to being beautiful, Ingrid is really durable — we have three kids, and we always have a home construction project going on. Ingrid stands up to it all.
Collaborations
learn more

next
SHop all
What We're Right Now
What We're Right Now
Looking for our favorite things? A place to shop our home room by room, or just catch up on what Julia's wearing / loving right now? Browse the CLJ shop.
Loving


Portfolio


Design
Befores, afters, mood boards, plans, failures, wins. We’ve done a lot of projects, and they’re all here.
BROWSE BY CATEGORY
let's break this thing up
We have a long-standing relationship with DIY, and love rolling our sleeves up and making it happen.
Projects
Even when you don’t want to rip down a wall, you can make that space in your home better. Right now.
read more
read more
read more
02
01
03
looking for inspiration?
A reader recently asked me if I’m starting to fully embrace traditional style and whether we still consider our house to be a “modern Colonial” and why. It was a really great question and so timely — I had really just been thinking about my approach to this home and how my style has changed […]


SEARCH THE BLOG
We've been doing this since 2009 and we've posted a whopping 24145+ blog posts and counting. You might need a little help searching, huh?
looking for something?
find stuff like:
")
Can We Send You Our Love Letter?
Another way for us to stay in touch! Joining our weekly newsletter gives you access to exclusive content, never-before-seen photos, your questions answered, and our favorite DIYs. Sign up below!
Follow Along on Instagram
Welcome to our online community where we've posted home, DIY, style, renovations, and family since '09. Renovating our #cljmoderncottage in Idaho and headed for new adventures in Raleigh, NC. #cljfam #cljtransformations
@chrislovesjulia


Links
Get Around
Make yourself right at home
Portfolio
Design
Casual Friday
Projects
Lifestyle
Gift Guides
All Posts
Shop
Love where you live.
Social
RivrLinks
Links
Get Around
Make yourself right at home
Portfolio
Design
Casual Friday
Projects
Lifestyle
Gift Guides
All Posts
Shop
Love where you live.
Social
RivrLinks
What a great post with sponsored content that will be incredibly useful to so many people looking for a budget-friendly way to boost curb-appeal!! Good job, you guys!!
Oh my goodness! Incredible article dude! Many thanks, However
I am having issues with your RSS. I don’t know the reason why I am unable to join it.
Is there anybody else getting the same RSS problems? Anybody who knows the answer will you kindly respond?
Thanks!!
Really enjoyed this post! The sponsorship was seamless and very fitting, I’ll keep them in mind for future projects!
Quick-ish question for you. We’re looking to put in a door where a window is now. We found a reasonable mostly glass door but getting one with a sidelight is way more expensive. Would it make sense to have our contractor frame in a space for us to insert a Zabitat sidelight panel? I’m having trouble figuring out how that would work.
Totally!
As others have commented, love this post both for the awesome transformation itself and for the do-ability. I’m not in a living situation where I can make or afford all of the renovations I’d like right now, but this type of entry update is something I’m excited to tackle!
Hello,
Love the idea of painting the door but was wondering if we should let the paint cure before putting it back up? I’m afraid it will start peeling and getting scratched up. I know paint can sometimes take a few weeks to cure. So would you recommend putting in a temp door while it dries and cures?
Thanks!
In all the doors I’ve painted, we never have done that. It’s not a bad idea to treat it with care at first, but no need for a temporary door.
This question might have already been asked, but is there anything you can add to the glass to make it harder for people to see in when at your front door or walking by? Thanks!
You can either frost the windows from the inside or mount a little roller shade inside!
Could not love this more! Bravo for using what you have and keeping costs down. This is also a rare sponsored post where I’m actually really happy to learn about a product that I didn’t know existed! Gorgeous final result! I’m sure the family living there is thrilled.
Can you link the angle grinder and specific blade Chris used? I need to cut off some heart-shaped curly cues on my front porch and indoor staircase!
You bet! Here is the angle grinder and here are the cutoff wheels for it.
Fantastic makeover – I love every piece of it. Also, really wonderful example of a sponsored post. I had no idea that these door/window products existed, and they’re 100% relevant to your blog. Thid reads much more like you’re letting us in on a secret than like an ad. Great job!
Hi Chris and Julia!
Love them all!! It’s like magic!
Can you let me know the name of the lighting so that I can search for that light?
Or if I can purchase only the local shop, I want to purchase it over the phone.
Can you help me get that lighting?
Thanks!
We bought it from Wolfe Lighting in town here. All I can see on the name is “Capital” with a product number 9582OB. Hope that helps!
It’s discontinued everywhere online????!! I have checked 8 online stores that carried it…all say discontinued!! If you find a store only that still sells it pls post a comment. Thanks! Gorgeous light and makeover!!
The color of he door with the brick is ????????! I think you nailed it on everything except that high light. Is there any way to move something like that lower since it’s in brick?
I had no idea you could get a new window insert for a door, that is amazing! Thanks for sharing because my mom just bought a house and has the exact same oval door and she hates it. This information will come in handy, thank you!
I am obsessed with this makeover! I had no ideas it was that easy to switch out the glass and repurpose the door. And that colour!! It looks so good with the brick!
Great job! Such an improvement with these precise changes. The door is spectacular. Do you have a picture of the whole front elevation of the house? I’d like to see the whole picture!
Thanks!
Beautiful! I’ve followed you guys for years and have incorporated so much of your influence into my own home. I’m wondering why you didn’t keep the kick plate and paint it with the same spray paint that you did the mailbox. Seems like it would tie together nicely. Just wondering if you just wanted to keep the door more streamlined, or if the paint may not hold up on a kick plate? Thanks!
The homeowners requested no kick plate, so we left it off. I think it could have looked nice either way!
Cool. Thanks for replying!
Disregard my question- looked through the comments and found your answer. Thanks!
It looks AMAZING. Do these inserts work on metal doors? Assuming no but worth the ask- couldn’t find the info on Zabitat’s site. Thanks!
Tiffany – The glass inserts on Zabitat.com work with fiberglass, steel (metal), and some wood doors.
How did you spray paint the railing with it still attached without getting spray paint on the porch? I want to do this at my house but worry I will get spray paint all over my porch!
We just taped off/covered everything
Thank you for breaking it down for us. The Makeover Gods are pleased. ;)
Good post. I certainly love this website. Thanks!
Worth every penny… x10!
This is so awesome. Thank you for sharing this cool project.
This is stunning. One of my favorites, just gorgeous!
Hi! First, I love this makeover. It’s beautiful! This might be a silly question but I’m just curious how the painted door frame and window frame look with the other windows of the house? I can’t say that I’ve seen front door frames and side light frames painted a different color than the rest of the exterior windows. I think I might like it! Great work!!
How did you cover up the holes from the kick plate?
Caulk and paint.
I love everything you guys do, but this is the best post in awhile. Such an awesome, do-able project. Love a good before & after!
Can I ask where you got the cement planter?
The homeowners had it (you can see it in the corner of the before photo). But we shared some comparable options on Instagram Stories today!
I had no idea you could even DO that to a front door! Awesome :)
This post couldn’t have come at a better time. I need to replace something very similar at my house. Thank you.
Just a suggestion, you should with the price breakdown list also mention the tools once again that Chris used and for those of us that don’t own them, please let us know if we can rent from Lowe’s or Home Depot. The renovation looks great, but I don’t even own a masonry bit and a hammer drill so I would need to rent tools or hire a handyman. Also I know there’s no Marcum party this year– but will you take your sweet daughters trick or treating? If yes, what are their costumes this year?
Thanks for the thoughts, Mimi! And we’re definitely taking the girls out – they’re dressing as Dorothy and Glinda from Wizard of Oz.
I want you to ONLY do exterior updates like this. I’m nominating myself for your next one :) PLEASE!
I love this update! The entry would look really cute with a few window boxes with greenery too.
Looks very nice! It is always so nice to see renovations/make overs that the “average” person can tackle. A very affordable project with a huge impact. Thank you for sharing :)
OMG. That is GORGEOUS! You two are extremely talented! Thank you for sharing, I’ve learned so much from your projects.
I LIVE for posts like these! Not that I dont love me a huge reveal of a kitchen or bath, but something so simple as a stoop refresh — Something I could do – probably in a weekend – and makes a dramatic difference. I. live. for. this.
Thank you! And I love the word stoop.
I had no idea you could do that to a door! Showing my husband the instant he gets home. Thanks for sharing this makeover!
This is my favorite kind of makeover and blog post! Smallish project, lowish-budget, high-end look with a big impact! The paint color is perfect. What a gorgeous entry and so doable for the masses. Most of us don’t live in our dream homes but we can still have pretty things. I don’t comment much (ever?) but wanted to say bravo and thanks for inspiring me. I love your style so much.
Thank you so much!!
OMFG!!!!! This looks incredible! Your blog is such a great mix of aspirational and affordable, and I learn so much every time! Thank you for your hard work!
This is an amazing transformation! I never knew you could by inserts and change dated doors. The entry looks like a million bucks!
Absolutely STUNNING!!!
Honestly, this is what a DIY blog is all about. Thank you for always showing quality work that is doable and stylish!!
You guys knocked it out of the park with this one. I loved how you worked with what was already there! Very inspiring.
These inserts are genius! We have horrible french doors with 3×5 glass panes that do not match our mid century ranch at all. I’ve been eyeing to replace them and at $400ish we can do this a lot sooner!
Also seeing the sizing of the Dropcap numbers on the house is soooo helpful. I’ve been following them for a while since you mentioned them, but haven’t been able to gauge the sizes. Another quick low cost project I can do to make this house make some more sense! I love that you share innovative products so often.
I love these kinds of posts. I think I would’ve gone for painting the brick, but that colour for the door compliments the brick perfectly!!! I love everything about this–you used what was there, and made it better, and didn’t spend a ton of money on it. The only thing I would add would be a small rug under the welcome mat, perhaps in a black and white and grey buffalo check, to ground it a bit more. But how picky am I? This is amazing!!!
Looks so good! I love the door color and new hardware!
Absolutely amazing! Did you take the railing down to paint them or just protect the area around them?
We just taped it off
Here to echo everyone’s comments that these types of project posts are so great and helpful. What a difference you can make on a small budget with a good eye for design! And it sounds like everyone learned a new affordable technique/product for improving an exterior door, I certainly did. Thank you!
I definitely need to do this to ours!!!! Such inspiration !!!
I love the look of this, don’t get me wrong, but am I alone in thinking that this large of a window is incredibly Impractical? First of all, at night, everybody will be able to see into your house, with it being dark outside and ligjt inside. I can’t be the only person who occasionally pretends they are not home when somebody comes to the door!
Second of all it seems like a safety issue as well. It really easy way for somebody to try and break in, even if you have an alarm. It looks great, but I feel like a huge window at your front door is not really functional.
We have a huge window and love it! If they wanted to, they could always mount a roller shade on the interior of the door for a little more privacy at night.
I have a solid wooden door and REALLY REALLY want one with glass panels instead. We have a duplex so the entry is quite dark, and I can’t put another window in. But I *could* make the door function like a window! You could frost the panels if you need privacy. As for security — we got broken into already. They came in through the back door; chiseled the lock out instead of smashing through the glass French doors. I figure if someone wants to get into your house, THEY WILL ANYWAY! I could also get run over every time I cross the road…
Love this update so much! The simplicity, the colors, the DIY aspect. I’m here for it!!
Love the door and how you were able to swap out the glass insert. I had no idea that was possible! Do you know if it would work with a metal door?
This was a metal door with a foam insulation core, so I think it would work!
I LOVE THIS! I have wanted a window in my windowless door but you are totally right the prices are insane!!! This might just be what i am looking for!!! SO HELPFUL! Now if I could only get Chris to come and install it! ;)
Amazing how a few little changes can spruce up a space so much!
Liz @ ShoppingMyCloset.com
I watched your instagram story and I thought you said you got the door glass from “Habitat” and so my brain thought a habitat restore, and thought it was one off scrap you found. But I’m so much happier to hear that it is something I could find! In the glass in my front door is an oval wheat stalk.. not exactly my style!
Wow! Just,……wow! I never would have thought that was the same door – so impressive – you two have a great eye when it comes to things like this!! Very nice!
I LOVE this simple makeover! The light choice, house numbers and am blown away by the insert idea. I have one of those ugly ugly oval panes in my door as well and if we weren’t planning a whole front porch reconstruction (including a new door) this would be a serious option. I wish I knew of the inserts 7 years ago! The planter adds that perfect welcoming touch and the blue color you chose compliments the brick so nicely.
Can you tell me why you chose matte over a glossier finish for the front door? We are painting the door of a flip house soon and I assumed I would use a satin finish, but now I’m rethinking this.
Since it was an older door, it did have some dings and dents in it. A matte finish really disguises ALL of that, while any sort of sheen will highlight those things.
Looks great!! What prep work did you have to do on door before paint? And what primer do you recommend for fiberglass?
This was a metal door and we just cleaned it before painting with a high-quality, exterior paint.
This is beautiful! Nice job on the color choice, it neutralizes and compliments the brick so well and I’m sure it wasn’t easy to choose a color. I love makeovers like this, low cost and huge impact.
Oh my gosh, your paint color choice is brilliant!! I mean the whole makeover is brilliant, but I REALLY want to commend you on that color. What a transformation.
Wow, this is fantastic! I love what an impact you made on that budget!
Question: is that a wood door? I’d love to do something similar, but my exterior doors aren’t wood.
This is a fiberglass door.
Any particular reason for painting the mailbox gold instead of black to match the rails?
Thank you for explaining why you picked the gray paint – I learn so much from your blog!
I really love mixing metals and I didn’t necessarily want the mailbox to stand out.
This looks amazing! I painted our front door a year ago but never did the trim or sidelights, totally inspired to finish. Does the planter block the mailbox?
What a difference! Love seeing these low-budget, high-impact makeovers, and I think it’s awesome you are beautifying your friends’ spaces one small project at a time.
How many inches are the house numbers that you used? Looks amazing!
6″
Sweet baby Jesus, this is amazing!!!! Ordering my inserts NOW! This is so much more affordable than replacing our existing door and side lights. thank you!! Also, where is the planter from?
They actually had the planter, this one is similar!
Not a huge commitment of time and cash but what a great impact! It went from looking shabby (but not the chic kind) to looking stylish and simple. You made the brick look good … and that was a real challenge!
I love the gray color you used. We have the same yellow brick and we’ve experimented with a black door, but it’s too harsh instead of welcoming. This was a great example to show what you can do with a budget while keeping the original brick!
This came out great! I’ve been shopping around for new doors because mine is very outdated as well, but this looks like a great alternative! I have fiberglass or maybe a steel door and frame; is there a special type of paint to use to make sure it adheres to both the door and the frame?
Just one with a good primer and you’re good to go!
That looks so good!!!! Amazing job!
Expensive bathroom renovations are nice, but THESE are the posts I come for! I love this and had no idea you could cut a new opening into fiberglass doors! I’ve been eyeing replacing our front door for one with windows so I’ll definitely have to check out this site. It’ll probably be 1/3 of the price!
Great content.
What kind of paint did you use on the door? Just a flat exterior? I’m struggling with my door paint peeling.
Yup! Make sure it has a good built-in primer, or you can prime it first!
Looks amazing! How deep is that planter? Will it be difficult to reach back to the mailbox now?
The mailbox is still very reachable
Looks amazing!!
I love it when you guys do projects like this! I’m totally going to check them out. I’ve been wanting a door like that and this look so affordable!
This is a stunning before and after! Looks awesome!
Wow. Wow. Wow.
Is the Templeton Gray color matched to another brand or did you have it mixed at BM?
I matched it to Valspar because that’s what we have local
That’s what I was hoping you’d say! I’m going to go to Lowe’s and have a quart mixed too. Hopefully they have the formula in their system at my local store.