
A couple weeks ago we introduced one of our new room projects to you–a dedicated home office/studio–and this weekend, after a lot of planning and a trip to Ikea last weekend to pick up desk supplies, we finally got cracking on it.

It’s a pretty vanilla room to start with, and although it’s in the basement, it gets a good amount of sunshine throughout the day. When we were planning the furniture, our desk, lighting and the walls–it was the walls that kept stumping me. Would an interesting paint color be enough to turn it from vanilla into something more “us”? It didn’t seem so. Then, we turned to wallpaper–which I definitely loved the idea of. But it would have been pretty pricey and this small of a room couldn’t get by with just an accent wall. So, we decided to apply a wainscoting to all the walls.
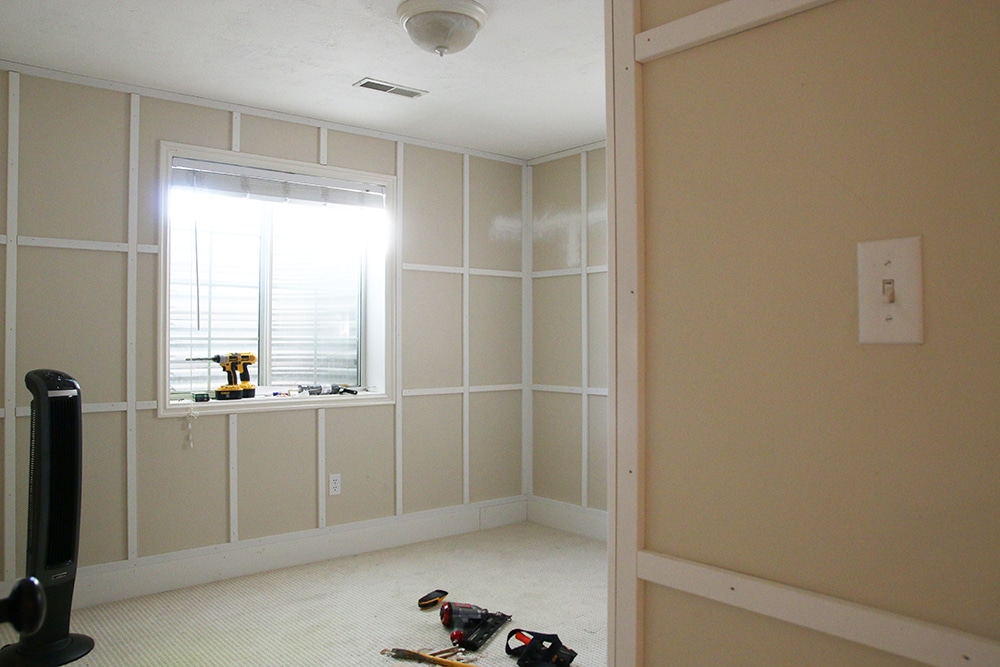
We still have a lot of work to do before it’s done, but this is how far we got on Saturday (a long 10 hour day) and it’s already added so much dimension and interest to the room.

We’re using 1 1/2″ MDF trim boards, to not overwhelm the room, attached with liquid nails and a nail gun. But before we could start trimming it out, we removed the baseboards and added filler MDF for the trim to sit on top of and we’ll add the baseboards back on right before we paint.
Chris started by adding the top and bottom trim pieces near the floor and ceiling, then attached all the verticals and lastly the horizontals. However, the trim is not complete yet. We’re going back in and adding molding to the inside of each panel.

We picked up this “Raw Colonial Moulding” from Lowe’s for the inside and trimmed out one section to see how it looks before calling it a day.

I think it will add something very special and a much more finished look, but I’m not sure the inside moulding is beefy enough–or maybe its just that the wood tone is too close to the wall color. Verdict is still out.


Once we get the inside moulding on, we’ll reattach the baseboards, caulk until we can’t caulk anymore, and then give it all a coat of paint. I’m thinking a warm gray-green–similar to this space we’re pulling a lot of inspiration from. Anxious to see it all come together!


Hey Julia! Wondering if you can tell me how big each rectangle is? We have an offcentered window we are trying to work around. Any tips, tricks?
What did you do to address the overhang where the mdf boards meet the baseboard or door trim?
We removed the baseboard and added it on top. The door trim and window trim stuck out enough.
Julia, which nail gun and compressor did you use?
We used a Kobalt air compressor with a Hitachi brad nailer, both from Lowe’s. The compressor we have is actually no longer on their site, but this one is pretty close. And the nail gun is this one.
Can’t wait to see the final product! This reminded me that we need to finally post our shaker panel project.
Gosh that’s going to look so good painted (it already looks good!)! How nice to have natural light in a basement!