


Tool gift guides are a bit of a yawn sometimes, and not very helpful. We’re changing all that and giving you 61 tools anybody would love to receive, and breaking them down by the task they need to accomplish! And while some tools apply to almost everything you do, every project has unique tools that make it so much easier.
1 | 2 | 3 | 4 | 5 | 6 | 7 | 8 | 9 | 10 | 11 | 12 | 13 | 14
This gift guide assumes a certain level of knowledge for each of the project areas, but is still meant for the home owner. We always encourage people to never do a task they are not comfortable with, especially in areas where safety and building codes area such a factor (like electrical work, framing, plumbing etc).. Do what you feel you can, and hire out the rest. :)
Essential Tools
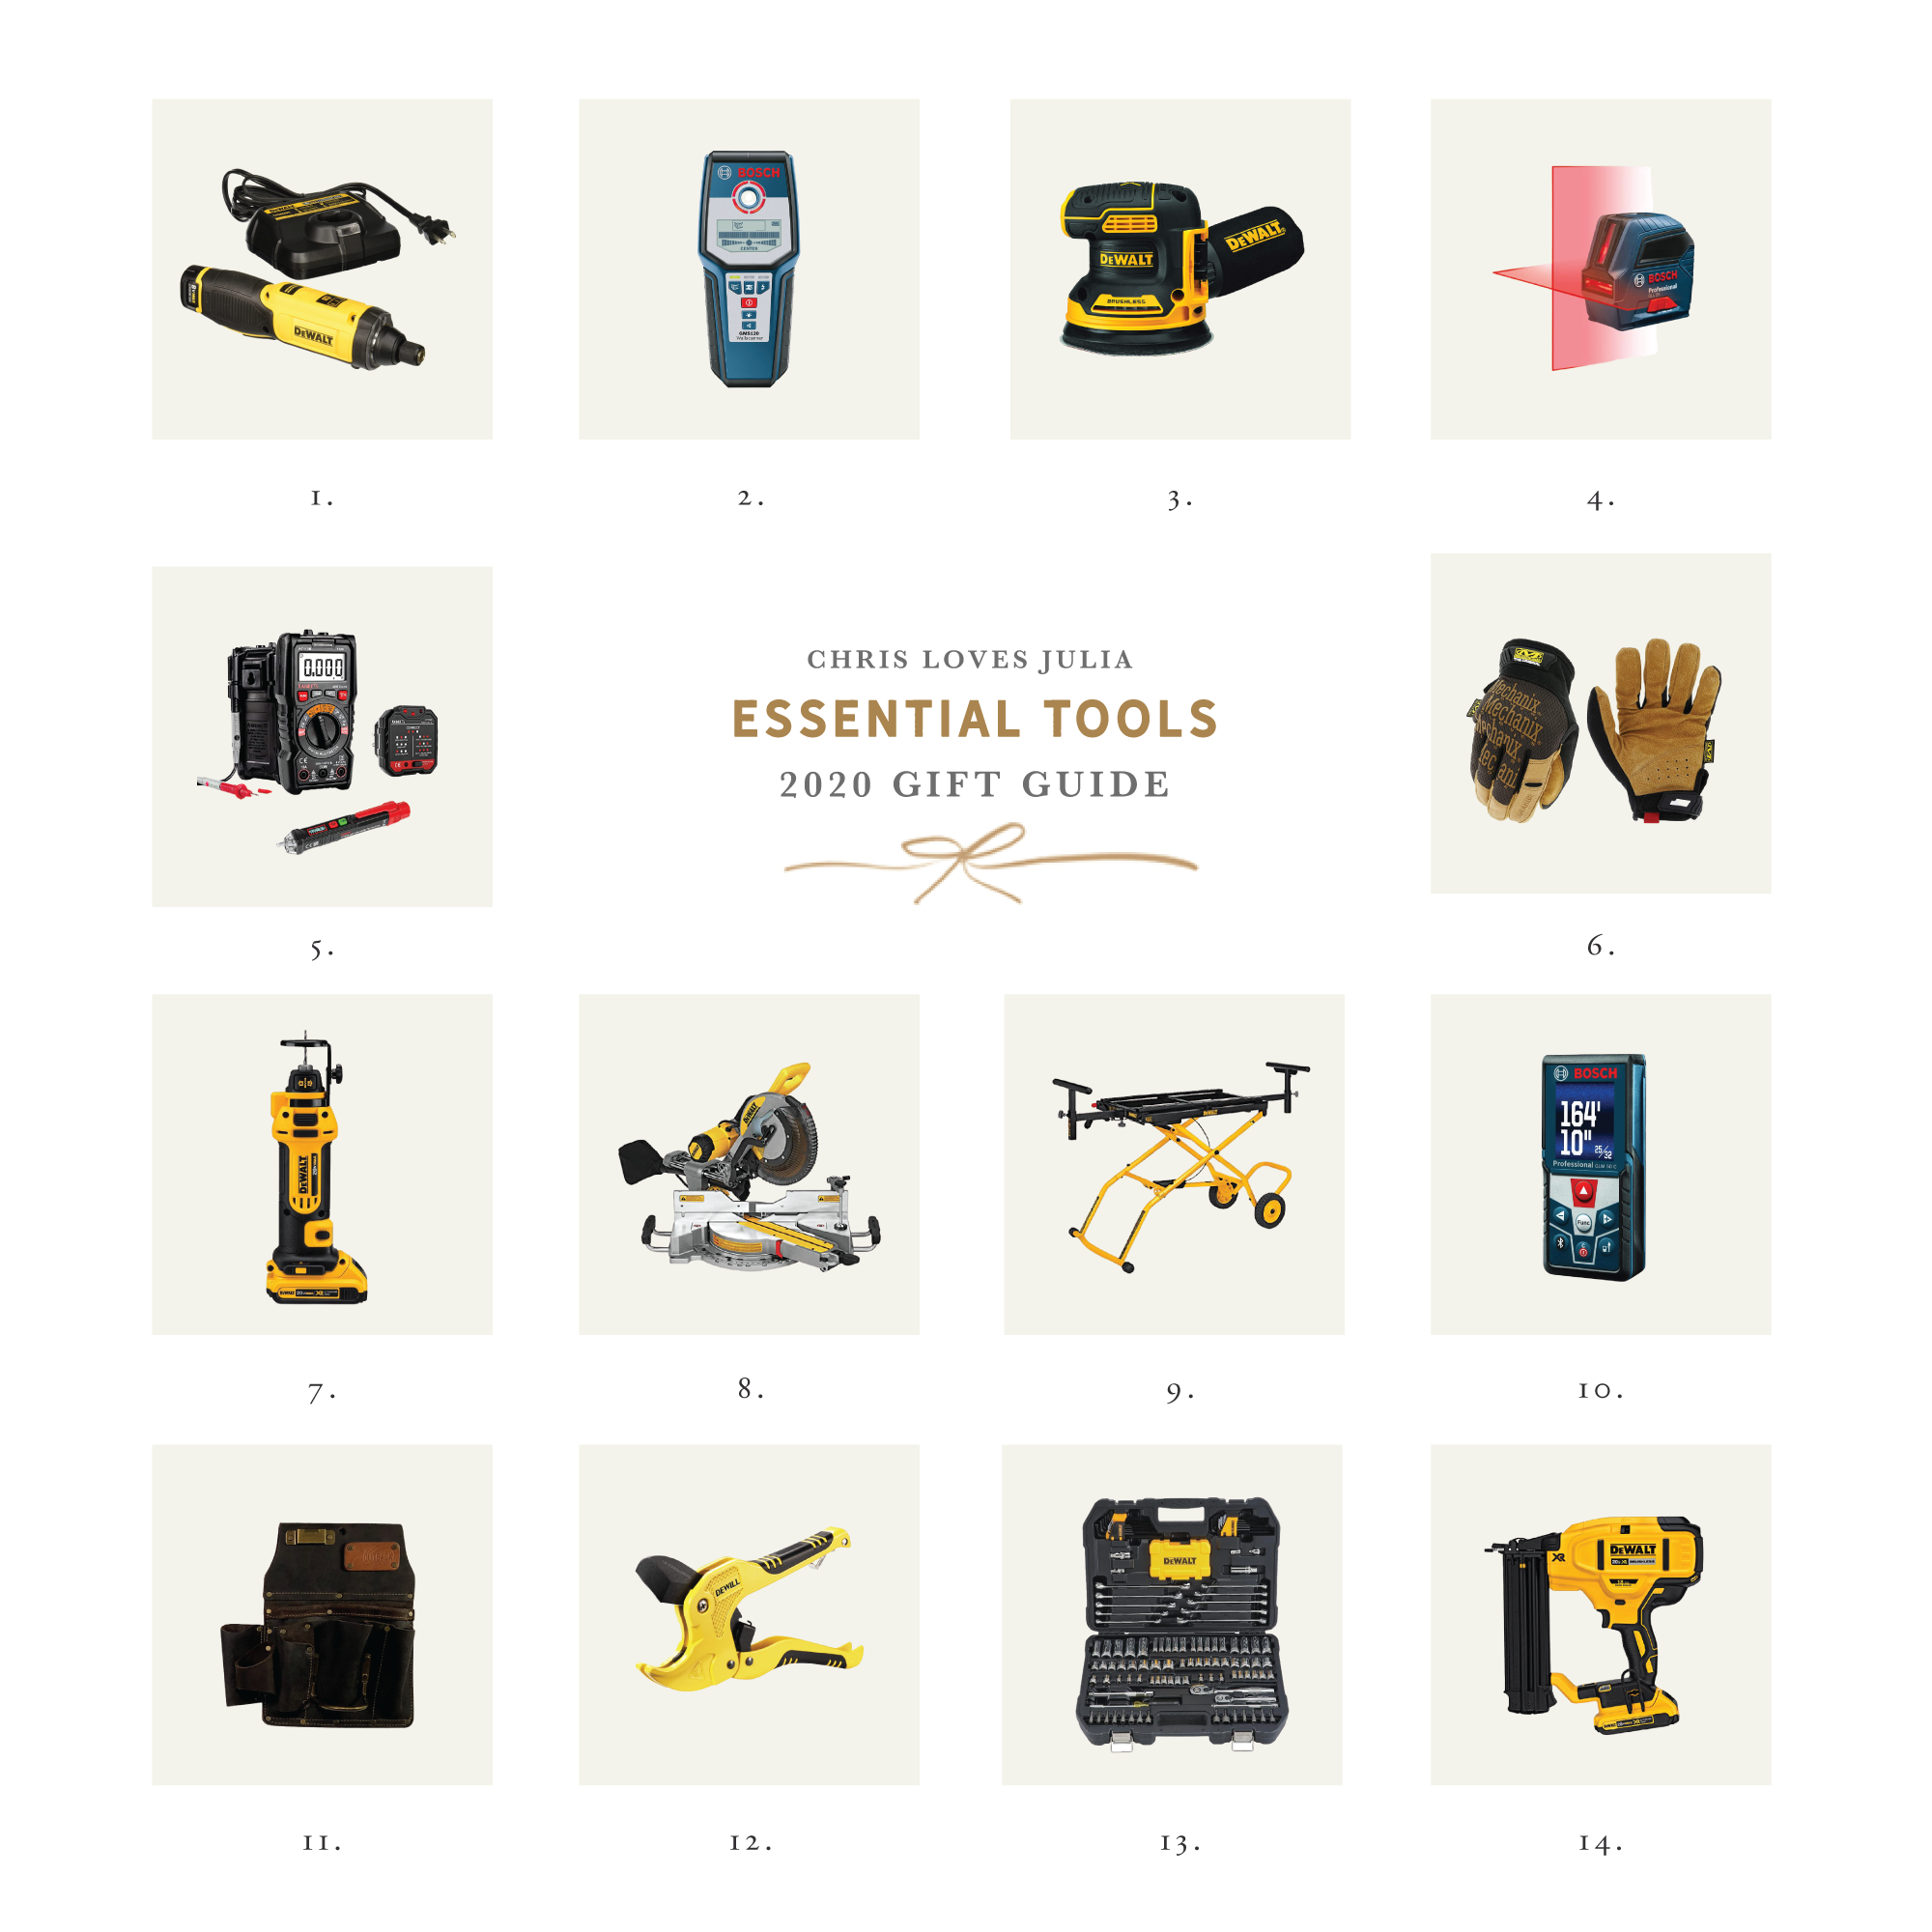
Every DIYer needs a baseline of tools available, and this is mine. Things I use daily. Weekly at the very least. If you’re just starting out your tool collection, this is a great place to start.
1. Gyroscopic Screwdriver: I use mine every day. Super intuitive and comfortable.
2. Laser Distance Measure: this one is a power house. It really shines when measuring a space to order materials like flooring, wallpaper, moulding etc., but also super accurate for detail work.
3. Impact Driver: every person I convince to make the change from traditional drills to an impact driver is blown away by the difference. Having this tool is a non-negotiable for me.
4. Stud Finder: but not just studs – pipes, gas lines, wires, all that stuff. Before drilling a hole or shooting a nail into your wall, you should have an idea of what’s behind there.
5. Impact Ready Bit Set: quick-change bits, in a set with enough variety to cover 90% of projects you’ll do day-to-day.
6. Razor Blade Knife: one you can open with one hand. I love this style with the locking button on the side.
7. High Vis Measuring Tape: Lufkin tapes are my preferred – great quality, and the high vis options are really nice. Great contract and visibility.
8. 16oz Hammer: for daily use, a light-weight hammer is the best. I prefer the straighter claw as opposed to the curved.
9. Channel Locking Plier Set: standard pliers, plus a few channel locks. Will be used often.
10: Wrench and Socket Set: basic, but necessary. One of the first things any homeowner should buy.
11. Circular Saw: this little circular saw is so easy to use, comfortable, and versatile. Wide enough blade to cut a 2×4, but really shines on plywood.
12: Wet Dry Vac: using your nice Dyson vacuum to suck up sawdust and sheetrock debris is a great way to force yourself to buy a new Dyson. Use the vacuum made for the job.

Electrical Work & Wiring
Not a task for everyone to tackle, but if you’re buying for someone familiar with electrical work who could use some better equipment for those simple jobs, these are my favorites.
1. Headlamp: if you’re working on wiring the power should be turned off, but you still need to see what you’re working on.
2. Electrician’s Pouch: the homeowner working on electrical is usually doing basic things, and only needs a handful of basic tools. This pouch is perfect for keeping close the things you’ll need.
3. Voltage Testing Set: essential safety equipment. Never dig into wires without first ensuring there’s no power running through them.
4. Fish Tool: if you need to run wire, you want to avoid opening the wall if you can. This little number has come in clutch so many times for me.
5. Wire Strippers: lots of kinds you can get, and if you’re working with wire often, you should have several. But this is a comfortable set that is sturdy and designed for 14/3 and 12/3 electrical wire (pretty standard in most homes).
6. Jab Saw: for the times you do need to open a wall. Sturdy blade, quick-saw teeth. Great option.
7. Torpedo Level: handy little guy for ensuring the “old work” junction boxes you’re installing are level. Pet peeve.
8. Measuring Tape: always have it handy.
9: Impact Driver: this one has drive settings to turn down the torque so you don’t crack your light plates.
Tile Work
Tile work is slow, messy, and daunting. Those are also the reasons it’s so expensive to hire out, so if you can do it yourself then you can save a lot of cash. This list doesn’t include trowels, because the type of trowel depends on the tile you’re using so just get those as you need them.
1. Wet Saw: there are a lot of elaborate tile saws out there, but you don’t need anything too crazy. A simple wet saw like this can do just about anything you need.
2. Contour Gauge: just because you’re a DIYer doesn’t mean everyone needs to know your tile was done by a DIYer. This contour gauge helps get tight fittings around doors, trim, and other fixtures.
3. Rubber Bucket: after a day of tile work, sometimes you forget (or you’re not in the mood) to clean out your mortar bucket. Rubber buckets are awesome for that, because the dried mortar cracks right off. Stays cleaner, use again and again.
4. Knee Pads: absolute necessity for floor tile.
5. Tile Nippers: sometimes you have just that little corner keeping your tile from going into place. Tile nippers take off the little edges and save you constant trips to your saw.
6. Angle Measuring Tools: tile work is all about the angles. In addition to the contour tool, this set will cover most situations you’ll run into.
7. Diamond Drill Bits: drilling into tile is scary, because doing it wrong causes cracks and that’s a pain to fix. Diamond bits are meant specifically for tile and much less prone to cracking than trying to force regular bits (which will just ruin your bits, honestly).
Plumbing
Another task not to take lightly, but made so much easier by having the specific tools meant for plumbing.
1. PVC Cutter: don’t try to “make do” just because you don’t think you’ll use them often. They’re worth the space they take up in the toolbox, even if you only pull them out twice a year.
2. Copper Cutter: as with PVC cutters, a copper cutter just does the job better than trying to hack through a pipe with a saw. Plus they’re super compact and take up hardly any space.
3. Channel Locking Plier Set: I prefer channel locks to just about any wrench because of how quickly you an adjust them. That makes all the difference when you’re huddled in a heap under a kitchen sink.
4. Adjustable Wrench: though the plier set above includes an adjustable wrench, it’s good to have several on hand. Lots of pipes, lots of connections, lots of sizes.
5. Bucket Organizer: when you’re crawling under sinks and lifting up toilets, you don’t want tool belts on. They get in the way. The bucket organizer is the best way for a homeowner to organize tools and materials when plumbing, IMO.
6. Waterproof Endoscopic Camera: wondering if your daughter flushed that Minnie Mouse car down the toilet and that’s why it’s clogged? Take a look without remove the entire toilet.
7. Drain Snake: A lot of drain problems can be addressed with a snake. You have to be careful when using a snake, especially in old homes with old pipes. But if you’re familiar, it’s a great tool. I like that this one can be hooked to a drill to give more torque to the feed.
Finish Carpentry
Though slow-going, finish carpentry is one of my favorite aspects of a job. It’s really what makes it all look “wow” instead of builder-basic. It’s also pricy to pay someone to do, so learning to do it yourself is a big money-saver.
1. Tool Pouch: for finish work, I have this small pouch on my hip with only a handful of tools. Lightweight but keeps my tools handy. Plus it has a metal clip that holds tapes, nail guns, drivers etc..
2. Spring Nail Set: one of our contractors introduced me to this and now it’s always at my hip when doing finish work. Set a nail with one tiny tool, no need for a hammer.
3. Angle Tool: we like to think that our walls are 90 degrees, so we cut our baseboards at 45s but find large gaps. Know the actual angle so your miter cuts fit snug.
4. Scribe Tool: an alternative to miter cutting is coping. It’s trickier but often gives a more seamless profile. A scribing tool works great for coping, but also getting boards to fit tighter to wavy walls or uneven stone surfaces.
5. Measuring Tape: I actually prefer a 16ft tape for most trim work. The smaller the tape I lug around is, the better the experience for me.
6. Speed Square: perfect angles, straight cuts, level placement. This is a handy set – keep the square close to your saw, and the level in your pouch.
7. Pencils: stocking stuffer. It may seem silly, but when you finally get your board where you want it and need to mark it for the cut, you want a pencil at hand.
8. Miter Saw: I’m often asked “can I just get a smaller miter saw?” Sure, but I never suggest that. A 12in miter saw will be much more versatile for all your projects, and a better investment for most people.
9. Rolling Miter Saw Stand: I used to just put my miter saw on the ground. It’s obnoxious. Get it off the ground, on a folding/rolling storage solution. I have this stand and it’s the best.
10. Table Saw: you can use a circular saw in a lot of instances, but you either need a really long straight edge as a guide or a steady hand. For the straightest cuts, a table saw is unbeatable.
11. Orbital Palm Sander: with trim and finish work, get used to wood filling and sanding. A battery-powered palm sander is a convenience you won’t want to be without.
12. Battery-Powered Brad Nailer: I recently moved all of my tools over to battery-powered from pneumatic (air-powered). The convenience is undeniable and they work super well. I’ll never go back.
13. Razor Blade Knife: rarely will you find me without it. Again, get one that can be opened with one hand.
14: Comfort-Grip Caulk Gun: I know you think a caulk gun is a caulk gun, it’s that’s not the case. Save your hands the ache and get this one. It’s a little more money, but a lot more comfort.
15: Laser Level: if you really wanna get serious about level lines and accuracy, this laser level is a dream. We use it on every trim/finish project to find our starting lines and maintain consistency.
Framing & Construction
Framing and construction work is about strength. Not having it, necessarily (though that helps), but creating it. And the tools you use have to be well-suited for the intense demands framing has.
1. Miter Saw & Stand: squared and true framing is best done with straight cuts. Opt for a blade with a low tooth count (for 12in, that would be like a 60 tooth blade) for quicker cuts on dimensional lumber.
2. Circular Saw: most contractors I see on the job sight actually use a circular saw more than their table saw. That comes with practice, but it’s handy to have close by and better for plywood than a table saw in this instance.
3. Battery Powered Framing Nailer: it would seem like this wouldn’t have the power needed to drive large framing nails, but it does. For homeowners, you’re likely not framing a whole house so opt for this. If you’re doing a lot of framing, choose pneumatic (an air compressor + the tool).
4. Impact Driver: this tool shows up again and again, because it’s essential! If the person you’re buying for doesn’t have one, get it for them!
5. Tool Belt with Suspenders: the particular one on this list is actually designed for electricians, but I like it for my own use because I’m not framing a house – I don’t need all the pockets and weight. Has all the space I need, plus the suspenders save me from pulling my pants up constantly.
6. Framing Hammer: framing hammers are heavy and big, because if you’re up on a rafter you only want to hit a nail 2-3 times at most. The wood handle absorbs shock well and reduces fatigue.
7. Laser Distance Measure: measure the dimensions of a wall by yourself, without needing an extra hand to hold the other end.
8. Razor Blade Knife: another one that shows up a lot, because you’ll use it constantly.
9. Framing Square: a 1.5x2ft square comes in constant use when framing. It’s also nice to keep a speed square handy, but overall I use this one more.
10. Pencils: lots of measuring, lots of cutting, lots of marks.
11. Work Gloves: dimensional lumber is not smooth, so a good pair of gloves will save you on splinters.
12. Cat’s Paw: also called a nail puller. Construction nails are tough to pull, and this tool is the best thing for it.
13. Measuring Tape: for framing I keep my longer tapes on me. 35 feet is usually good – anything longer I use the laser measure.
14. 4ft Level: really you should have a torpedo level, a 2ft level, 4ft, and 8ft. But 4ft is most versatile for framing.
Drywall
Probably my least favorite part of a project, but super necessary. Having the right tools makes it bearable.
1. Razor Blade Knife & Carbide Blades: gypsum boards are brutal on razor blades, so swap for carbide to keep them lasting longer.
2. Jab Saw: scoring with a razor and snapping a board is fastest and cleanest, but sometimes you just need a saw handy.
3. Drywall Cut-Out Tool: a lot faster than a jab saw, more accurate, and great for cutting around junction boxes.
4. Tool Pouch: just enough room for the things you need close, and a great leather finish.
5. Stud Finder: before cutting into drywall, especially when using a jab saw, check to see what’s behind to avoid damage to wires and pipes.
6. Drywall Hammer: the hatchet end of this hammer comes in handy with taking down drywall, and the front end is often waffled to keep grip on nails.
7. Drywall Square: designed for marking 4ft wide pieces of drywall. Great for scoring and snapping drywall as well.
8. Measuring Tape: obviously.
9. Driver: you can use an impact driver for drywall, but you have to make sure to turn down the torque so it doesn’t just punch through. If you’re getting serious about drywall, you can opt for a drywall screwgun. Very tailored to drywall hanging, but works amazing.
10. Taping Knives and Tray: when it comes time to apply mud and seal the seams, a good tray and variety of knife sizes is nice to have. I suggest the set, but if you have to choose one, 8in is safe.
Leave a Reply
What do you think?


Semihandmade
Our wood grain Shaker cabinet fronts were designed for busy, high-traffic homes like ours. Clad with durable textured thermofoils, this line is compatible with Sektion, Akurum, Godmorgon, and Besta cabinets from IKEA. It's the perfect, practical way to add the warmth of wood to all the rooms of your home.
Collaborations
learn more

next
Loloi
We have teamed up with Loloi to create a line of rugs that are as affordable as they are beautiful. This collection houses a great mix of traditional and modern rugs, in cottage-y colorways, as well as vintage-inspired beauties that you’ll want to roll out in every room.
Collaborations
learn more

next
STUGA
We partnered with Stuga on a line of hardwood floors — The Ingrid is really livable, and the color is very neutral. It doesn’t lean warm or cool, it’s that just right in-between. We have really loved putting it everywhere in our house. It’s the best jumping-off point for design, no matter your interior style. In addition to being beautiful, Ingrid is really durable — we have three kids, and we always have a home construction project going on. Ingrid stands up to it all.
Collaborations
learn more

next


SHop all
What We're Right Now
What We're Right Now
Looking for our favorite things? A place to shop our home room by room, or just catch up on what Julia's wearing / loving right now? Browse the CLJ shop.
Loving


Portfolio


Design
Befores, afters, mood boards, plans, failures, wins. We’ve done a lot of projects, and they’re all here.
BROWSE BY CATEGORY
let's break this thing up
We have a long-standing relationship with DIY, and love rolling our sleeves up and making it happen.
Projects
Even when you don’t want to rip down a wall, you can make that space in your home better. Right now.
read more
read more
read more
02
01
03
looking for inspiration?
A reader recently asked me if I’m starting to fully embrace traditional style and whether we still consider our house to be a “modern Colonial” and why. It was a really great question and so timely — I had really just been thinking about my approach to this home and how my style has changed […]


SEARCH THE BLOG
We've been doing this since 2009 and we've posted a whopping 24145+ blog posts and counting. You might need a little help searching, huh?
looking for something?
find stuff like:
")
Can We Send You Our Love Letter?
Another way for us to stay in touch! Joining our weekly newsletter gives you access to exclusive content, never-before-seen photos, your questions answered, and our favorite DIYs. Sign up below!
Follow Along on Instagram
Welcome to our online community where we've posted home, DIY, style, renovations, and family since '09. Renovating our #cljmoderncottage in Idaho and headed for new adventures in Raleigh, NC. #cljfam #cljtransformations
@chrislovesjulia


Links
Get Around
Make yourself right at home
Portfolio
Design
Casual Friday
Projects
Lifestyle
Gift Guides
All Posts
Shop
Love where you live.
Social
RivrLinks
Links
Get Around
Make yourself right at home
Portfolio
Design
Casual Friday
Projects
Lifestyle
Gift Guides
All Posts
Shop
Love where you live.
Social
RivrLinks
This is genius. Perfect. Thank you.
Husbands stocking is now filled.