


Andrea Ahedo, our Visual Media producer, is back for another tip! (Check out how to make a mood board here!) If you ever wished you could have your house try something on–whether it be a paint color, wallpaper, light fixture, art!–this post is for you! She’s sharing 4 of her tips and tricks to try before spending a dime on design. Take it away, Andi!
When you tackle a home project, how much time is spent solely making decisions? Do you dive deep in mood boards and Pinterest for a week, weighing options? Are you one to set up camp in the kitchen and stare at paint samples in different light for the weekend? Or when you have an itch to change what’s above the mantle do you just shop to your heart’s content and unbox allll the options? You can return what doesn’t work, right…
Needing to “picture” something in a room that’s being worked on is a normal occurrence at CLJ! Maybe they haven’t nailed down the light fixture in the bathroom remodel yet, should a TV go in the living room above the mantle? And Faye’s room: did you see how many wallpaper options there were?! I’d like to make a case for two top tools you should lean on when design decisions have you feeling stumped and stuck: Lightroom & Photoshop. In a “Tech Support” fashion, I’m going to walk you through four common project decisions you can take to the editing room and get results in minutes.
(Before we begin: These tutorials are done in Lightroom & Photoshop Creative Cloud, which is a subscription bundle. You can get the Photography bundle which includes both programs starting at $9.99 You can also get a 7 day free trial for both programs here.)
1. Lightroom: Try on a Paint Color
An adjustment brush in Lightroom will not only let you see your kitchen cabinets in one color, but literally any color on the spectrum. It couldn’t be easier:
- Select the Brush tool or key the letter “B”
- Don’t be intimated by sliders in Lightroom. There’s a lot, but think of it as having complete control and freedom of the look you want to get!
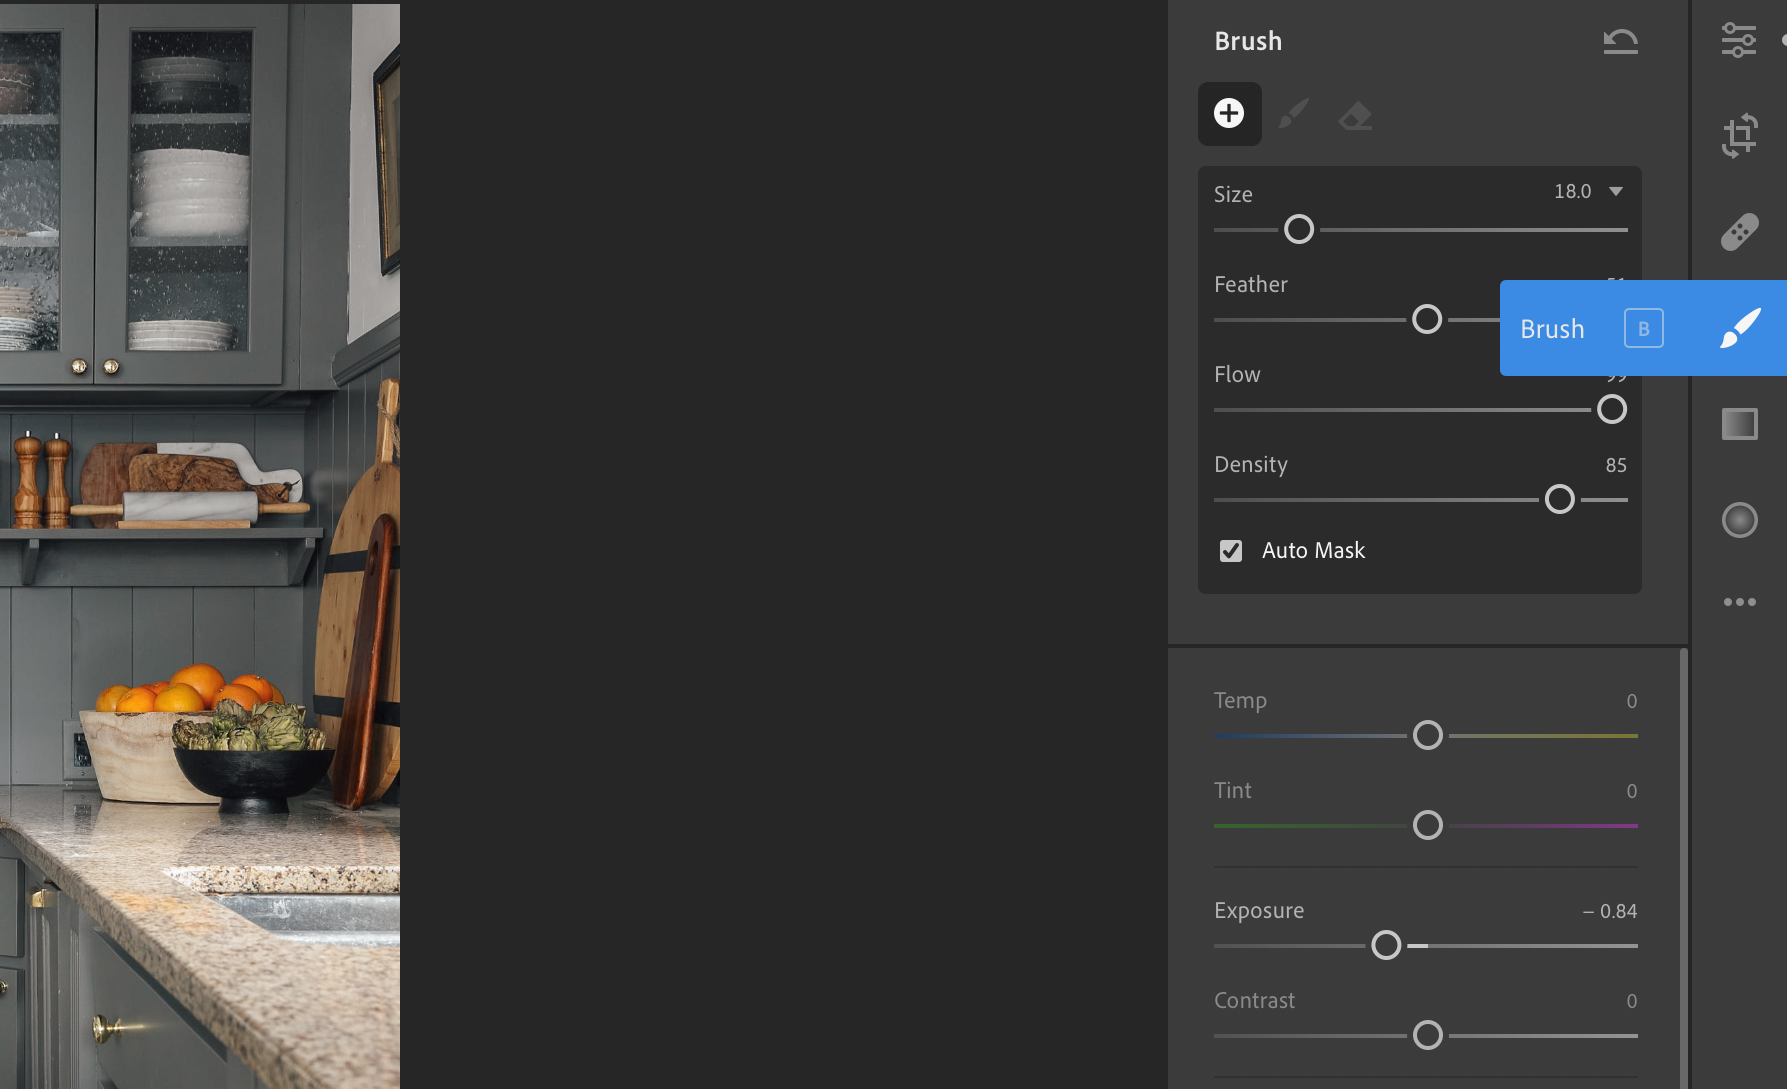
- 3 things to double-check:
- Adjust the “Size” top slider so you have a bigger brush to work with.
- Check the Auto Mask button. It will blow your mind.
- Make sure the “Flow” slider is also up. Think of it as how easily paint is coming out of a tube.

- Scroll down to the bottom of the menu and toggle on “Color.” Don’t worry yet about nailing down the perfect hue, choose any color and it can be adjusted afterwards. The joys of an Adjustment Brush!
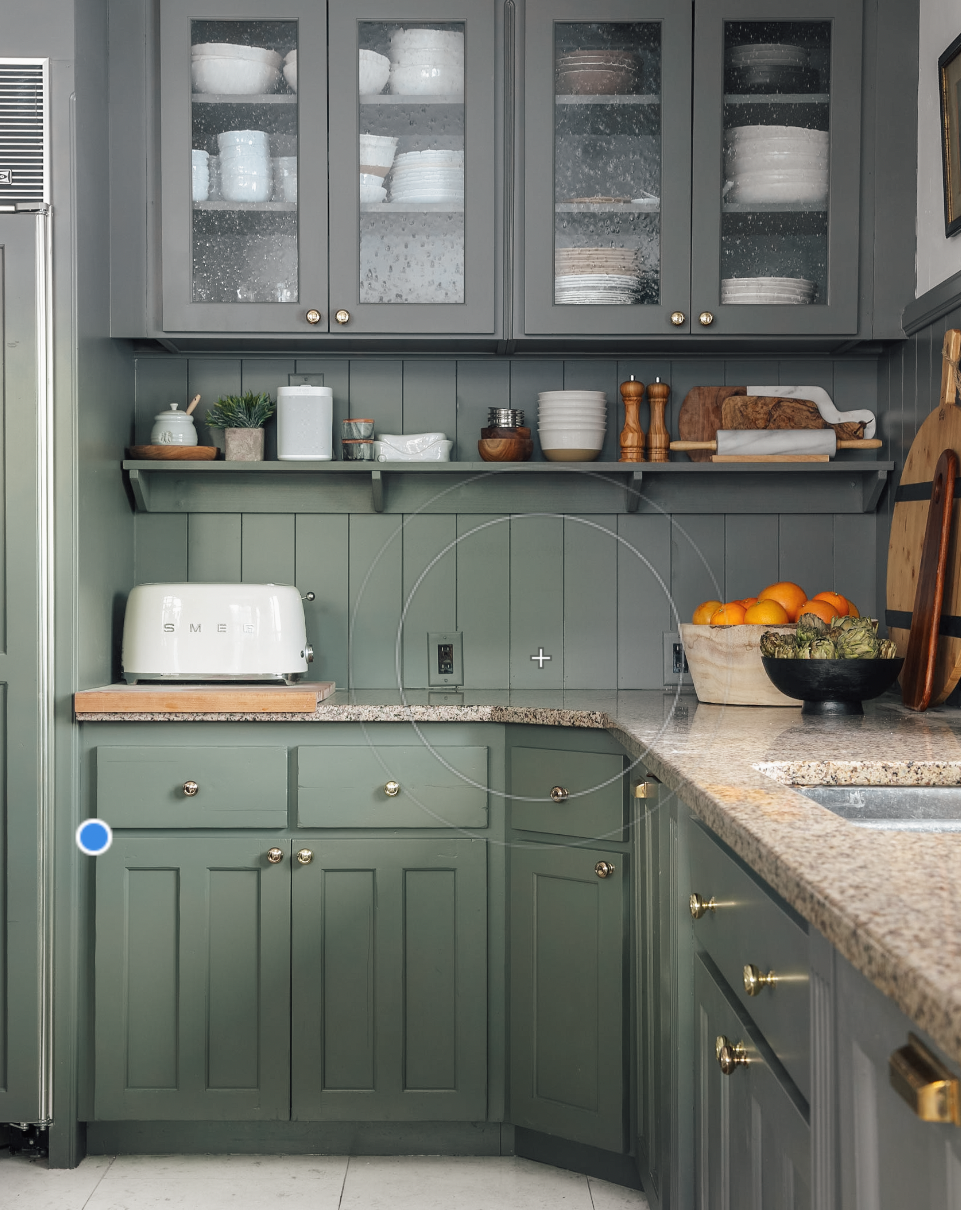
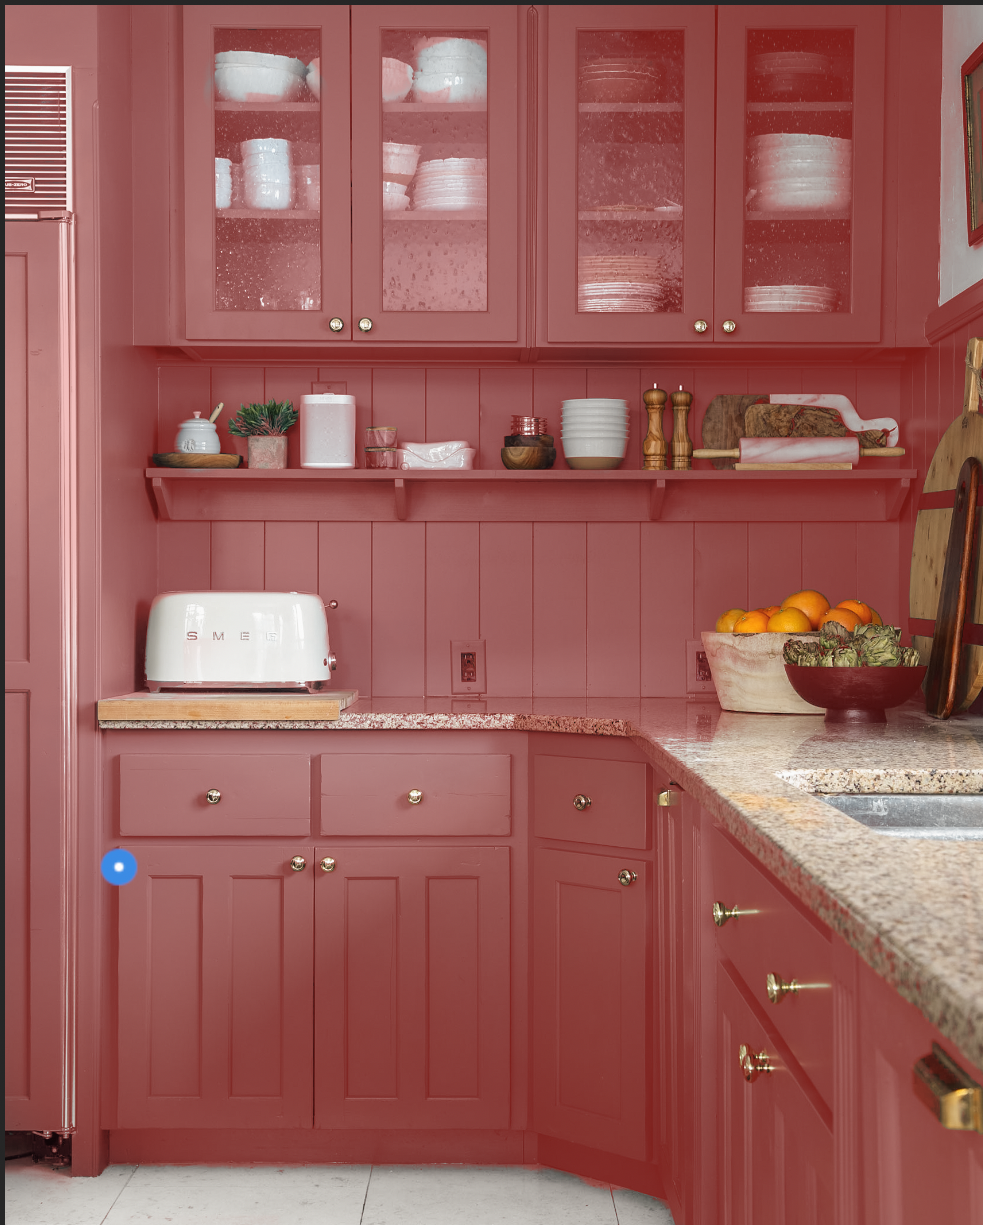
- As you start painting on your photo, your super smart brush will respect lines and the natural lighting of your room; meaning hardware, windows, furniture in front of walls, won’t be painted! Satisfying, right?
- Here’s the best part: You don’t have to paint again to try on another color. (See above video clip) The blue dot marks your brush and its coverage. If you click on it, your selection area will appear in red. Now go back to your Color window and try on another one!
- After you pick a color, you can then adjust the saturation, exposure, temperature, etc on the sliders to really zero in on a shade you’re considering.
Feeling good? Ready for more? Onto Photoshop
2. Photoshop: Hang up a Light Fixture for Size
This tutorial works best for seeing how a light fixture would look where there isn’t one already. Think adding sconces to your bedroom, a chandelier above the dining room table, etc.
- Take a picture of your space and open it in Photoshop
- Take a screenshot of the light you’re thinking about and go to https://www.remove.bg/ (Gaaaame changer)
- The site removes the background of any image FOR YOU! No cutting pixels, no mess, just download your new product .png and bring it into Photoshop.
- This is an eye-balling game, but to more accurately see how the light will look in your space, note the size dimensions from the website and make your best judgement from there as you scale it to size.
![]()
- Make sure at the top left corner of Photoshop you have these 2 boxes checked: Auto Select and Show Transform Controls.
- Select your light fixture and begin dragging from the corner to adjust its size.
- If you want to see more than one of the same light fixture in your space, hold Option (or alt) as you drag to duplicate that object.
3. Install wallpaper in under 5 minutes
This is how we most recently tried on different wall paper designs in Faye’s bedroom makeover!
- Take a picture of the space you’re considering for wallpaper. If there’s furniture, don’t worry about moving it out of the way! These steps will show you how to place wallpaper behind objects in the room, so you have an even more accurate depiction of how your pattern will play off everything.
- Open your room photo in Photoshop.
- Select the wall portion with the Quick Selection Tool.
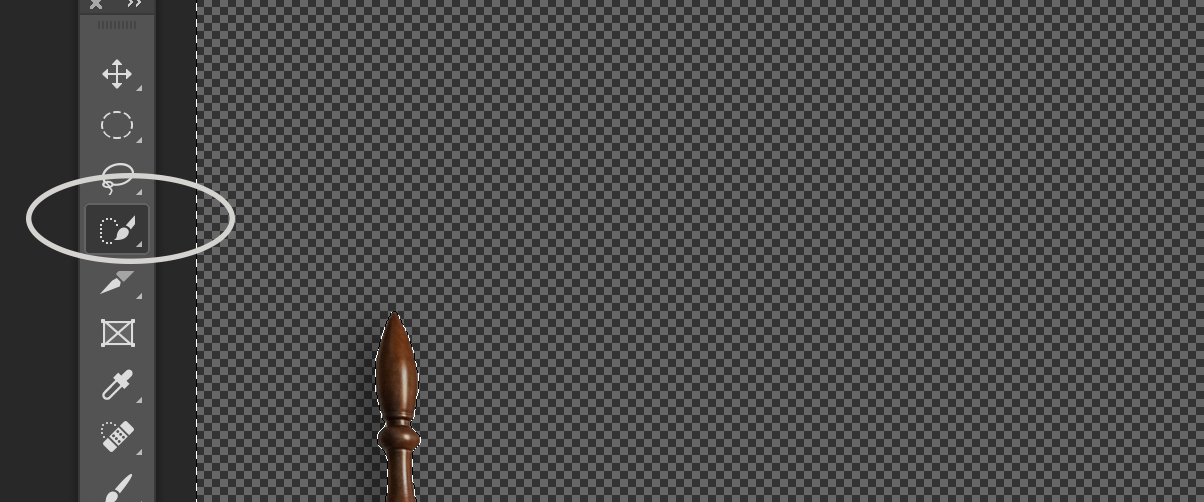
- Press delete to remove the wall or select “Add Layer Mask” at the bottom of your Layers panel. This will temporarily hide the wall without deleting pixels.
![]()
- We’re ready to add wallpaper! When shopping online, they’ll usually have the wallpaper square swatch photo. That’s the one we want! Take a screenshot and drag it to your Photoshop file.
- In your Layers panel, make sure the wallpaper layer is underneath your room layer.
- I can’t stress enough the importance of looking at the wallpaper dimensions from the site. The one in Faye’s room is 27″ x 25″ per sheet. If you just place your pattern arbitrarily without noting the sheet size, you’ll be mislead as to what it’s actually going to look like in your room:

Not correctly scaled

Correctly scaled
- Hold down Option (or alt) on your wallpaper swatch and drag to make duplicates of it, over and over.
- Tap your arrow keys left and right to fine-tune and line up the wallpaper perfectly.
4. Switch out decor options
This last how-to uses the same tools as the light fixture tip, which is why I saved it for last. You’ll be feeling like a seasoned editor now!
- Remove the background from different objects you want to try in your space here
- Again, make sure to look at the dimensions of the objects you want to try on.
- Open a room photo in Photoshop and drag your cut out objects on top.
- In the top left corner of Photoshop, make sure Auto Select and Show Transform Control are checked.
![]()
- Now just drag the corner of your different pieces to scale!
- Follow these steps and style a whole mantle if you wish, or even set up a gallery wall
Decision fatigue in home design is a real thing. But I feel like so much of that weight comes from the uncertainty of not knowing how things will play out in a room. So if you already have wallpaper samples, paint chips, and Pinterest in your toolbox, you might as well add Lightroom and Photoshop too.
Leave a Reply
What do you think?


Semihandmade
Our wood grain Shaker cabinet fronts were designed for busy, high-traffic homes like ours. Clad with durable textured thermofoils, this line is compatible with Sektion, Akurum, Godmorgon, and Besta cabinets from IKEA. It's the perfect, practical way to add the warmth of wood to all the rooms of your home.
Collaborations
learn more

next
Loloi
We have teamed up with Loloi to create a line of rugs that are as affordable as they are beautiful. This collection houses a great mix of traditional and modern rugs, in cottage-y colorways, as well as vintage-inspired beauties that you’ll want to roll out in every room.
Collaborations
learn more

next
STUGA
We partnered with Stuga on a line of hardwood floors — The Ingrid is really livable, and the color is very neutral. It doesn’t lean warm or cool, it’s that just right in-between. We have really loved putting it everywhere in our house. It’s the best jumping-off point for design, no matter your interior style. In addition to being beautiful, Ingrid is really durable — we have three kids, and we always have a home construction project going on. Ingrid stands up to it all.
Collaborations
learn more

next


SHop all
What We're Right Now
What We're Right Now
Looking for our favorite things? A place to shop our home room by room, or just catch up on what Julia's wearing / loving right now? Browse the CLJ shop.
Loving


Portfolio


Design
Befores, afters, mood boards, plans, failures, wins. We’ve done a lot of projects, and they’re all here.
BROWSE BY CATEGORY
let's break this thing up
We have a long-standing relationship with DIY, and love rolling our sleeves up and making it happen.
Projects
Even when you don’t want to rip down a wall, you can make that space in your home better. Right now.
read more
read more
read more
02
01
03
looking for inspiration?
A reader recently asked me if I’m starting to fully embrace traditional style and whether we still consider our house to be a “modern Colonial” and why. It was a really great question and so timely — I had really just been thinking about my approach to this home and how my style has changed […]


SEARCH THE BLOG
We've been doing this since 2009 and we've posted a whopping 24145+ blog posts and counting. You might need a little help searching, huh?
looking for something?
find stuff like:
")
Can We Send You Our Love Letter?
Another way for us to stay in touch! Joining our weekly newsletter gives you access to exclusive content, never-before-seen photos, your questions answered, and our favorite DIYs. Sign up below!
Follow Along on Instagram
Welcome to our online community where we've posted home, DIY, style, renovations, and family since '09. Renovating our #cljmoderncottage in Idaho and headed for new adventures in Raleigh, NC. #cljfam #cljtransformations
@chrislovesjulia


Links
Get Around
Make yourself right at home
Portfolio
Design
Casual Friday
Projects
Lifestyle
Gift Guides
All Posts
Shop
Love where you live.
Social
RivrLinks
Links
Get Around
Make yourself right at home
Portfolio
Design
Casual Friday
Projects
Lifestyle
Gift Guides
All Posts
Shop
Love where you live.
Social
RivrLinks
Yes, its very easy for me now install wallpaper. Thanks a lot for sharing your blog article.
So cool and similar to a trick we’ve been using a LOT in our new place. We’ve actually turned to Microsoft PowerPoint because we find it’s even easier – although admittedly you don’t get as much control or finesse as in Photoshop! We just did it to try on different moulding styles for a PAX hack we did, inspired by yours!
Thank you! You guys came through as always! I’ll be honest, I didn’t think this tutorial would be posted, but it just shows how transparent CLJ is. Even more respect for you guys now. Much love. Can’t wait to learn photoshop and Lightroom.
Thank you for this tutorial–it is so helpful! I love all of Andi’s features & tutorials!
I have used several of these tricks for years and they are so helpful!! I don’t even remember how I ended up in a photoshop class in high school, but it has taught me some of my most used skills!!
Back in the day, I worked in advertising and Photoshop was one of my favorite programs. I think you did a great job explaining how to use it for trying out design features.
Ok, I am seriously AMAZED by this background removing site. You’re right – total game changer! Thanks so much for these tips!
I am working on an Ipad app that can help to do some of these things. it’s In its BETA right now. Including showing tile layouts. It’s not as precise as the tools shown here but it is easier to use and less expensive. I am an interior designer and being able to see things is so important for people to make solid decisions. Andi, I am excited to dive into my Adobe suite and try some of these tips. Also, the website that will help translate digital code to paint colors is Encycolorpedia.com
This is awesome! Thank you
Thank you SO much for the cropping background website!!! I just used it to crop maybe at least 50 different furniture and decor items and it has instantly improved my moodboard game.
Thank you!! Amazing advice that will be so incredibly helpful!
Thank you SO SO much for sharing this! I have been wanting to learn how to do this and never know where to look for info. Can’t wait to try it out for my own home!
Amazing!! I’m a little tech shy, but what amazing tools!
I always use Photoshop to plan my rooms! I did not know about the Lightroom trick for changing a wall color though…definitely will be using that!
Any tips for replicating a certain paint color in Lightroom?