


Now that Greta’s room is painted, we’re diving right in to decorating it. A globe was definitely on our must-have list for Greta’s room. She loves pointing out where we live and we like to show her where her friends, cousins, and relatives live all over the world, too. I fell for this globe when I was putting together my ideabook for Houzz last month, and thought I think I can make something similar. While the original is far superior in many ways, I pulled off my own DIY version that turned out pretty cute, too. My mom has been a teacher for 30+ years and has a collection of globes in her classroom. A lot of them are outdated (the one I chose still has the Soviet Union on it) so she said I could pick one!

Keeping an eye on my inspiration, I lettered the words “adventure awaits” with one of Crayola’s ultra-clean washable markers. They wipe off so easily (a must around here!) so I knew I wasn’t doing any damage.

Once I had the placement of my letters right, I cracked open a can of paint. I decided to use a dark ivory (similar to the color of the globe) for my first coat so I could get the shape of the letters right. And if I made a mistake and needed to wipe it off quickly, any lingering bits of paint would blend in.

I wiped off one letter in the marker with a damp paper towel and followed it by painting the letter. One by one so I could keep the format on track.

After my first coat was done and I was happy with both the placement and shape of the letters, I went back over everything with a bright white. I used latex house paint for this project because it comes as a paint and primer in one and is a lot more washable than something like craft paint.

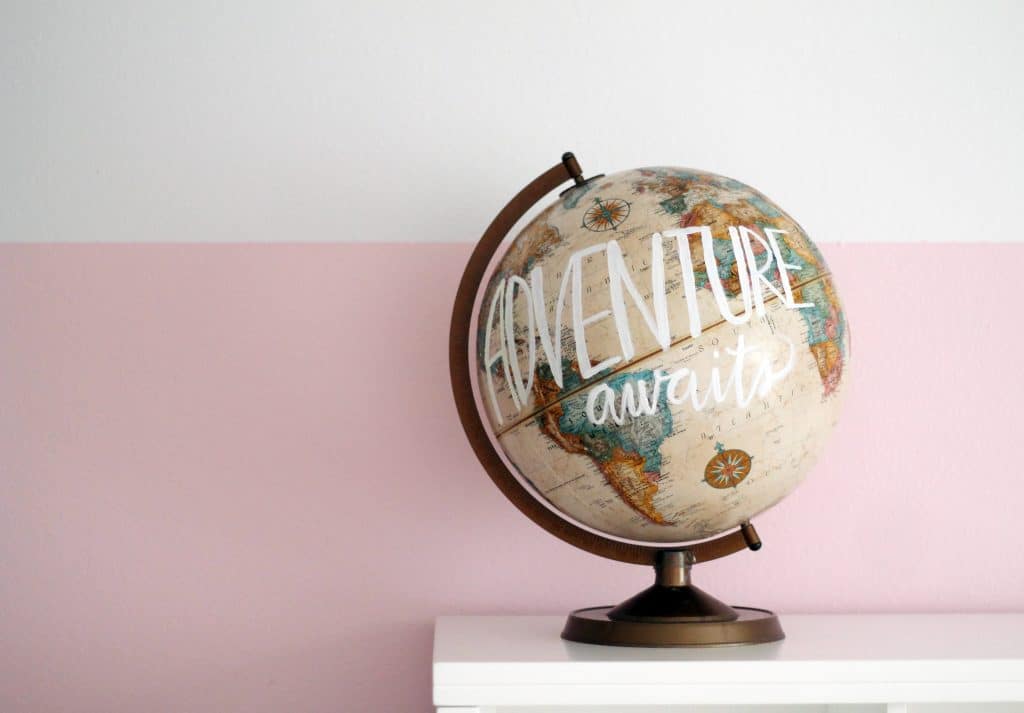
The whole project took me 30 minutes and was really fun for me to do. If you don’t feel comfortable using a paint brush (I used a small detail brush), I bet something like a sharpie paint pen would work, too! Or if you have a cool Cricut or Silhouette…well, color me jealous.
Leave a Reply
What do you think?
Previous Post
Next Post


Semihandmade
Our wood grain Shaker cabinet fronts were designed for busy, high-traffic homes like ours. Clad with durable textured thermofoils, this line is compatible with Sektion, Akurum, Godmorgon, and Besta cabinets from IKEA. It's the perfect, practical way to add the warmth of wood to all the rooms of your home.
Collaborations
learn more

next
Loloi
We have teamed up with Loloi to create a line of rugs that are as affordable as they are beautiful. This collection houses a great mix of traditional and modern rugs, in cottage-y colorways, as well as vintage-inspired beauties that you’ll want to roll out in every room.
Collaborations
learn more

next
STUGA
We partnered with Stuga on a line of hardwood floors — The Ingrid is really livable, and the color is very neutral. It doesn’t lean warm or cool, it’s that just right in-between. We have really loved putting it everywhere in our house. It’s the best jumping-off point for design, no matter your interior style. In addition to being beautiful, Ingrid is really durable — we have three kids, and we always have a home construction project going on. Ingrid stands up to it all.
Collaborations
learn more

next


SHop all
What We're Right Now
What We're Right Now
Looking for our favorite things? A place to shop our home room by room, or just catch up on what Julia's wearing / loving right now? Browse the CLJ shop.
Loving


Portfolio


Design
Befores, afters, mood boards, plans, failures, wins. We’ve done a lot of projects, and they’re all here.
BROWSE BY CATEGORY
let's break this thing up
We have a long-standing relationship with DIY, and love rolling our sleeves up and making it happen.
Projects
Even when you don’t want to rip down a wall, you can make that space in your home better. Right now.
read more
read more
read more
02
01
03
looking for inspiration?
A reader recently asked me if I’m starting to fully embrace traditional style and whether we still consider our house to be a “modern Colonial” and why. It was a really great question and so timely — I had really just been thinking about my approach to this home and how my style has changed […]


SEARCH THE BLOG
We've been doing this since 2009 and we've posted a whopping 24145+ blog posts and counting. You might need a little help searching, huh?
looking for something?
find stuff like:
")
Can We Send You Our Love Letter?
Another way for us to stay in touch! Joining our weekly newsletter gives you access to exclusive content, never-before-seen photos, your questions answered, and our favorite DIYs. Sign up below!
Follow Along on Instagram
Welcome to our online community where we've posted home, DIY, style, renovations, and family since '09. Renovating our #cljmoderncottage in Idaho and headed for new adventures in Raleigh, NC. #cljfam #cljtransformations
@chrislovesjulia


Links
Get Around
Make yourself right at home
Portfolio
Design
Casual Friday
Projects
Lifestyle
Gift Guides
All Posts
Shop
Love where you live.
Social
RivrLinks
Links
Get Around
Make yourself right at home
Portfolio
Design
Casual Friday
Projects
Lifestyle
Gift Guides
All Posts
Shop
Love where you live.
Social
RivrLinks
I love this tutorial! I’ve featured it over on the FaveCraftsBlog! :)
http://www.favecrafts.com/blog/fc/diy-globe/
An option is to design the wording on the computer. then use graphite transfer paper to trace the lettering onto the globe. Great if you’re not super confident on free handing the letters.
Good tip!
This looks great! I tried this once with a globe and it turned out awful because I have sucky handwriting.
That made me legit crack up!
Fantastic idea. It makes me wish I had an old globe tucked away somewhere.
oooooh. *stares at the pretty*
I, also, have a globe with the soviet union on it. It’s actually got a light inside, total 60s kitsch, and it’s been sitting in a closet for years. This would be a great way to repurpose it. YAY!
I love globes! I hope we have a library or office someday full of books and globes. Love it!
AMAZING!!!! LOVE!
LOVE this! Totally have been thinking of incorporating something like this in our abode!