


Quick Note About Permitting: Permit laws vary from state to state, and sometimes town to town. Before starting any renovation, always check with your local permitting office to discuss your plans and they can give you guidance on whether or not your plans require a permit, what you need to do to obtain one, and how the inspection process will work. Permits may seem like a pain, but they help protect you and the future owners of your home from well-meaning but potentially damaging and dangerous reconfigurations. We’re big proponents of responsible DIY, and encourage every homeowner to look at their local permitting office as a resource for information, not an obstacle in the way of their progress.
One of the most freeing things, when it comes to renovating your home, is realizing that your home doesn’t have to stay the way it was built – even the things that seem to be “permanent,” like a toilet that sits on top of cement.
Now, I’ve heard tales of new homeowners who inherit the original plans for their home when they purchase it. Or others who are able to obtain a copy from city records. This can really help out when planning a renovation, because you can see where water, electrical, ventilation and other lines run, and you can plan around them. This sounds wonderful, but we’ve never had such luck. Our renovations are mostly blind, in that we don’t always know exactly what’s in the walls, floors and ceilings when we start. So we plan for what we want, rip open the walls and understand that we may have to make changes to the plan along the way. With renovation, a certain degree of flexibility is often required.
That said, so far so good for us, on this bathroom anyway. We planned for where we want the water lines, drains, toilets, lights and electrical, and the only issue we’ve run into is where we wanted to add the new vent/light. We wanted to put it directly in the middle of where the tub would go, but a drain pipe from upstairs was in the way, so we had to move the vent over one joist.
Ventilation
Some kind of ventilation is required by code in most, if not all bathrooms. Since we’re dealing with a basement bathroom (read: no windows), the fan is especially important and needs to vented outside to be of any value. Where this was a bathroom before, it was only a matter of replacing the vent as opposed to adding it. If you’re adding a bathroom, planning for ventilation can be tricky, especially in relation to other pipes, vents and lines that may be in the way. Take the time to plan, and consult your contractor for recommendations.
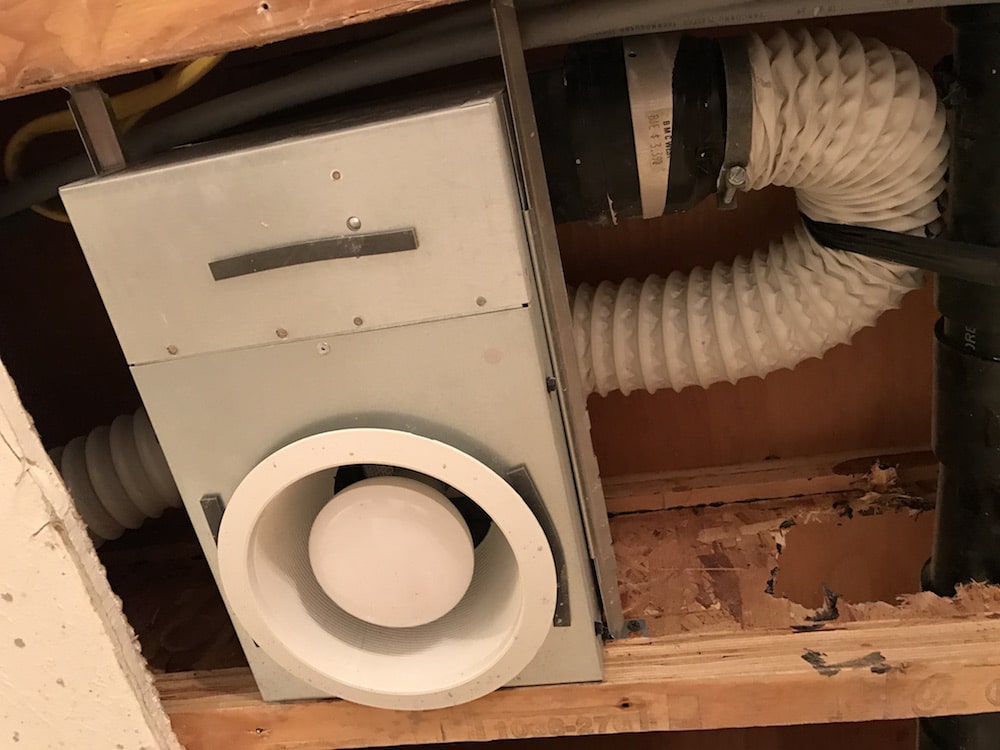
Our old vent was exactly what you picture when you hear the words “bathroom vent.” A faded, almond-colored plastic box stuck to the ceiling that starts up with a raucous thud and runs continuously with all the serenity of an EF2 tornado.
With that juxtaposition, this new vent (a recessed light and vent in one!) is a treasure. First, it serves the purposes of both ventilation and additional lighting, which this room was in desperate need of. The vent itself is incredibly quiet, and will only get quieter once we put the sheetrock back in place. It can be wired so the vent and light are on different switches (boo to vents that are always on when the light is on, amiright?), and the vent itself will take up no visual real estate in the finished bathroom. So many wins I struggle imagining using any other vent for the rest of my days.
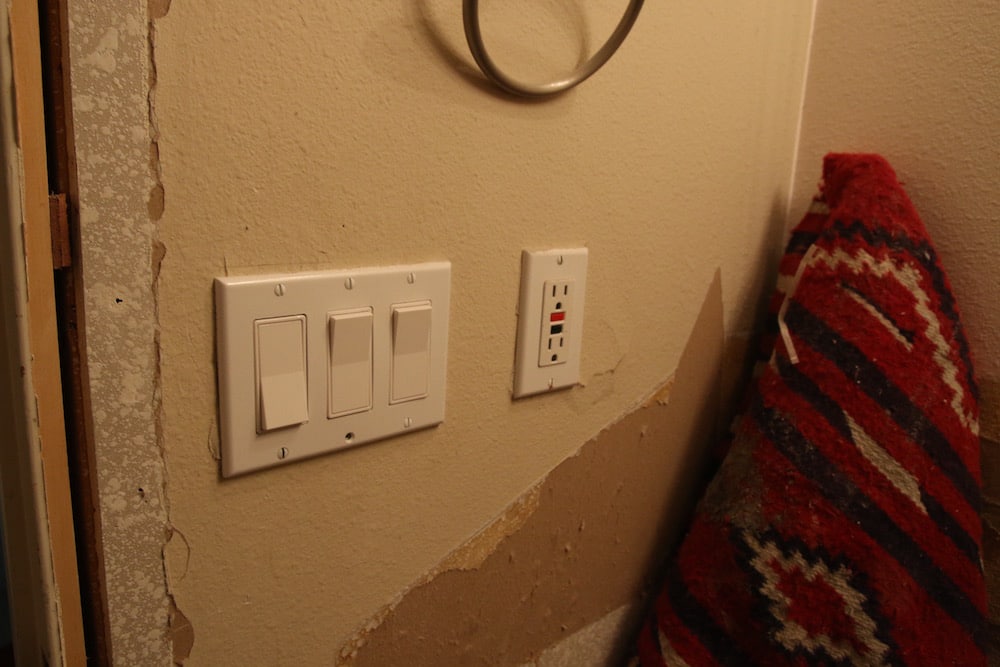
One switch for the recessed lights, one for the fan, and one for the vanity lights. Our contractor added these switches to our bathroom, but we’ll probably change them to the standard kind that we have everywhere else. I think contractors assume these are the kinds of switches everyone wants – nothing wrong with them, just wouldn’t be consistent with what we have in the rest of our home.
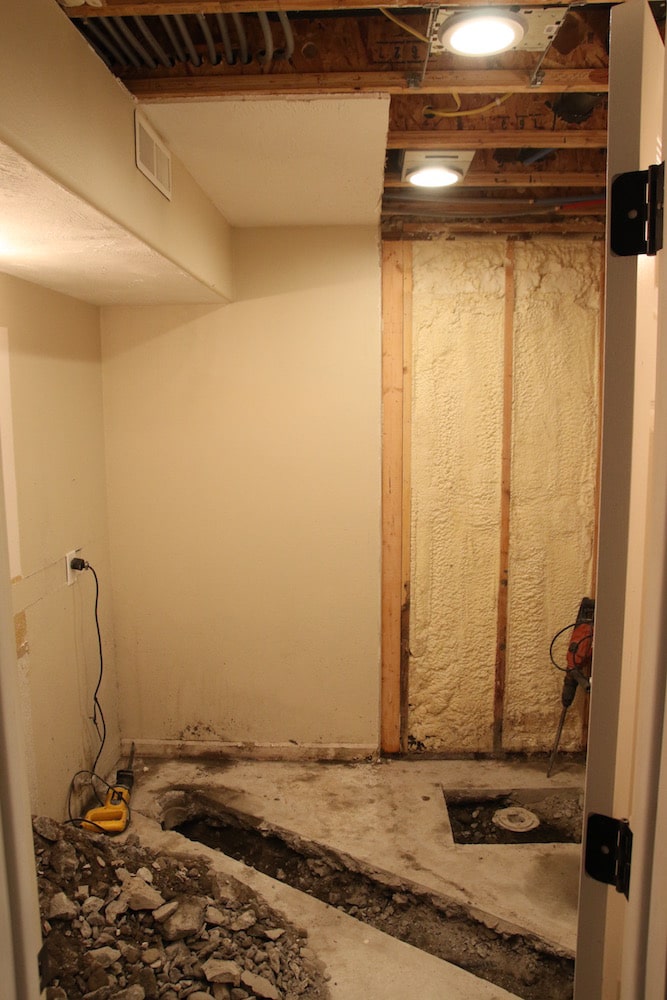
You can see in this picture we also added another recessed can to the room for balance and additional light. And, you can see the destruction of the concrete.
Moving Shower, Tub and Toilet Drains
Our bathroom is in a basement, so we’re dealing with cement and the lines below it. One benefit is there tends to be fewer obstacles below a cement slab, whereas bathrooms on a second floor may run into ductwork, electrical, and other plumbing that can add complexity. If you find yourself in this situation, prepare yourself to be flexible and understand that having a drain that works in your less-preferred location is better than one that doesn’t in your preferred location. Drains need to slope gently downward to prevent backup, and if an obstacle will prevent this, your plan will need to be adjusted.
Once we knew where we would be moving our toilet and shower drain, we scored the concrete with a concrete saw and broke the rest out with a jackhammer and sledgehammer. That said, I do not suggest using a concrete saw. Perhaps a handheld angle grinder with a 7 inch masonry blade on it to score, but gas-powered concrete saws are not meant to be used indoors. The contractor we hired to help us with parts of this bathroom had to leave after about 20 minutes of using the saw because he started feeling nauseated. A little check on our carbon monoxide detector and our CO levels were through the roof. We opened all the windows and doors, set fans in place and evacuated the house for an hour as it aired out. Learn from our mistake.
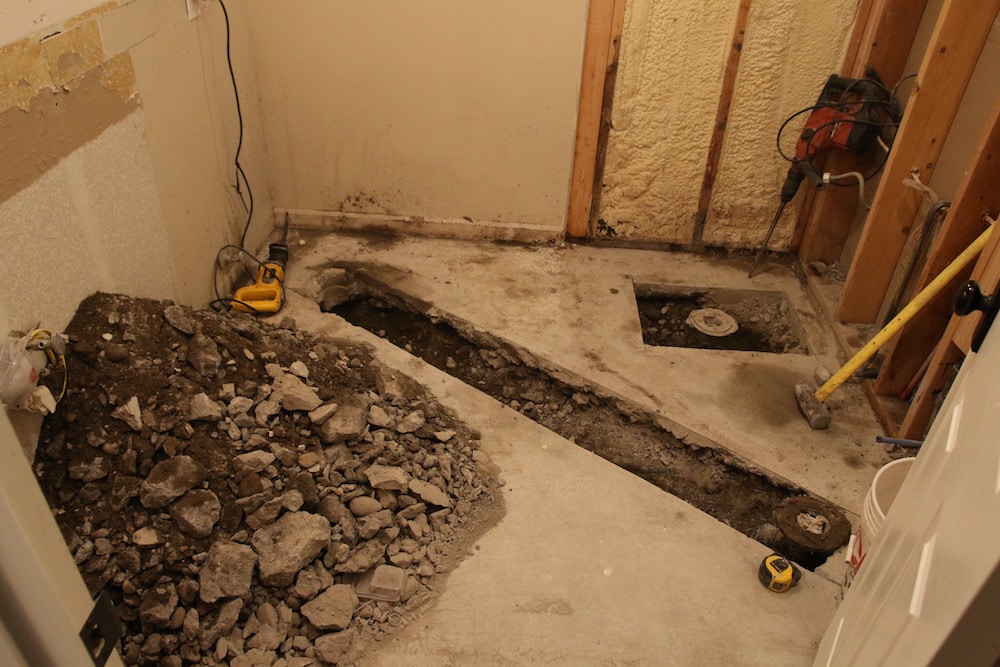
Back the the picture above – even though the tub drain was going to generally be in the same area as the old shower drain, they didn’t line up perfectly. So we broke up a square around that drain to allow some flexibility there, and then set the tub in place to determine the exact location where the new drain needed to be.
For the toilet, we measured how far away from the walls the old toilet drain was, and duplicated this spacing at the new location. We plumbed the new drains, vented the toilet into a toilet vent for the upstairs bathroom (VERY important to have your toilet vented, otherwise it will always have trouble flushing), mixed about 9 bags of concrete to fill in the holes, and smoothed it all out.
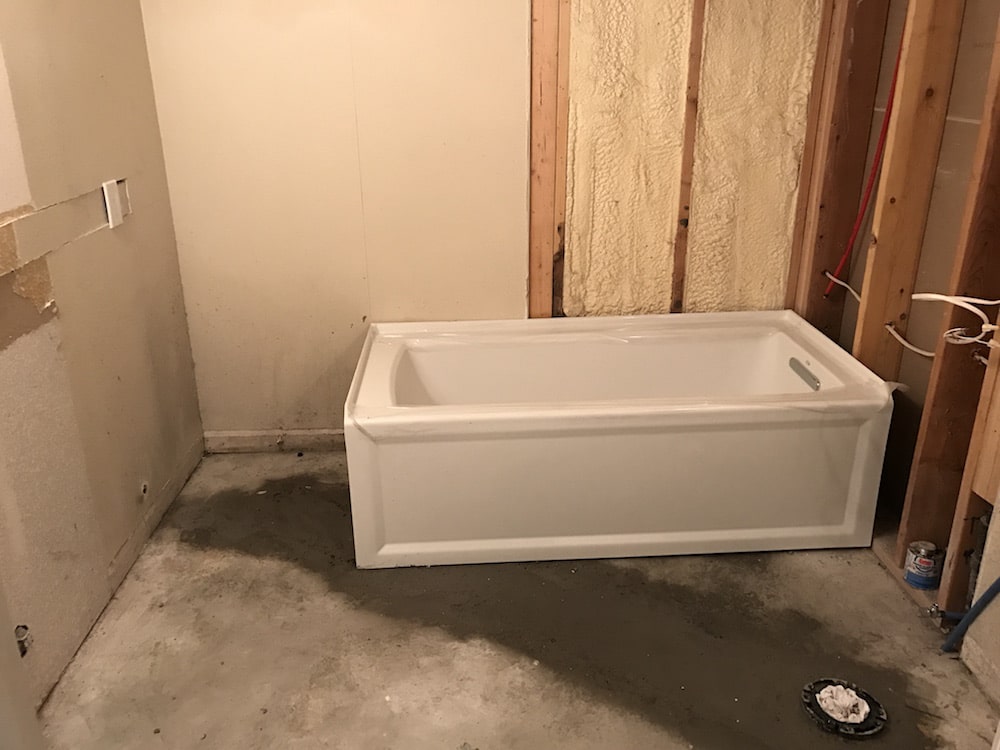
Tub is the Kohler Archer in White, ordered from Lowes.
Progress in this bathroom is a bit at a stand still now until the concrete cures. Curing time varies depending on the concrete used, but make sure to follow the recommendations on the bag to achieve maximum strength and durability.
Sources:
Brian Recessed Bulb Fan & Light
Kohler Archer Alcove Tub
Bathroom Reno 101 Posts:
• Let’s Start At The Very Beginning
Leave a Reply
What do you think?
Previous Post
Next Post


Semihandmade
Our wood grain Shaker cabinet fronts were designed for busy, high-traffic homes like ours. Clad with durable textured thermofoils, this line is compatible with Sektion, Akurum, Godmorgon, and Besta cabinets from IKEA. It's the perfect, practical way to add the warmth of wood to all the rooms of your home.
Collaborations
learn more

next
Loloi
We have teamed up with Loloi to create a line of rugs that are as affordable as they are beautiful. This collection houses a great mix of traditional and modern rugs, in cottage-y colorways, as well as vintage-inspired beauties that you’ll want to roll out in every room.
Collaborations
learn more

next
STUGA
We partnered with Stuga on a line of hardwood floors — The Ingrid is really livable, and the color is very neutral. It doesn’t lean warm or cool, it’s that just right in-between. We have really loved putting it everywhere in our house. It’s the best jumping-off point for design, no matter your interior style. In addition to being beautiful, Ingrid is really durable — we have three kids, and we always have a home construction project going on. Ingrid stands up to it all.
Collaborations
learn more

next


SHop all
What We're Right Now
What We're Right Now
Looking for our favorite things? A place to shop our home room by room, or just catch up on what Julia's wearing / loving right now? Browse the CLJ shop.
Loving


Portfolio


Design
Befores, afters, mood boards, plans, failures, wins. We’ve done a lot of projects, and they’re all here.
BROWSE BY CATEGORY
let's break this thing up
We have a long-standing relationship with DIY, and love rolling our sleeves up and making it happen.
Projects
Even when you don’t want to rip down a wall, you can make that space in your home better. Right now.
read more
read more
read more
02
01
03
looking for inspiration?
A reader recently asked me if I’m starting to fully embrace traditional style and whether we still consider our house to be a “modern Colonial” and why. It was a really great question and so timely — I had really just been thinking about my approach to this home and how my style has changed […]


SEARCH THE BLOG
We've been doing this since 2009 and we've posted a whopping 24145+ blog posts and counting. You might need a little help searching, huh?
looking for something?
find stuff like:
")
Can We Send You Our Love Letter?
Another way for us to stay in touch! Joining our weekly newsletter gives you access to exclusive content, never-before-seen photos, your questions answered, and our favorite DIYs. Sign up below!
Follow Along on Instagram
Welcome to our online community where we've posted home, DIY, style, renovations, and family since '09. Renovating our #cljmoderncottage in Idaho and headed for new adventures in Raleigh, NC. #cljfam #cljtransformations
@chrislovesjulia


Links
Get Around
Make yourself right at home
Portfolio
Design
Casual Friday
Projects
Lifestyle
Gift Guides
All Posts
Shop
Love where you live.
Social
RivrLinks
Links
Get Around
Make yourself right at home
Portfolio
Design
Casual Friday
Projects
Lifestyle
Gift Guides
All Posts
Shop
Love where you live.
Social
RivrLinks
I noticed you mentioned a contractor when you were talking about electrical things….how much do you hire out and which things do you do yourself? We just received a $50k quote to redo our master and we’re trying to figure out which things are a must to hire for and which we can do ourselves. ????
We do everything we can or want to learn about! Tiling is easy, plumbing is hard and can ruin your house–so we hire that out. :)
For some reason I thought your basement had in floor heat, if iso what are you doing to avoid lines? If you by chance don’t have in floor heat, do you have any suggestions on how you would handle the remodel differently and how to avoid hitting the lines below the concrete??
There was never on for heating in here, but we’d definitely have to do more research if there was!
Thank you for posting about this fan/light combo. This is exactly what we need for the bathroom remodel we are just beginning. It looks like you guys are installing two can lights in this bathroom. Are both the same fan/light combo or were you able to find a can light that matched?
Because the light doubles as a fan, the insert around the bulb allows more space, but we bought a 6in can with an insert that matched the fan, and the two look great together.
Hello! Do you have a link for the insert you purchased that does not have the vent but matches? Thanks.
I don’t – we just went to Lowe’s and brought the fan insert with us so we could match it.
That’s a big job! Cutting through a concrete slab is no joke. A note about the light switch: our home has a hodge-podge of light switches and it drives me batty. We have beige switches, white, dirty white, all in the standard style and that flat style. Boy, I’m eager to switch them out once I am able.
Thank you for stressing the need to check what is necessary permit-wise. While we’re in Canada, it’s the same thing here – there are just things that have to be done a certain way for good reason. My husband is a plumber and can’t count the number of times he’s come across “homeowner hack jobs” and just shakes his head at what people will attempt without looking into how it ought to be done. And, sometimes you just need to call in a professional because in the end it may not really be worth it trying to save a few dollars but doing it all wrong and having to spend the money to have your error fixed anyways! Sounds like you guys are doing things the smart way.
We just remodeled our bathroom and used the same Kohler tub. It’s awesome!!
Same here! I never knew I could love a bathtub so much
Did I miss a post with your mood board for the bathroom or has that not been posted yet? We are in the midst of a bathroom renovation as well and while my husband is upset with the slow progress, I was so happy to see our old bathroom gutted that I don’t mind the delay one bit!! We are doing our bathroom in a couple of phases, so I knew it would take time. We hired out the gutting and installing of the tub and shower surround, then had my uncle (who is a contractor) help us move the door frame to make the bathroom larger and then my husband was supposed to finish up the drywall, spackle, and paint but discovered half way through that the spackling is too tedious, so now we’re hiring that part out as well. It actually took us a while to find anyone willing to do it! Apparently not many people like to spackle.
Excited to follow along on your renovation! I like everything you guys do :)
Mood board on its way – probably posted sometime next week. :)
Good luck with your renovation! We’re all in this together.
I love the in-progress posts and
1. Thank you for posting a note about permitting. Working in construction and also loving DIY and DIY blogs, I get so annoyed when permitting isn’t mentioned or skipped for the sake of helping a friend out or just feeling so “familiar” with the type of work your doing. Also,
2. I think your contractor and mine need to switch switches they are installing. I want those kind since they match my house and I always get the other kind! #regionalthing
We were told those switches are better for ADA compliance – could be why the contractor uses them. :)
I actually really love seeing all the construction behind-the-scenes, maybe even more than before-and-afters lol! Thanks for sharing, looks great so far you guys!
xo,
Kira | http://www.theimperfectionistblog.com
THANK YOU for finding a lighted vent!! I have been searching for one (and idiotically enough, never thought of amazon… who am i??) for years now because I despise our dated ones so very badly. Bam, getting one stat.
Consider one with a heater too! Bathrooms should generally be about 10 degrees warmer than the rest of the house when someone is bathing or showering.
“…runs continuously with all the serenity of an EF2 tornado.”
There are not enough cry-laugh emojis for this descriptor.
Looks like a fun, but huge, project! Our tiny master bath doesn’t have a fan, and our ceiling in the shower has gotten a bit moldy. We purchased a fan/light last summer, and it’s still in the box…
The exciting stuff is about to begin once the cement cures. I can’t wait to see what kind of flooring you picked out! I just rounded up my favorite tile options for all budgets today!
http://dahliasanddimes.com/2017/02/22/high-low-backsplash-ideas/
Maybe you’ve specified in a previous post, but can you please share which carbon monoxide detector you use? It’s obviously worked very well for you guys! Thanks!! Can’t wait to see what comes next!
No problem. You can read about it here: https://www.chrislovesjulia.com/2016/05/psa-carbon-monoxide-could-have-killed-our-whole-family.html
Wow! Great progress! It’s so exciting to watch it come together. Now if only it was as quick and clean in real life as it is scrolling through a few photos, amiright?? We’re supposed to start demo on our own remodel this weekend/next week and I’m so excited! Not so much for the mess and work, but the upside is that we won’t be living in the house during construction so the mess won’t affect us too badly :)
That would have been the end of me, lol! Can’t wait to see what is next :)
Ooooo, so excited to follow along on your bathroom reno! Question: do you guys plan on installing in floor heating?
Yup! Just came in yesterday! That post is coming.