


We’re so excited to share how the shared room for our daughters progressed in just one week! As soon as we hit publish on last week’s ORC (One Room Challenge) post, we headed straight to Lowe’s to pick up supplies and get started on the largest project in the room–the built-in bunkbeds. Just yesterday, we attached the crown molding–so it’s been a busy week!
There’s still wood-filling, sanding and painting to be done, not to mention the adjacent reading nook, but we thought we’d share exactly how we made these bunk beds for around $700 in this weeks’ ORC post.
Step 1: Measurements & Plans
Planning is, of course, always the first phase of any project, and it’s especially involved with anything “built-in.” The measurements have to be exact, down to 1/16th of an inch. Even trickier still is when you’re dealing with walls, because very rarely are the walls of a room perfectly squared.
When drawing out plans, we like to start with the “fixed size” items. Since we’re working with bunkbeds, for us that meant the mattresses – they’re really the only part that has a fixed size. We’re using XL Twin mattresses, which are a few inches longer than a standard (we have an inkling our girls will be tall), making them 39X79. With a bed, it’s always a good idea to add a little wiggle room for the mattress, so we added 1 inch to each dimension, making the mattress area 40×80.
From there we decided how wide we wanted each section to be when finished. We wanted to leave as much room as possible for the reading nook, which meant making a staircase as small as we were comfortable with. We landed on 18″ wide, which feels like a good size for the girls, but still workable by us if we ever needed to make our way up top. Subtracting the 4″ posts I designed on either end of the beds and the length of the mattresses, that left us with 42 inches for the reading nook–which we were happy about.
We’ve had so many comments since starting from readers who wanted to do bunkbeds but couldn’t because of their ceiling height. Our whole house, including this room, has standard 8 foot ceilings (92 3/4 inches, to be exact), so bunkbeds are possible! We took the height and divided it in half, so that once the mattresses are in place, each bunk will have the same amount of space.
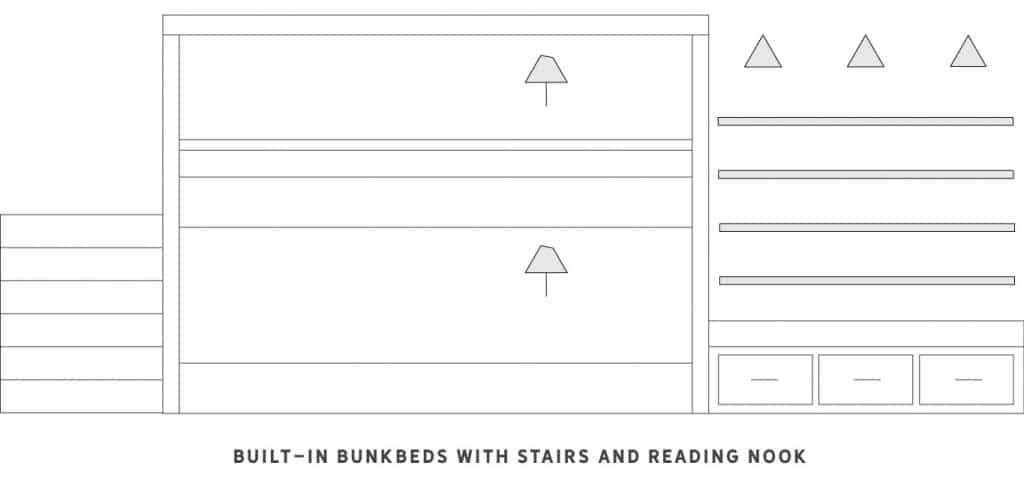
This post is only about the bunkbed section, but we’ll also be adding the reading nook on in the coming days.
Step 2: Calculate Materials
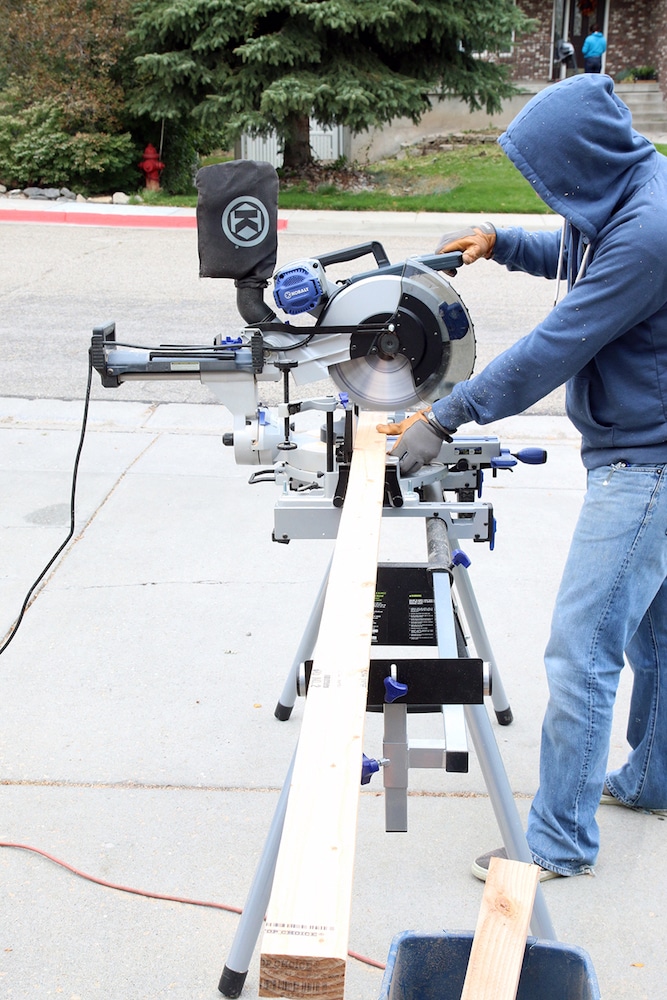
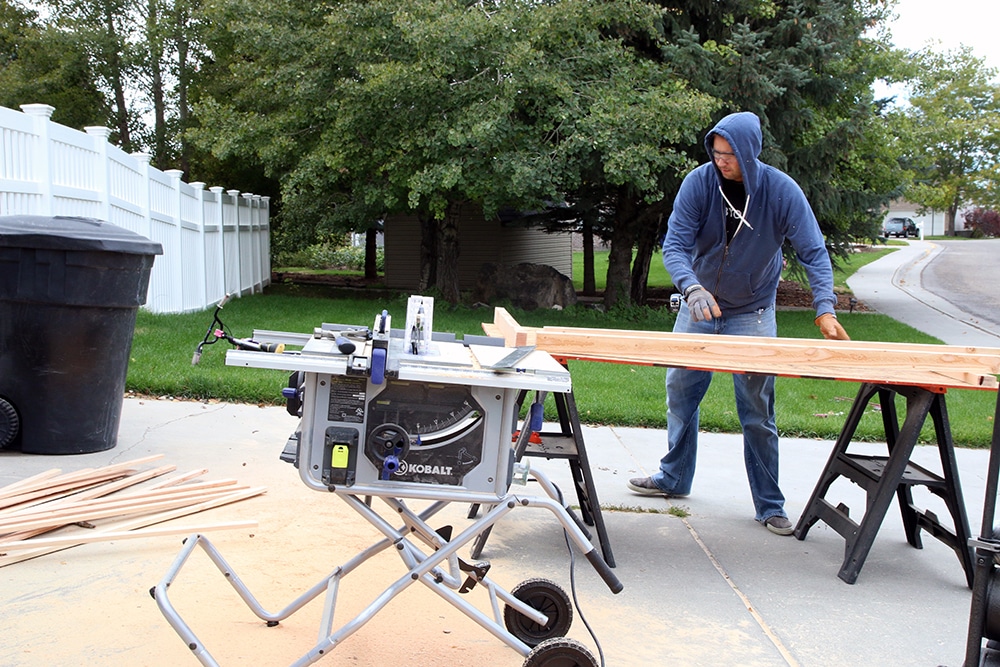
Calculating materials starts with knowing what type of lumber you’ll use where. We used premium 2×4 studs for the framing, 3/4in premium maple plywood for facing, and a few other types of lumber for various, specific purposes (8ft 2x10s for the stair supports, for example). Things to keep in mind:
• When you’re drawing up your final blueprint with all of your measurements, remember to take into account the facing material. We wanted our posts 4 inches wide, but that would include a layer of 3/4″ plywood (which is actually closer to 11/16). The plywood would be on both sides of the walls at the foot and head of the bed, meaning we would need studs that were 2 5/8 inches wide, as opposed to the 3 1/2 inches you get out of a 2×4. We decided we’d still go with the 2×4 studs because you can get a better lumber product (less prone to warping) and run it through the table saw to get the exact width we wanted.
• Studs should not be more than 16 inches apart. If you’re afraid they will be, err on the side of caution and add more. You’ll feel much better about a structure that is too strong, as opposed to one that is too weak.
• For the plywood facing, there will always be seams, but the fewer the better. The end product will be better if you plan on having enough full sheets to be able to use whole pieces for large sections that need to be covered, instead of piecing them together and using wood filler on the seams.
• It’s not a bad idea to get more product than you think you’ll need, and return what is unused. So long as your lumber is in like-new condition, you should have no trouble returning it, though you may want to check with your lumber yard. We get all of our stuff through our local Lowe’s and they’re always great about it.
Here is what our material list looked like:
• premium 2×4 studs – 22
• 3/4in plywood – 6
• premium 2×10 boards – 3
• plywood sheathing – 2
• 42in stair tread – 4
• dimmer switch – 2
• old work junction box – 2
• electrical wire – 2
And of course framing nails, screws, finish nails, brad nails, and wire nuts.
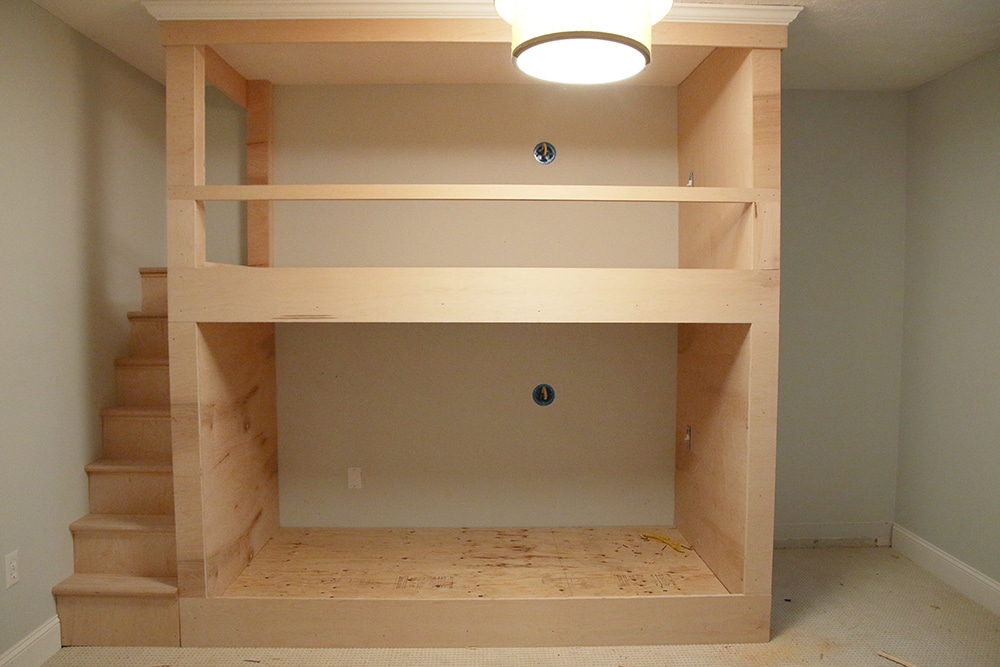
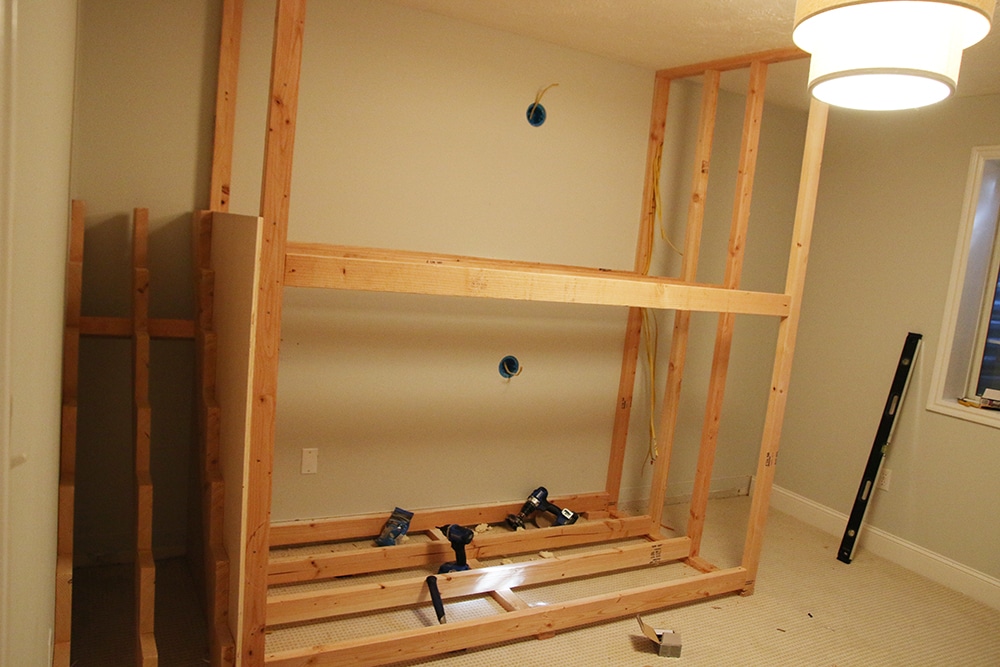
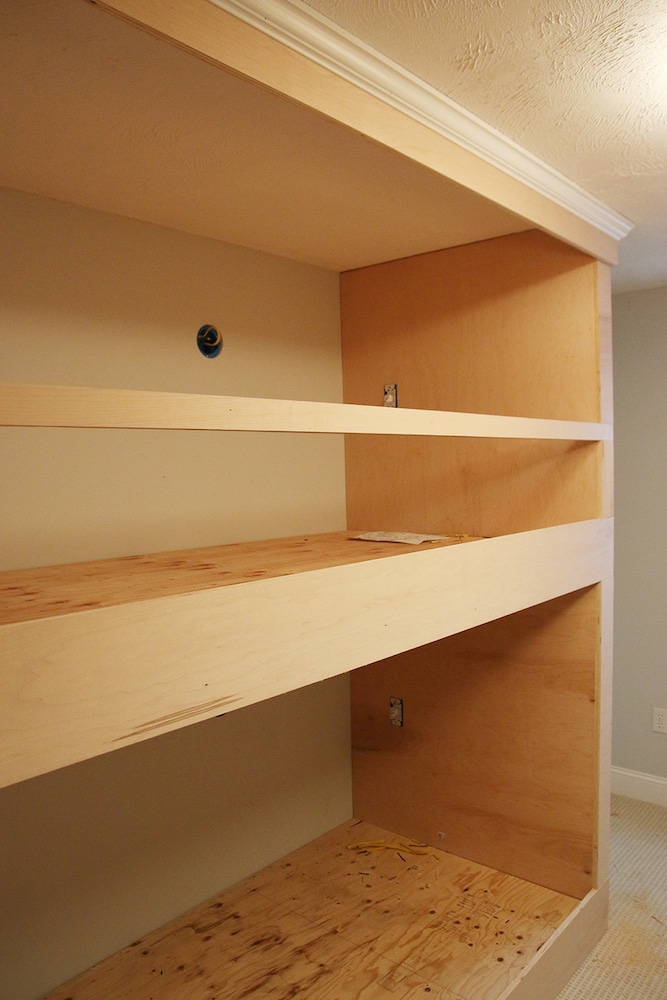
Step 3: Framing the Bunkbeds
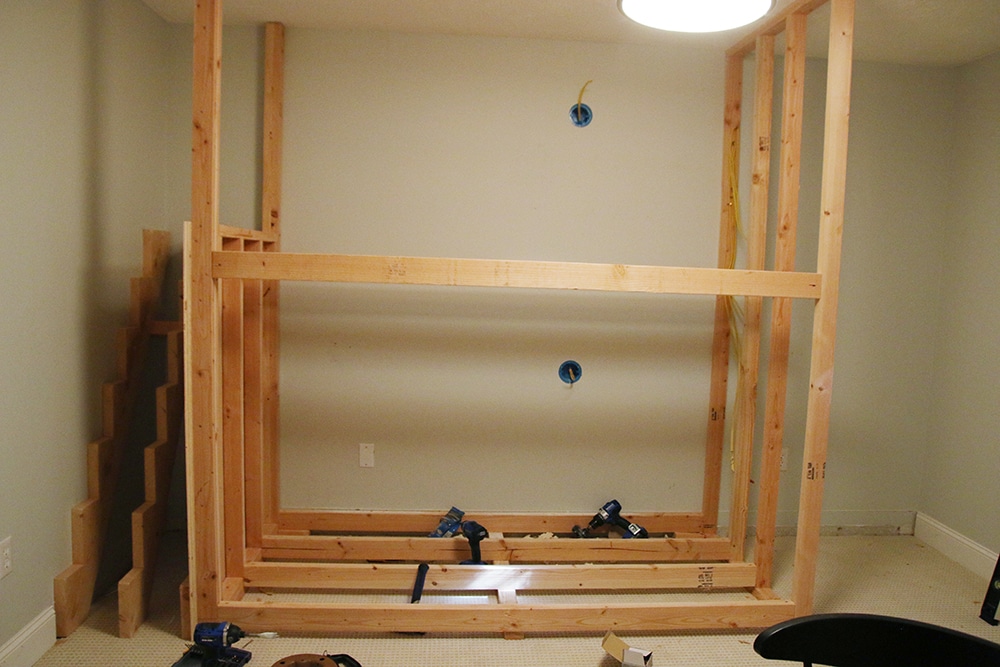
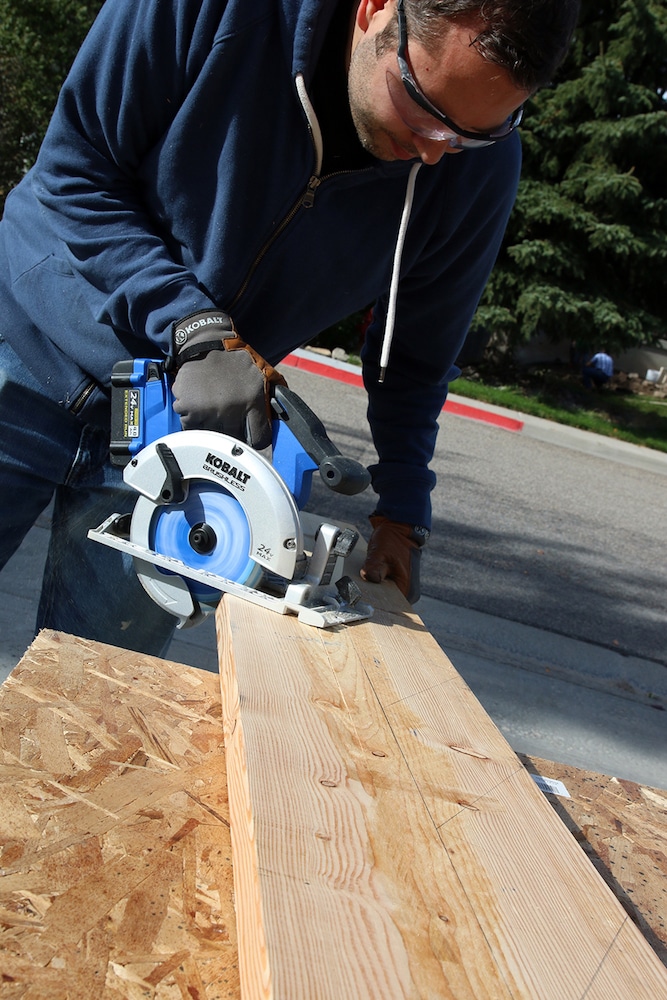
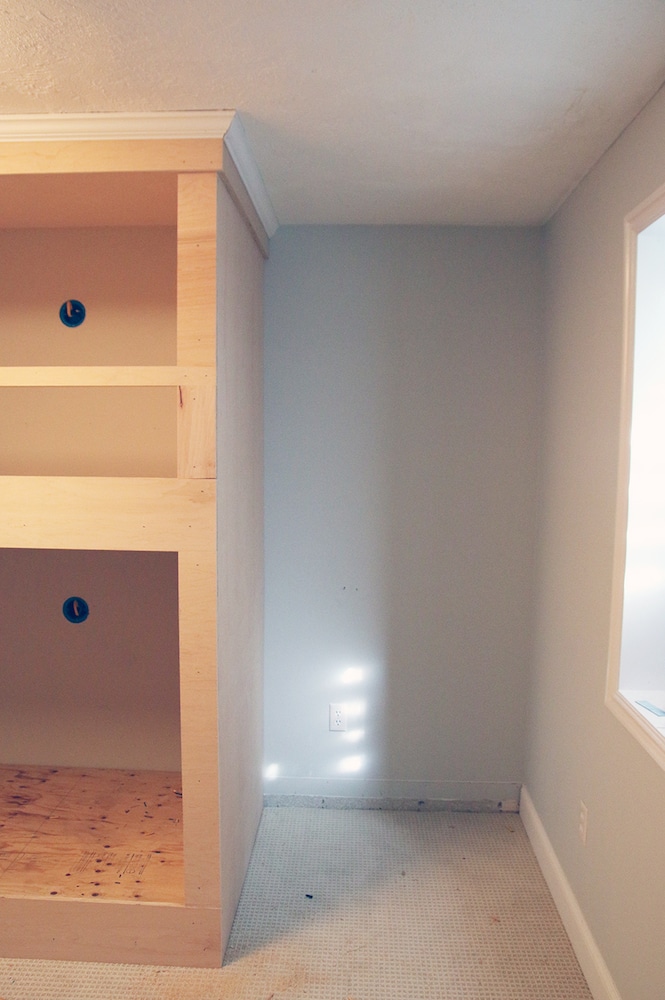
Building the frame starts with the wall at the foot of the bed. Since we wanted our posts 4 inches squared, we created two 91 1/4″ long posts up to the ceiling that were exactly 2 5/8 inches squared. That way, the plywood facing would bring it up to an even 4. Chris did this by running a couple 2x4s through the table saw at 2 5/8, then running one of them through again, standing on its end, to make it 1 3/16″ thick. He then nailed the two together to create a 2 5/8 squared post (twice to create two posts).
Why did the posts need to be 91 1/4 long? Because the ceiling is 92 3/4, and whenever you are doing framing you have a 2×4 both at the top and bottom of the frame, each being 1 1/2 inch thick. BUT, since these posts were going all the way to the ceiling without a top frame (they will be secured later), we only needed to make room for the bottom frame (92 3/4 – 1 1/2 = 91 1/4). If you listened to this week’s podcast, you know how I always walk in on Chris whispering these kinds of numbers and measurements to himself–it cracks me up!
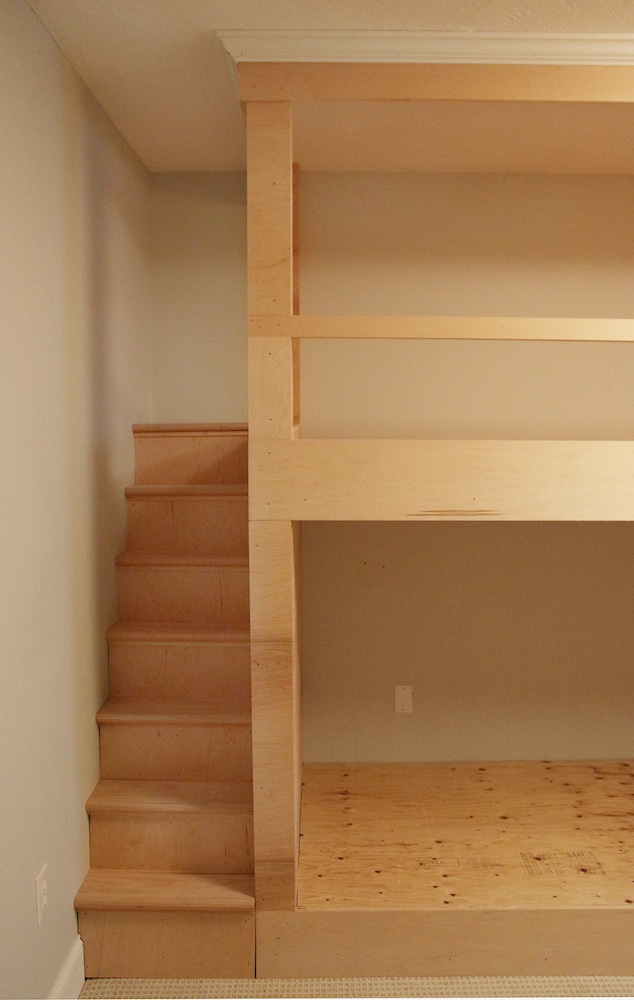
This left wall has our opening for climbing into the top bunk from the stairs. We planned for the top of the stairs to be 57″ after a 1″ stair tread. So the top of the frame in the center needed to be 56 5/16 inches so the stairs and footboard opening would be aligned (56 5/16 + plywood facing = 57).
Lucky for us, the wall at the foot of the bed perfectly aligned with a stud in the wall and we secured it there to hold it in place. If you aren’t so lucky, you may want to put the foot wall in place then move on to the step of adding the stairs (see below) so the foot wall can be connected to something stable, then move on to the head wall.
The head wall is simple framing – 4 studs, evenly spaced throughout 40 inches with a top and bottom piece. This is, of course, after passing all studs through the table saw to make them 2 5/8 wide so the finished wall will be our desired 4 inches.
Once again, when placing the head and foot wall in place, figure for an additional 1 3/8 inches (for a layer of plywood facing on each wall). This means, if you want the finished mattress area to be 80 inches tall, you’ll put the head and footboard frames 81 3/8 inches apart.
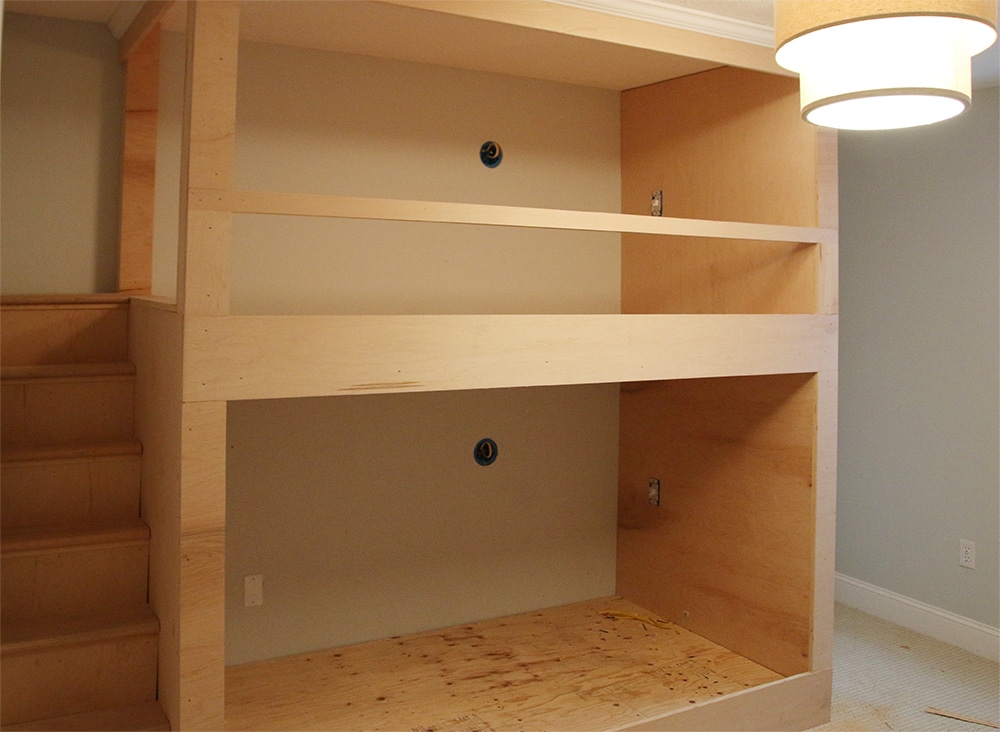
For the mattress supports, cut 8 2x4s (no need to send these ones through the table saw – they’ll be stronger if you keep them at their standard thickness) to that exact length (81 3/8). Use a Kreg Pocket Hole Jig to drill pocket holes into the ends of each board so that there will be at least 2 screws connecting each end of each 2×4 to the head and foot walls.
Secure the 2x4s for the bottom bunk to the walls so their tops are exactly 5 inches from the ground. I also added a 2×4 under these 4 boards as an extra support. Measure halfway from the ground to the ceiling and mark the head and foot walls at that point. Secure the 2x4s for the top bunk so that the bottoms of those boards are 11/16 of an inch higher than that mark (again, plywood will be added so it lines up exactly with that mark). A level is your friend here. Level each board, as you add it, with itself, and the other boards next to it.
Step 4: Framing the Stairs
About those stairs. Stairs can be tricky and they’re fairly involved to get them right. Chris’s dad taught him how to do them, but here is a thorough tutorial that describes the process.

Before attaching the stair supports, cut and attach the piece of plywood that will be between the stairs and foot wall (or left-hand wall in our case), so the stair supports can be attached directly to the plywood, and also into the studs in the adjacent wall.
Step 5: The Electrical
Running electrical wire is not something we feel comfortable giving a tutorial on. Legally speaking, there’s a lot that could go wrong and if you don’t know how to do it, it’s best to hire a professional. Chris has done a lot of electrical work so he handles it himself, but even when you do it yourself it’s important to get your inspections done to keep your family safe.
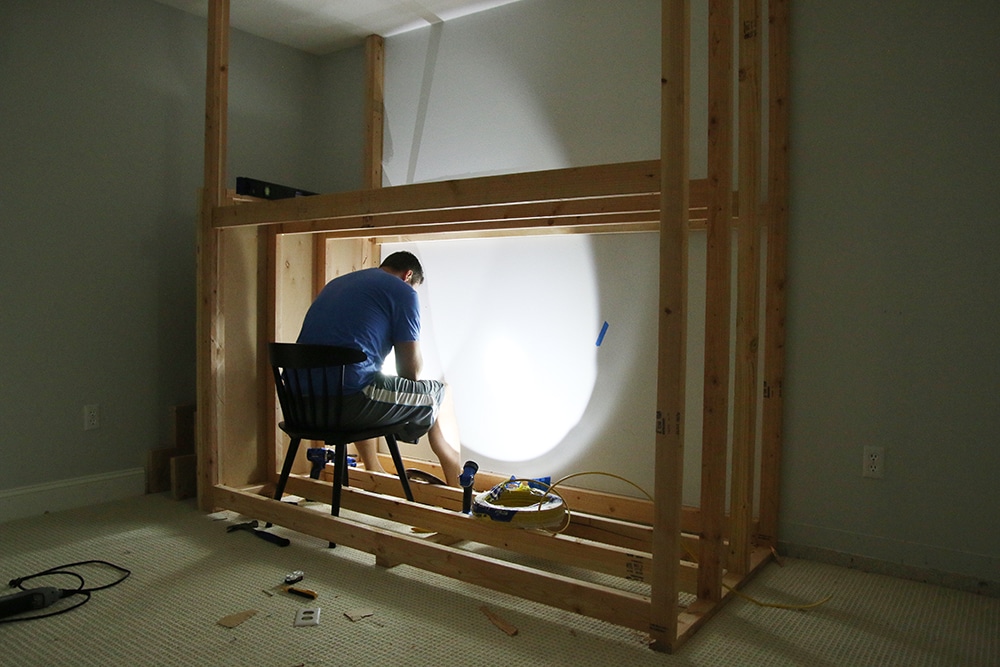
The short version, Chris capped off an outlet in the bottom bunk area and rerouted its power to two switches in the head wall of the bunk beds. All the wires are hidden within the frame of the structure. Getting the wires run before adding the rest of the plywood facing is extremely important (and probably pretty obvious, but we have to point it out). I mentioned in last Friday’s post that we were still not sure if we were going to put switches in the bunkbeds to give the girls the power or what! But, we decided to do so. And add a dimmer switch! If we thought it through for 10 more minutes, we probably would have thought to put the switch near the bunkbed openings instead of the back wall, so if they fell asleep, we could easily turn them off ourselves, but what’s done is done.
Step 6: Plywood Facing & Crown
The last step is adding the rest of the plywood facing to enclose the wiring and cover the framing. I’m a big fan of mitered corners, as it makes everything feel tight and seamless, but there are so many edges, corners and angles on these beds that it would have driven Chris crazy trying to get those miters correct. He actually cut the first few edges mitered and then I stopped him because it was taking so long. “Cut them all squared and we’ll go back and fill any seams with wood filler” I said, and we’ll give it a good sanding, too.
The order in which you add the facing makes a difference, so take your time and think it through. A great place to start is on the underside of the top bunk – add that entire sheet and nail it in place using a finish nailer and 2in finish nails. (If you can picture this, I was actually holding the sheet of plywood in place on my back while Chris nailed it in place.) Then add plywood to the foot and head sections of the bottom bunk. This further grounds and supports the top bunk to prevent it from sagging or dislodging at the screw points.
From there, this is the order Chris suggests, but feel free to do what makes sense for you:
• floor-to-ceiling section on the right side of the head wall
• head and foot of the top bunk (the foot is the small riser from the under frame to the opening leading to the stairs)
Once the head and foot pieces are done, you can cut the holes for the old work junction boxes for the light switches and have those hooked up.
• left and right sides of the foot wall posts that go to the ceiling
• 8in high fronts for the mattress areas
• 9in tall pieces between top bunk front and security rail
• security railing (we doubled up two layers of plywood for the railing to make it stronger)
• the rest of the bunkbed facing as you see fit
• stair risers
• stair treads
Once all of that is in place, you’re ready to add the sheets of plywood sheathing that go in the mattress areas. We used Douglas fir plywood sheathing here because it doesn’t need to be fancy. Cabinet-grade plywood is a bit overkill, since it will never be seen.
Finally and lastly, the top trim and crown that really seals the deal.
As I mentioned before, the next step is using wood filler for all of the seams, sanding them smooth. Then caulk, paint, and build out the reading nook.
I know that was a lot of technical words to read, especially if you aren’t planning on building a bunk bed, but if you are–I sure hope it helps! And if you aren’t, I hope you’re just as excited to see this room inch along. I’m off to see what the rest of the bloggers (listed below) in the One Room Challenge accomplished in the last week!

Jana Bek | Chris Loves Julia | Shannon Claire | Coco.Kelley | The Curated House
Driven by Decor | The English Room | From the Right Bank | Sherry Hart
Hi Sugarplum | House of Jade | Hunted Interior | The Makerista | Making it Lovely
Marcus Design | Pencil & Paper Co. | Megan Pflug | Place of My Taste | Suburban B’s
Waiting on Martha Media Partner House Beautiful | TM by CIH
Leave a Reply
What do you think?
Previous Post
Next Post


Semihandmade
Our wood grain Shaker cabinet fronts were designed for busy, high-traffic homes like ours. Clad with durable textured thermofoils, this line is compatible with Sektion, Akurum, Godmorgon, and Besta cabinets from IKEA. It's the perfect, practical way to add the warmth of wood to all the rooms of your home.
Collaborations
learn more

next
Loloi
We have teamed up with Loloi to create a line of rugs that are as affordable as they are beautiful. This collection houses a great mix of traditional and modern rugs, in cottage-y colorways, as well as vintage-inspired beauties that you’ll want to roll out in every room.
Collaborations
learn more

next
STUGA
We partnered with Stuga on a line of hardwood floors — The Ingrid is really livable, and the color is very neutral. It doesn’t lean warm or cool, it’s that just right in-between. We have really loved putting it everywhere in our house. It’s the best jumping-off point for design, no matter your interior style. In addition to being beautiful, Ingrid is really durable — we have three kids, and we always have a home construction project going on. Ingrid stands up to it all.
Collaborations
learn more

next
SHop all
What We're Right Now
What We're Right Now
Looking for our favorite things? A place to shop our home room by room, or just catch up on what Julia's wearing / loving right now? Browse the CLJ shop.
Loving


Portfolio


Design
Befores, afters, mood boards, plans, failures, wins. We’ve done a lot of projects, and they’re all here.
BROWSE BY CATEGORY
let's break this thing up
We have a long-standing relationship with DIY, and love rolling our sleeves up and making it happen.
Projects
Even when you don’t want to rip down a wall, you can make that space in your home better. Right now.
read more
read more
read more
02
01
03
looking for inspiration?
A reader recently asked me if I’m starting to fully embrace traditional style and whether we still consider our house to be a “modern Colonial” and why. It was a really great question and so timely — I had really just been thinking about my approach to this home and how my style has changed […]


SEARCH THE BLOG
We've been doing this since 2009 and we've posted a whopping 24145+ blog posts and counting. You might need a little help searching, huh?
looking for something?
find stuff like:
")
Can We Send You Our Love Letter?
Another way for us to stay in touch! Joining our weekly newsletter gives you access to exclusive content, never-before-seen photos, your questions answered, and our favorite DIYs. Sign up below!
Follow Along on Instagram
Welcome to our online community where we've posted home, DIY, style, renovations, and family since '09. Renovating our #cljmoderncottage in Idaho and headed for new adventures in Raleigh, NC. #cljfam #cljtransformations
@chrislovesjulia


Links
Get Around
Make yourself right at home
Portfolio
Design
Casual Friday
Projects
Lifestyle
Gift Guides
All Posts
Shop
Love where you live.
Social
RivrLinks
Links
Get Around
Make yourself right at home
Portfolio
Design
Casual Friday
Projects
Lifestyle
Gift Guides
All Posts
Shop
Love where you live.
Social
RivrLinks
Thank you for posting as there are lots of pictures out there of bunk beds but not a lot that show the build sequence. I am not sure plywood facing was the best choice. I would think that just using 1×6 pine facing boards would be much cleaner. You could just build like a face frame to a cabinet with pocket holes and install and it would be a clean finish. Thanks again.
I am obviously a little late to this post. I don’t know if this question has been asked or not but how wide are the steps? We are looking into building this for our teens.
Love the bunk
Great post guys! Thanks for sharing.
Quick question for you!
Any reason why you chose plywood over MDF for the facing? Getting ready to build a set and trying to get the cleanest finish and thought MDF May seal and paint better???
These bunk beds are exactly what I’m looking to build in one of our guest rooms. I’d like to do full over full size. Do you know how much weight the top bunk will support? Our bunks would be used by adults as well as kids. Thanks so much.
I’m not sure since we didn’t do full size beds!
Thanks for your quick response! How about for the twin size you built — any thought on how much weight the top bunk will support?
It’s built using decking standards for 2×4 boards. I can lay in it with both my daughters (between the 3 of us that’s over 300lbs). It’s really solid.
Hi,
Love this Tutorial ????
I will be using it to build something similar.
Did you use Pocket Holes to attach the Timber posts together?
Thanks,
Luke
Yes!
HI! If you mentioned this already I’m sorry!! How long did the building of the bunk beds take? Im hoping my husband and father-in-law can tackle this over christmas break :)
It was about a week on and off.
I am trying to figure out how you made the top part of the bunk supported enough for the weight with just 2x4s? I thought the maximum span without sag for a 2×4 was 4’5” without an additional support underneath. So for the top bed, I’m guessing you have that center support tied into the wall somehow and I just missed it. Also, did you use joist hangers for your top bed 2x4s? I feel like I can’t see well how you supported and attached the top bed. Thank you!
For one 2×4, yes. But when you add others it increases the strength. We used a floor calculator, which rates it to hold much higher weight than the bed ever sees.
I’m leaving looking at building something pretty similar and have a space for my boys that looks the same as yours. Can you let me know the wall length you ha FYI work with. Also what was the final size of the entire bed including stairs. I think I’m going to build a desk next to their bunks. Thank you.
The whole wall is about 13′.
what is the length of the wall behind the beds? Would love to do this in our guest room. Great job!
If I remember correctly it’s 11 or 12 feet.
Hi, love these beds! What did you do on the edges of the plywood? Did you apply edge banding, or just sand and paint?
Thanks!
Sand, wood fill, sand again and paint.
Love the design and build. Is the framing of the bunk attached in any way to the framing in the wall, floor, or ceiling joists, or are the head and foot board walls simply just attached to each other and free?
The side walls are attached to the floor with a Ramset and the joists in the ceiling, and the bottom frame of the bed areas are attached to a couple of studs in the wall.
Love these bunks! I am using your plans and modifying to create a loft bed with stairs for my kids, and ran into a couple questions about your stairs (since there wasn’t much of an explanation there). Can you share the rise and run of your stairs? I will need to go the same height with mine, but mine will be an inch narrower to accomodate a closet door.
It looks like you have 7 steps that run up to 57″ tall. Can you share the depth of your treads? I’m thinking the overall length they will run is 48″ (width of the mattress area + 4″ posts).
Also, are all 4 corners doubled up 2x4s or just the front posts? It’s a bit hard to tell from your pictures. Any help would be greatly appreciated as I am planning out my modified plan!
The treads ended up being 6 inches deep, and the doubled 2x4s are only for the posts on the one side, as the head side is solid and didn’t have posts. I hope this helps!
What is the total length of the wall the beds sit on? I’d love to do this in our boys room and am curious of the space planning. Thanks in advance for your time! LOVE everything on your blog and your style!
Please tell me total length of the wall the beds are against. I’m sure it’s somewhere in your description but I can’t find it. TIA!
Consider putting hinges on top of each stair step so they use the lost space as storage.
Oh! Good ide!
I can’t even believe how awesome this is. Crazy good! I’m listening to the pod cast as I go through the rooms. You are both so adorable. Thanks for the lovely mention.
How cool! I saw the girls reactions on snapchat (I think?) and they looked so excited!
These look great! I just wanted to mention something I learned when researching bunk beds for my boys, is that it is recommended to have a shallower mattress for the top bunk, so the kid is not as high. It is supposed to be safer.
Those bunk beds are soo cool! Can’t wait to see more!
Looks awesome! Just wondering how the mattress will breathe if you lay it on the solid wood? Do you have plans to make slats?
Hi Kim! We’ve had Greta’s mattress on a flat surface like this for years and it’s never been an issue, but we’ll keep an eye on it and if it becomes a problem we’ll drill some holes in the sheathing under the mattress.
These look so awesome! Great Job :)
Wow you guys are amazing doing all of this! I’ve been watching on your IG stories & im in awe!!
X
Wow guys, so impressive! You really got the scale of these just right. cant wait to see how this turns out!
This looks awesome! The reading nook is deeper than I expected (just saw the drawing and didn’t really think about the depth) – that’s going to be a fun little space to have!!
OMG I love built-in beds! I just did a built in bunk at my beach house. I so wanted to do the staircase you put in on the side of yours but there was not enough room – https://www.instagram.com/p/BJgQkUUDJBB/?taken-by=rebeccarescate. These look amazing – keep up the great work! I can’t to see the finished project at the end of the 6 weeks.
My friends’s two boys might need to share a room so I am totally sharing this post with them! Thank you for such a thorough guide through the process! You guys are the best :)
They look amazing! Have you considered hiding a secret cupboard under the stairs?
These are looking awesome! It’s making me want bunk beds in our house!
But I had the same thought as Sabrina! What happens if the carpet gets stained or torn and you need to replace it?
Hi Rachel! We’re not too worried about that. If something gets stained and we need to replace it, then we just cut the carpet around the bed. But if that doesn’t happen and we decide someday to take the beds out (not likely but who knows), then the carpet is still in tact underneath. :)
Julia – these are amazing! When I first saw a glimpse on Insta story, I thought, “Holy moly, I better get to work!” I have yet to make any major decisions on our ORC living room, let alone order furniture, remodel the fireplace, etc. Major panic over here!
Was listening to the latest podcast this morning and loved the story about Greta’s initial reaction, though. And the video of them together that you shared on Insta was too sweet!
This is awesome! So excited to follow along with this space!
These look amazing! One question – I thought bed frames needed to be slatted (or have holes) to allow air to circulate through the mattress? Maybe that’s not really a thing? Regardless, loving these built-ins!
You’re not crazy – I’ve heard the same over the years as well. A friend in college had a mattress on the floor he used to prop up against the wall during the day. Helped it to dry out/prevent mold. I haven’t bought a mattress in quite a few years, maybe this isn’t as much of an issue any longer.
I’ve not heard that but I can see how it would make sense. We’ll keep an eye on it and let you know if we have any issues. Worst case I can go back through and drill some holes in the fir sheathing under the mattresses.
Hi! Great ideas you have, but the previous commentators are right! The matresses need holes underneath, because they will definately be mold! I have seen that, and the worst thing is that, at first you do not even see the mold, it is going to be inside the matresses. That is a huge danger for your girls lungs. That is also the reason why beds have slattered bases- to let the moisture out.
I’m curious if you built the beds over the carpet or pulled it back. I couldn’t tell from the photos which way you went. The beds look amazing so far!
We just put them directly on top of the carpet.
I was curious about this too. Did you have to screw or nail into the carpet or did you just place them on carpet and the pressure of beds will secure to ground? Thanks!
The bunks are attached to the wall, but only sitting on top of the carpet. Once framed in and finished, they’re incredibly stable, plus if we ever remove them then the carpet will be undamaged.
Oh my goodness, I bet those littles are getting SO excited to see that bed come together! I’m looking forward to following along on your adventure!
OK….y’all have been uber busy! If I had to do all of that I would be in a bigger tizzy than I am already in:) Looking forward to seeing more of this great project!
It looks so good already ! Are the girls excited seeing their bed taking shape?