


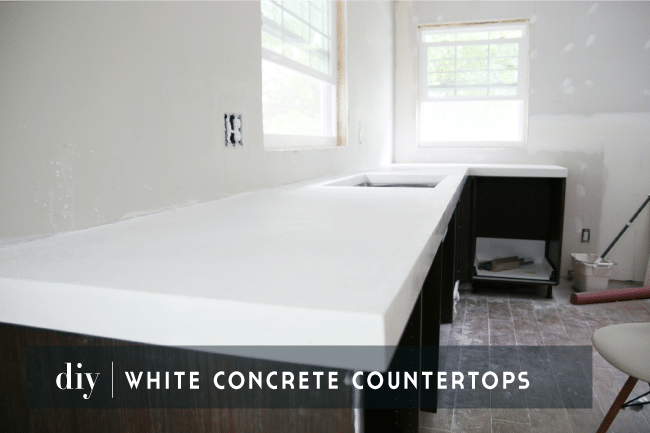
Ever since we came in contact with the Pugmire’s concrete countertops in their kitchen, we have had it in the back of our minds for ours–except in white to contrast our dark cabinets. We love to mix traditional and modern with an industrial edge in our home and white concrete countertops around the perimeter of the kitchen (with a walnut island top) not only sounded like a fun project to do and share, but we hoped it would add a bit of modern character to the kitchen. There are a few different kinds of concrete countertops floating around blog land, but for ours, we poured them in place using white countertop concrete mix and squared edge counterforms from Z Counterforms. Last Saturday, with the help of our friend Preston (musician, DIY master, concrete worker extraordinaire), we DIYed our countertops and today I’m here to spill all the details, the results and a few lessons we learned.
PREP
The prep work is the most important part of DIYing concrete countertops. We started out by screwing in 5/8″ CDX plywood from underneath our cabinets. Although our countertops turned out awesome, if we were doing it again, we would definitely use Durock cement boards in place of the plywood. While plywood is an acceptable base, we learned that Durock absorbs liquid, while plywood repels it. This concrete mix was more fluid and we had quite a mess on our hands at one point. Like I said, it all turned out great in the end, so all is well that ends well, but after talking to the guys at Z Counterform, Durock would have eliminated a lot of the excess liquid.

Once the plywood was set, we started attaching the forms. Preston is the one who told us about Z Counterforms because he had worked with them before, had great results and they are geared to DIYers and professionals alike. The backside of the countertop had a simple 90 degree straight edge form:

While the form for the front edges had a dip in it so it would go slightly down in front of the cabinets appearing to be a full 2 1/4″ thick. They had all sorts of fancy profiles for countertops, but we like the simple square edge.


Since we were planning on an undermount sink and pouring concrete in place, this is the time to undermount the sink! It felt a little backwards at first, but we cut the hole for the sink and siliconed and braced it in place.


To protect the sink from getting mounds of poured concrete in it, we used the sink template to cut out a form in 2″ blueboard styrofoam. We wrapped the edges in packing tape to promote the smoothest finish on the sink edge, marked where the top of the concrete would sit and siliconed that to the sink (came right off after the concrete dried!). We did a similar process for the faucet hole.


This is where you are going to want to silicone every crack where the concrete could leak out. Where the counterform meets plywood, all seams (from the outside)–we also duct taped the outside corners as an extra precaution, and where the counterform meets the wall in the back. We thought we did this pretty well, but we missed a few spots where the wall meets the form and had some leaks to clean up during the pouring process. We’d definitely spend more time on this part doing it again.
The last part of the prep was rolling out fiber glass mesh (equivalent to rebar in large concrete projects) we picked up from Z Counterform, too. It keeps the concrete from cracking and reinforces the counters.

Once we had it rolled out and cut, we attached what are called “Z clips“. They get screwed into the plywood and hold the mesh up and in place.


We laid out rosin paper on the floors and covered all the cabinet fronts, too, after the above photo was taken. And we were finally ready to start pouring the countertops!
MIXING AND POURING THE COUNTERTOPS
As I mentioned earlier, we used a countertop specific mix from Z Counterform–this one! The directions are right on the bag, but there is a little wiggle room in how much water you add to the mix.

Because we used plywood, instead of Durock, we settled on about 2.5 quarts per 50 lbs of concrete mix. We ended up using 14 bags of countertop mix for our perimeter countertops (about 35 sq feet).

The day started out with both Chris and Preston mixing, but after the first couple batches, Preston settled inside working on leveling the concrete while Chris kept mixing. In retrospect, we should have rented a mud mixer from the hardware store. Even these heavy duty drills were struggling to keep up and Chris’s shoulder was feeling it, too. Note: Rent a mud mixer!

After a bag was mixed up, it was poured onto the countertop:

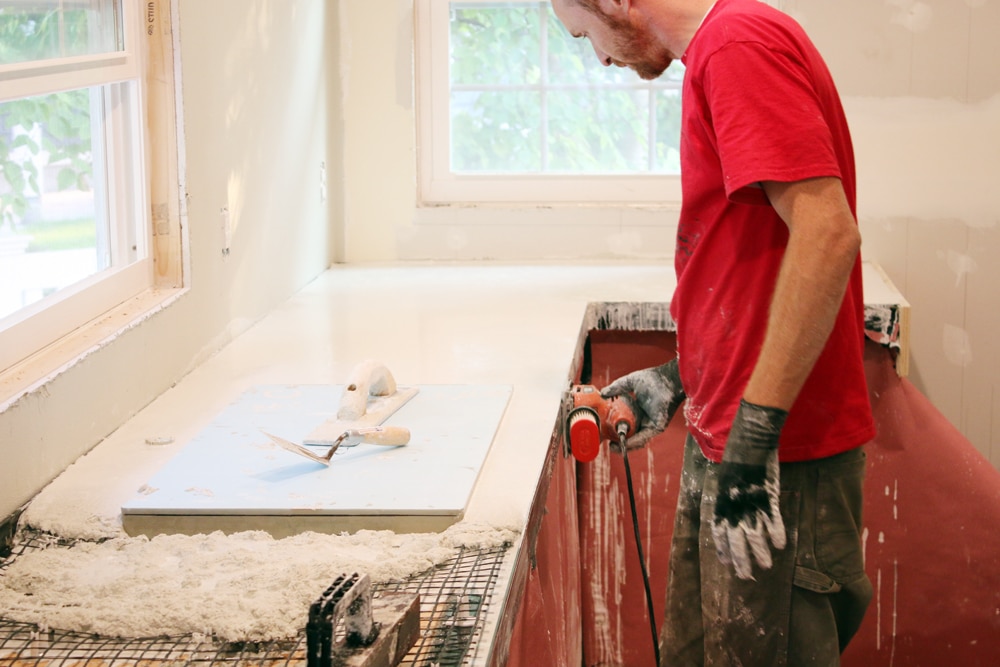
And worked into the mesh with a magnesium float.

When there was enough concrete in place, Preston would level it first with a screed. This was one Chris made in a couple minutes using a scrap piece of wood and two handles that came on a pallet we got.

And then moved to the magnesium float:

While the concrete was still very wet, we took a palm sander (with no sandpaper on it) to the sides of the form and turned it on. This helped settle out any bubbles forming in the concrete.
And finally, once things started setting up, a more flexible zinc trowel was used, which Preston explains a little more about in this short video that was shot during the final step right before we called it a night:
REMOVING THE FORMS AND SANDING
We finished that final step above on Saturday night. Monday night, we had the Pugmires over for dinner and to remove the edge forms. The back forms stay in place and will never be seen once we put in the backsplash. Z Counterforms are designed to bend and snap off–it’s the coolest and scariest part. Before removing the edge, we sanded over the form so we could pry it back a bit.

I took a 15 second video showing how easy it was to remove the forms.
The edges and underneath the counters are so, so smooth since they were up against the forms. The tops were pretty smooth thanks to all of the effort Preston put in during the first 5-6 hours after pouring, but still got sanded down after the forms were snapped off. We got this sanding block from Z Counterform and it has 3 different diamond sanders with velcro on the back (printed with the grit). We started with a 150 grit and went up to a 300 for a velvety smooth finish.


We couldn’t be happier with the results! The concrete is cool to the touch, like stone. It looks very organic with spots speckled with “pepper” and others swooshed with white. It’s smooth and thick, giving us a great overall counter + cabinet height.


The cost breakdown (not including sealer) is:
The concrete mix: $29 a bag x 14 bags= $406
Square Edging: $180
Fiberglass Mesh: $50
Z Clips: $20
Z Gem Pad (Diamond sanders): $60
Magnesium Float: $26
Zinc Trowel: $39
Screed: (DIYed)
Plywood: $45
Silicone: $15
Blueboard for sink: $15
TOTAL: $856
The last step is sealing it. We did a ton of research on sealers and invested in one that promises the utmost protection–fingers crossed! We are going to wait a full week, allowing it to cure completely, before doing that. So, I’ll share those details next week. We’re so glad we branched out a bit and tried something new to us. We love, love, love them. Is it something you would ever try?
SEE HOW THE COUNTERTOPS LOOK IN OUR FINISHED KITCHEN HERE.
UPDATE: Woot! I just got an email from Z Counterform and they’d like to offer all of our readers 15% off all products for the next 3 months using code CLJ015. Go get em, guys!
After all that work, we wanted to make sure our countertops would last. See how we finished and sealed the countertops in this follow-up post!
Leave a Reply
What do you think?
Previous Post
Next Post


Semihandmade
Our wood grain Shaker cabinet fronts were designed for busy, high-traffic homes like ours. Clad with durable textured thermofoils, this line is compatible with Sektion, Akurum, Godmorgon, and Besta cabinets from IKEA. It's the perfect, practical way to add the warmth of wood to all the rooms of your home.
Collaborations
learn more

next
Loloi
We have teamed up with Loloi to create a line of rugs that are as affordable as they are beautiful. This collection houses a great mix of traditional and modern rugs, in cottage-y colorways, as well as vintage-inspired beauties that you’ll want to roll out in every room.
Collaborations
learn more

next
STUGA
We partnered with Stuga on a line of hardwood floors — The Ingrid is really livable, and the color is very neutral. It doesn’t lean warm or cool, it’s that just right in-between. We have really loved putting it everywhere in our house. It’s the best jumping-off point for design, no matter your interior style. In addition to being beautiful, Ingrid is really durable — we have three kids, and we always have a home construction project going on. Ingrid stands up to it all.
Collaborations
learn more

next


SHop all
What We're Right Now
What We're Right Now
Looking for our favorite things? A place to shop our home room by room, or just catch up on what Julia's wearing / loving right now? Browse the CLJ shop.
Loving


Portfolio


Design
Befores, afters, mood boards, plans, failures, wins. We’ve done a lot of projects, and they’re all here.
BROWSE BY CATEGORY
let's break this thing up
We have a long-standing relationship with DIY, and love rolling our sleeves up and making it happen.
Projects
Even when you don’t want to rip down a wall, you can make that space in your home better. Right now.
read more
read more
read more
02
01
03
looking for inspiration?
A reader recently asked me if I’m starting to fully embrace traditional style and whether we still consider our house to be a “modern Colonial” and why. It was a really great question and so timely — I had really just been thinking about my approach to this home and how my style has changed […]


SEARCH THE BLOG
We've been doing this since 2009 and we've posted a whopping 24145+ blog posts and counting. You might need a little help searching, huh?
looking for something?
find stuff like:
")
Can We Send You Our Love Letter?
Another way for us to stay in touch! Joining our weekly newsletter gives you access to exclusive content, never-before-seen photos, your questions answered, and our favorite DIYs. Sign up below!
Follow Along on Instagram
Welcome to our online community where we've posted home, DIY, style, renovations, and family since '09. Renovating our #cljmoderncottage in Idaho and headed for new adventures in Raleigh, NC. #cljfam #cljtransformations
@chrislovesjulia


Links
Get Around
Make yourself right at home
Portfolio
Design
Casual Friday
Projects
Lifestyle
Gift Guides
All Posts
Shop
Love where you live.
Social
RivrLinks
Links
Get Around
Make yourself right at home
Portfolio
Design
Casual Friday
Projects
Lifestyle
Gift Guides
All Posts
Shop
Love where you live.
Social
RivrLinks
I am using your experience as motivation and a guide to pour counters for my kitchen that I am currently renovating. I am nervous about the sink and faucet aspect though. ???? What sealer did you end up going with?
We are looking to do concrete countertops in our kitchen, and I’m so excited! But I would like to do some possible veining, so it’s white with some gray in it. Do you think this is possible?
Hi! I see it’s been 5 years. How have they held up? Have you liked them? Any regrets or things you would do differently?
Payne. Ha
A lot of people have commented on the discrepancy in color between their “white” and the author’s “white”. I think the author’s unintentionally forgot to mention they added TITANIUM DIOXIDE pigment powder to their mix. That is the only way to get a white as bright as they did. I’m also noticing they’re reluctant to just disclose the name of the sealer they used and eventually started directing people to another blog about resealing. Just saying.
Your counters look great!! My hubs and and I are looking into doing the same. Did you not need to use the bright white tint? They look very white with just the white concrete mix! :)
What sealer did you end up going with?
They look great! We poured ours last night. How long do they have to sit before pulling off forms? 2days?
What sealer do you use?
Would love to see an update on how the white concrete aged and stained over time?
I am assuming that the white concrete shows oil or other stains more than others. Could you do an update or share your experience?
Beautiful house! Beautiful kitchen!
How have your concrete counters held up over the years?
I’m worrying about staining and cracking.
We just finished doing these in our own kitchen using the Ikea sektion cabinets. I LOVE the look, texture, and feel of them. However, for those that are thinking of doing the same thing I wanted to add a few notes from our experience.
The square edge profile with 1/2” hardie backer worked just fine for the island. The issues we had were with the perimeter cabinets using the euro forms and 1/4” hardie. Primarily on the 30”, 36”, and corner cabinets that were not reinforced, we saw some sagging in the center of each cabinet. It is a pain to fix and could have easily been avoided by bracing under the cabinets. Even temporary braces while the concrete cured would have been very helpful.
I absolutely adore this! how long and how difficult would it be for a single lady to accomplish (one who likes the DIY road)
It’s a tough project but definitely doable!
Two things.
1. We have a sink and layout similar to yours and have been wanting to do concrete. I always thought it would be impossible to have a long countertop and a thin layer of concrete between edge and sink, as it wouldn’t hold, and be fragile even with rebar. Glad to see it actually holds!
2. This part is a question. I see
You used the z-frame which is much easier and less prone to mistakes I would believe than building ones own frame. However, we have already done textured subway tile up to the existing counters edge. Would we be able to use the z form backing and then remove it later? Keep in mind subway tile has a bit of texture.
Thanks!
That’s hard to say – I’m not sure I can picture it right. But Z-Counterforms can help you with that!
How much does it weigh? I want to do a 5×9 island but concerned about weight cracking sheet rock walld downstairs.
It’s heavy, like solid stone would be.
This tutorial is super helpful and we’re excited to do white concrete in our new reno. Do you guys reseal the counters? Also, we’re putting it on a peninsula with a counter to sit at… Any suggestions on structure for that? Thanks!!!
We haven’t yet but we plan on doing it soon. You could use IKEA cabinets for the peninsula!
Did the front edge of the counter form that dips down in front of the cabinets affect your cabinet front installation? I’m worried the cabinets won’t be able to open? We are also installing an ikea kitchen with cabinet fronts from Semihandmade, though.
You first lay down plywood or Durock and the counterform attaches to that, so the finished counter ends up being flush with the top of the cabinets – it doesn’t overlap downward.
Love your kitchen! How’s the white holding up after a few years? Do you have a pic of the countertop today? I want to do white, but nervous about it staining…
It’s doing great! Using a quality sealer is the most important step in the whole project!
Now that you’ve lived with the counters for a while, would you do it again? I’m debating this for my house and would love to hear your thoughts.
We’d definitely do it again.
Hi
Great video and information
Could you help me to buy the form and concrete in Western Australia
Thanks for sharing. This is the exact same project I’ve started here Haines, Alaska. The biggest problem I’m having is getting the white concrete mix. Alaskans have to get freight to Seattle then barged north. Hence cost of everything jumps up and a squeezes the tar out of pocket book. Trying to locate supplier in Seattle area.
Love! Question, I have all the stuff ordered and ready to go. I’m mostly freaking out because I don’t want the sand to come up to surface which gives you that speckle look. Could you have avoided this? I think it comes from sanding but I don’t know how you can avoid that. Suggestions?
Thank you,
Not sure! It’s a natural material.
Hi again! Thanks for your quick response! My next question is, are you still happy with having gone with the undermount sink? We were looking last night at buying a form for creating a drainboards right in the concrete. But not sure if it’s worth the effort instead of just buying a sink with one built in. Thanks so much for your time!
Very happy with it
Hi! We LOVE the look of this white countertop, but feel a bit disheartened that you’re finding you’ll need to reseal so quickly. Our question is, do you think if you’d done a drop in sink with drainboards, it would avoid some of that direct moisture you got from sink usage? We’ve found an awesome one with drainboards on both sides, but it’s pricier than we’d like to spend on a sink. But if it saves on having to reseal so quickly, then perhaps it would be worth the investment? What are your thoughts? Thanks!
I think just finding a different sealer from the one we used would be better. The chips in our sealer aren’t along the edges of the sink – they’re off to the sides a bit, where plates are stacked after dinners and such. But it’s been over two years now, so I don’t think that’s too frequent.
I was wondering if you would be willing to share which sealer you ended up resealing your countertops with (or the one you had planned on resealing with). There are so many out there and we are finding it hard to make a decision. Your input would be tremendously helpful. Thank you!
You inspired us to do 59” x 22” concrete countertops for our bathroom! What would you do for a backsplash? Make molds of them and adhere them to the sides? We were hoping to not use tile.
That would look awesome!
Hi! What is the square footage on your countertops? Trying to figure the amount of materials I would need for my kitchen.. thank you!
I can’t remember off the top of my head what ours is, but I don’t think that would be helpful for you anyway since your kitchen likely isn’t the same size or footprint. Most kitchen countertops are 24in deep, so you would simply take the length of your countertops and times that by 2. Do that for each section and add the total, then that should give you the square footage for your countertops.
I hope that helps!
Are the forms cut to fit the counter ends since they come in 8′ sections? I’m wondering how you guys did this, as I love your results with this project, and will be referencing the blog and the Zcounter forms site during our kitchen remodel! (ahhh!)
The bags listed/linked no longer exist (or the link doesn’t) and we have to order some boxes AND bags now it looks like (I realize this is an older post ;) )
I used our miter saw to cut the corners so they fit tightly, then we applied duct tape on the outside edge on any seams. Once we removed the forms, the seems were visible, but we sanded with the diamond sanding blocks from Zcounter and the lines are very minimal. Unnoticeable unless looking for them, I’d say.
absolutely bee-you-ti-FULL! well done guys! we just finished our kitchen using Neolith marble looking porcelain. if I have my way, our next kitchen will definitely be concrete. i’m super impressed with the white and the Price – no comparison. you’ve hit it here! a definite save to my pinterest page for future reference, thank you for your great instructions.
what happens woth to wood you place under your countertop
It’s part of the counters now. It doesn’t come out.
Good morning! We’re in the planning stages of our kitchen and your stunning kitchen is the inspiration for ours! What is the finished height of your counters from the floor and do you find them to be a comfortable height to work at? We have a walnut tree that we cut down for an addition and we are having it milled for one of the work surfaces. I’m trying to figure out the thickness to have it cut to. I’m also looking at those gorgeous concrete countertops although the exchange on the Canadian dollar may be a factor!! I do love your step by step posts on your kitchen – it’s given us the confidence to tackle our kitchen ourselves and save a whole lot of money doing it!!
I believe they are 37″–a little taller than standard height because we are tall. They are very comfortable for us. Good luck in your reno!
I applied the StoneLok E3/2K2 sealer on my new concrete countertops after they cured for a week. That was about a year and a half ago and I now I have noticed a few small spots where the sealer is coming loose from the concrete. Have you had this problem? If so, were you able to fix it?
This just started happening to us, too. It’s probably time for both of us to re-seal.
Have you found a more effective, long lasting sealer? My husband has been desiring to replace our countertops with concrete countertops. I have resisted because so many say they require a very good sealer and still have to be sealed at least 1-2 times a year.
The other drawback is that they are reported to be porous and capture stains from oil, wine, ketchup and other condiments very quickly.
I want very low Maintenance countertops. I don’t want to have to worry about accidentally not wiping up a mess and that one area stain the countertop. I want to have to seal only every few years. Please let me know if this is realistic.
I am looking at the different colored sprays so that I can make the countertops look like marble or granite. Any suggestions or recommendations?
Thank you so much for the detailed instructions!!!! Your countertops are stunning.
Yes! Check out this post.
Hi! I am in the middle of planning my kitchen remodel and saw this post and am definitely going for the white countertops. Sorry of this is a repeat question, but did you use Z Countertops bright white color pack? I did not see it in your list of items. Just trying to gauge how white the countertops are without it.
We just used their white concrete mix and it turned out great.
Hi we are currently trying to do a countertop with an integral sink- we had to toss the first mix- the mix is very dry- we used up to the 3 quart water Max- but even still its thick- and hard for two people to work in time to add more with out the first batch setting up some- I know we are very dry here with winds today- do you think added a bit more water would compromise the strength ? your mix looks so very wet in comparison to what we are getting.. any ideas?
Very inspiring.
I don’t live in the US so don’t have access to the mix you used. I’ll need to craft my own!
Did the mix have any larger aggregate in it? Or is it simply sand and cement + admix.
no larger aggregate. Good luck!
LOVE your countertops! I have been looking into concrete countertops & just recently stumbled upon the fact that you can do white ones! This opens up a whole new avenue of design options for us!! As I have read some reviews about the standard concrete counters most people say they scratch easy & that they tend to get grease spots…did you have this problem down the road with the white ones? I would love to know! Thanks!!
None at all. It’s all about sealing them
Great countertops! In the processing of doing the same to my kitchen. This was our inspiration for tacking our own! Quick question, did you take the block sander to the whole top to smooth it out, or did you use something more heavy duty, like a palm sander? Thanks!
Just the block sander, but we used it consistently during the entire process through drying.
How come you used plywood over durock, do you find it to be better durability or was it cost? I am looking to do the same and wanted your opinion as I’ve seen others use durock.
We used plywood because it’s easier to work with as far as cutting and such, but now that we’ve done it, I would suggest Durock. The concrete mix reacts oddly with the plywood and, until it begins drying, can cause the liquid to separate more and can be messy.
Wow, these white concrete countertops look amazing! I’ve never seen such white concrete. I may try this for a dining table! Thanks for the detailed step-by-step instructions~
Hello,
just wondered why you chose the sealant that you did? We are looking to do the countertops but just wanted to know about the sealant. Thanks!
It looks like you used 2″ thick countertop. 14 Bags for 35 sq ft correct? I have about 45 sqft I will be looking to cover. The look you have is exactly what I want.
These look amazing. I’m considering doing this for my large kitchen island, which will be a 10X6. Can you tell me the linear ft that was covered by the 14 bags you purchased? I’m trying got get an estimate of what it would cost me. Thanks!
Loving your stunning bench tops. My husband made grey polished concrete benchtops for our last kitchen, they were stunning but we have changed our kitchen and now need white benchtops… we are having trouble finding a concrete mix that makes them truly white… what was your mix?
We ordered it from the company listed and it dries very white. We’re really happy with them!
I LOVE how your concrete countertops turned out! Im building a new house and thinking of doing this in my kitchen and laundry room. Just wondering how they’ve held up? Any cracks or stains?
What kind of dealer did you end up using??
Sealer **
I really love this blog, they way you have explained it is great. Thanks for sharing.
Do you think it would look nice to add a little sparkle to the seal?
You totally could!
Can you add a sparkle to the concrete so it looks more like a quarts counter top?
yup!
Awesome job and you guys really documented this thoroughly!!! Thank you so much!
Thank you so much for all the insight. Your post really gave us the confidence to take on the project for our own kitchen. We just finished up ours last week and they turned out great. It is definitely an in depth process but the final results are pretty amazing.
Hi,
I was wondering how these are such bright white? Did I miss it in the process? I gather you used white cement, but these seem really bright. Would love to have that same look in my kitchen!
We used the white concrete mix from Z counter forms and this is just how white they are.
We have referred to your kitchen counter post at least 50 times! So helpful. Two questions: Did you just dry sand or did you wet sand at all? We have some pin/bug holes on top of the counters and on the edges. We are using the same sealant you used (thanks for doing all our leg work! :-)) and it appears that b/c it is an epoxy, many of those tiny holes will be filled in. We have been filling in hole by hole itty bits of concrete but if from your experience, that is unnecessary, we will stop. Thanks so much for you help.
I wouldn’t worry about those little holes, they’ll all be taken care of with the sealer! Send pics!
so we are doing ours on top of ikea cabinets as well. You had mentioned you would have used durok or cement backer board for the base. Which is what i have seen in a lot of videos. but with ikea cabinets that lip would have blocked the top drawer from coming out. Luckily I saw your guys video because I was all about using backer board until I saw this video. I actually thought you guys caught the mistake so I remeasured and realized my drawer wouldn’t open if I used duroc. Thanks!
Beautiful-how long did it take you to grind and sand?
How long did you wait to apply the sealer?
This post should answer all your sealer questions. We waited a full week before sealing them.
Amazing tutorial. One question, another blogger who used the same brand of white concrete and they said it turned out cream and not 100% white. Your counters look bright white, any issues with the color? Would you call it a cream or bright white? Thanks!
I would call it white, for sure! There are specks of gray specks in it that we love so much but really no cream.
Hi can you give me more insight on the kitchen sink prep ?
Hello! I absolutely love the counters! Am about 90% of the way there in terms of planning for them. One question I’d love to know the answer to is what do you mean when you say you used silicone on the forms and around the sink to stop leakage? I’m from the UK and wondered if the terminology was different! Could you tell me a product name so I could find an equivalent please? Thank you :)
This Do it yourself project is very good and I am going to try this project at home. This kind of do it yourself project is very good. For sure I am going to try this post at my home. Keep posting and keep growing.
קורות צהובות
I love these! Very inspiring. How did they hold up to wear and tear since installation?
How or when did you of you did remove back forms along wall?
How do you level them to make sure there are no dips / groves ? Also does the cement clean up on cabinets well ? Also any pics of the faucet hole prep ?
I had these same questions. ~ Did you set a hole for the faucet before you poured the cement (I didn’t notice in the pics) or drill the hole out later? Either way, I would really appreciate hearing how you prepared for the faucet. ~ Thanks so much! I’m totally inspired to try this.
Did you pay for shipping? Or did they ship for free in exchange for your blog posts?
There was an exchange. But you can use the coupon code and hopefully that will cut it down!
This is amazing – love the blog and the countertops are absolutely gorgeous. I’m so grateful that you took the time to post all the photos and steps in detail; I’ve been scouring the internet trying to figure out how I can create a white concrete vanity top for my bathroom and this is perfect. I’m going to give it a try!
Your kitchen looks amazing! I am also doing the Ikea Laxarby black-brown cabinets and a concrete countertop. I’m still on the fence whether or not I want to go with the white concrete mix from Z counterform or to go with a gray concrete. Anyways! I had read at one time that the z counterforms came down too low and would collide with the ikea drawers, and that modifications were needed so the countertop did not come down so low. You didn’t run into this issue, right? Maybe the problem was with the old Akurum cabinets and not the new series. If you could confirm, that would be great!
Hmm, no problems on our end! Good luck!
How does this hold up to stains. I have been thinking about doing white concrete in my kitchen.
We just had a huge party with over 100 people and lots of spills and no stains so far. Although, I do believe our sealer has a lot to do with it. Don’t skimp on the sealer! Check out this post for more details:
Looks Great! Did you guys have any concerns with the weight or look into the weight of concrete countertops on the IKEA cabinets?
There were no issues at all concerning weight. The concrete we used was specifically for countertops so we weren’t concerned about weight.
These look amazing!! We used the same edge forms from Z Counterforms and loved them too – well worth the extra money. We just used standard concrete mix in our kitchen and did the whole project for about $16/sf. I think we’re going to splurge and do the white mix in our bathroom soon though!
Check out our project here: http://www.moderninthemiddle.com/#!home/c1k8r/Tag/concrete countertops
Sorry – that link above didn’t work. http://www.moderninthemiddle.com/#!home/c1k8r/Tag/kitchen
Love the white counter tops. I am thinking of doing it with navy cabinets. Can you tell me if it is a cool, grey white or a warm tone? Thanks!
I would say it’s a warm white
Thank you, Julia! That is what I am searching for. Now I am even more excited! (We live in the middle of the woods and having someone come and install granite or quartz is mind-blowing expensive. This DIY counter top will give me the look I want and I can save same money!) Thanks for the great tutorials!
So I looked into getting the Z Counterform product (concrete and accessories). One cost you didn’t mention is shipping… $450 for shipping alone just for the bags of concrete to Utah!! That’s a deal breaker. I wish they had a distributor here. Or if you got yours some other way I’m all ears.
Shipping on the sealer is also $20 FYI. So with shipping, your $856 price should really be closer to $1,356 which makes your countertops approx. $38/sq. ft.
Don’t forget the 15% off! ;)
It sounds like you had a lot of help from your friend that works with concrete. Do you think you would have had the same results without his expertise? e.i. Can most of us really get these results at home?
They look amazing!
Brienne, that is such a good question and one that I have really, truly thought about before sharing our own countertops. We wanted to do concrete countertops because we love the look and we thought it would be a fun DIY project. Our friend, Preston, he LOVES working with concrete. It’s not his career but it is one of his passions. So naturally he was excited to help us out. And while he definitely held our hands and guided us, this is 100% something any DIYer can do. We followed the instructions given by Z Counterform (they even send a video demonstration to watch before you get started that breaks down all the steps really well!) and we even made a few minor mistakes (i.e. plywood instead of cement board) and they STILL turned out amazing. You can do it. Anyone can do it. :)
I love the way these look. I do have a question about the sink. In thinking long term, what will you do if you ever need to or want to replace the sink since it is sandwiched between the concrete and the plywood?
Good question! We are able to cut the plywood from underneath and release the sink if need be.
Absolutely the best DIY concrete counters i have ever seen. LOVE them! Did you have to do anything special to the cabinetry to be able to hold the weight of the concrete?
We didn’t.
This looks so, so good. Our kitchen needs a major overhaul and we’re going to try to do as much on our own as we can, so this post is inspiring (if not a bit daunting)! Thanks for sharing it!
Of course they look beautiful. I’m wondering if these companies you mention are sponsors- or maybe they will be! Is there any reason you didn’t cast them upside down? It’s more work but gives a mirror finish if you use plexi or metal. Once it cures there is no problem flipping it.
Wow! This DIY is awesome! I would’ve never thought of DIY-ing my own counter tops. This post definitely inspires me to make my own counter tops one day. Great post!
Those look gorgeous, modern and earthy. Love them!
I’m inspired!
Gorgeous! Did you have to do anything to make sure there weren’t any bubbles that would prevent the smooth finish?
Yes! Good question I’ll have Jules update the post. We took a vibrating sander, removed its sanding pad, and ran it along the edge of the forms (while it was turned on, off course). The vibration brought the bubbles out.
Oops! Yes, I’ll update the post. I even have a photo of that!
Hi Julia,
Amazing job! The kitchen is looking great is is really fun to watch as it transforms. I am curious… how do you drill the holes for the faucet?
Thank you!
We just used a 1 1/2″ drill bit through the plywood and then added a same-sized blue board foam piece into the hole before we poured concrete. Similarly to how we did the sink. :)
You stop it right now. This is exactly what I want someday! I keep telling Logan that he will pour me some counters whenever we buy a house and I want concrete! I am sold on the white. How bright and beautiful is your kitchen?!?! Wish we could be up in Rexburg with guys!
So nice! Come to Rexburg, the water’s warm! (no it’s not.)
They are so gorgeous! I love that you went with white.
MAN, this is good. SO SO SO good. I would LOVE to do something like this, now I have to think on where I can do this in our home. love the attention to detail you guys put into each project. It looks a million times better than the other concrete counters you see on the internet. WELL DONE
Thanks so much, Brittany! Your comments always make my day. :)
How did the Pugmires do in the contest they entered? Did they win anything?
What awesome friends, by the way! It’s great that you’ve been able to help each other out with DIY projects.
I owe you guys an update on that! They didn’t win the grand prize, but they got an awesome opportunity out of the whole thing. I’ll write a whole post on it when their house gets a facelift next month–wooott!!! And you’re right, it’s awesome to have such great friends.
They look elegant and strong. I love them.
This is amazing!! I would love to try it someday. Thanks for sharing every detail! What do you estimate the cost to be on a square foot basis? Great job!
If the total cost was $856, dividing that by the square footage of the counters (35 sq ft) works out to about $24 a square foot. But that does include all materials and tools, too. Not JUST the concrete.
These look really really cool! If you can get detail shots, I would love to see some of the color variation you mentioned!
LOVE.
It looks awesome! Addicted to Decorating used the Z system too, but it is really interesting to see the contrast between your counters. Hers is much more traditional, but as you described I like your more industrial vibe. This kitchen is awesome. I cannot wait until you have cabinet doors!
These look amazing! I’ve done the ardex feather finish on countertops and was not too happy with the result, but these look so great. I would love to know what your final costs were. I also wonder how much the white will stain and age over time. The feather finish countertops got all kinds of oil stains despite sealing it multiple times and using a wax on it.
Hi Dan,
The final cost breakdown is:
The concrete mix: $29 a bag x 14 bags= $406
Square Edging: $180
Fiberglass Mesh: $50
Z Clips: $20
Z Gem Pad (Diamond sanders): $60
Magnesium Float: $26
Zinc Trowel: $39
Screed: (DIYed)
Plywood: $45
Silicone: $15
Blueboard for sink: $15
TOTAL: $856
I am going to update the post with this information since a couple people have asked! Also, I’ll go over the sealing process next week, but we spent a good chunk of change on just the sealer (Stonelok E3/2K Epoxy/Urethane countertop sealer) that is supposed to lock all of that stuff out but time will tell.
cutting boards!
Wow! Looks great! Thanks of the in-depth tutorial and videos too. Great info here. Can’t wait to see more! :)
Love it! So beautiful! We are about to embark on our own kitchen gut and reno so it’s great inspiration reading you blog! So I was wondering…can you share details on the cost? Or just a general it was so much more or less expensive than that amount of granite or Quartz? I want to know if it was a cost thing or just the esthetic and diy spirit that caused you to choose this.
It is a LOT less expensive than granite or quartz IF you do it yourself. Here’s the breakdown:
The concrete mix: $29 a bag x 14 bags= $406
Square Edging: $180
Fiberglass Mesh: $50
Z Clips: $20
Z Gem Pad (Diamond sanders): $60
Magnesium Float: $26
Zinc Trowel: $39
Screed: (DIYed)
Plywood: $45
Silicone: $15
Blueboard for sink: $15
TOTAL: $856
It wasn’t necessarily a cost thing for us, although this kitchen is definitely a mix of splurge and save to keep us in a reasonable budget. We also truly love the look of concrete, especially this white concrete and thought it would be a fun project to try.
Awesome! Thank you SO much for giving this cost breakdown! I love your counters. Now just have to show them to my hubby!!
Is there a Z Counterform distributor in Utah? Or did you order yours direct? I’m not too excited about paying shipping and handling for bags of concrete… :)
This is so helpful!! Kitchen looks fabulous. What was the shipping cost? I imagine it to be a crucial part of the total cost. I would love to know. On the website from the concrete you used they don’t give a shipping cost untill you order.
Simply Gorgeous! We renovated our kitchen one year ago and I wanted concrete countertops but couldn’t find an experienced contractor. We ended up splurging on white quartz. In the end, I love the look of the quartz but wished I had tried something new. Now, with your tutorial,l we may be bold enough to try it on a bathroom vanity?! I can’t wait to see the final kitchen reveal.
Wow! I love it! Can’t wait to see it paired with the island top….and the cabinet fronts of course lol
Yes! Cabinet fronts stat!
The light!! The white! It’s all gorgeous. And I love the gritty industrial specks in the smooth classic white counter tops. It’s such an interesting balance. The thickness is what makes them look so rich and modern to me. You explained the process really well. It’s a huge DIY project, but those Z products make it seem so much less daunting.
Couldn’t have done it without your constant positive energy Corine! xo
So,once it’s sealed, how is it cleaned and kept sparkly white? Do you have to use special products on it?
I’ll definitely go over that once we seal it next week. :)
These are Awesome! I cannot wait until the final Kitchen reveal! Will you be doing a cost break down of your kitchen reno? I need to tweak my kitchen and get rid of my countertops!!!! Please give us the info about the sealer!
I’ll go over everything sealer in a post next week, but we used Stonelok E3/2K Epoxy/Urethane countertop sealer.
They turned out great! Must have been quite a process :-)
Thanks Morgan, the process took all day on Saturday and then a couple hours Monday evening. Not too daunting.
They look SO good! Love how thick they are and the contrast to the dark lowers. The light is literally pouring into your kitchen now thanks to those windows! Can’t wait to see what’s next!
We did our countertops but they came out like an oatmeal color. Any suggestions on how to make them white?