


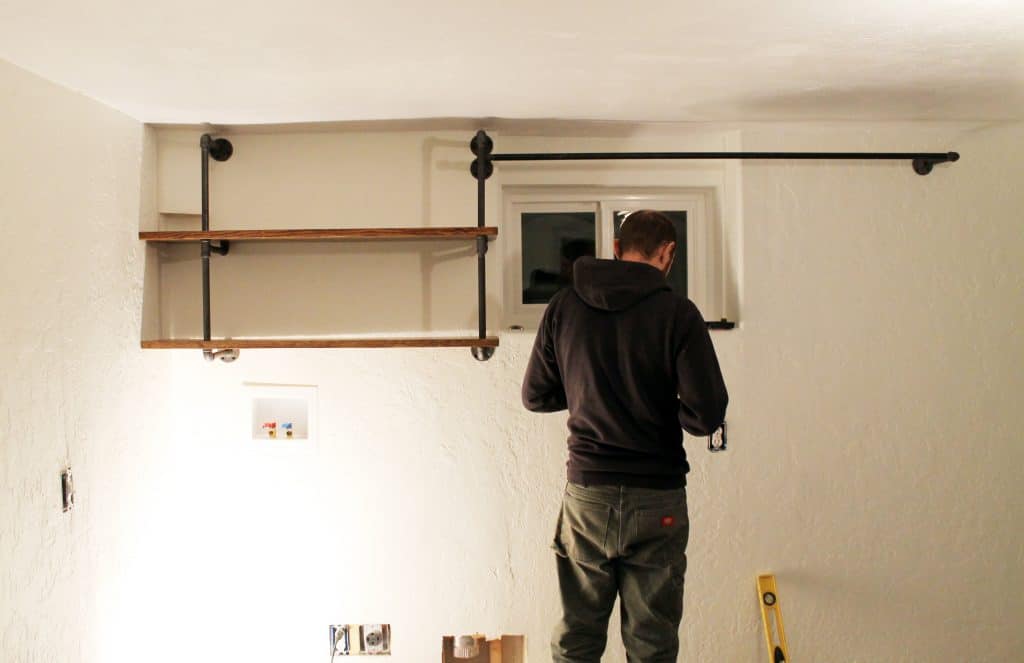
Last time I updated you on the laundry room project we were working on at our friends’, Preston and Corine’s home, we got the walls up, textured and painted and the floors started as well. This week we are finishing everything else up (you can check out the mood board for the space here) and we’re shooting for a reveal next week! Eek. There’s still quite a bit of work to be done, but it all feels fun now and we’re all excited that the end is in sight. One of the projects we (and by we, I mean Preston) tackled last week, was the industrial pipe shelving we planned for over the washer and dryer.

We decided to go this direction for a few reasons: 1. The room is on the small side with lower ceilings and this shelving keeps everything very open. 2. Since Ace threw in a gift card for the project, we wanted to use something available to us–all the piping and hardware we got from Ace and the stain and poly for the shelves, too–we’ll get there in just a minute. 3. Since this laundry room doubles as a threshold to their entire downstairs, something that looked as good as it functions was a plus.
Of course you can customize the cuts and sizes to your own space, but here’s how the Pugmires figured out the shelving and clothes drying rack for this room. Take it away, Preston!
Materials Needed For the Shelves:
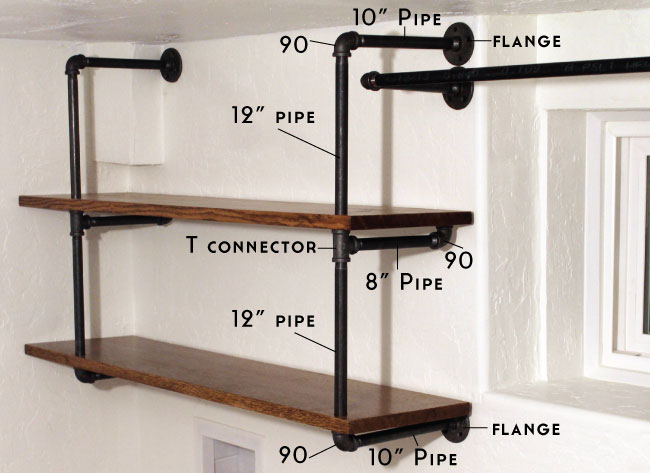
Black 1/2″ pipe. Precut and threaded from ace hardware.
4 – 12″ pieces
4 – 10″ pieces
2 – 8″ pieces
6 – 90 degree elbows
2 – T connectors
4 – wall flanges
Materials Needed For the Hanging Rack:
60″ pipe
2 – 90 degree elbows
2 – 8″ pipes
2 wall flanges.
Here’s a drawing of how the pipes came together from the side:
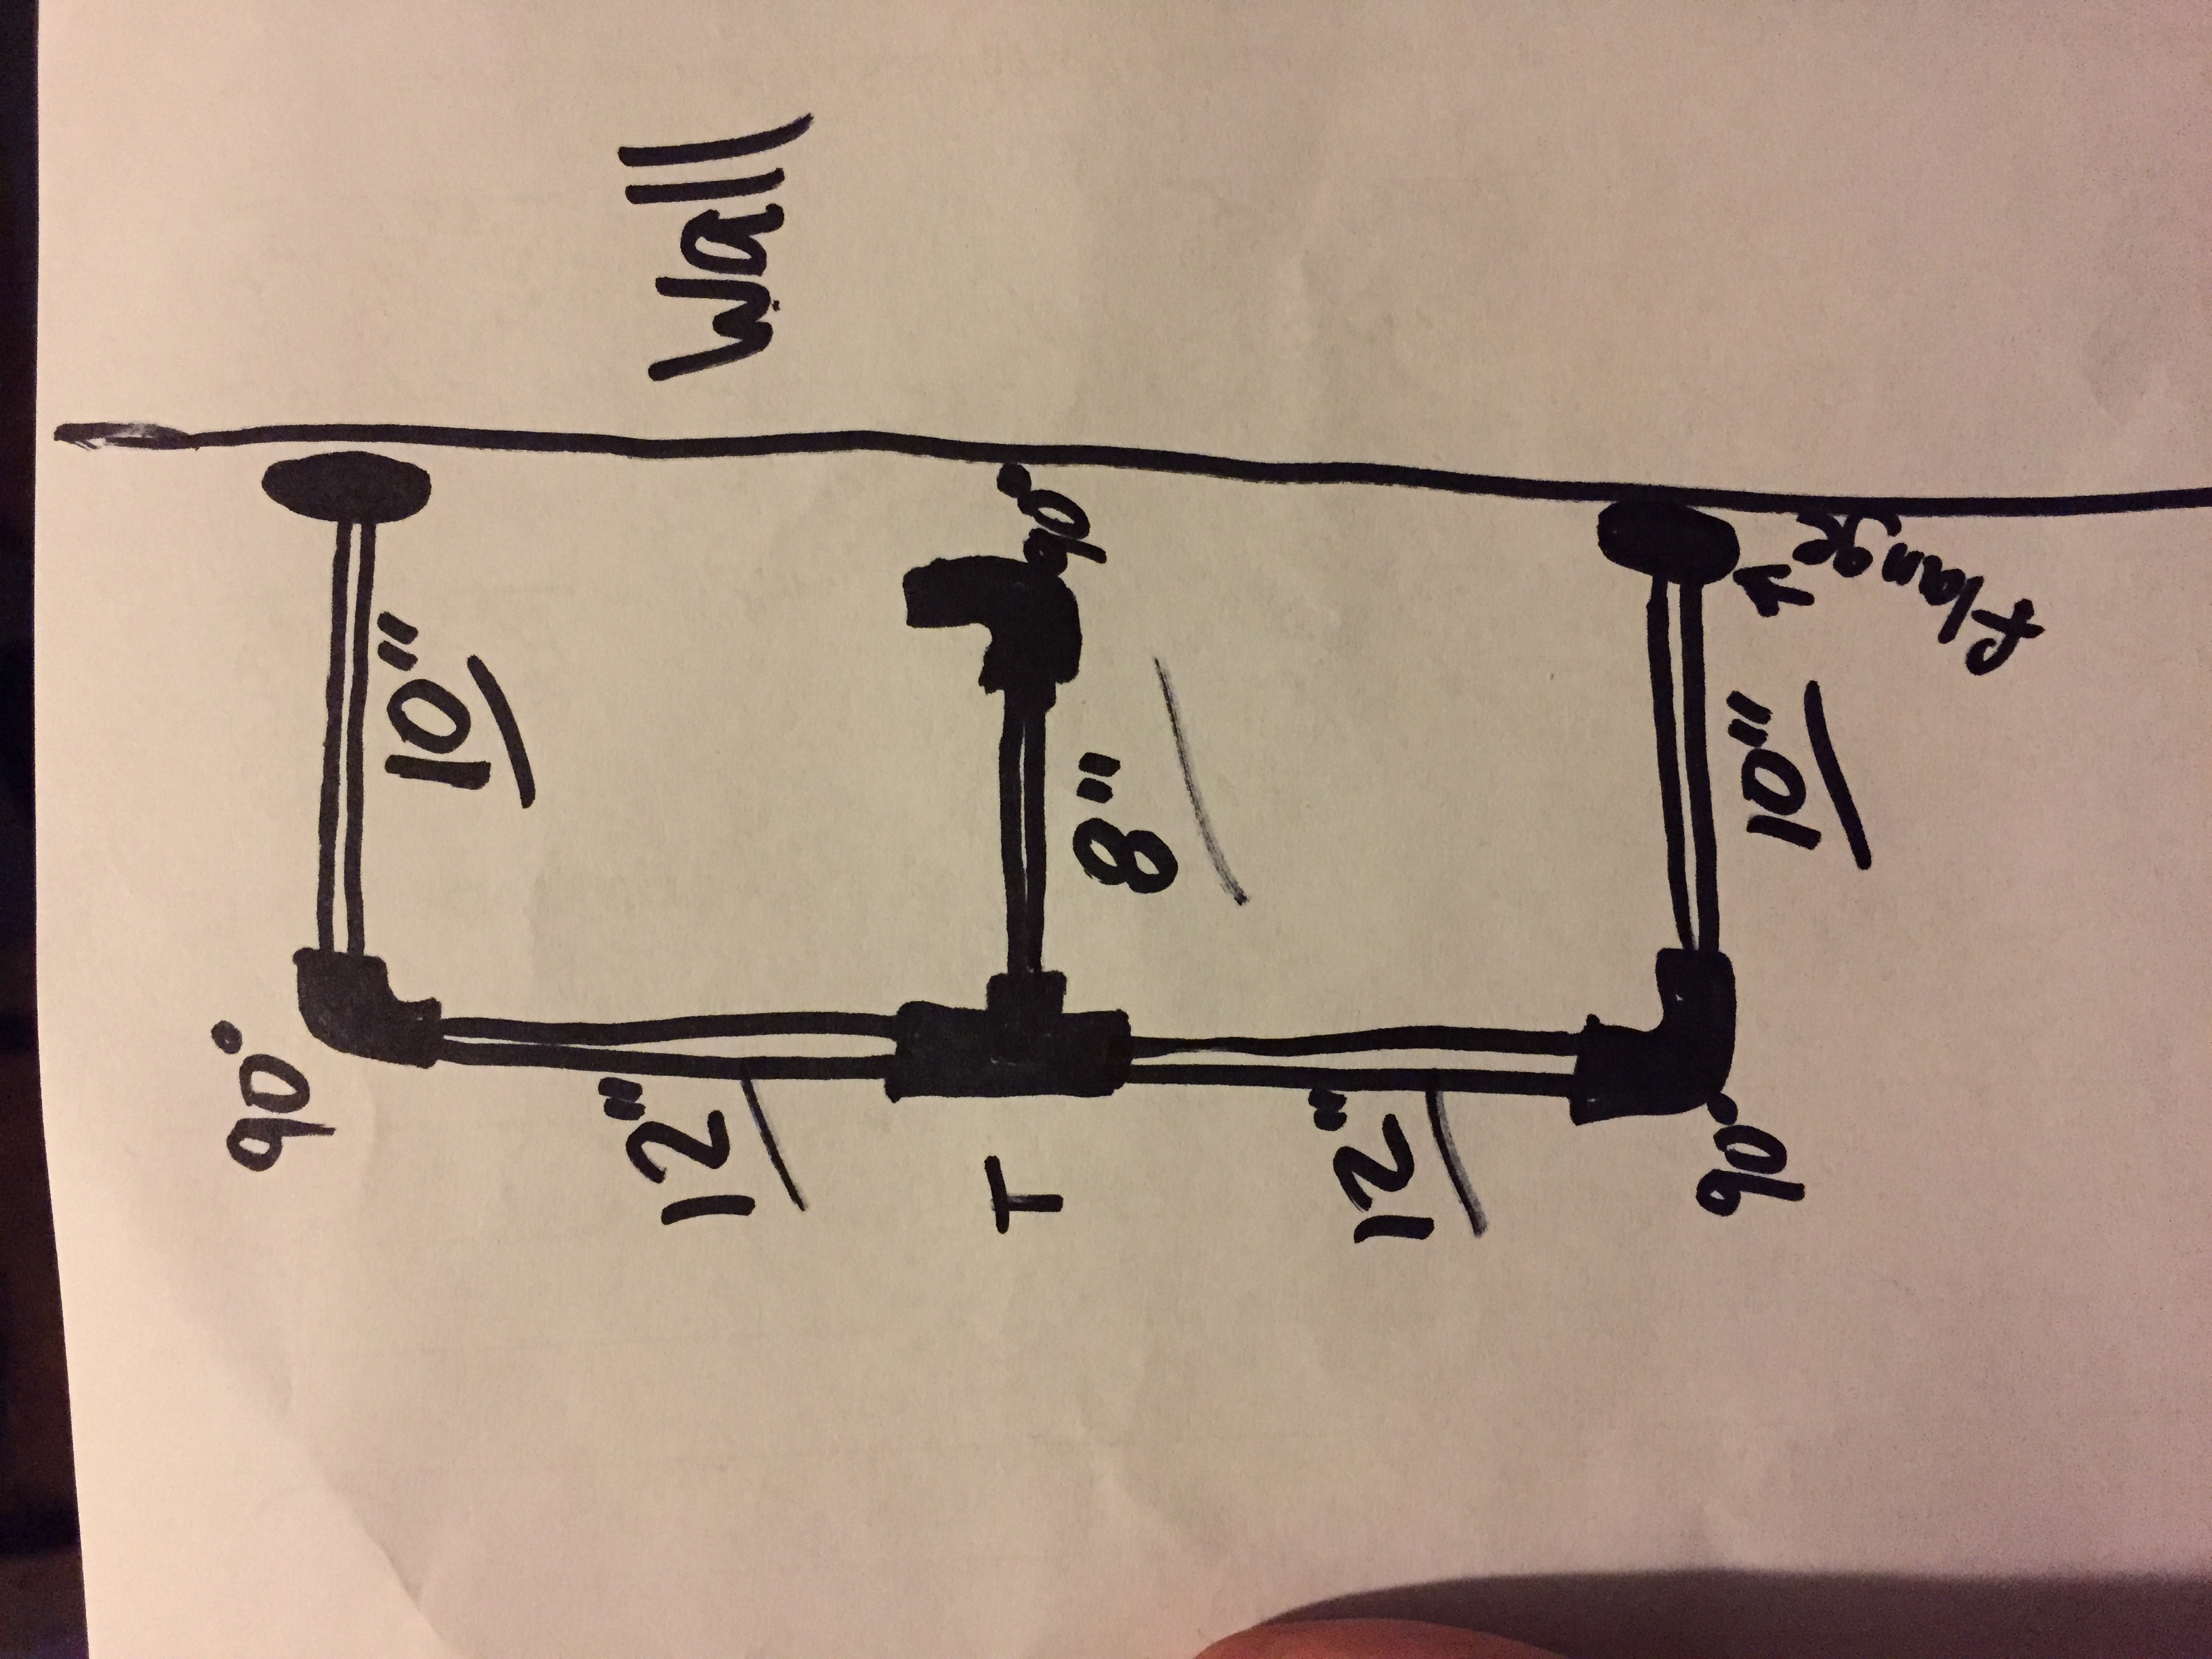
The reason the top one and bottom are 10″ and the middle one is 8″ is because the middle one has a 90 degree elbow on the wall side and the top and bottom ones only have flanges. If there was a 10″ pipe in the middle the 90 elbow would not have fit against the wall. Make sense?
For the shelves themselves, we used 1″ thick white oak boards trimmed down to 11.5″ x 44″ stained with 2 coats of Minwax special walnut and topped it with two coats of minwax polyurethane. When drilling the holes for the pipes, take special note of the inside vs. outside diameter. We drilled 7/8″ holes for the pipes even though the pipes are 1/2″, that’s an inside diameter measurement. The outside diameter is 7/8″ which is how big we wanted the hole.
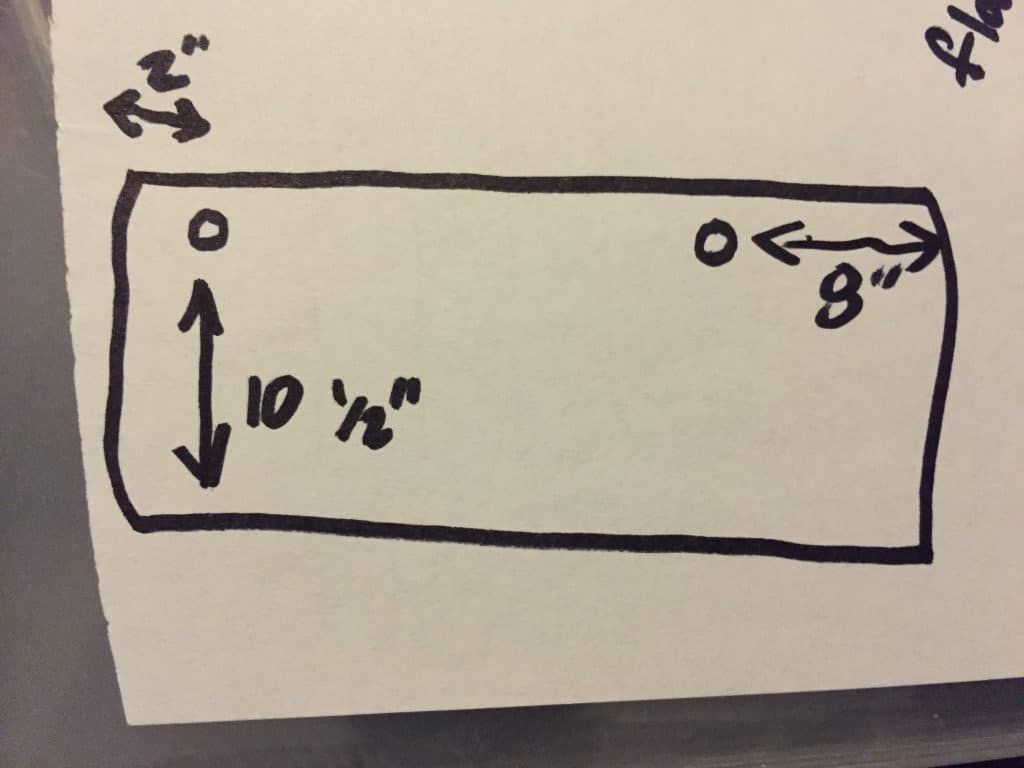
The center of our holes are drilled 10.5″ away from the WALL and 2″ away from the side.
On one side of our shelves we had to make the hole 8″ away from the side because of an obstruction in the upper corner of the room, but that’s specific to this space and no one else will have to deal with that.
Putting it all together:
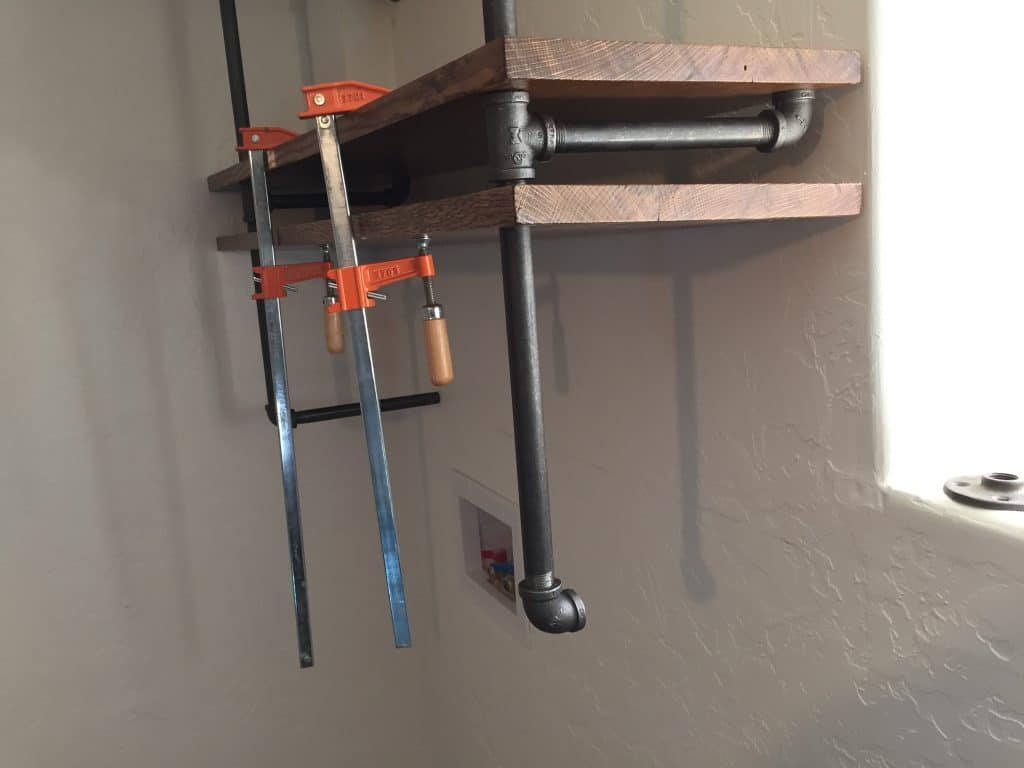
Start assembling the whole thing from the top down. When you need to put one of the shelves on the pipes, using clamps to hold it on while threading the lower pieces on work great if you don’t have an extra set of hands.
We were lucky enough to start this project with the walls open, so studs were placed where we knew we were going to need them–especially for the drying rack. But even still, we had to use a few anchors along the way. I picked these up from Ace for those areas:
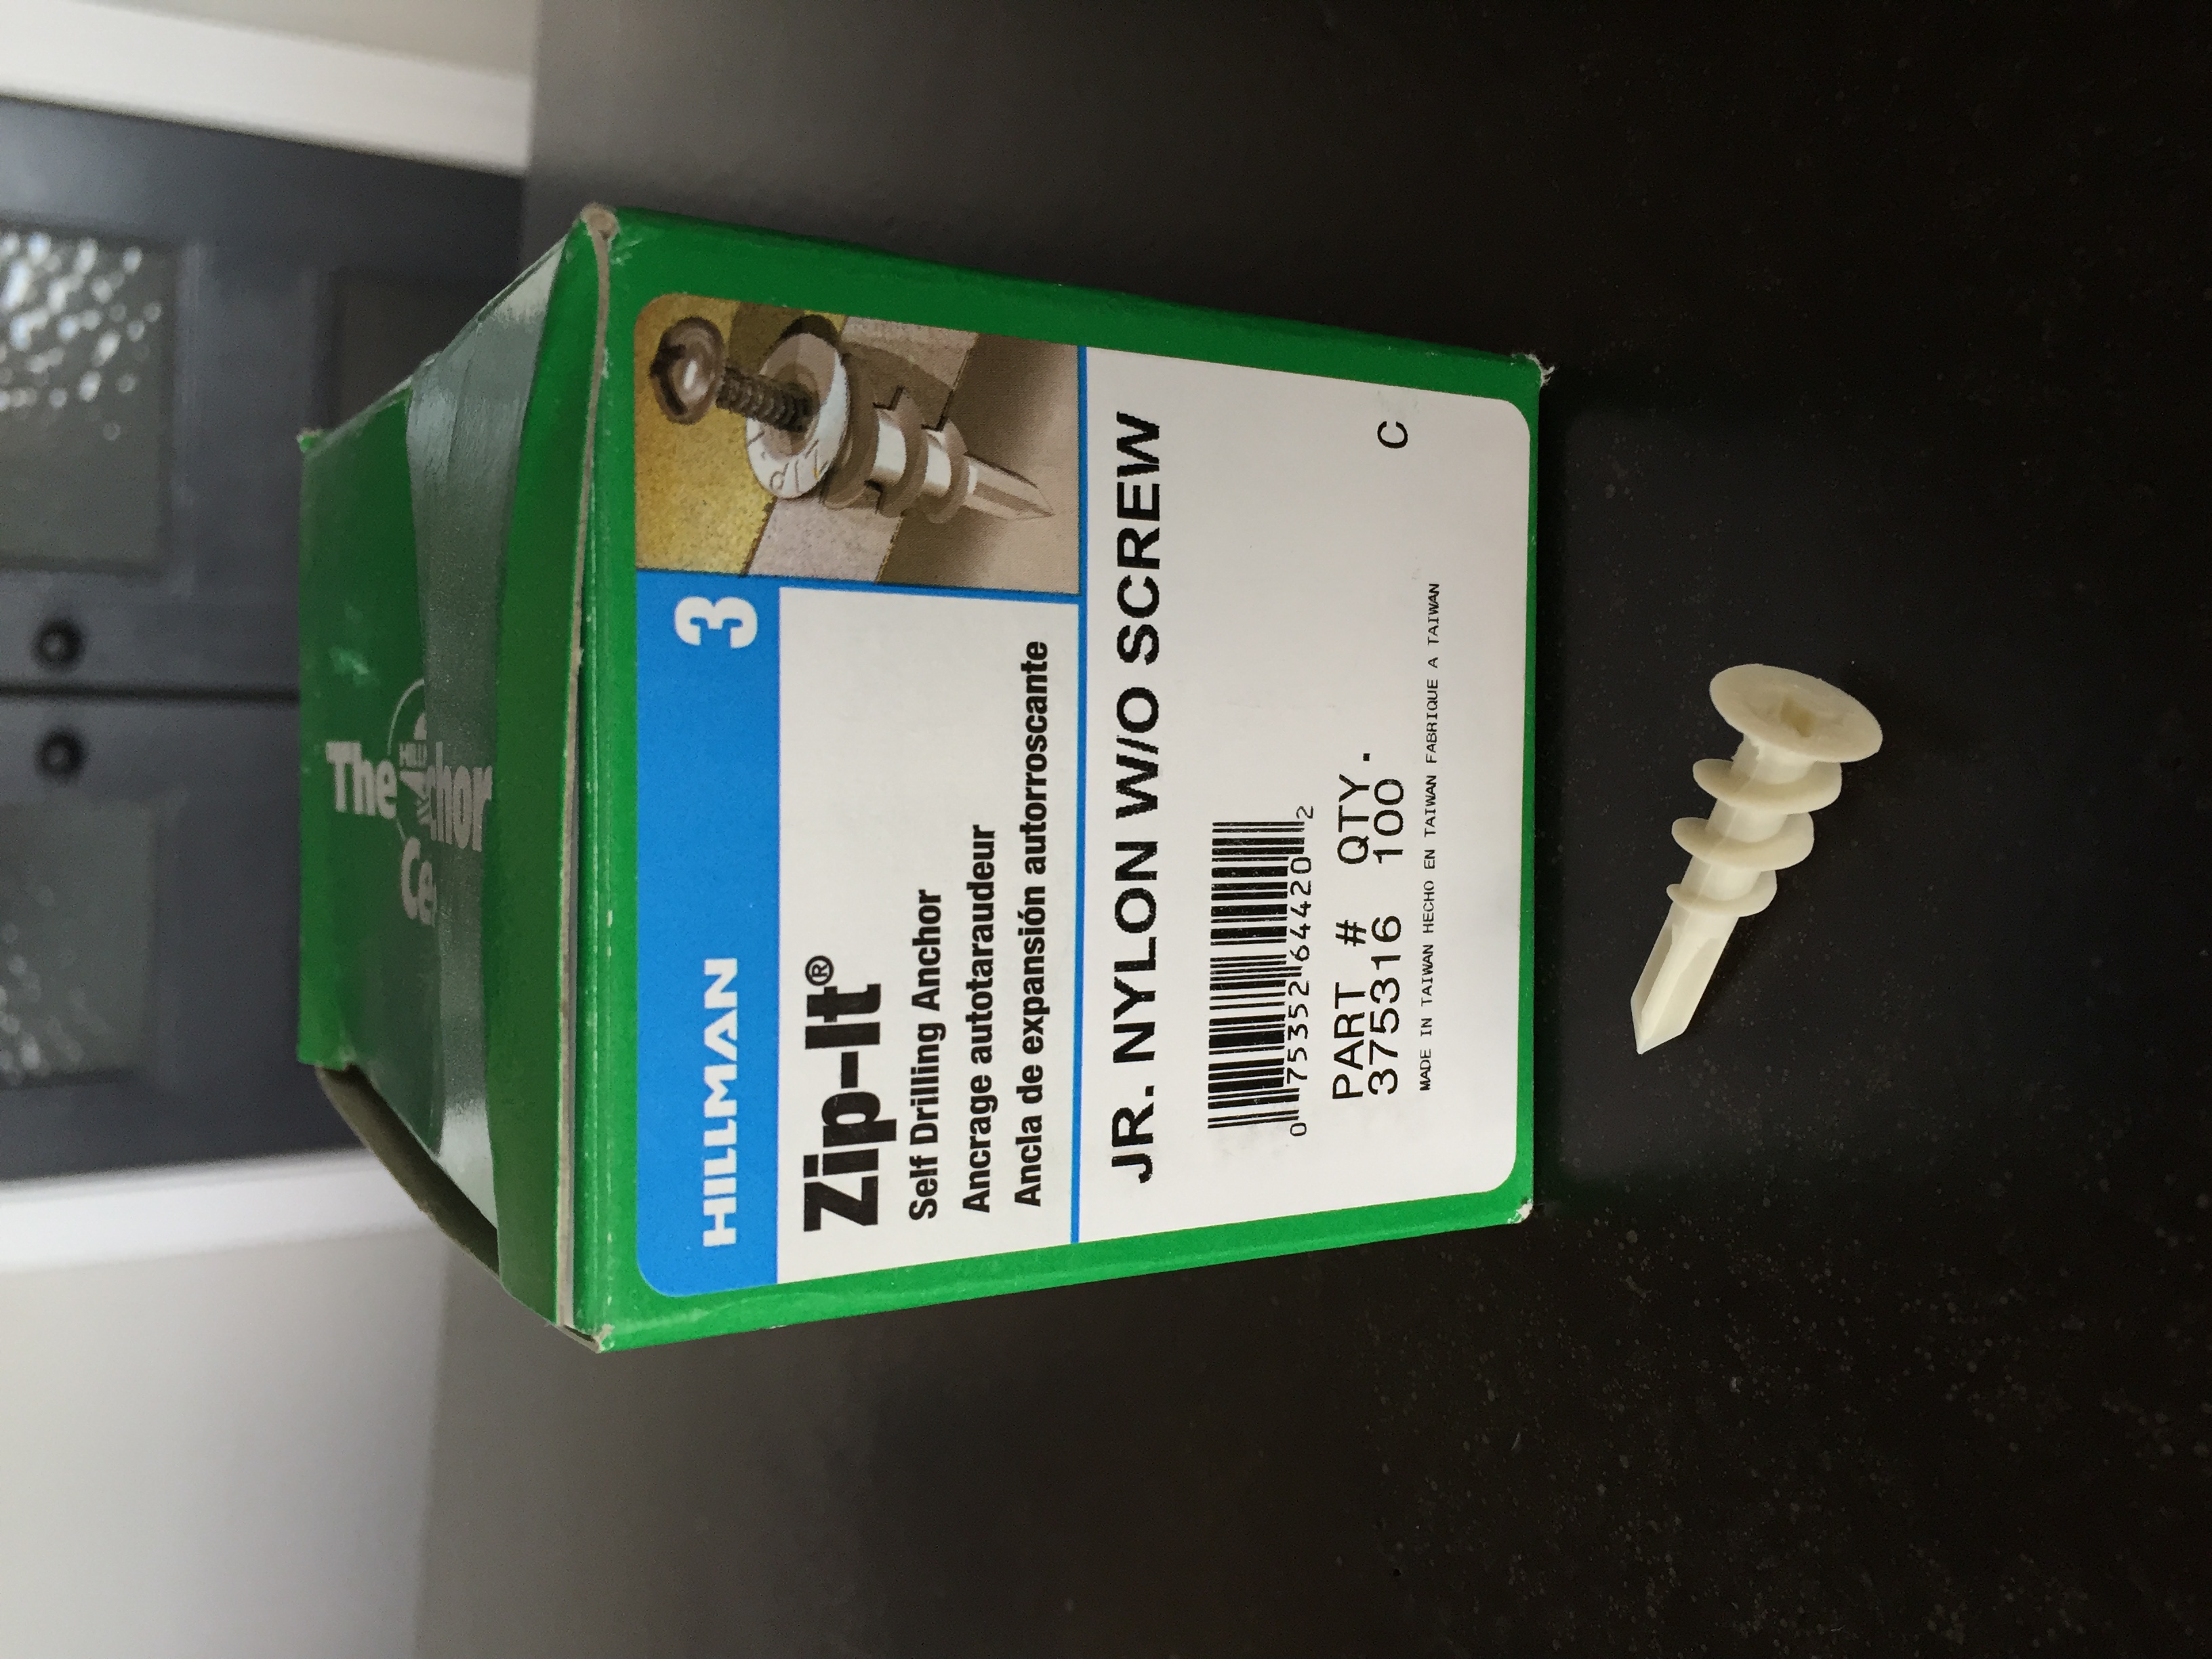
These are awesome, easy-to-use anchors and sturdy, too. One challenge I faced was trying to decide about the pipes on the left side of the shelf. The box up in the corner (that I made, meaning I created the problem) made it so the piping could not be symmetrical. At first I wasn’t sure it was going to look alright, but I think it turned out pretty good. The drying rack on the right balances it out and it goes to show that every house is different and will create different obstacles but each little job can be tailored to your taste and needs and can come out looking good even with interesting and frustrating obstacles.
Another challenge we ran into that didn’t come up on any industrial pipe shelving tutorial online is this: The top shelf is supported by the T section and the 90 degree elbow. They end up being the same height off the supporting 8″ pipe. But the bottom shelf has an elbow and a flange. The flange does not support the shelf like the T section or the elbow. So I had to do this:
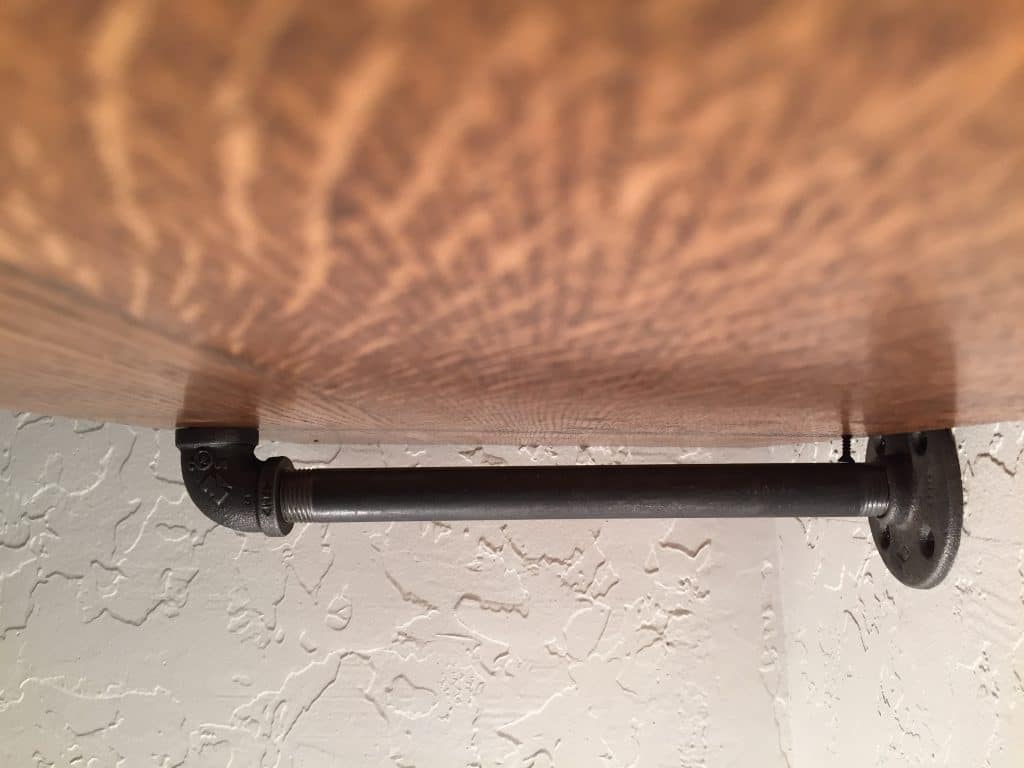
Using a screw to bump up the back seemed like a good solution to the problem at the time, but I realize now that it looks a little temporary–even if no one will see it. So before the project is finished I’ll likely get a 1/4″ dowel to fill in the gap.
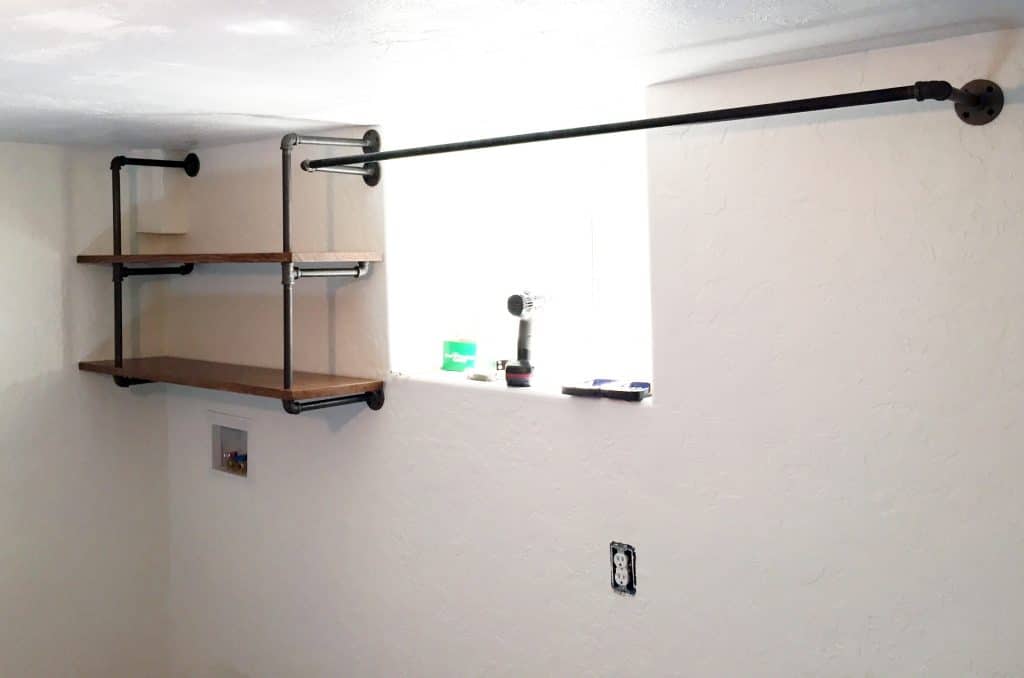
Thanks for the breakdown, Preston! I just love the way the pipes for the shelves interact with the drying bar.With the shelving in place, the room is really starting to go a direction we can’t help but get excited about. The next time you see these, they’ll be loaded up with glass jars filled with laundry soap, baskets, and maybe a succulent or three. ;)
To see more posts about this laundry renovation, click here and follow the hashtag #pumirelaundry on Instagram for sneak peeks. Special thanks to our sponsors Wayfair and Ace Hardware who so generously provided the means to renovate our laundry room and then allowed us to forward it onto someone else who needed it–they’re the best!
Leave a Reply
What do you think?


Semihandmade
Our wood grain Shaker cabinet fronts were designed for busy, high-traffic homes like ours. Clad with durable textured thermofoils, this line is compatible with Sektion, Akurum, Godmorgon, and Besta cabinets from IKEA. It's the perfect, practical way to add the warmth of wood to all the rooms of your home.
Collaborations
learn more

next
Loloi
We have teamed up with Loloi to create a line of rugs that are as affordable as they are beautiful. This collection houses a great mix of traditional and modern rugs, in cottage-y colorways, as well as vintage-inspired beauties that you’ll want to roll out in every room.
Collaborations
learn more

next
STUGA
We partnered with Stuga on a line of hardwood floors — The Ingrid is really livable, and the color is very neutral. It doesn’t lean warm or cool, it’s that just right in-between. We have really loved putting it everywhere in our house. It’s the best jumping-off point for design, no matter your interior style. In addition to being beautiful, Ingrid is really durable — we have three kids, and we always have a home construction project going on. Ingrid stands up to it all.
Collaborations
learn more

next


SHop all
What We're Right Now
What We're Right Now
Looking for our favorite things? A place to shop our home room by room, or just catch up on what Julia's wearing / loving right now? Browse the CLJ shop.
Loving


Portfolio


Design
Befores, afters, mood boards, plans, failures, wins. We’ve done a lot of projects, and they’re all here.
BROWSE BY CATEGORY
let's break this thing up
We have a long-standing relationship with DIY, and love rolling our sleeves up and making it happen.
Projects
Even when you don’t want to rip down a wall, you can make that space in your home better. Right now.
read more
read more
read more
02
01
03
looking for inspiration?
A reader recently asked me if I’m starting to fully embrace traditional style and whether we still consider our house to be a “modern Colonial” and why. It was a really great question and so timely — I had really just been thinking about my approach to this home and how my style has changed […]


SEARCH THE BLOG
We've been doing this since 2009 and we've posted a whopping 24145+ blog posts and counting. You might need a little help searching, huh?
looking for something?
find stuff like:
")
Can We Send You Our Love Letter?
Another way for us to stay in touch! Joining our weekly newsletter gives you access to exclusive content, never-before-seen photos, your questions answered, and our favorite DIYs. Sign up below!
Follow Along on Instagram
Welcome to our online community where we've posted home, DIY, style, renovations, and family since '09. Renovating our #cljmoderncottage in Idaho and headed for new adventures in Raleigh, NC. #cljfam #cljtransformations
@chrislovesjulia


Links
Get Around
Make yourself right at home
Portfolio
Design
Casual Friday
Projects
Lifestyle
Gift Guides
All Posts
Shop
Love where you live.
Social
RivrLinks
Links
Get Around
Make yourself right at home
Portfolio
Design
Casual Friday
Projects
Lifestyle
Gift Guides
All Posts
Shop
Love where you live.
Social
RivrLinks
Do these pipes not leave black oil residue?
How much space is between the 2 shelves? I am working on a wall of shelves and I need to make sure I account for proper measurements. Thank you.
These shelves are probably about 13 inches apart, but you’ll just want to determine what you plan to put there and then measure whatever that is. If you have a certain laundry detergent you use, for example, and that’s going to be on the shelf, measure how tall it is and make sure you have enough clearance.
My wife showed me this post and said “make it.” One thing I want to add to this project is instead of a dowel or screw to hold the bottom shelf up, I’m gonna make a saddle piece to be attached under the shelf. Imagine a small block with half of a 7/8 hole drilled at the end. This would keep it from sagging and also add to more resistance to side to side movement. Good post.
I wish we could do this in our rental but we have a wall of windows in our laundry room over the machines. I love the light I just wish there was more storage!
“a wall of windows…” I’ll trade ya! Haha
I love these shelves because they are totally customizable to fit any space and in any configuration. We did a DIY pipe shelf in our living room. And…to solve the problem on the bottom shelf…use a T-connector….you will have to have the 10″ pipe cut and threaded, or just buy shorter pipes so you can add the T-connector for the bottom shelf to rest on. Get it? Kinda hard to explain. You could have even done the T-connector on the top 10″ pipe that screws into the wall and then had the drying rack at the same level, instead of below it. Do you know what I mean? Excited to see the finished room :)
I like the shelves but I think they would look a lot better if you cut of a bit on the left side.
Hi Julia, shelves are looking great. I have a question about the hanging bar..Will a standard size hanger be able to be used there? Thanks!
Yup!
I love this look but I don’t think I could ever make it diy. Those drawings got my head spinning!
Oh Meagan. I’ll help you. ;)