


This post is in partnership with MINWAX®.
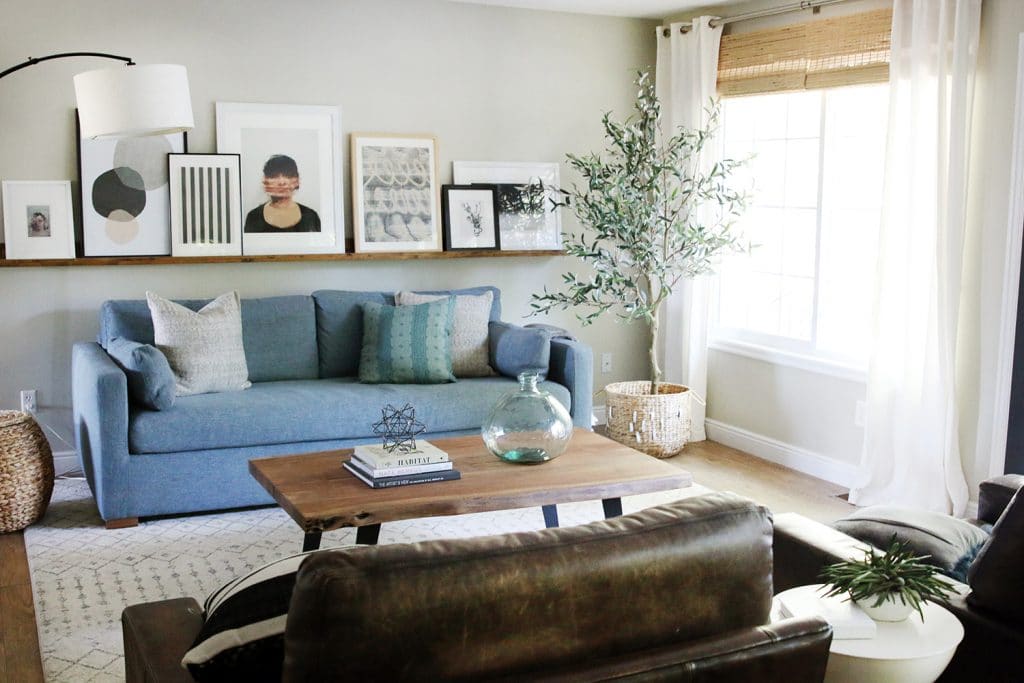
Ever since we made the art ledge in our living room four years ago, we’ve loved seeing them pop up in so many of your homes. They are such a functional way to display art, but finding one that is the perfect size for that wall in your home can be tricky (and expensive). Although it’s one of the easiest DIYs out there, we realized we never put together a proper tutorial to follow…until now! Follow this beginner-level DIY project to make your own in one day with a few simple supplies.
Materials Needed
| 1×12 pine board | 2inch wood screws | 1 1/4in wood screws |
|---|---|---|
| MINWAX® Pre-Stain Wood Conditioner | MINWAX® Wood Stain | MINWAX® Polycrylic (clear matte finish) |
| paper towels | vinyl gloves |
Tools Used
| sanding block | paint brushes | driver |
|---|---|---|
| 1/8inch drill bit | wood clamps | circular saw (optional) |
Step 1: Prep the board
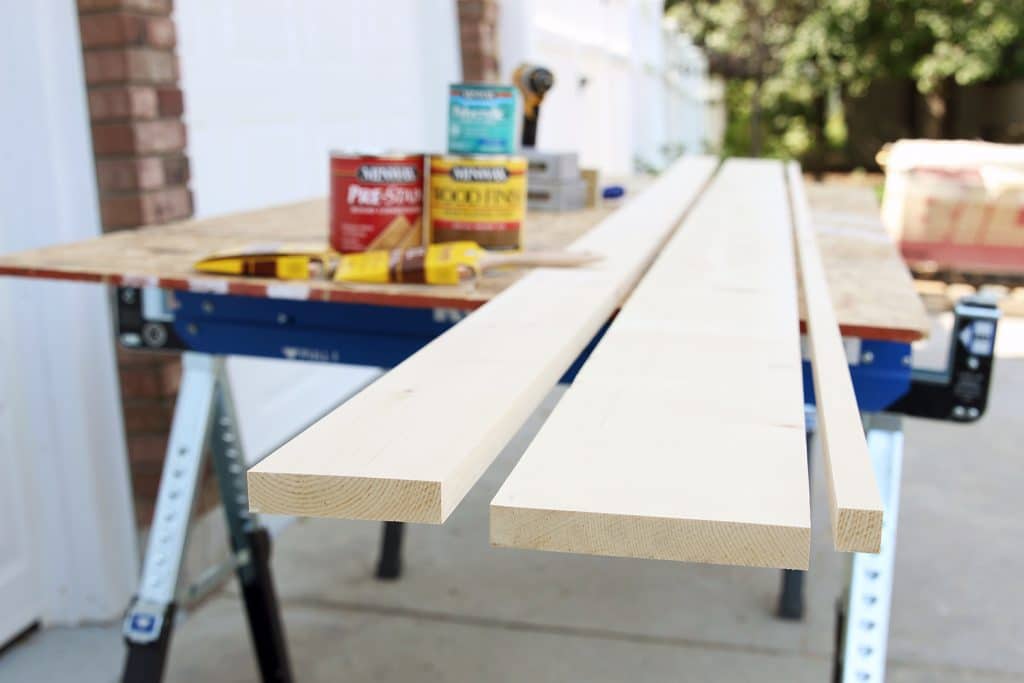
Believe it or not, you can make this entire ledge with one piece of pine wood. The pine board can be whatever length you like – ours is 10 feet. Out of this one 12in wide board we will create the three pieces for our shelf. Using your circular saw (or a table saw if you have one), rip the board into three separate pieces of these sizes:
– 5 1/2 inches
– 3 1/2 inches
– 3/4 inches
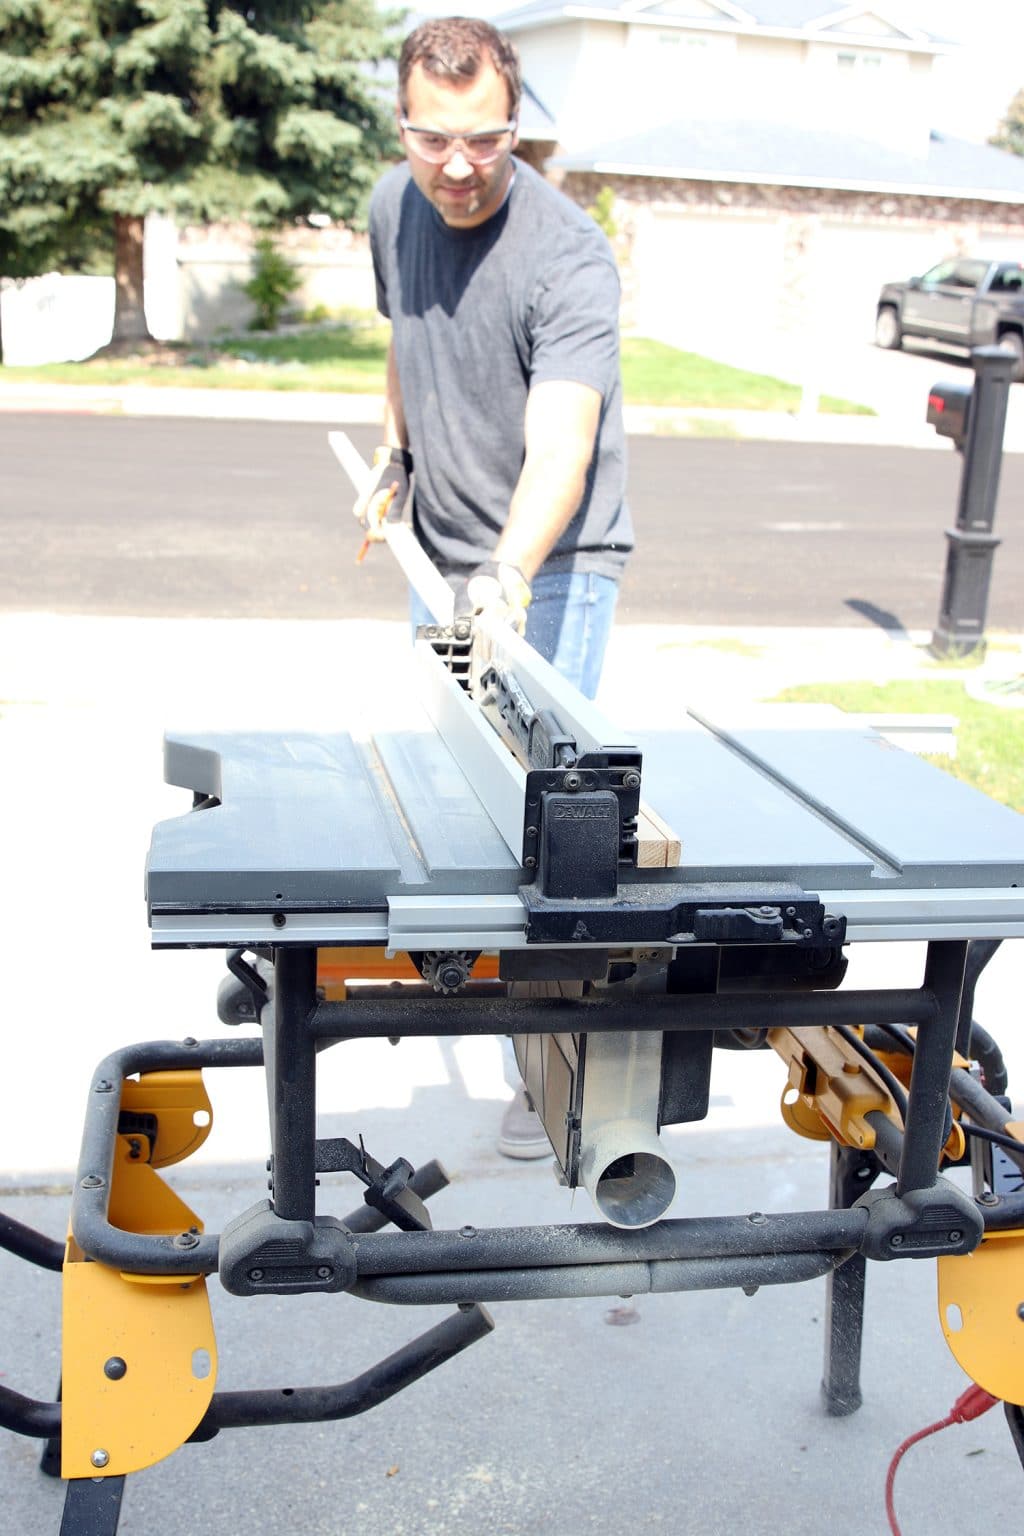
If you do not have a circular saw (or a table saw), Lowe’s can rip the board for you into these pieces. There will be a small piece left over which you can save as scrap for future projects.
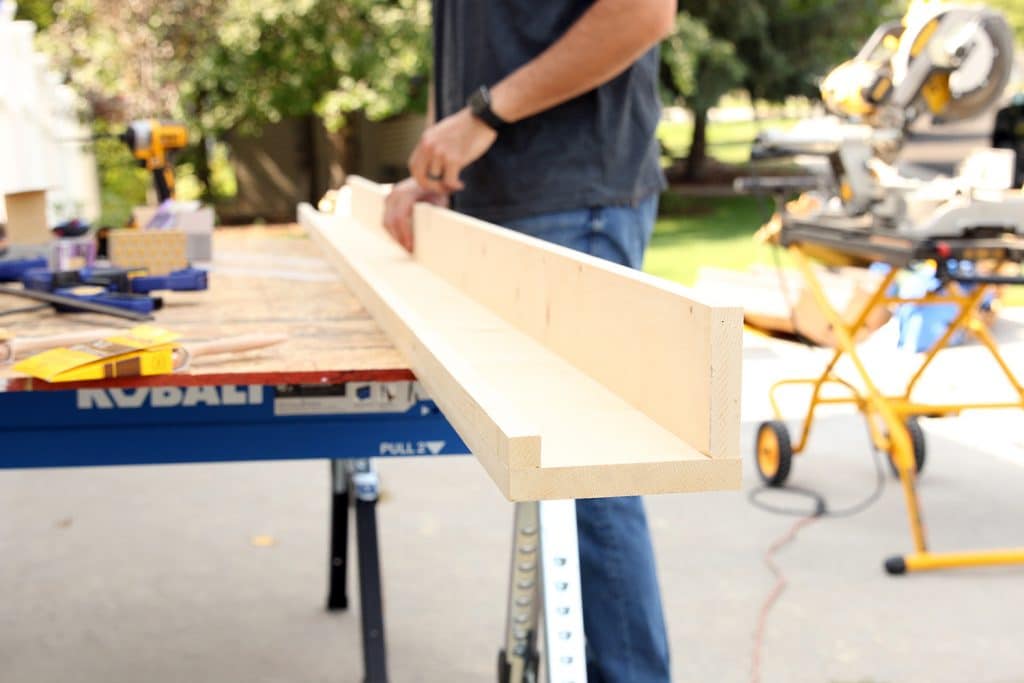
Step 2. Screw the boards together
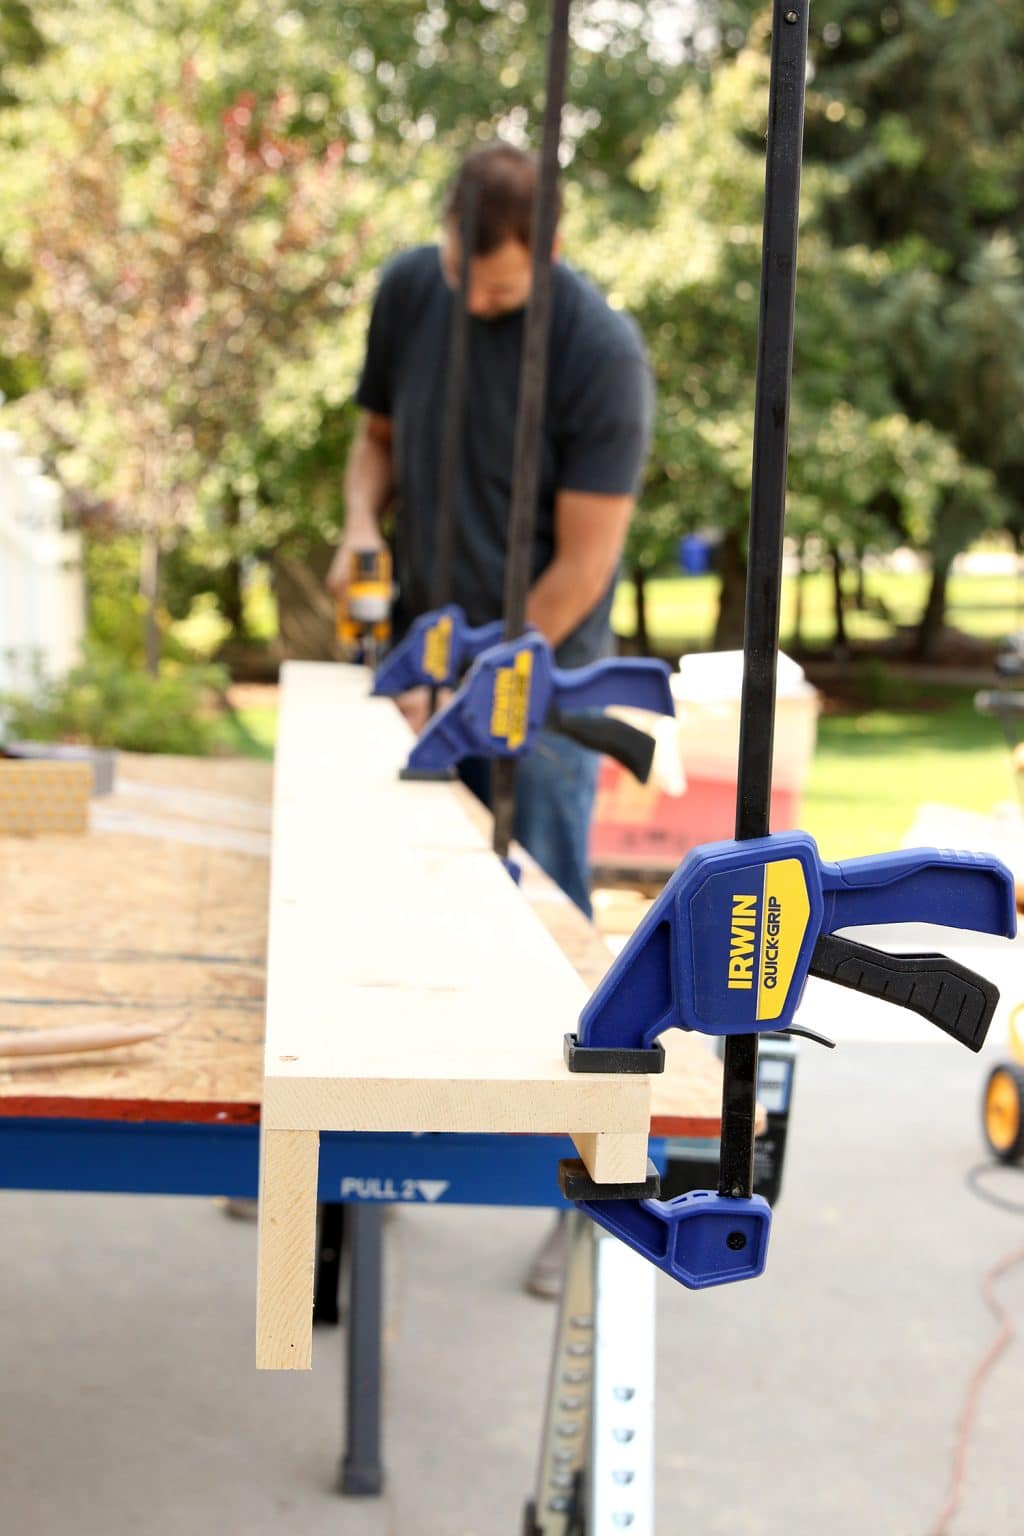
The 5 1/2in board is the base of the art ledge, the 3 1/2in board is the back and the 3/4in board is the front. Stand the back board up on top of the base, flush with the back and side edges, and clamp them together with wood clamps.
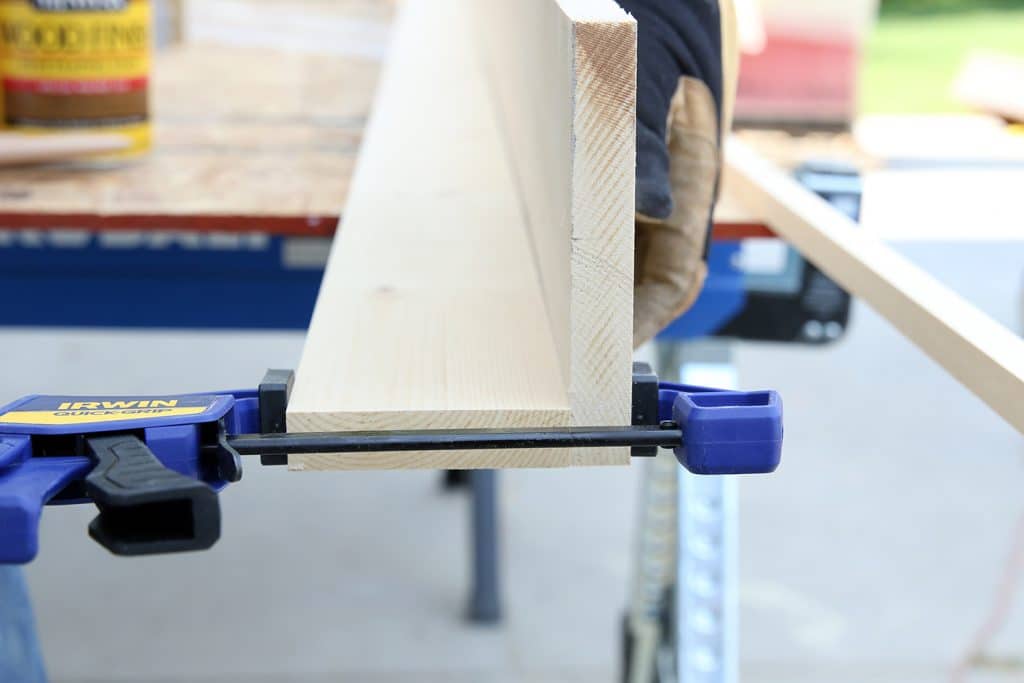
Using the 1/8in drill bit, drill pilot holes about 12-16 inches apart through the bottom of the base into the back board, being careful not to drill out the sides of the board.
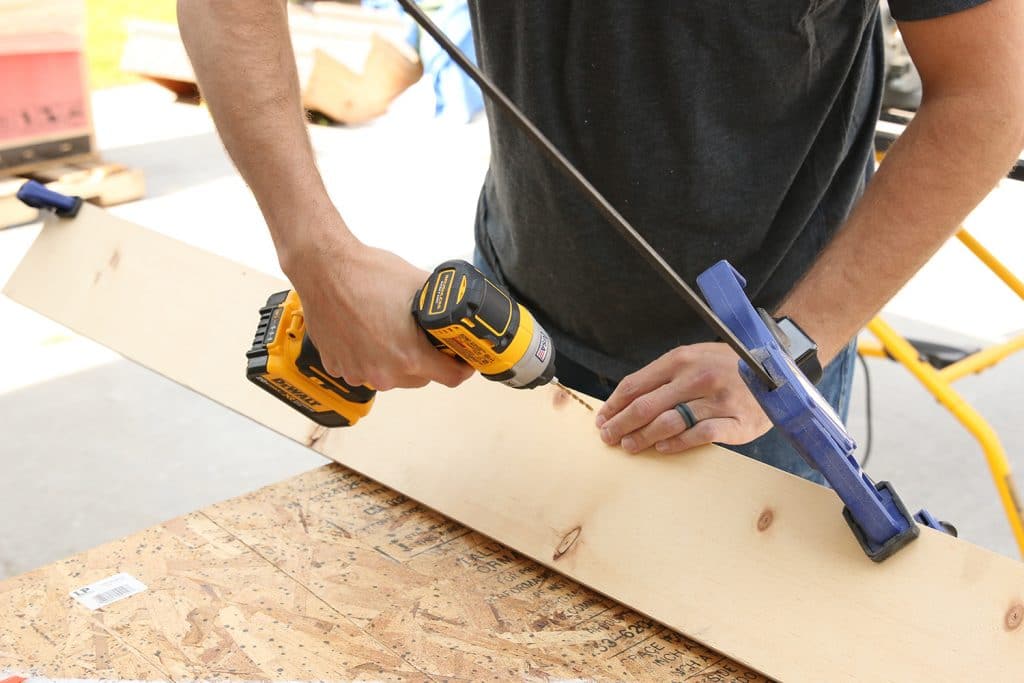
Screw one 2in wood screw into each of the pilot holes, countersinking the heads only slightly so they are flush or just below the wood surface.
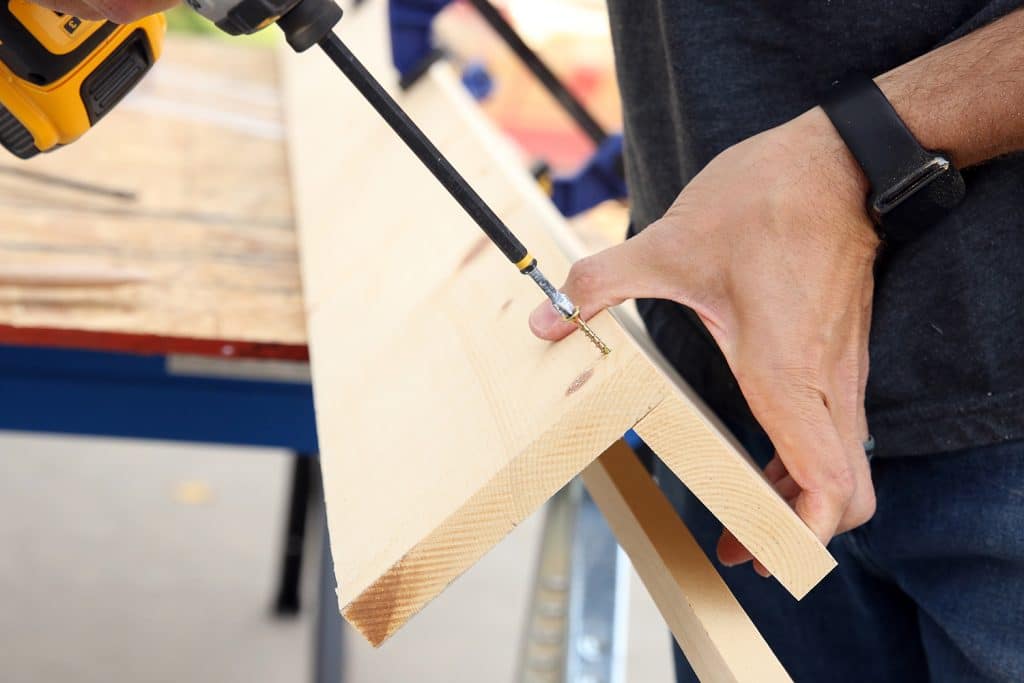
Repeat this process for the front, 3/4in board using the 1 1/4in screws. When drilling pilot holes, only drill through the base, and not into the 3/4in piece.
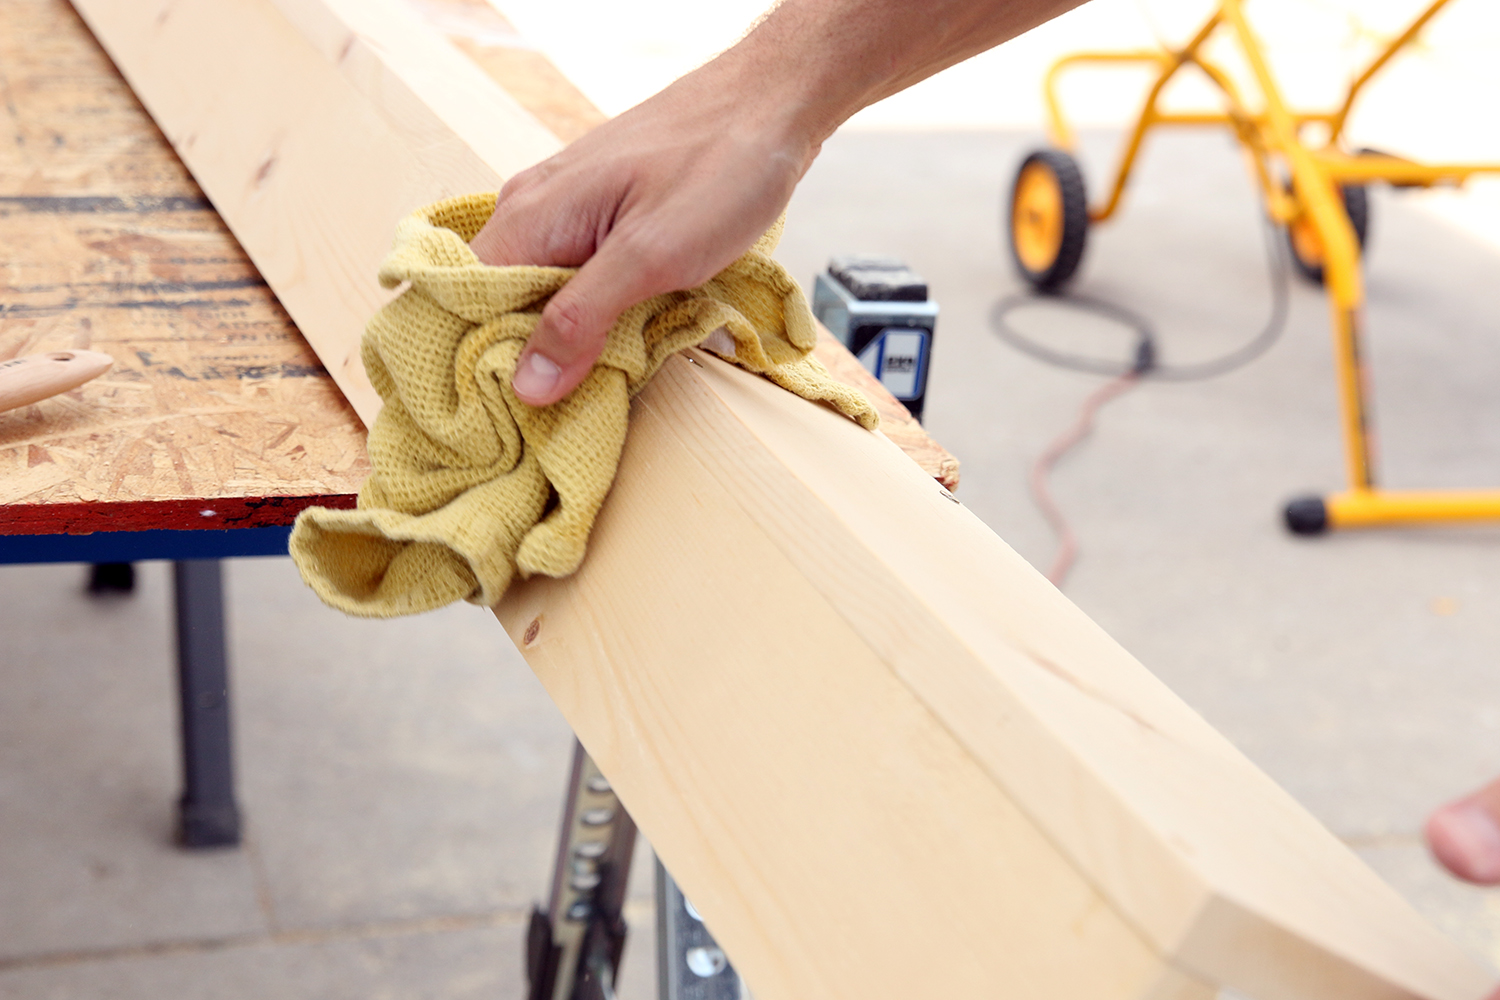
Step 3: Prep the ledge for stain
Using a fine grit sanding block (we used a 220 grit), sand all the edges of the art ledge to remove any splinters or roughness. Clean off with a dry rag or tac cloth.
Once sanded, apply a coat of MINWAX® Pre-Stain Wood Conditioner. Soft woods like pine tend to take on too much stain in some areas and not enough in others, making the finish look blotchy or uneven. Conditioner evens out the pores in the wood and helps it take the stain evenly.
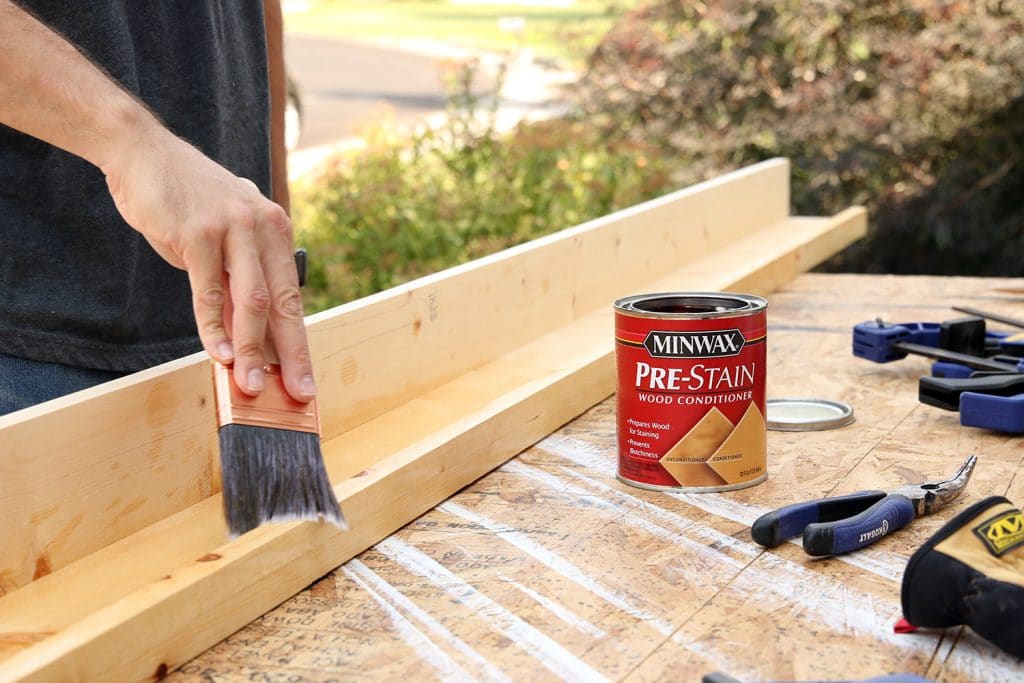
Apply one even coat over the wood, let sit for 10-15 minutes, then wipe away any excess using a paper towel and let sit another 5 minutes.
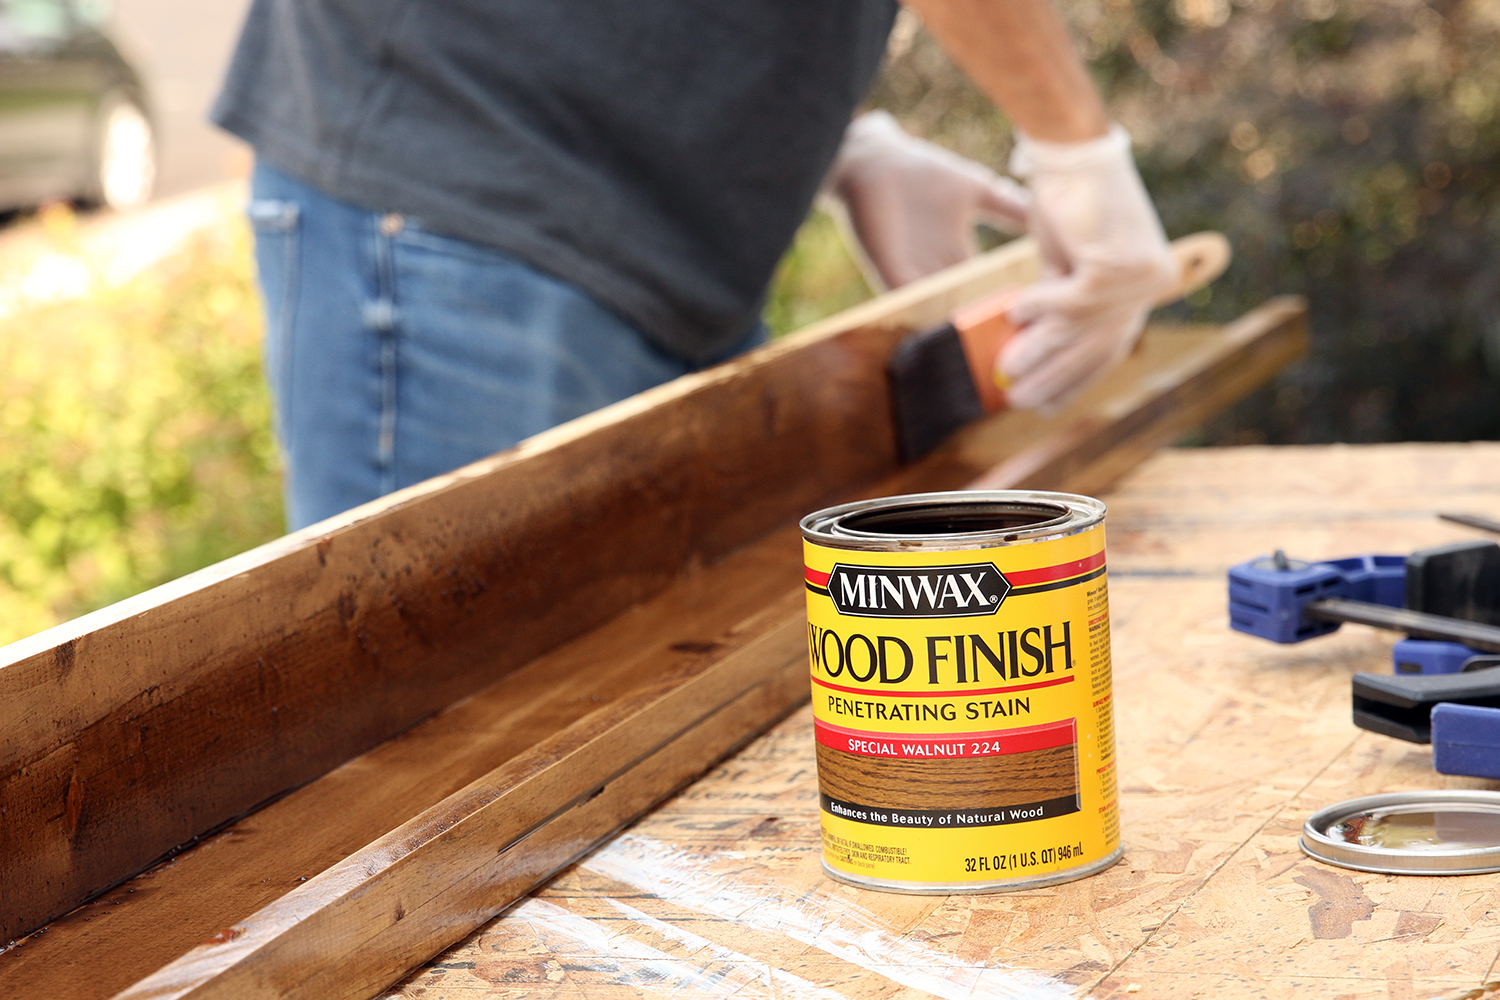
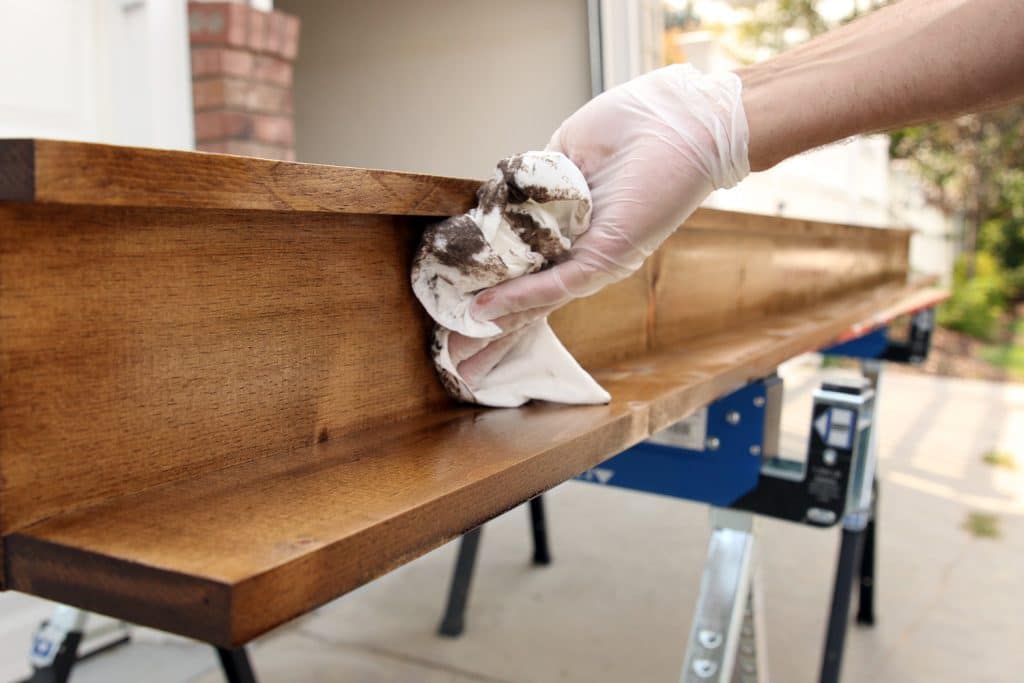
Step 4: Stain the ledge
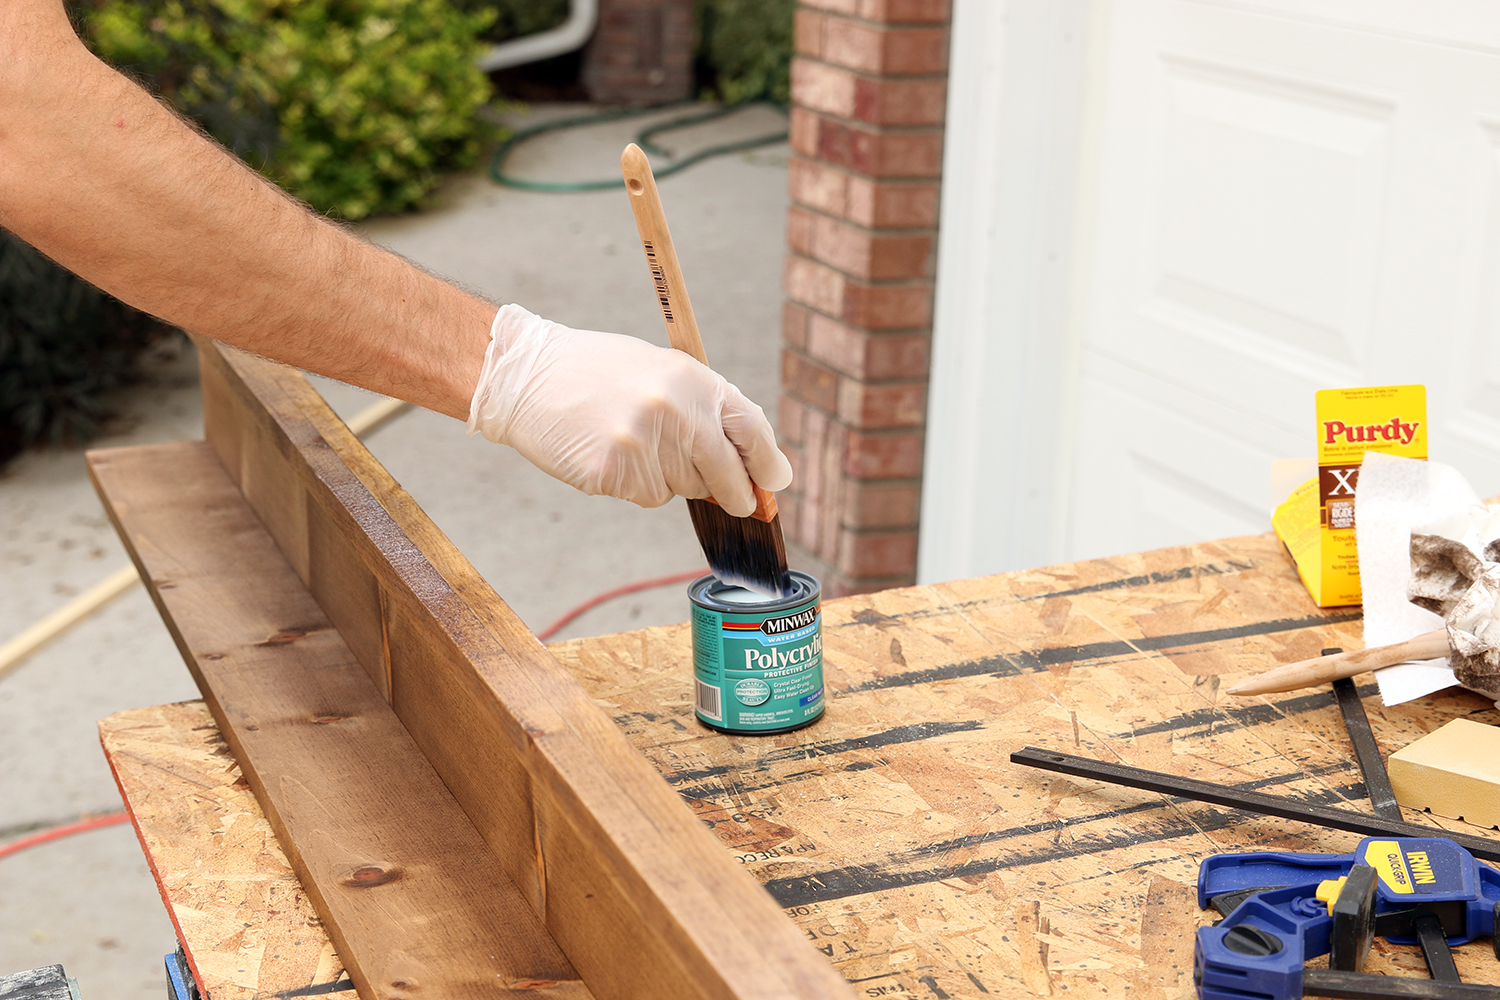
Once the wood conditioner has dried on the ledge, apply your preferred color of MINWAX® Stain. We used one coat of Special Walnut that was wiped off immediately after the entire ledge had been stained. It’s helpful to use vinyl gloves for this.
Step 5: Seal the ledge
One fear with wood projects is adding a sealant coat that will alter the look you achieve after staining. For this reason we used 3 coats of MINWAX® Polycrylic in Clear Matte finish, with 2 hours of drying time between each coat. It seals the wood without causing it to yellow, which can happen with some sealant coats. I encourage using vinyl gloves for this as well.
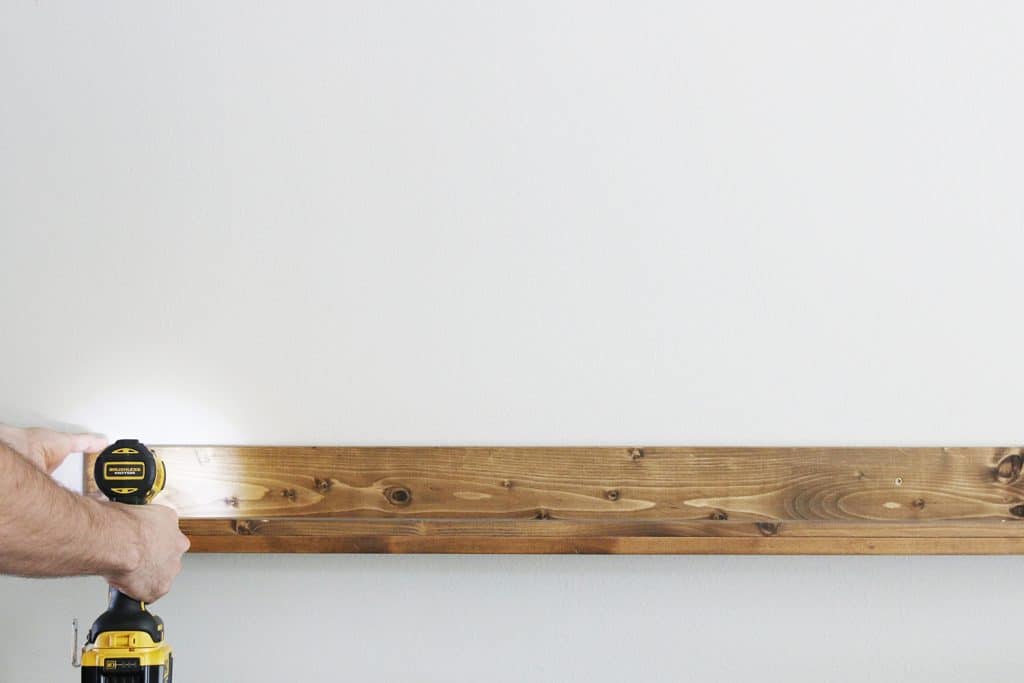
Once the Polycrylic coats have cured, simply hang the board by screwing through the back piece, directly into the wall studs, with 3in wood screws.
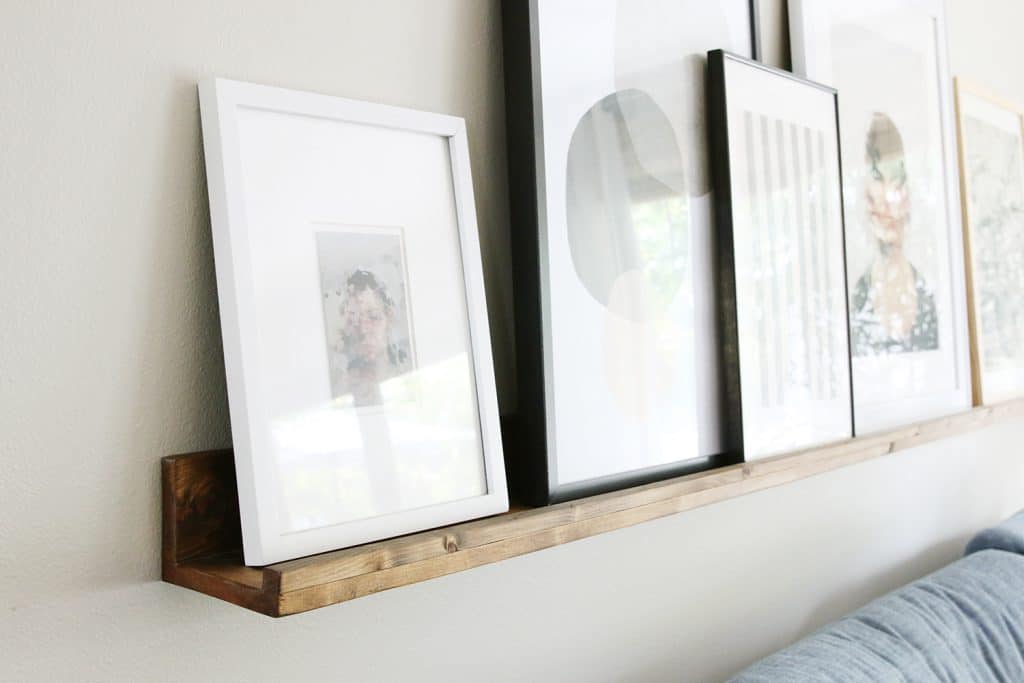

All-in-all this project took just a few hours (most of that was drying time) and only a handful of supplies. It’s a great way to display art while having the option to quickly swap pieces in and out. Hope you can use this tutorial to make the perfect one for you home!
Watch the full DIY video here:
Leave a Reply
What do you think?
Previous Post
Next Post


Semihandmade
Our wood grain Shaker cabinet fronts were designed for busy, high-traffic homes like ours. Clad with durable textured thermofoils, this line is compatible with Sektion, Akurum, Godmorgon, and Besta cabinets from IKEA. It's the perfect, practical way to add the warmth of wood to all the rooms of your home.
Collaborations
learn more

next
Loloi
We have teamed up with Loloi to create a line of rugs that are as affordable as they are beautiful. This collection houses a great mix of traditional and modern rugs, in cottage-y colorways, as well as vintage-inspired beauties that you’ll want to roll out in every room.
Collaborations
learn more

next
STUGA
We partnered with Stuga on a line of hardwood floors — The Ingrid is really livable, and the color is very neutral. It doesn’t lean warm or cool, it’s that just right in-between. We have really loved putting it everywhere in our house. It’s the best jumping-off point for design, no matter your interior style. In addition to being beautiful, Ingrid is really durable — we have three kids, and we always have a home construction project going on. Ingrid stands up to it all.
Collaborations
learn more

next
SHop all
What We're Right Now
What We're Right Now
Looking for our favorite things? A place to shop our home room by room, or just catch up on what Julia's wearing / loving right now? Browse the CLJ shop.
Loving


Portfolio


Design
Befores, afters, mood boards, plans, failures, wins. We’ve done a lot of projects, and they’re all here.
BROWSE BY CATEGORY
let's break this thing up
We have a long-standing relationship with DIY, and love rolling our sleeves up and making it happen.
Projects
Even when you don’t want to rip down a wall, you can make that space in your home better. Right now.
read more
read more
read more
02
01
03
looking for inspiration?
A reader recently asked me if I’m starting to fully embrace traditional style and whether we still consider our house to be a “modern Colonial” and why. It was a really great question and so timely — I had really just been thinking about my approach to this home and how my style has changed […]


SEARCH THE BLOG
We've been doing this since 2009 and we've posted a whopping 24145+ blog posts and counting. You might need a little help searching, huh?
looking for something?
find stuff like:
")
Can We Send You Our Love Letter?
Another way for us to stay in touch! Joining our weekly newsletter gives you access to exclusive content, never-before-seen photos, your questions answered, and our favorite DIYs. Sign up below!
Follow Along on Instagram
Welcome to our online community where we've posted home, DIY, style, renovations, and family since '09. Renovating our #cljmoderncottage in Idaho and headed for new adventures in Raleigh, NC. #cljfam #cljtransformations
@chrislovesjulia


Links
Get Around
Make yourself right at home
Portfolio
Design
Casual Friday
Projects
Lifestyle
Gift Guides
All Posts
Shop
Love where you live.
Social
RivrLinks
Links
Get Around
Make yourself right at home
Portfolio
Design
Casual Friday
Projects
Lifestyle
Gift Guides
All Posts
Shop
Love where you live.
Social
RivrLinks
A perfect and unique way to hang art and family pictures on the walls. I personally prefer that ledge/shelf more than just simply hanging picture frames. Plus, you can get so creative with it. Thank you for sharing DIY tips.
Any recommendations on whether or not this would work with 10′ ceilings? I’m afraid there will be too big of a space between top of pics and the ceiling. I’m stuck!!!
Hello! The 1×12 board link seems to be linking to a 1×6 board.
can’t see the page yet – getting this spamy comment page first so hoping if I fill it out I’ll see the tutorial
Good
Thanks for the tutorial! The tutorial was clear and to me easy to follow.
I did it! actually I did 2. I had a wall in my office that everything I hung there was too small. I did not have all the correct tools that Chris has and looks great. thanks
I know this post is old, but I have finally started this project and am ready to hang my ledge based on your DIY. Thanks for that!! One quick question, what is the measurement between the back of the couch and bottom of the ledge?? Is it about 12″?
12″ to 18″ will do ya!
Hi! I’m planning to do this for a long hallway we have, but I want to make the backboard extend below the ledge so I can add some hooks to it (for guest coats). This means that instead of the screws going vertically through the ledge into the back board, they would go horizontally through the back of the back board into the ledge. My question is whether you think this will be less structurally sound or if it would work fine?
Thank you so much!
Finally going to make this after lusting after it for 5 years! If we were planning to paint it black instead of staining would you recommend different wood or what steps would you do differently? Thank you!! I’m so excited!
Hello! I am in the process of making this but have a quick question. The stain says to wait 24 hours before applying the Polycrylic finish. I did that but am now seeing that y’all did not. Why didn’t you wait and how long did you wait after applying the stain?
Is the DIY art ledge post down for good??
Could I adjust the width of the shelf so that I could put plants on it instead of photos? It would need to be at least six inches wide. I think that would work. Am I missing anything?
You for sure can.
How long did y’all wait after applying the stain to apply the first coat of the sealant? The can says 8 hours and I’m hoping we don’t really need to wait that long!
Would you suggest an art ledge like this for over a bed in a masterbedroom? I love the look but am having trouble deciding between 1 large scale piece or something like this! Help!
I love a ledge anywhere.
Not over a bed if you are in an earthquake prone area. Anything not securely mounted to the wall will jiggle off during a quake. You’d end up with the ledge staying just fine, but pix might walk off. And if you’re in bed? Not good!
This is awesome. I remember seeing at some point a graphic of all your frames and their sizes on the ledge, but can’t seem to find it now…where is that?
Does the 5.5” piece end up leaving you with a 5” depth?
Depending on how you attach the other pieces, but yes
I’m super visual and I’m struggling with understanding how your head doesn’t hit that ledge when it’s so close and low to the couch. And yet I love the design look of the ledge close to the couch. Can you put my fears at bay by showing us a video of someone 6’ y’all sitting on the couch? Thank you!!!
Help. I LOVE this and want to do it but my family thinks we will hit our heads or thst it will be in the way when you sit. Can you speak to this? You mentioned 41.5” up. Is it still comfie to sit on couch even for 6’ male —- even w kids in the house —- or does it get in the way?
Jules is 6ft and I’m 6’4″. Neither of us have ever hit our heads, so I would say go for it!
Hello. What’s the weight capacity for the picture ledge? Thank you.
Haven’t tested that, but we stock it up pretty good with art. It’s held up for 5 years now.
How do you decide how long to make the shelf? I noticed you have an overhang on either side of your couch, but in our living room the wall above the couch is only about 3 feet longer than the couch itself (due to the front door)… I have debated on if it would make more sense to hang a ledge on the opposite wall which is longer, but that’s where the TV is and I can’t decide if the TV being in front of a portion of the ledge would look too cluttered. I don’t want to switch the couch to the other wall because the room doesn’t feel as cozy with it on the other side. Any thoughts or guidance?
I personally wouldn’t hang a TV with it. Maybe two separate picture ledges on either side would be better, but limit the art so there isn’t too much competing up there. And the Samsung Frame TV would be a great option to hang among your art.
I love this and want to copy in our living room. What sizes are our photo frames?
The largest is 20×24, the smallest is 11×14.
Thanks for the DIY for this! We are in the midst of making this and have a couple of quick questions! The directions on the polycrilic say to wait 24 hours after staining to use, and also to sand between each coat- you don’t follow either of those- did it make a difference? Also, our Lowe’s didn’t have pine in this size and didn’t offer to cut it, ugh (we’re using poplar instead). Do you think this would need any extra supports to prevent it from warping from the weight over time? Thanks so much!
We did do a sanding between each coat, just didn’t show it. AS for poplar, you should be fine but warping is possible. Once it gets on the wall, due to the structure of it, it doesn’t usually warp.
Hi C & J! JUST made and hung this art ledge in our living room!! So excited! Thank you for such an easy to follow tutorial. Wondering what the sizes are of some of your prominent art… sizing and scale is my new challenge as I fill and style the ledge. Would love some input!
YES!!!!! I have been waiting for this tutorial. Thank you. Will do it this week.
My question is regarding the wall color. May I have the brand and color name? It’s beautiful and makes the wood tones in the room very soft. This is a great project. Thanks.
Benjamin Moore Hazy Skies
Chris mentions the lip measurement at 1 inch in the video, but the post says 3/4 inch. Does it matter which measurement is used?
I ended up making it 3/4 instead of an inch. I think I clarified that later in the video, but perhaps not. Either one is fine, though.
Thanks again for this tutorial. How high should you hang the ledge above the sofa?
Ours is just over 41″ from the ground.
Hi friends! Love this tutorial. Question- I want to hang this art ledge on an 8’ long wall without a couch under it… how high do you think i should hang it? Is the 41.25” safe? I will have tall frames much like the portrait white frame you have on your shelf. Thanks!
I think that’s still a good height with the art right at eye level.
Thank you!!
I would abso-freaking-lutely love to have a picture ledge, but our cats would murder it! :(
Thanks so much for this tutorial! Do you have any tips on finding the right wood for a project like this? I clicked on your link, but it says it’s not available anymore. When I go to Lowe’s, I feel like there’s a million different options. I know it’s pine, but does it say something else specific? I just want to make sure I’m getting the right thing! Thanks so much!
We just used pine. It is light enough that it doesn’t carry unnecessary bulk that could weigh down the shelf over time, and it’s also inexpensive.
Quick question- Great tutorial! Is there any reason to not use a slightly wider board from the front “ridge” of the shelf and screw it to the front of the base board rather than on top? It’s a personal preference, but then you wouldn’t have a seam at eye-level. Do you think it would affect the structural integrity of the ledge in any way?
The seam is barely noticeable, and we’d rather not have screws in front.
We did this and used finish nails with a nail gun and you can’t see them once it’s stained.
The list of requirements for screws does not tie up with the instructions
Good catch – I clarified it.
Love this very specific, step by step tutorial! I made one modeled after your previous (lesser detailed) post and it turned out great. If I make another one I’ll definitely refer back here!
This is off topic, but will you be putting together a fall candle round up again? My candles are either summery or wintry, need some good fall ones…
We included a few favorites in this post!
I’ve been toying with the idea of putting one of these over our living/entertainment/family area couch that’s on a wall. I’ve always hesitated though because our ceilings are vaulted and the area about the couch is pretty drastic – the area about the shelf would probably decrease over the width of the shelf from around 8 ft to 4 ft.
What do you think of pairing this shelf with a vaulted ceiling? My first thought is to just have a couple larger/taller pieces toward the 8ft side to fill up the area some, but I’m afraid that would make the shelf feel too unbalanced. I’m going to have to photoshop it up most likely, but am wondering what your thoughts would be. Thanks!
I generally put our larger pieces in the middle, does your vault peak in the middle or on one side?
One side… I love the idea of being able to swap things out easily, just not sure if it would work in my case!
We have vaulted ceilings and I have a ledge in our dining room. It looks great! It’s been my favorite place to decorate in our open concept area. I keep the taller/larger pieces in the middle (one frame is 11×14 and the other is 8×10) I think this helps balance the vault. Then just place layer in the smaller pieces. I’d say go for it!!
TOO FUNNY, I just ordered a custom walnut picture ledge from an shop in Maine, c/o Etsy! And of course, all the times I googled this (image search) to make sure I’m getting the “look” I want, your living room picture was at the top. And you bet I scoured your past Picture Ledge posts to find out the dimensions of your ledge.
I went with two ledges, each 63″ long (our sofa is 120″) which will line the length of the sofa, and I’m flanking each side with these Rejuvenation Cypress Sconces: https://www.rejuvenation.com/catalog/products/cypress-double-swing-arm-sconce-brushed-satin-brass-with-oil-rubbed-bronzes-shade/configurations/ob
I’m also starting to work on the art I’ll display on the ledge! We’ve been in our house for 2 years now, lived through way too many renovations, so I’m excited to be working on FUN decorating stuff (finally!).