Projects

100 year old home gets a 3 Day Kitchen Makeover for less than $5K!

April 10, 2017

We believe we should all love where we live.

We’re a couple of homebodies, working to uncover the home our home wants to be. And we’re so happy to have you here. 

Portfolio

Projects

Design

We're Chris + Julia

read more

What we're                   right now

Loving

browse the shop

Befores, afters, mood boards, plans, failures, wins. We’ve done a lot of projects, and they’re all here. 

We have a long-standing relationship with DIY, and love rolling our sleeves up and making it happen. 

Even when you don’t want to rip down a wall, you can make that space in your home better. Right now.

browse all

browse all

browse all

02

01

03

Popular Posts

1.

2.

3.

Top Categories

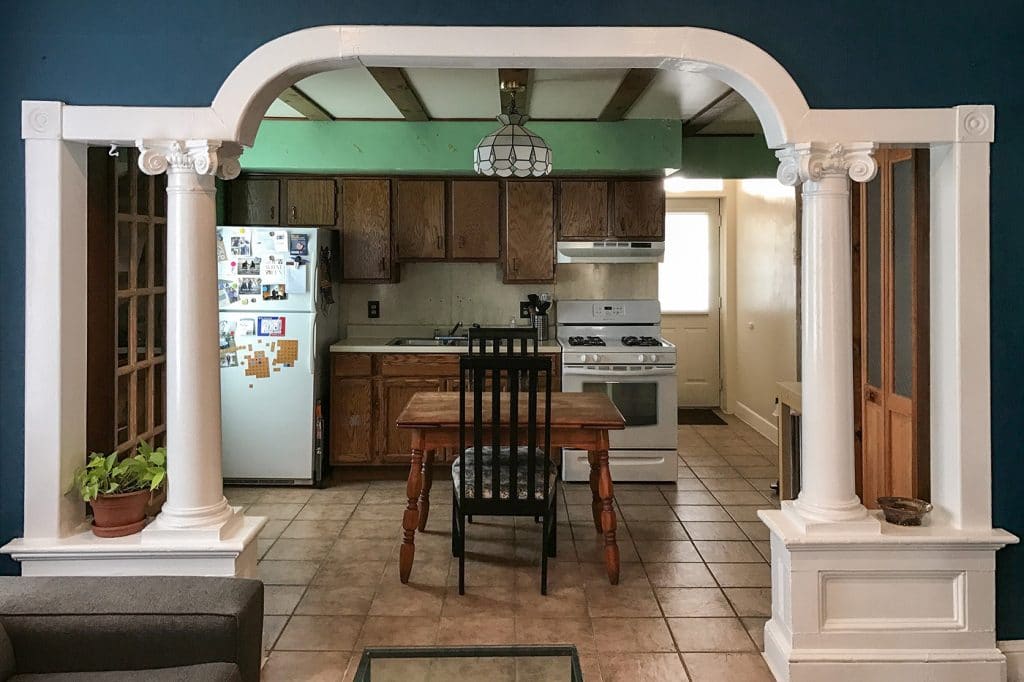
Back in February, we went through more than 2600 applications that poured in over 48 hours for a makeover, sponsored by Lowe’s. It was our second time traveling anywhere in the country making over one of your spaces in a weekend, although this year was a little different. Last time we ended up on Long Island, transforming an entry/sitting area, but the stakes were a little higher this year as all of the entries were bathrooms and kitchens. The decision was not easy or quick, and included a lot of discussion around, “Could we really do this in 3 days?!” but we found ourselves enamored with a small, early 1900s kitchen in a Baltimore row house and knew that it was the perfect candidate for our weekend refresh.

Over the weeks that followed, we spent hours upon hours designing the space, collecting measurements, picking out and ordering everything from Lowe’s and Skyping with the homeowners to try to get the best possible feel for the space without ever stepping foot in it. Lowe’s also allowed us the absolute privilege to assemble a small team to help us execute our vision in the allotted time. We chose the detail-oriented and connoisseur of old home style, Daniel Kanter of Manhattan-Nest.com, the upbeat, driven and beyond-talented DIY duo Kim and Scott Vargo of YellowBrickHome.com, and Chris’s ultra-handy, can-build-anything brother, Brandon Marcum (what can we say, it runs in the family) to join us in Baltimore.

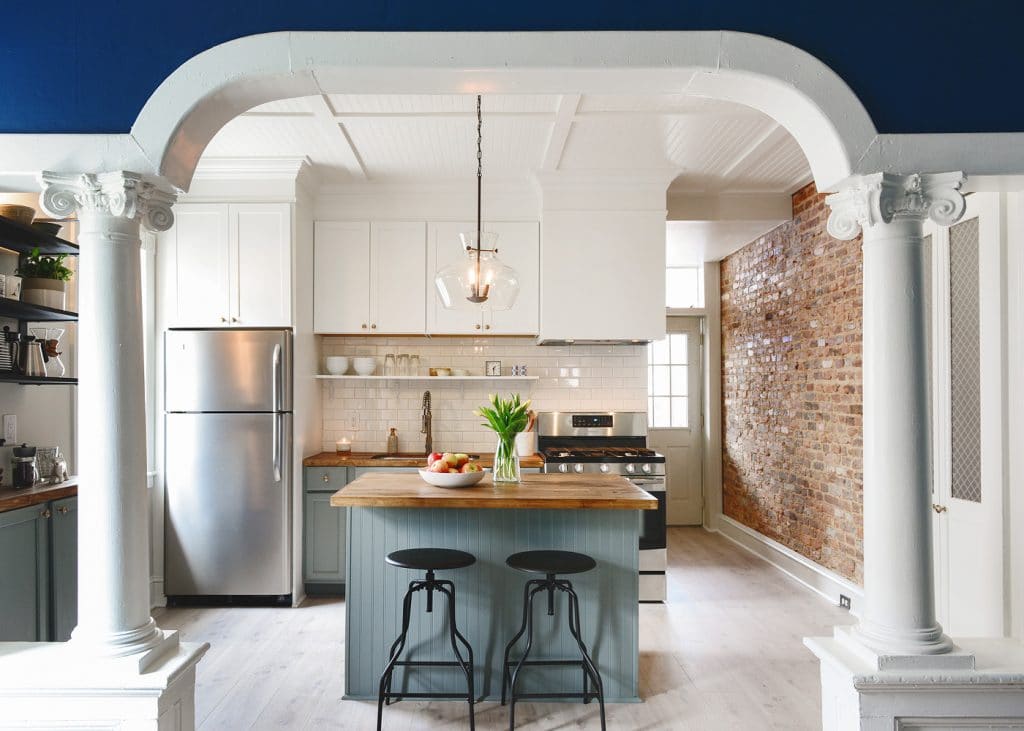
At the end of the weekend, and on a small budget (we’ll get to that in a minute), we presented the homeowners with their new, refreshed kitchen!

How Much Did it Cost?!

A lot of times, during a renovation, you can have it budget-friendly or you can have it fast. In the case of this kitchen refresh, we were able to accomplish both by focusing our efforts and budget on a few standout items. After tallying up our receipts, the entire renovation came to a grand total of $4555.35–including new appliances!

Wanting to create something similar in your home? Here are our biggest takeaways, budget-friendly details and DIY projects we included here (plus! we’re sharing every last source at the bottom of this post):

That Ceiling

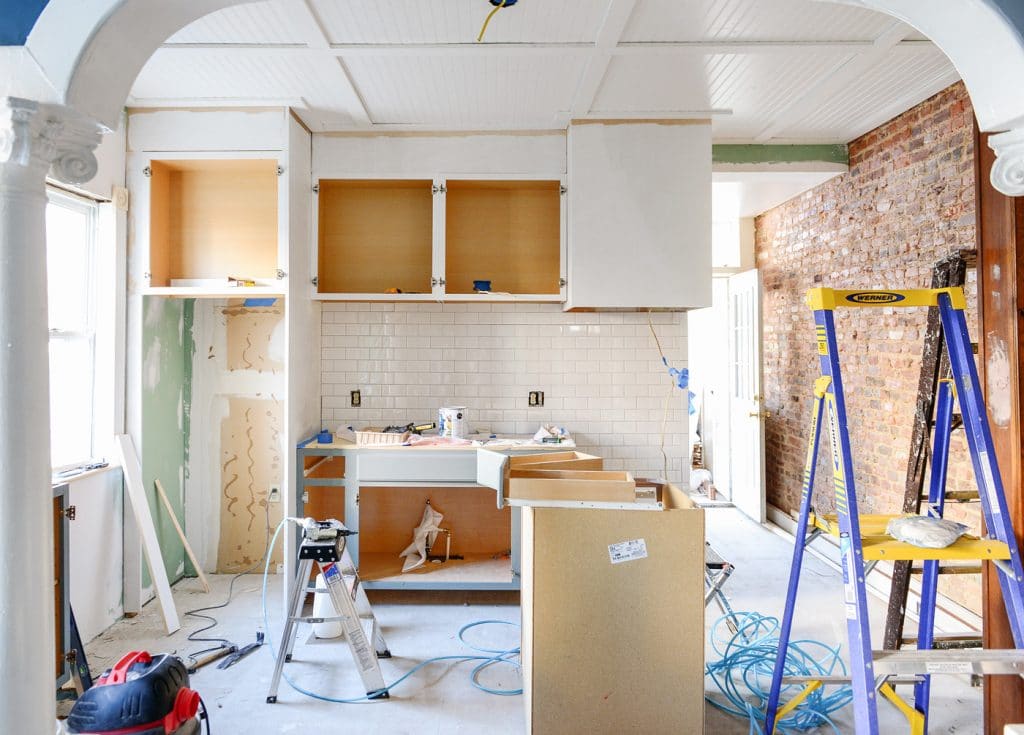
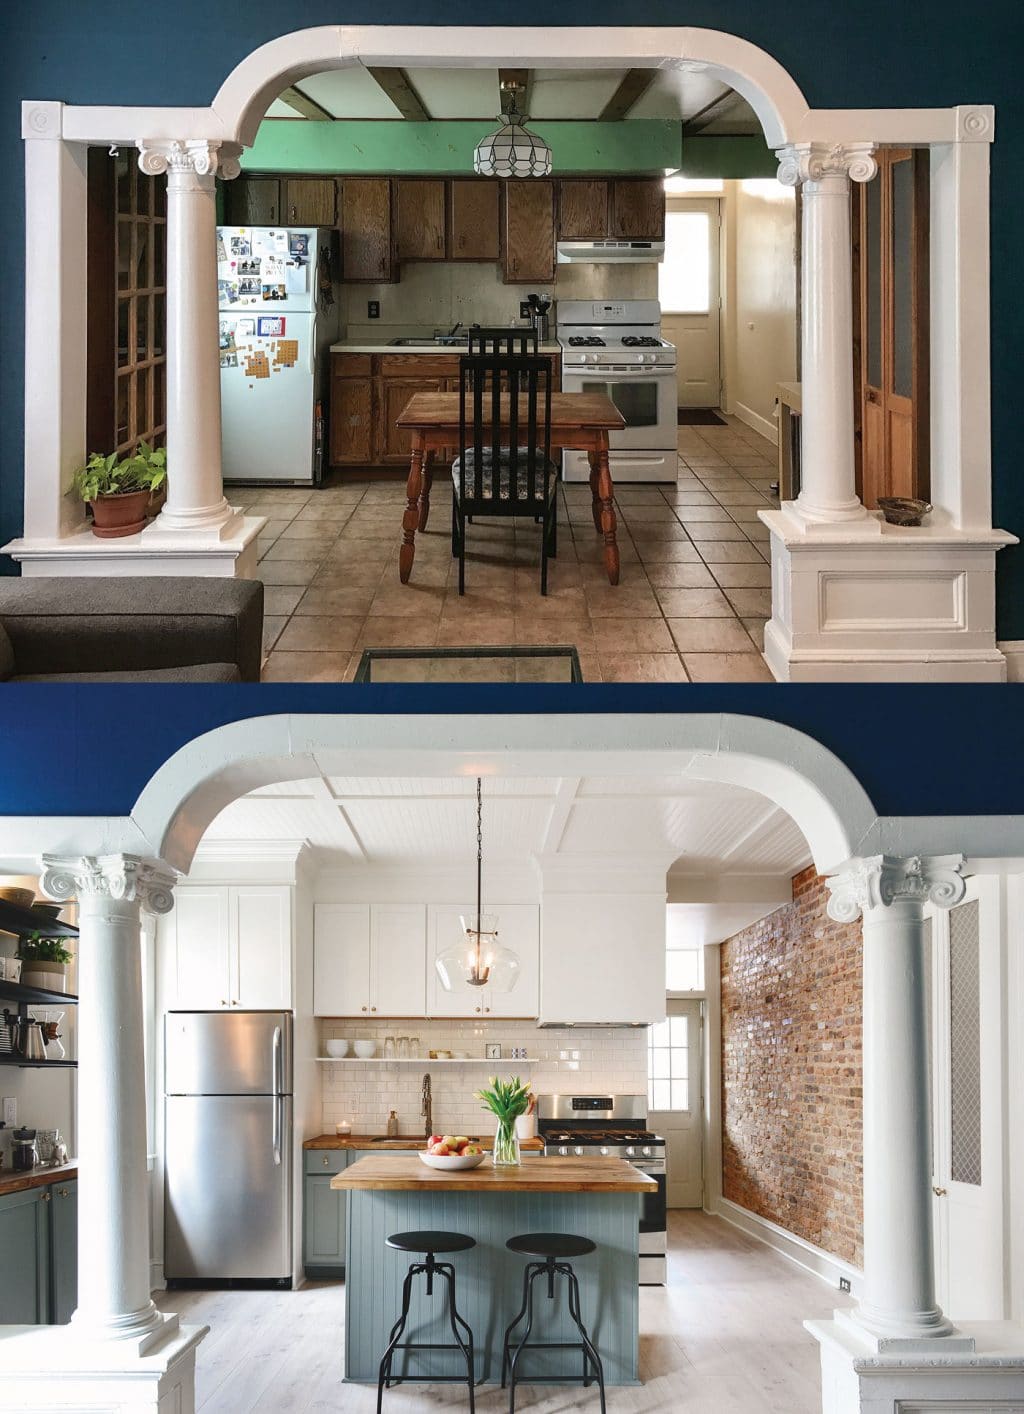
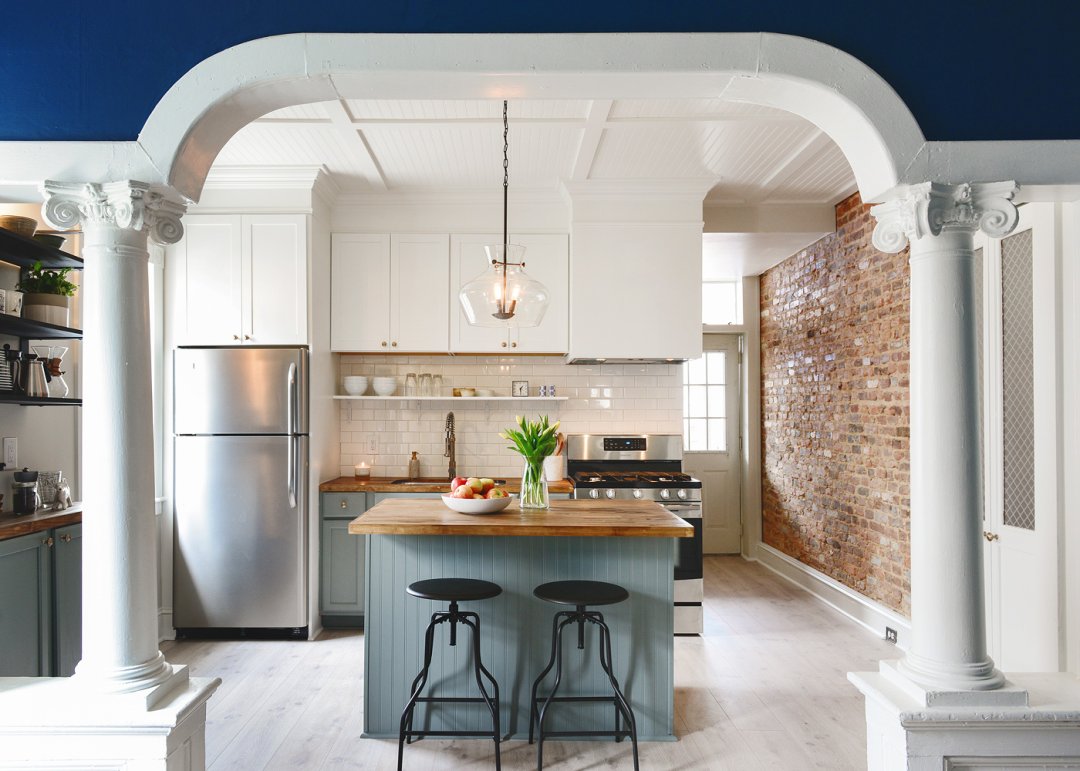
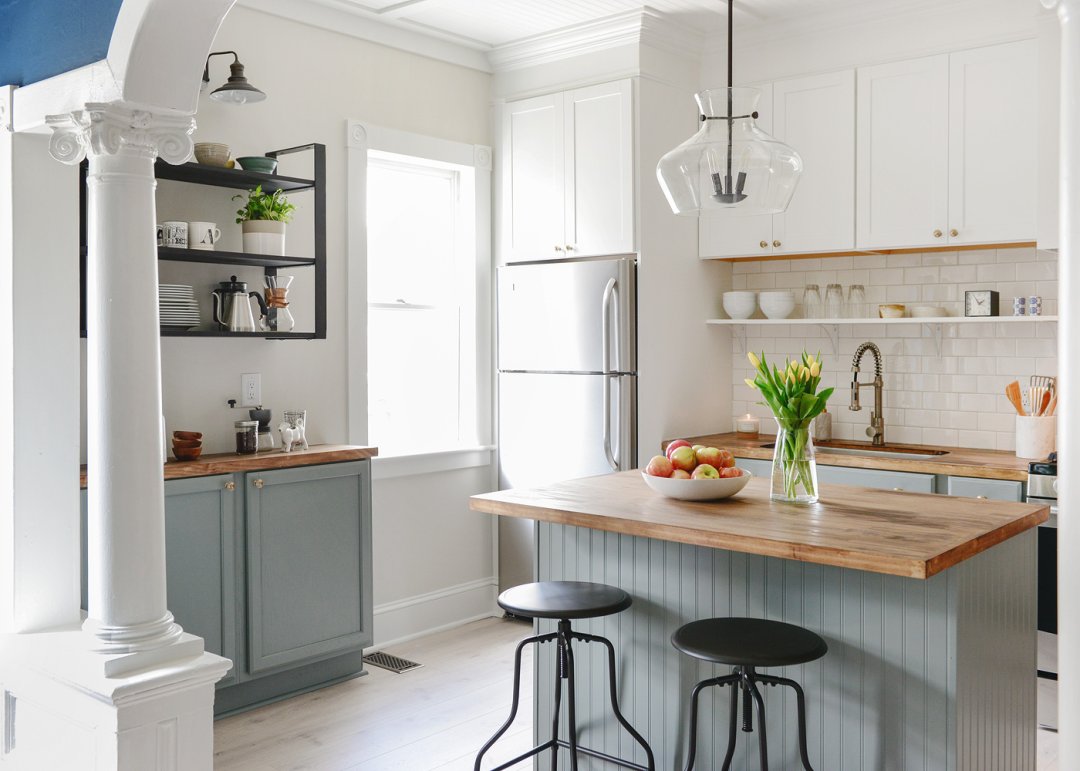
If you scroll from the before to the after photo, you might notice the ceiling looks…taller? In the first hour of arriving, while demo-ing out an old pantry next to the window and soffit above the upper cabinets, we discovered what they thought was their ceiling was actually a drop ceiling, 1.5′ lower than the original and completely empty! Usually a drop ceiling could indicate there’s HVAC or something up there, but we were greeted with some beat up tiles on top of furring strips in great shape. We counted our lucky stars and  down it came!

Although the higher 9.5′ ceilings definitely gave the smaller 10×13 kitchen some breathing room, this ceiling treatment is one that would enhance a ceiling of any height! We used these budget beadboard sheets from Lowe’s and trimmed out the seams with pre-primed 1x4s. We finished the project with caulk and satin paint (color matched it to the in-stock upper cabinets from Lowe’s) for an ultra-chic look.
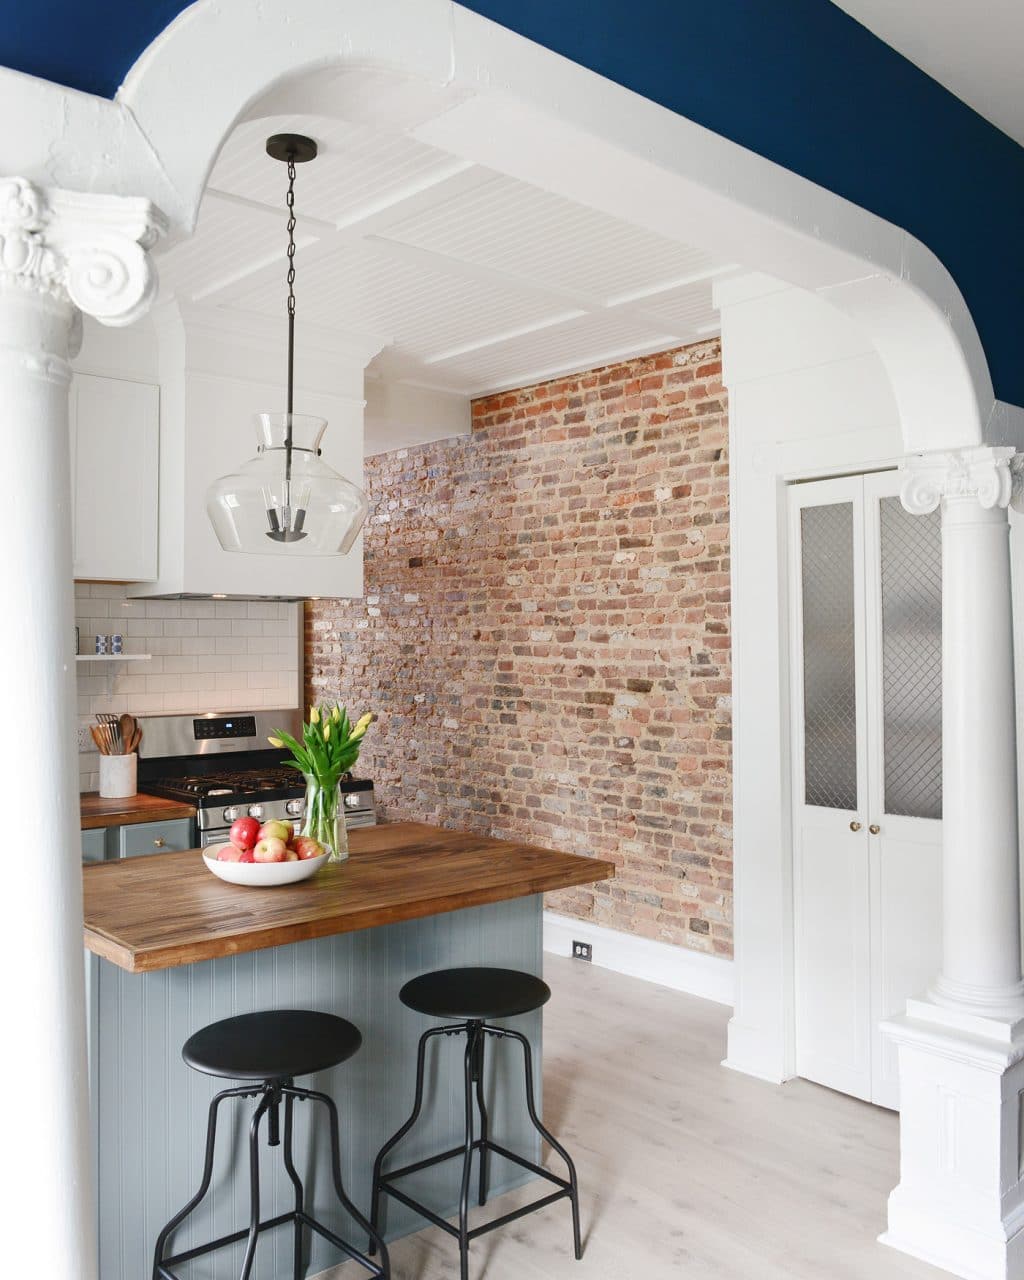
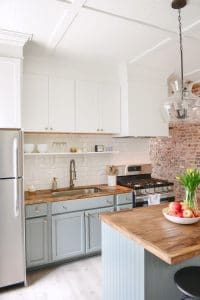
The Brick Wall

The homeowner’s mentioned in their application for the makeover that there might be a brick wall under the plaster. Their next door neighbor’s had completely exposed theirs and it was something they would definitely be interested in doing. One weekend, after they had been selected, they chipped away a small section of plaster and sure enough!–a brick gold mine. Removing the plaster covering the brick wall was a homework assignment we gave them to do before we got there and it took a good portion of one weekend, plus a little more, while we were there, after we raised the ceiling.

Major Save: In-Stock Cabinets

Lowe’s has in-stock cabinets in a variety of sizes, depths and finishes and they are extremely affordable (often $100 or less!) and can be used for a variety of applications. We re-used the homeowner’s existing sink cabinet, but purchased three 30×30 white Shaker upper cabinets, one 24″ base cabinet for the island and two 24×30 upper cabinets for a coffee station. Keep in mind, upper cabinets are generally a more shallow depth than base cabinets; 12″ compared to 24″ respectively.

For starters, we made the cabinets look more custom by cheating the upper cabinet above the fridge out (creating a simple mounting box out of 2x4s above the cabinet will do the trick!) so it was flush with the front of the fridge. Not only will this allow the cabinet to be more usable–how horrible is it trying to reach into an above-fridge cabinet waaayyy back there?!–but the varied depths also create interest and dimension that you’d find in a high-end, custom kitchen. Box in the sides with sheets of MDF, paint to match, and no one is the wiser.

We used the two shallow 24″ wide upper cabinets as base cabinets to create a small coffee station. The slimmer profile allowed us to keep the kitchen feeling airy while still injecting storage into the space. We created a base for the cabinets out of 2×4’s faced with plywood for a toe kick, and painted the cabinets the same color as the rest of the base cabinets in the kitchen., a beautiful green/blue gray called Valspar’s Beguile. 
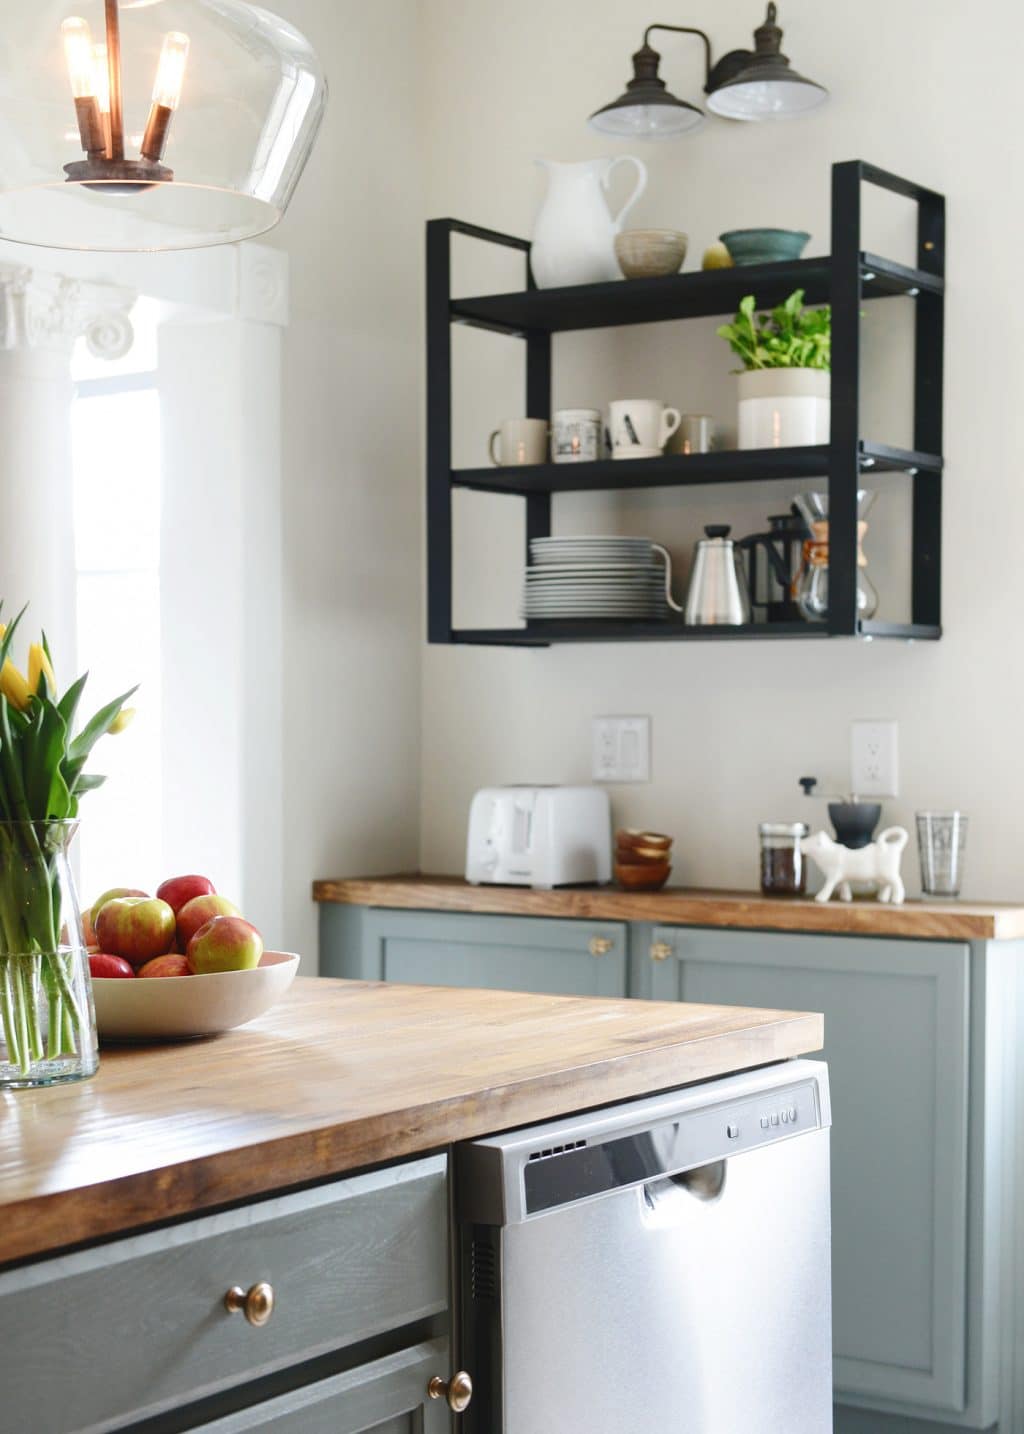
DIY Open Shelving

Above the coffee station cabinets, we knew would be a great spot for additional storage. We came across these heavy, steel brackets on Lowe’s.com and decided to use them for a refreshing take on open shelving–apparently you can also use them for desk legs! When they arrived, we spray-painted both plain steel brackets with flat black Rustoleum spray paint for a powder-coated look.

We cut project boards down to depth and painted them black to blend seamlessly with the brackets, as if they were all one piece. Although the brackets had holes to attach the shelving, they didn’t have holes to attach it to a wall. We used this step drill bit to drill through the steel and attached the shelving directly into studs.

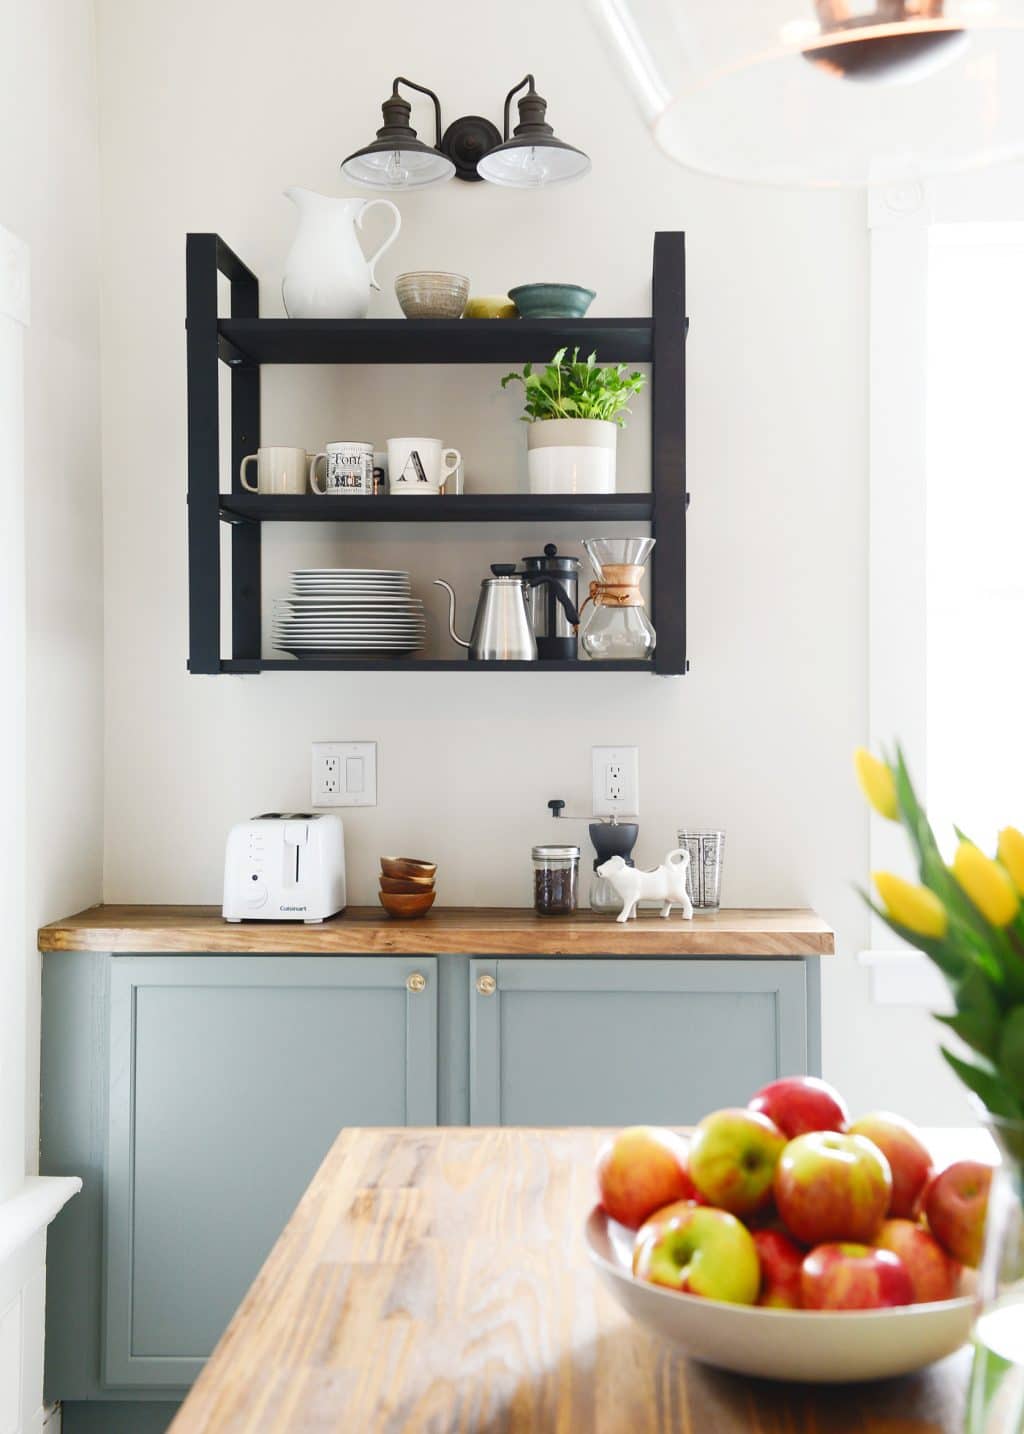
Above the sink, we added an additional 9.5″ deep open shelf, also made of project board–except this time we painted it white and attached it to the tile with these brackets. It’s the perfect spot for spices, a cooking timer, or a handy spot for easy to reach glasses.

The Budget-iest Butcher Block

Counters can easily cost as much as our entire budget, so we had to get creative. A member of our team, Daniel, used Lowe’s project boards as countertops in his kitchen with great results, so we were confident using the same product here. Project boards look a lot like butcher block countertops you’ve seen, they even come in a variety of ready-made widths. However, they are only 3/4″ thick and we needed an extra deep piece for the island.

We remedied these problems by using a Kreg jig to join two pieces together underneath to achieve our desired depth (we went with a 10″ overhang) and then wood-filled and sanded the top and you’d never know! To make the thickness a little more beefy, we attached pine 1×2’s to the perimeter of all the countertops.

To achieve a rich, these-countertops-have-been-here-for-100-years look, we first applied a layer of wood conditioner, which helps the wood (especially pine) accept stain more evenly. We followed up with a light coat of Minwax’s Provincial Stain, immediately wiping the excess and finished with 3 coats of water-based Polycrylic sealer, sanding with a 220 grit sanding block in between each coat.

Trim Trim-ity, Trim Trim-ity, Trim Trim…

If there was one place we splurged, it was on trim. And it was worth every penny. A simple plywood rectangular vent hood cover we whipped up, became a statement piece by adding two types of molding around the top. We used this smaller chair rail molding where the cabinets met the filler piece we added to bridge the gap to the ceiling. And this substantial crown molding near the ceiling. We had the crown meet a 1×4 for extra oomph!

To save, we only applied the chair and crown molding to the cabinetry and range hood, and opted for a simpler 1×4 treatment around the rest of the ceiling. The baseboards are simple 1×6’s, topped with rail molding, with shoe mold at the base. Trimming out the window and pantry door did wonders, and injecting special details like rosettes at the corners and adding a window sill (made from a stair tread to save time!) went a long way in bringing this room back to its historic roots. Not a splurge per se, but applying the same inexpensive beadboard we used on the ceiling, to the island and the side of the coffee station cabinets is an easy way to dress up cabinets with little effort or money.

Can’t Forget Details: Lighting, Flooring, Tile and Hardware

Subway tile is a classic choice that will never go out of style, and fortunately, the one we used is only 22 cents a tile! These don’t even require a spacer, so the job was quick and adds just the right amount of shine to the back wall. We used the lightest warm gray grout, Silverado, to allow the tile to pop ever so slightly.

With a medium wood countertop, we knew we didn’t want the flooring to be anywhere close in color as they could easily clash. So we opted for this light oak, click-lock Pergo flooring from Lowe’s is beautiful, durable and the wide planks are swoon-worthy, plus only about $3 a square foot!

The same warm, champagne bronze knobs pepper the room. We added two to the faux drawer above the sink (as a rule of thumb, any drawer longer than 30″ could use two pieces of hardware) and two to their original bi-fold pantry door. It’s an easy trick to make any bi-fold door look a little less bi-fold and a little more luxe.

Center stage, we hung this stunning, allen + roth aged bronze large glass bell fixture from Lowe’s with gorgeous curves and a soft glow, for just $119! It comes with these charming, vintage-inspired bulbs, but you could easily swap them out if you wanted something a little brighter.

And don’t forget to check the bathroom lighting section if you’re looking for a great wall sconce. We found this allen + roth aged bronze cone double vanity light, perfect for lighting up the coffee corner for $54.

The homeowners were present for the first day and a half of renovation, but then we ushered them into relaxation mode elsewhere so we could keep the reveal a big surprise. And surprised they were! Surprised, excited, grateful and we were all a little teary-eyed watching them take in their new renovated kitchen.

Special thanks to Lowe’s for sponsoring this project and asking us to head up a makeover again this year–it was an unforgettable and rewarding experience. And thanks to our fabulous team for helping us pull it off–we couldn’t have done it without you. All photos are by Kim Vargo.

Sources are listed below, or you can hover over the photos below for direct links.


SOURCES

Wall Color: Valspar Promenade 7006-3
Base Cabinet Color: Valspar’s Beguile
Upper Cabinet + Trim Color: Color matched to Lowe’s In-Stock White Cabinets
Upper Cabinets / Base Cabinet / Coffee Station Cabinet: Lowe’s In Stock
Cabinet Hardware: Brainerd Champagne Bronze Round Cabinet Knob
Crown Molding
Flooring: Pergo Portfolio Modern Oak Plank
Countertops
Countertop Stain: Minwax Provincial
Refrigerator: Frigidaire 18-cu ft Top-Freezer Refrigerator (EasyCare Stainless Steel)
Range: Samsung 5-Burner Freestanding 5.8-cu ft Self-Cleaning Gas Range 
Range Hood: Broan Undercabinet Range Hood
Dishwasher: Whirlpool 55-Decibel Built-in Dishwasher
Sink
Faucet: VIGO Stainless Steel 1-Handle Pre-Rinse Kitchen Faucet
Pendant Light: allen + roth 16.02-in Aged Bronze Vintage Single Clear Glass Bell Pendant
Wall Sconce: allen + roth Hainsbrook 2-Light 7-in Aged Bronze Cone Vanity Light
Large Steel Brackets for Open Shelves: Plain Steel Federal Brace Universal Shelf System
Small White Brackets above Sink

Leave a Reply

Your email address will not be published. Required fields are marked *

This site uses Akismet to reduce spam. Learn how your comment data is processed.

What do you think?

  1. Hoodsly says:

    Its look amazing! Good Job!!

  2. Hmmm, I can’t seem to see the post. Can you only see it if you leave a comment?

  3. Allyson Rogers says:

    That’s unbelievable!

  4. Krystal says:

    This is such an old post BUT I just recently came across your blog and have been working through reading it from the very beginning (oh how I love seeing how everything has evolved over the many years). I saw the picture of this kitchen and thought … that looks super familiar. HA I’m a big follower of Daniel at manhattan nest and remember back when he shared this on his blog! I didn’t even know of or follow you guys then, so what a fun coincidence! I’ve also been a follower of Kim and Scott for a while … I’m so unsure how I missed you guys until recently, but don’t worry, I’m making up for it now as an avid reader. Now I can be virtual friends with all of you lol. :)

  5. Diane says:

    Love the bottom cabinet color, but when I look up other pics using Valspar Beguile, they all seem darker. Did you lighten the color at all, or is it just that this kitchen is very bright?

  6. Lyn Laparan says:

    Did you the pergo on top of the tile?

  7. Norma says:

    I love small home projects within my small single mom budget!

  8. Arran says:

    That kitchen is beautiful and I can’t believe you did that in a weekend!! I love the colour of the lower cabinets and the exposed brick. I was wondering if you ever do consultations with people via skype or anything? I live in a Toronto condo and I feel like I have so many ideas but can’t land on a cohesive vision and would love your opinion!!

  9. Tiffany says:

    *a while

  10. Tiffany says:

    ABSOLUTELY GORGEOUS!!!! Wow! I’m obsessed with everything!! Any suggestions for making a soffit less noticeable? Unfortunately, we’re stuck with ours for awhile. Also, I was admiring those adorable salt & pepper shakers. Would you mind sharing where they’re from? Thank you!

  11. Abbe says:

    Just B-E-A-UUUU-T-I-F-U-L! We live in 116 year old double in Pennsylvania. Been bantering back and forth if we want to expose the brick. Looking at these after photos seals the deal – YES! We also have the original pine cabinets that are built like a piece of furniture with original quilted stainless steel backsplash and countertop with sink and hardware. It’s all staying but we need an island and that’s been on my mind how I want to approach that. Simply love the color. The big question is what is the trim color? Too many whites to choose from and the one you picked looks dreamy. Last question, our back door is our main door since our garage is in the alley. With that being said we need a floor that can stand water, salt, dirt, dog, kids…. We’ve exposed and finished the original floors in the house which are simply pine boards (not tongue and groove) but simply charming. The odd part is that they are both the subfloor and the actual floor. That definitely won’t work in our hardworking kitchen. Any suggestions? Happy New Year and can’t wait to see what you busy, creative people share with us in 2018!

  12. Catherine says:

    Hi! Where are the bar stools from?? Thanks.

  13. Kim says:

    Just awesome!!! I’m redoing my house and using the Lowes Arcadia cabinets as well. I want to paint the MDF board and my house trim in the same color as the cabinets.
    Do you know what brand of paint you used and sheen you used on the panel and on the house trim? I could really use that information for my renovation! Thank you so much!!

  14. Amanda says:

    I loved this post when I read it! I was so intrigued by the design and DIY projects that I decided to try and mimic some for my modest kitchen renovation in Towson, MD. Specifically the black open wall shelf (and I also ordered the faucet). I’m posting here because I was very disappointed with Lowes.com and the service received and am making this known on social media sites and it made sense to post on the blog where I first found out about the Lowes.com products. The steel brackets themselves were $109 a piece — I was confused with the Lowes.com description posted if I would get one bracket for $109 or two for $109. After I placed the order I called Lowes.com to confirm if this was one bracket or two for the price. I spoke to a representative who put me on hold and said she talked to a Federal Brace representative and confirmed I would get two brackets for $109. This seemed more reasonable to me and I waited for my package. Once it arrived, it contained only 1 bracket. It also did not have the hanger bolts that Lowes.com said are included. I called Lowes.com again and this time after talking to Federal Brace they said the $109 is for only 1 bracket and apparently that is very clear on the website. I asked for them to go back and listen to the phone conversation I had with a Lowes representative (I’m sure these are all tapped) and no one seemed to think that was necessary. I was misinformed but Lowes did not care to look into that. So now I had only 1 bracket and needed another and this shelf was going to now cost over $200 plus I had no way to hang it. Federal Brace and Lowes were on the phone with me trying to figure out how to get me another bracket when the Federal Brace employee mentioned that Lowes.com should be selling the bracket for $61.53 and that included shipping. Lowes.com is selling it for $109 which is the same price that Federal Brace lists it at. So Lowes.com is marking this up about 80% and selling it at the same price as Federal Brace. This information clearly put me in a sour mood. After this conversation I later was informed by Lowes.com via email that the hanger bolts actually do not come with the order and those would have to be purchased separately in a kit that is $37. Lowes did apologize for this as it was a mistake on their site and offered me an $80 gift card which will only cover the cost of these additional hanger bolts it seems. Still $210 in on the brackets by themselves (haven’t even purchased the wood yet). All in all I was very unsatisfied with the service and the way Lowes.com handled this issue. This particular order originally was about $250 originally (1x bracket and 1x faucet) and then I would need to add an additional $109 bracket to be able to complete by project. Not to mention that I am a Lowes cardholder and have spent a good deal of $ with them in the past on windows, appliances, cabinets, cabinet knobs, project board, paint, lighting, etc. I personally will switch my home improvement shopping over to Home Depot and Amazon.com and felt it was important to share this with others especially on a blog sponsored by Lowes.

  15. abbey says:

    This is beautiful!! I love it! Chris & Julia, have you had any experience with the Harmonics laminate flooring that is sold at Costco? We are so tempted to put that in, but I’m so afraid that just a tiny bit of water will make it bust. We have a dog and a pool so I’m just not sure the combo will work eek! But seeing your pick here really makes me want to try it!

  16. Kenna says:

    I’m curious now that it’s been a few months- how are the countertops holding up? I’m very interested in using this process for some of the countertops of a recent flip of ours. thanks!

  17. Julia says:

    Wow, amazing work! It looks great. I heard the story on the podcast and had to look it up. What a time challenge!

  18. Jen B. says:

    You two are magical. Looks so great! One question about those floors. I live in a small town with a Lowes. Before I drive four hours to check out that flooring in person, I was hoping you could give me your opinion: could it work for an entire ground level of a home, or would it look too fake when covering a much larger area?

    We have a rental that our previous renters trashed and are trying to get it ready to sell. Given all the unexpected expenses courtesy the world’s worst renters (hence our exit from property management), I am trying to find something that is current and yet affordable. A lot of the LVT I’ve seen looks great in sample form but a bit plastic when applied across large open spaces. Any feedback you could give would be so (so, so very!) appreciated!

  19. David says:

    Wow! Incredible make over kitchen. How do I get submitted one?

  20. Fabulous makeover! We have butcher block counter tops but white laminated cabinets throughout the kitchen and bathrooms. Since the cabinets are not wood under the laminate, what would you suggest as the best but cost effective way to replace them?

  21. franki says:

    INCREDIBLE!!!

  22. Eden says:

    Really love it. I wish I had submitted too. I have a very similar old kitchen in Baltimore no less!!!!

  23. Great make over! Very beautiful! Thanks for sharing!

  24. Steph N says:

    I heart eyes bead board so much. Looks amazing!

  25. Priya says:

    This kitchen looks beautiful! You have such vision and you did a great job!!

  26. Lisa says:

    This is amazing! Debating whether not to go with all white cabinets in my kitchen. Seeing this transformation has convinced me that I need to do white on top and that gorgeous blue green color on the bottom. that would go perfectly in our home.
    Did you have to do a tin of plumbing work to add the dishwasher to the island? Was that part of your weekend work as well?
    Thank you! Love what you guys do!

    • Chris says:

      The plumbing was part of our weekend work. Luckily the basement was unfinished and we had unhindered access to connect the necessary drain lines.

  27. May says:

    You guys did a great job! Love the brick walls and new colour scheme. It really brightens up the space.
    x
    May
    http://happinessinmay.com

  28. Lindsey says:

    smart to have the homeowners leave… people love to eat sausage, but no one wants to see how it’s made!

  29. Annie M. says:

    This is so incredible! Love every detail and how it blends the old and new. That brick wall is to die for!

    A bit of a random question – we’re in the process of doing a built in range hood in our new kitchen, similar to this one. Was this range hood vented outside? Or did you install as ductless with the charcoal filter? We bought this same hood yesterday and wanted to build around it similar to the above, but we can’t vent to the outside. Would love your advice!

    Thanks so much!

  30. Monica says:

    Really spectacular! You guys nailed it.

  31. Sylvia Waller says:

    This post literally saved my life. I have a kitchen with white tile and grout counters and my husband had this bright idea of staining the grout to make it look so much worse! Since then, I have been going back and forth on how to do something with the counters that would not cause me to loan out my first born child. This transformation is beautiful and I think I talked the hubbins into tackling this project!! Great job!

  32. Jennifer says:

    I need those barstools. Can you share a source?

  33. This is beautiful and charming and such a great show of what you can do with creativity and skills on a budget. I really wish I had the skill set you all have. I’ve been thinking of taking a basic carpentry class for this very reason!

  34. monica says:

    Love this! Ceiling especially. Wondering if you guys have discovered outlets with built in USB ports? I put some in our kitchen recently and love them for charging everything! That coffee station could be the perfect place for one! :)

  35. It looks beautiful! Kudos to whoever discovered those steel brackets on the Lowe’s website – the product listing never would have caught my eye, but they’re amazing!

  36. I loved hearing about this reno in the podcast! Wow I am so impressed that you whipped this out in 3 days, even knowing you basically didn’t sleep I can’t imagine doing that so fast. It looks so fantastic!

  37. Anna Mesa says:

    Love it & reasonable price! Could the average Joe like myself do this for under $5k? I’d love to know where & how to start a project like this, can you help?

    • Julia says:

      Anyone can for the price…the 3 days is quick, for even us. Each tutorial is broken down and every source is linked so ANYONE can achieve these results.

  38. Jenn Freeman says:

    As if you guys haven’t helped us enough with our home, now I have so many ideas for our kitchen!! I may have taken a hammer to our soffit today ???? Always inspiring. Love it!!

  39. This is so beautiful – the ceilings and brick wall and beadboard and wooden benches … I can’t even pick a favourite. I would love this kitchen so much, even if it cost triple that and took me a year! xx

  40. Well, you’ve really outdone yourselves! This kitchen is so fresh and enviable. I CANNOT believe the price tag. You’re inspiring all of us to take on these projects with confidence and limitless aspiration.

  41. Whitney says:

    Well done! I can’t believe you did all of this in 3 days. Just creating the post about the reno would take me more than 3 days.
    Just wondering why you guys opted not to add recessed lighting in the ceiling? Was it a time issue?
    Excellent work, the homeowners must be thrilled! xx

    • Chris says:

      Once we took out the drop ceiling, running the wires and working around the mysteries in the ceiling unfortunately would have taken up too much time. So we changed the lighting option over the island to a single light without a shade so it would spread light upwards, as well as down.

  42. Lisa says:

    Wow!!! You guys did it again! And it looks amazing!!! It shocks me you were able to do it in only 3 days! But please stop with the speedy renovations……you are making the rest of us look bad ???? ???? But seriously, great job! ????????????

  43. HOLY COW Chris and Julia — this was by far my most FAVORITE post on your site! I think I need to replicate that kitchen (when I’m not renting a college apartment!) I just sent this link to my husband – I’ve got to have this kitchen! It’s BEAUTIFUL. And I just didn’t think something this possible could be less than 5k. That is absolutely stunning!

    -Emily

  44. A Stephens says:

    Can you provide details on how you painted the lower cabinets? Spray? Hand painted? I’m looking at various options and trying to determine the best method.

    • Julia says:

      We hand painted them. There weren’t very many, so it went quick. I recommend a small foam roller (or Purdy makes one specifically for cabinet painting). We brushed the inlay corners and then went and foam rolled the rest. Took 2 coats.

  45. Ash says:

    This place looks terrific! So much inspiration, I think I’ve pinned half of the Lowe’s products already. One question about the new flooring… did remove the tile floor before putting it down and if not, how did the click and lock flooring layer on top of the tiles? Is there a process for that?

    I’m looking to take on a very similar looking tile kitchen floor this summer….

    Thanks so much and beautiful work!

    • Julia says:

      We did remove the tile flooring before laying this floor (although, I heard if the tile is in good enough shape you can lay it right over top). Other than that, we laid flooring underlayment (from Lowe’s) and put the flooring on top of that.

  46. Lauren says:

    I love it! My favorite details are the historic ones you uncovered and highlighted, like the brick wall and that adorable pantry. I can’t get enough of that pendant, too. What a find! Great job!

  47. Sarah G. says:

    This looks AMAZING. Talk about a transformation! Did you use a painted piece of wood to make the panel between the refrigerator and sink cabinets?

  48. Merry says:

    Very nice indeedy!! I wish I could be one of your clients! I work in a dark, dated kitchen and so I noticed here you don’t have lighting over the sink area. Is that fine with the owners, or something to be addressed down the road? I always have shadows on my work at the sink or counters since our lighting is in the middle of the kitchen ceiling. Drives me nuts. Looking forward to a reno one day……

  49. Allison says:

    This is incredible! The design is great, but I’m most inspired by the creative use of materials to achieve the beautiful look. It’s relatable for people like me who are on a tight budget. The ORC rooms are beautiful, but I get discouraged when I see the price tags of individual items. But THIS makes me feel like I could make my home beautiful and functional despite my limited budget. Did you have a self-imposed budget, or did Lowe’s ask you to keep it under 5k?

  50. Stephanie says:

    This is absolutely breathtaking! The shelves under the cabinets are a great idea that I think we’ll use so that we save money on our own reno–instead of getting the extra tall cabinets. Here’s a weird question–does the couple not have a microwave? I know it’s possible to live without one but we’re currently living with one of the kind that goes over the range and I want a hood sooooo badly but don’t know where we would place it instead…

  51. Mara Smith says:

    Looks SO good!

    Question about the cabinets. Any reason you guys didn’t replace the base cabinets to match the new uppers? Or have the new uppers match the existing base cabinets? The two different styles would drive me bonkers.

  52. Elyse says:

    Chris and Julia. Holy smokes. This is amazing. UNDER 5k?! Under 3 days? UNDER 5k?! I wont say it again but the fact you were able to do all that for that budget blows me away. This is massive inspiration, I can’t even tell you. My fiance and I are looking at starter homes together and because the market is so strong in our area we’ve been looking at some fixer uppers but are nervous that a kitchen reno within a year would be too much for us financially. (But also not sure if we could live a few years in these big ole stinkers of a kitchen)

    This gives me inspiration to find a home with a good kitchen layout and take it from there. THANKS!!

  53. Kates says:

    This kitchen does not disappoint! It has classic touches but looks fresh and modern! Bravo! Gives me lots of ideas of how to update my kitchen for a limited budget! I also like how the appliances are not top of the line, makes the whole redo more realistic.

    Awesome job!

  54. Caitlin says:

    Wow, everything looks absolutely stunning! I love the color palette and the small, inexpensive details you paid attention to in order to give the whole space a luxe feel!

    I did have one question through about functionality…is it easy to use the sink and dishwasher at the same time? It looks like the dishwasher is directly behind the sink, which would make it hard to stand at the sink and place dishes into the dishwasher. Thoughts? Have the homeowners run into any issues here?

    • Julia says:

      The homeowners didn’t have a dishwasher previously and tried in front of the oven and sink, both. In the end, they chose to have it more in front of the sink. There’s enough space there to have it opened and load it easy from the sink thankfully, but it was definitely on our mind!

  55. Natalee says:

    This knocks my socks off. So so good you guys.

  56. Katie says:

    This looks amazing! Y’all did a great job. I can’t believe it was only $5k. I’m inspired!

  57. Kelli says:

    For the countertops is there anything else you need to do to make them food safe and protect them from the wear and tear of being used frequently? Fantastic job! This was a very inspiring remodel! ????????

  58. Hallie says:

    This is so great! I would love to know how to do a built out over the fridge cabinet like that.

  59. Leena says:

    I’m very impressed with the style and the budget! It’s stunning!

  60. Kate says:

    Wow, this kitchen is gorgeous! I’m curious about the subway tile not needing spacers. Why is that? I’m looking to install a similar tile in my kitchen and it doesn’t say anything on the website about spacers either way. Thanks!!

    • Julia says:

      The very base of it has a small beveled edge so it allows a small grout line. Of course, if you wanted larger grout lines you could use a spacer, but it’s not necessary for these.

  61. lu says:

    Amazing job y’all! The kitchen looks bigger… and the under $5K budget is impressive!

  62. Janis says:

    This kitchen looks beautiful. I love the color of the cabinets. We’ve done a lot of reno at our house and have found Lowe’s to be the best. Shout out to my nephew, the homeowner.

  63. KJ says:

    So so pretty! I too am wondering about the brick wall. Was it found and uncovered during the reno? Also, you mention using polycrylic to seal the countertops. When I researched sealing wood countertops lots of places said you need something food safe – I can’t remember the specific name the websites mentioned, but I’m guessing polycrylic will work too?

  64. Allison says:

    This is such a dramatic improvement to what was there previously! I’m really impressed with the budget and timeline, especially including appliances. I’m curious if the newly raised ceiling is the same height as the adjoining room? Or is it now higher? Also, did the new flooring match the adjoining room at all, and if not, how did you handle the transition. I’m wondering because it appears to be an open space that flows into another room and I’m curious how it all looks cohesively. Also, on a practical note, I know you two are tall, but it looks like the upper cabinets are taller than the homeowners’ heads! Did you leave them a step ladder? ;)

    • Julia says:

      The raised ceiling now matches the adjoining room. The homeowner’s assumed there was plumbing above the kitchen, which is why the ceiling was lowered, but once we got there we discovered that wasn’t the case. The living room is carpeted and they expressed that they’d like to keep it that way, so we didn’t worry ourselves with that. :)

  65. It looks amazing! The kitchen looks so much lighter too! The exposed brick and the ceiling keep with the character of the old home. I just love it! One suggestion…could you paint the underside of the cabinets above the sink white?? My eye just keeps getting drawn there. Nice work you guys!

    • Julia says:

      That’s actually something I texted to Kim after we got home and I started looking at the photos! At my height, I couldn’t see it all! Isn’t that funny? That would be an easy 30 minute project as there are only 2 upper cabinets.

  66. Brooke says:

    Amazing!!!! It all looks incredible!! Im curious about the brick wall…in the first photo it looks like the whole thing is drywall. Did you guys tear that down also? Amazing work, everyone!

    • Julia says:

      Yes, it was all plastered over. There’s a short paragraph about the brick wall, but essentially, the homeowner’s chipped away at the plaster exposing the whole thing shortly before we arrived.

  67. Melinda Page says:

    Amazing. I’m loving those floors!! Was the brick wall a surprise? The shelf bracket is genius and I love the hood, is it too soon for me to renovate?

    • Julia says:

      I just added a little paragraph about the brick wall. We weren’t sure it was there when we selected the kitchen, but the homeowners did the dirty work in uncovering it before we got there.

  68. You guys ROCK! I loved seeing the transformation of this space, and it’s just stunning! I came away with dozens of ideas for my kitchen, especially those awesome floating shelves that seem like a really different take on industrial, and taking advantage of Lowe’s in-stock cabinetry (we have a built-in living room shelving project in our future). It’s so neat that you pull off these incredible projects for your readers! :)

  69. J says:

    Looks great you guys! I love that you exposed the brick wall…the space is such a lovely mix of old and new!

  70. RC says:

    Wow, miracle job – even with all of you working – you must not have got much sleep! Rest up.

  71. Erin P says:

    This is phenomenal! Hard to believe you accomplished this on that budget! The ceiling is so lovely and adds a great unexpected element to it all. I would LOVE to know more about the brick wall, will you be sharing more details on that by chance?

    Kudos team! :)

  72. Molly says:

    I absolutely love this! It’s stunning!! And with that pricetag- wowzers! I cannot get over completing this project in 3 days- it’s just incredible!

    Random question- is their stove missing the burner caps- the things that go over the burners?

  73. Amanda says:

    How/when did you know the brick was there? Love the kitchen, super pretty!

    • Julia says:

      I need to amend that in! In the homeowner’s application for the makeover, they mentioned they were pretty sure there was a brick wall under the plaster. They live in a row house and their neighbor had exposed the brick in their kitchen. After we selected them for the makeover, sure enough, there was! They actually did most of the chipping away at plaster before we got there, but there was a little more after we raised the ceilings.

  74. Shannon says:

    Looks great! One question though… why didn’t you paint the underside of the white cabinets? The unfinished wood is the first thing I noticed and sticks out like a sore thumb.

    • Julia says:

      That’s actually something I texted to Kim after we got home and I started looking at the photos. At my height, I couldn’t see it all! Isn’t that funny? That would be an easy 30 minute project as there are only 2 upper cabinets.

  75. Winnie G says:

    This looks amazing. Great Job!

  76. Corine says:

    3 days?! THREE days. I can’t get over that. It looks like a million dollars! Light, fresh, and breathtaking. You guys were such a dream team!

  77. Absolutely beautiful renovation. The owners might be delighted! I’m curious though is that pretty lamp and the double scons above the coffee station the only lights available? You did an amazing job! :)

    • Julia says:

      Right now, yes. We worked by the light all night and it seemed very sufficient! Although, we did add a plug outlet in the upper cabinets if they wanted to add under-cabinet lighting down the road.

  78. Katy says:

    Coming here to eat my words a bit. The whole time I thought you HAD to do something about those columns and I was so disappointed that you didn’t! But seeing them in the new space changes everything! They look like they actually belong because the rest of the space is so classic and elegant. Way to go, guys. This kitchen is amazing. And you got so lucky with that amazing brick wall and the surprise extra tall ceilings. Your taste is impeccable, Julia. Beautiful.

  79. Kathy says:

    How did you expose the brick wall? The whole thing looks great!

  80. Mara says:

    I love the kitchen!

    You guys are learning how to economize kitchen renovations! From 7 weeks to 6 days to 3 days (and cheaper and cheaper). I love the tips! Would you ever delve into any hiccups you had and how to handle them in a timely fashion?

    • Julia says:

      We’re sharing more behind the scenes in this week’s podcast, live now!, if you’re interested!

    • Heather says:

      Thank you so much for sourcing and breaking out price. I’m in the process of pricing cabinets and some of your tips are immensely helpful. Going to Lowes this afternoon.

all the latest

We believe we should all love where we live.

We’re a couple of homebodies, working to uncover the home our home wants to be. And we’re so happy to have you here. 

HI! We're Chris + Julia

read more

Load More

Reader Faves

SHop all

What We're                     Right Now

What We're                 Right Now

Looking for our favorite things? A place to shop our home room by room, or just catch up on what Julia's wearing / loving right now? Browse the CLJ shop. 

Loving

looking for inspiration? 

A reader recently asked me if I’m starting to fully embrace traditional style and whether we still consider our house to be a “modern Colonial” and why. It was a really great question and so timely — I had really just been thinking about my approach to this home and how my style has changed […]

Can We Send You Our Love Letter?

Another way for us to stay in touch! Joining our weekly newsletter gives you access to exclusive content, never-before-seen photos, your questions answered, and our favorite DIYs. Sign up below!

Follow Along on Instagram

Welcome to our online community where we've posted home, DIY, style, renovations, and family since '09. Renovating our #cljmoderncottage in Idaho and headed for new adventures in Raleigh, NC. #cljfam #cljtransformations

@chrislovesjulia