My aunt and uncle’s home in Pittsburgh is more than 90 years old and full of character, but the kitchen, like so many other kitchens, definitely had its fair share of challenges: the small 9×9 footprint, the outdated electrical, the radiator in the corner, no dishwasher, the in-swinging door that hindered so much usable space, the lack of counter space–and if all that wasn’t looming over us, we were given just 6 days to tackle the complete gut job renovation. We spilled a lot of our plans in this post, but as a reminder, here’s the before:

And six days later, here’s the after!

Of course there was a lot that happened in those six days. My sister, Andrea, documented the whole renovation process via video so we’ll cover a lot of those details when we release that footage later, along with a couple other videos she did for the project–including the reveal for the family–it will make you cry!
The goal for this kitchen was to really make it a pleasant, professional-grade cooking and entertaining environment for Judd and Betsy, to maximize storage and refrigeration (they have 2 teenage boys at home!), while also introducing them to a lot of modern conveniences, like a dishwasher. I thought it would be best to take you through each of the main three walls (there was a half wall on the 4th wall that we removed) of the kitchen and the transformations they went through, as well as, the choices we made.
The wall on the left (with the back door on it) used to have an old hutch, that they were not attached to in any way, that held a lot of odds and ends and dishes. Here’s the before:

And the after:

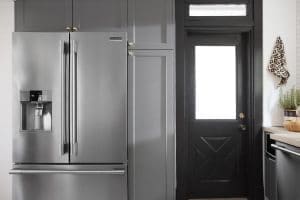
You can barely see it in the before photo, but there was a half wall making the doorway into the kitchen from the dining room smaller. We removed that and Chris built up the wall to be the depth of the cabinets. We also tore off the plastic green covering on the transom window and Chris figured out how to flip the door and make it out swinging (something we learned is easier said than done. We’ll share more tips on that in the renovation breakdown post.) We outfitted the space with the Frigidaire Professional Counter-Depth Refrigerator and surrounded it with floor to ceiling Ikea cabinetry fitted with Semihandmade shaker doors in Super Matte gray.

We ran a water line over so they could have filtered ice and water (another first!) and all their fresh food at eye level. On the outside, the counter-depth design saves precious inches in the smaller kitchen and inside the fridge, there are organizational solutions galore with fully adjustable shelves and bins. Knocking out the half wall really allows those french doors on the refrigerator to shine. They open alllllll the way and it’s like a food fashion show inside. Betsy told us all about how much her boys eat and how she preps dozens of sandwiches and wraps for them to eat after school. It’s so special for them to have the space to store those things now, and at eye level!

The stainless steel fridge has the same SmudgeProof finish as the rest of their appliances and all the compartments you can dream of to organize fresh and frozen food. And we designed their dry goods to be right next door. The tall cabinet to the right of the fridge is outfitted with pull out drawers for optimal pantry storage. And then we added another 15″ cabinet on top of that and two cabinets above the refrigerator for less-used items like crockpots, ice cream makers, or a large stockpot you might only use for big family gatherings.
The back window wall went through some drastic changes, but goodness, she turned out so beautifully. Just tearing down all the soffit and scalloped window trim left us with a big, glorious, albeit slightly off-center, window staring back at us. Capping off a radiator that used to be in the far left corner freed up enough room for a dishwasher and under-counter microwave–a great way to save counter space and one of my favorite details.

The close proximity of the back door to the back wall (bricked on the outside–not moving that!) didn’t leave enough room for a standard size 26″ depth countertop like the rest of the kitchen, but it was just deep enough for a small cabinet and microwave. Since counter space was something we were trying to maximize here, we came up with an easy solution for an under-counter microwave that looks built-in! We used a standard 21″ wide, 15″ depth Ikea base cabinet that we ordered an 18″ tall door for instead of a standard 30″H door (which would have covered the whole cabinet front) so the microwave would remain visible and accessible. We placed a shelf (just one that comes with Ikea cabinets) right at the opening to support the microwave and ran an outlet behind. It was the perfect fit. They already loaded up their cookbooks in the small cabinet below.
Next to that, the Frigidaire Professional dishwasher is so sleek. I love the hidden controls and the clean-lined, but substantial handle. When planning the layout, we wanted to make sure that whoever was unloading the dishwasher would be able to easily access the open shelves and the utensil drawers (to the right of the sink) and the corner cabinet which has two carousels in it full of Anolon pots and pans.

Having this dishwasher in our own home for the past several months, I was excited to show Betsy and Judd all of its tricks, like the 30-minute cycle, and the adjustable top rack that easily fits larger pots and pans. And, of course, the blue light that shines on the floor signaling the dishes are done is everybody’s favorite part.

The sink is a single bowl apron front sink from Ikea (all the sources for the kitchen are linked at the end of the post). Chris drilled 2 extra holes to accommodate this beautiful bridge faucet we picked out for the space. It was quite dramatic and nerve-wracking and I’ll go into that more in the reno post, but it was worth it. We ordered 2 slim doors from Semihandmade to fit under the sink cabinet (an option that’s not available through Ikea) to keep it symmetrical and also since space is at a premium, smaller cabinet doors take up less space when opened.
Prior to the renovation, the range and fridge used to coexist on the same wall, leaving very little workspace around the range and no exhaust hood in sight. The one good thing going for it was the gas hookup was already in place. Here’s the before to jog your memory:

Here’s how that angle looks now:

We installed this Frigidaire Professional Front Control Freestanding range (the same one we have in our kitchen x2) and can’t get enough of the built-in temperature probe, easy glide racks or the Powerplus 2-in-1 burners in the center of the range. The small center burner is great for simmering and the large griddle burner (comes with the flat top, too!) makes pancakes a breeze. You can cook up a storm on this range and I have no doubts my uncle Judd will do just that.

One of my favorite features is the convection bake and roast options. We baked cookies for them before the reveal and they were done in minutes, which was good since we could barely wait another minute to show them their new kitchen!

Above the range, we installed this 30″ hood inside a custom cover my uncle, Thom, made for the kitchen. The hood is a convertible one, meaning you can either recirculate the air or vent externally. Since this wall doesn’t vent to outside, we opted to make it recirculating and there are two circular vents on either side of the hood cover, at the very top.
Moving the fridge to the other side of the kitchen allowed us to add more base cabinets (hello, storage!). We decided on 30″ drawers, which are just so easy and versatile. You can fill them with spices, cooking utensils, linens, and the big drawer at the bottom is perfect to house small kitchen appliances like a toaster, blender, etc.

We mounted a magnetic strip and line of Wusthof knives (Chris’s favorite) on the wall and I can only imagine the kind of work that extra countertop will see now. The open shelves were the one thing on Betsy’s wish list, and since we added so much extra storage elsewhere, we loved the idea of keeping this wall open and airy around the range hood.

We used these simple, budget-friendly brackets and painted poplar boards (measuring 29″ on one side of the range and 36″ on the other) as our very last project. After the paint dried, we secured them to the wall with heavy-duty anchors and loaded them up with every day dishes, glasses, bowls and mugs that are used most often. We’ve heard a lot of comments about open shelves, and how things get grimy and dusty. From our experience (we have open shelves in our kitchen, as well), as long as the items you put on the shelves are used at least weekly, you shouldn’t have any problems.
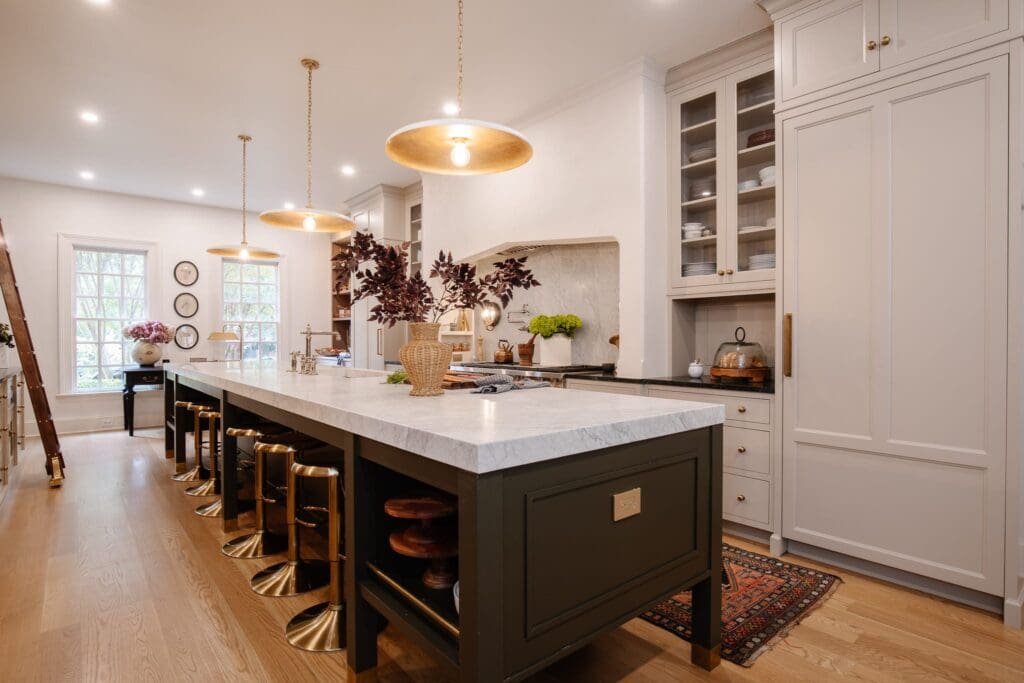
Now let’s talk about lighting. Lighting is important everywhere, but perhaps most essential in a kitchen. When you’re working, it’s nice to have it brightly lit, but sometimes, for dinner parties, you may want it dim and moody. I always say every room needs 2-3 light sources, and this kitchen started out with a singular light bulb lighting the whole room. We swapped it out for this beautiful semi-flushmount chandelier with 6 bulbs that ties in well with the stainless appliances and is close enough to the ceiling that no one is going to hit their head on it–hard to find statement lighting that fits that bill. Above the open shelves and window, we installed aged brass sconces on a separate switch so they can have either the overhead light on, the sconces or both. And they also have a light in the range hood to illuminate just the cooktop if they wanted. Lighting makes such a difference and is absolutely worthy of planning and purchasing.

As for the floor, we waffled between dark and light floors until we came across this 12×24 luxury vinyl tile (LVT) that looks like marble. It was so beautiful, it had to go in this kitchen! We originally planned on cutting it in half length-wise and laying it in a herringbone pattern, but we cut a few and tried it before coming to the conclusion that a more traditional placement felt right for this kitchen. It mimics the small scale 2×4 subway tile on the wall so well without demanding too much attention. We grouted both the backsplash and flooring (yes! this LVT is groutable!) with pre-mixed grout from Lowe’s in the color “Silverado.”

For the countertop, we went with another light, but warm option–white oak plank style countertops from Craft Art. We didn’t get a chance to seal them before we left (they needed 72 hours to cure and we just didn’t have the time!), but we left them with this sealer and finisher that will enrich the countertops, is food safe, durable and won’t yellow the white oak.

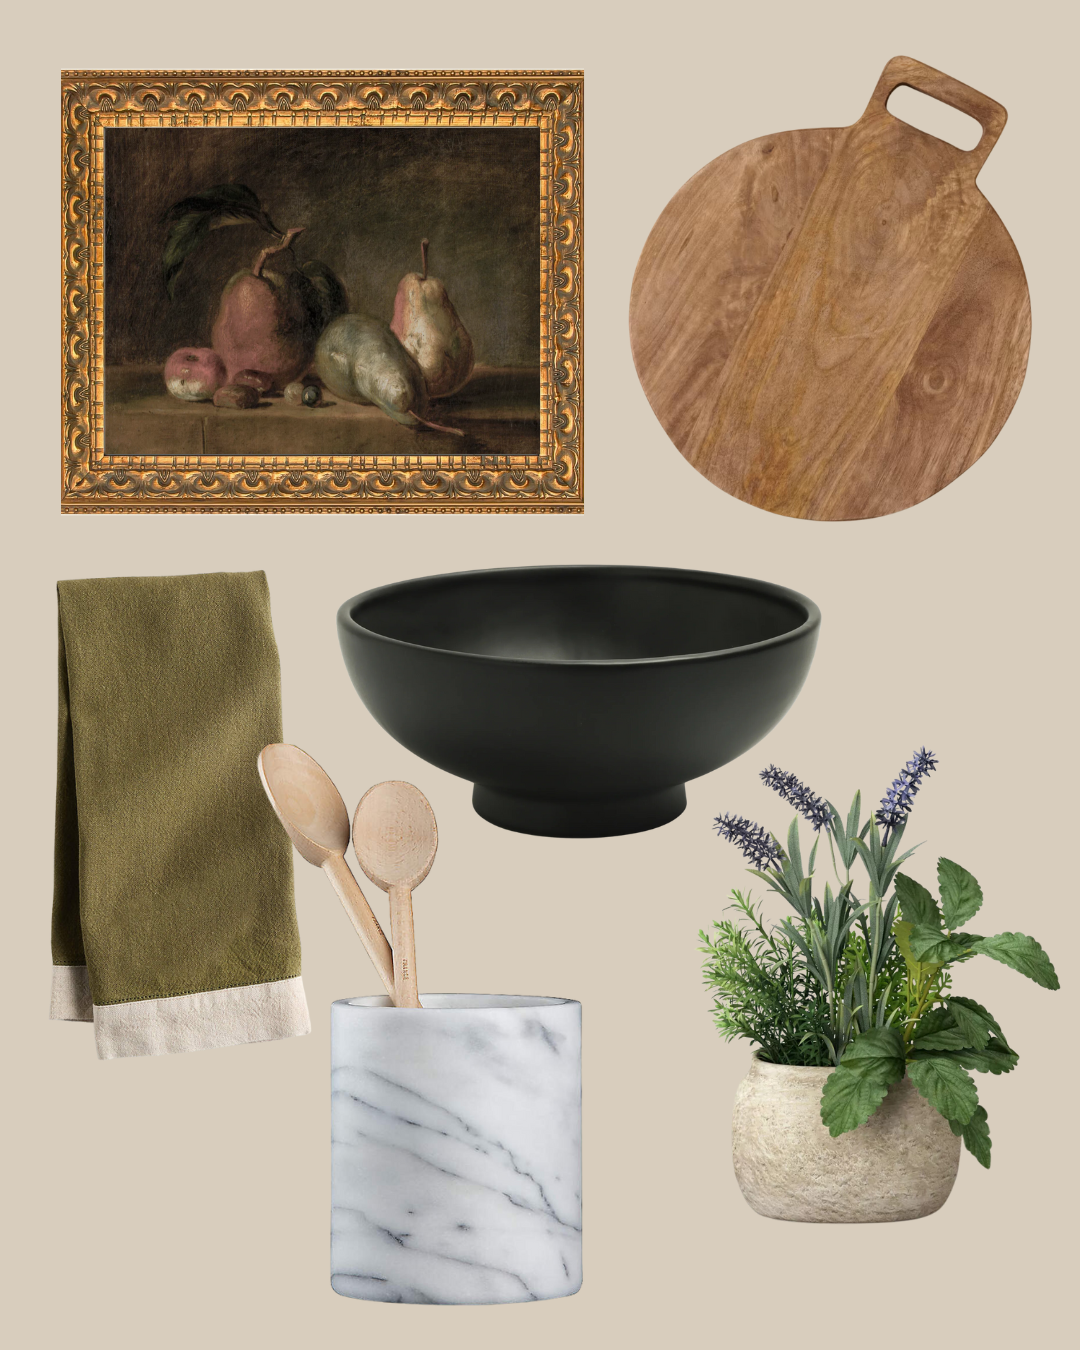
In a small kitchen, it’s easy to fill it with so much eye candy that it starts feeling busy, so we were careful to edit and make sure everything had a function and purpose, with one exception. We commissioned my sister, Victoria, to do a painting for the space and it’s the only thing in the kitchen that’s purely for decoration only–it was inspired by Bacchus, the Roman god of agriculture and wine. The tiny grapes in her hair are reminiscent of the grapes in Betsy’s grandmother’s backyard orchard. Portraits are very in right now and this one is so beautiful, I could see it hung anywhere. There are prints available in three different sizes here. We hung the painting to the right of the window to help balance the off-centered window a bit–so maybe even it has function.

There’s a lot of other supporting characters that really help this kitchen work: the small-scaled subway tile is appropriate for a smaller kitchen. The shiny, heavy, smooth knobs in unlaquered brass from Rejuvenation remind me that hardware is always a worthy splurge, and the crown molding around the whole room (something we decided to do while we were there!) is a quiet touch that elevates the whole kitchen.

There’s still a lot more we’re excited to share about this kitchen: the renovation process and video, the reveal to the family, and the cost breakdown, which a few people have already asked for. So all that’s coming! One thing Chris and I realized when we were done was although this is a small kitchen, this isn’t a compromise kitchen. Nothing feels like it is missing or we’re left wanting–not even more space. We packed it full of storage and workspace and the same full-sized appliances you would find in a larger kitchen without expanding the footprint. It’s a kitchen I think anyone would be happy to cook in and one the Worrall family will enjoy for years and years to come. And since I know they’re probably reading this, share your favorite part of their new kitchen in the comments!
All of the after photos were taken by the incredible talented, Pittsburgh and NYC-based photographer, Adam Milliron. You can check out more of his amazing work here. And yes, we’re still pinching ourselves he photographed this space for us. Thank you, Adam!
You can see the budget breakdown here!
SOURCES
Frigidaire Professional Counter-Depth French Door Refrigerator / Frigidaire Professional 30″ Freestanding Gas Range / Frigidaire Professional Dishwasher / Frigidaire Countertop Microwave / 30″ Undercabinet Range Hood / Flooring: Shaw Floors Fairmount Park 12″ x 24″ Luxury Vinyl Tile in Belmont / Backsplash: Classique 2″ x 4″ Porcelain Subway Tile in White / Grout (for flooring and backsplash): Unsanded grout in Silverado from Lowe’s / Countertops: White Oak Plank-Style / Cabinet Boxes: Ikea Sektion / Cabinet Drawer Fronts & Doors: Semi-Handmade Shaker-style Super Matte Grey / Hardware: Unlaquered Brass Ball Cabinet Knob / Portrait Art: “Elizabeth” by Victoria Bradley-Morris / Chandelier: Rae 6-Light Flush Mount / Sconces: Ford’s Mill Single 2 1/4″ Sconces in Old Brass with 8″ Old Brass Reflector Cone / Espresso Woven Shades / Sink: DOMSJÖ single bowl apron front sink / Faucet: Heritage Double Handle Widespread Kitchen Faucet with Side Spray in Vintage Brass / Area Rug: One of a kind (similar and similar) / Back door paint color: Dutch Boy Anchoring Neutral / Open Shelves: Poplar boards painted white / Brackets for Open Shelves / Copper Pitcher / Green bowls / Light Gray bowls / Two-toned Cheese board / White Essential Dinner plates / White Essential Salad Plates / Acacia Wood Bowl / Large White Serving Bowl / Nesting Prep bowls / Glasses / Camille Wine Glasses / Mugs / Marble fruit bowl /Round Acacia Serving Board / Rectangular Acacia Serving Board / Olive Wood Cheese Board / Utensil Holder / Olive Wood Utensils / Tea towel / Magnetic Knife Bar / Wusthof Classic Ikon Knives / Anolon Nouvelle Copper Stainless Steel Cookware / Blue Anolon Cast Iron Braiser
This kitchen renovation was sponsored by Frigidaire Professional.


Is the color you chose for the flooring “misty” or “snowbound?” The other options looks more tan. In person, is your floor white with grays?
The floors are still available now, would you recommend them still? Our house is a small 1,800 sq feet and we were thinking of using that for most of the house… not the bedrooms. What do y’all think?
They’re great!
Hi! I just ran across this kitchen renovation and LOVE it! I’m curious about the white oak countertops, how do they hold up to water? And how much maintenance are they?
Seal them with a few coats of waterlox and they’ll last many years with no issue!
Hello! (Sorry if you already answered this somewhere :) ) We are about to embark on Semi-handmade doors with our Ikea kitchen. We chose the Graphite color for our bottom cabinets. I am wondering, when you open the doors/drawers, do you see the white Ikea bases behind them? Or maybe through the gaps between the doors/drawers? Did you paint or did you consider painting the Ikea frames to match super matte grey? Any thoughts on this? The graphite is much darker and I’m worried about the contrast. We are using white on our uppers.
There are places where you may see a sliver of cabinetry but since you’re doing white uppers, I would do white interiors still. You may not see it and I can guarantee no one else will.
Oh my goodness! As many times as I’ve looked at this kitchen I never noticed that the sink and window were off center. The placement of your sister’s painting really did the trick! Nice work!