Design

Honey, I Blew Up The Kids | Tips for Making Engineer Prints Look Their Best

October 7, 2014

We believe we should all love where we live.

We’re a couple of homebodies, working to uncover the home our home wants to be. And we’re so happy to have you here. 

Portfolio

Projects

Design

We're Chris + Julia

read more

What we're                   right now

Loving

browse the shop

Befores, afters, mood boards, plans, failures, wins. We’ve done a lot of projects, and they’re all here. 

We have a long-standing relationship with DIY, and love rolling our sleeves up and making it happen. 

Even when you don’t want to rip down a wall, you can make that space in your home better. Right now.

browse all

browse all

browse all

02

01

03

Popular Posts

1.

2.

3.

Top Categories

I mentioned in yesterday’s post we were switching some art around in the living room. I purchased a few new prints that I’ve been eyeing for awhile and we are moving the main art wall to the larger wall behind the couch in the coming weeks. And while I love art, I love our girls more (obviously) so I wanted to make sure we had a prominent place for some photos of them, too. I was worried framing a bunch of smaller photos and creating a gallery would be busy and compete with the adjacent wall when we’re done with it, so I went for my favorite–engineer prints. Update: I got these printed at my local Alphagraphics. They are nationwide so maybe you have one near you, too? Staples also prints these for a similar price. The process is the same.

 HONEY, I BLEW UP THE KIDS | TIPS FOR MAKING ENGINEER PRINTS LOOK THEIR BEST  | Chris Loves Julia

This isn’t my first time using engineer prints, (check out this one with just typography for Faye’s nursery) I just love them. And seeing our girls larger than life has made our living room much more personal. Here are a few tips I’ve learned along the way to achieve something similar.

1. A light plain background is best for portraits. Engineer prints aren’t the best quality printing method. That’s why they are so cheap! Like, a couple bucks tops, cheap. So eliminating the ink that appears on the paper will really go a long way in creating a crisper looking image. Not to mention, the subject really stands out like this.

Here are the originals (straight out of my camera), next to the one I sent to the printer:

Honey, I Blew Up The Kids | Tips for Making Engineer Prints Look Their Best-prints

2. Think about the size of the actual subject. Faye is little compared to Greta, but Greta is still a little girl, too. So when I was taking Faye’s photo, I made sure to keep a lot of blank space above her so when I framed her photo, she would still be baby-sized in comparison to Greta. And when I cropped Greta’s photo (this is one I took of her while we still lived in our old house that I’ve always loved) I made sure to keep plenty of negative space again to keep that little girl feel to it. Negative space is so important.

3. Make it black and white before you send it to the printer. After I brightened and cropped each photo, I made them black and white so I have a better idea of what I am going to be picking up. I love using Pioneer Woman’s B&W Beauty action for this (free here!). Things look so different in black and white–really! In both instances, I deleted the action momentarily, messed with the contrast a little more and then added the filter again to send it off.

Screen Shot Honey, I Blew Up The Kids | Tips for Making Engineer Prints Look Their Best-10-06 at 8.33.50 PM

4. The last thing I would recommend doing is to adjust your resolution. I did this in Photoshop CS4, but you can do it in Preview on a Mac, too! (I have no idea how to even operate a windows based computer anymore, sorry.) Both of these photos came out of my Canon camera, but the resolution was only in the 90s. A lot of times, you might see a 72 px/in there. I shoot it up to 200 so that the image is far, far FAR less pixelated. This will really cut down on the graininess that is typically associated with Engineer prints.

Screen SHoney, I Blew Up The Kids | Tips for Making Engineer Prints Look Their Besthot 2014-10-06 at 8.46.56 PM

Honey, I Blew Up The Kids | Tips for Making Engineer Prints Look Their Best

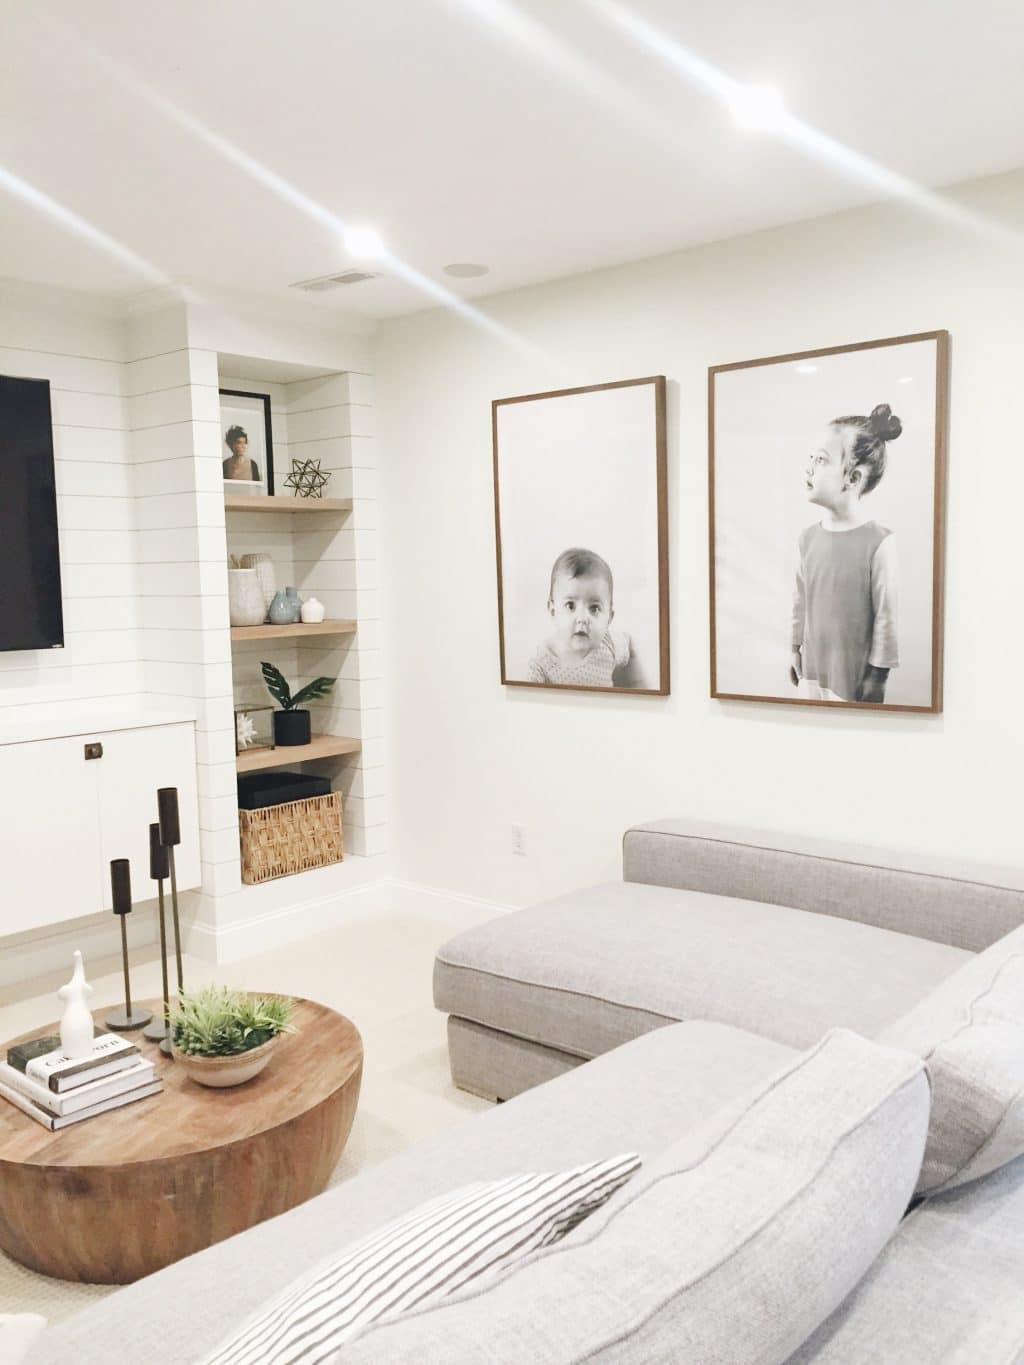
I put each print into the largest Walnut Ribba frame from Ikea which really warms up the black and whites, and I already had them. Nixing the mat really allows the subject (my cute girls) to shine. There’s a time and a place for a mat, I just don’t think portrait engineer prints are it.

 HONEY, I BLEW UP THE KIDS | TIPS FOR MAKING ENGINEER PRINTS LOOK THEIR BEST  | Chris Loves Julia

I do realize these prints aren’t new or ground breaking, but I hope these tips help bring about your best ones yet. $2 prints never looked so good. Really.

See more of the family room here. See something else you like? You can shop all the sources in our entire home right here (scroll down for the family room).

Leave a Reply

Your email address will not be published. Required fields are marked *

This site uses Akismet to reduce spam. Learn how your comment data is processed.

What do you think?

  1. Tarah says:

    What size are your frames

  2. Michele Brown says:

    Who is the manufacturer of the lounge sofa? Thanks!

  3. Kierah Larson says:

    Anyone have luck doing it on their phone? I took the pics with my nice camera. Idk what the pixels are tho… but then i transfered them to my phone. I am able to get them to a decent black and white that washes out the background using picsart. But now my problem is finding an app that allows me to do step 4. Seems like an important step too. Any ideas? I called my local office max to see if they do the engineered prints. They do, but are being a bit difficult with me saying they may not approve my pics as engineered because its a portrait, not blueprint. Otherwise i would just take what i have in and see how well it prints off. Thanks in advance!

  4. Hilary says:

    Love this! How do you hang the frames on the wall where there isn’t a stud, and about how far apart did you place the frames?

  5. Jenna Gerringer says:

    Love this!!! I was wondering if I could do this with an iPhone?!?! And then upload on apple computer and lighten it? Or lighten it on Instagram and then black and white it with that link you shared?

  6. Isabella says:

    I LOVE this idea and really want to do this with my kids but I’m a little confused with the whole engineering paper. I know that costco does poster prints, would it almost be the same thing?

  7. Ashley Lund says:

    HOW do you hang RIBBA frames? I am lost here.

  8. Abby says:

    I don’t have photoshop. Do you have any tips for doing this if someone doesn’t own photoshop? Anyone have any luck doing this without photoshop???

  9. Danielle Weinbrenner says:

    What size frame did you get?? Also, do you need to cut down the print or is it just the right size?

  10. Tania says:

    Hi! Just wondering when you took the pics of your beautiful children with your camera – was it in a raw or jpeg setting? Any tips are greatly appreciated! Thank you!! ????

  11. Hoa says:

    Can I use the free BW download from Pioneer Woman in Lightroom CS6?

  12. Jenna says:

    Hey girl! I love this! I do have a question. Can you do this with an iPhone??

  13. Jennifer Doss says:

    I really want to do this for my dogs and I also cannot figure out how you said you cropped it to get the background white!? Please please explain. Thank you so much!

    • Julia says:

      Make sure you photograph on a light, blank wall. Once you put it in black and white and up the contrast a little, it should print white.

  14. Kristin says:

    Can you explain how you made the background white washed (i.e. how do you get rid of the baseboard and the floor, etc.)?

  15. Connie Lee says:

    how come you made the document sized 30×40 inches?

  16. eve says:

    beauty is so much more than “skin deep.” you and your family are refreshed and blessed each day with such beauty and love. keep the love going………………..

    peace

  17. Gaby says:

    I looooovveeee this composition Julia! I think it’s unique and very personal. Best art anyone can have in their home ????

  18. Sini says:

    Where did you print your photos?

  19. Nada says:

    Nice and brilliant ????

    * i like the sofa , where you get it from ?

  20. Bess says:

    If anyone has ideas for a similar frame because ikea no longer carries this size, please share!!! Thank you!

  21. Sara Tower says:

    I love this idea! Do you mind sharing where the coffee table is from?

  22. Desiree G says:

    I love this idea, thank you! Also, can I ask where your couch is from? :)

  23. Shayna says:

    Love this idea!! But I cannot find these frames anywhere!! Can you send a like to where I can find these frames from ikea?

  24. Tina says:

    Did you use a fancy camera? The only camera I have currently is my iPhone :/ Do you think a picture from my phone could work with an engineer print?

  25. Maya says:

    Is there a reason why you sized the photo on PS to be 30×40 instead of the 30×42 size offered by Alphagraphics? I got one done at OfficeMax and sized it exactly what my frame is but ended up having two white borders on the top and bottom of the print. ): I’m wondering if resizing the image to be a little smaller will resolve that problem?

  26. I checked online at ikea and don’t see the walnut ribba frame. Did you purchase them a long time ago? I really love the color!

  27. Victoria says:

    I can’t wait to do this using a newborn photo from my little one on the way! Thanks for tips! Also, where did you get that round coffee table?? I’m loving it but having a hard time finding one similar to it that doesn’t cost $400..

  28. bella moore says:

    Omg these are absolutely amazing! I adore the technique! Thank you for the step by step process! Def will be trying thank you!!!

  29. Lexey Burkett says:

    Hi I have two questions. What size frame did you buy? Also where’s that coffee table from?

    • Julia says:

      Hi Lexey, the frame is the largest Ikea Ribba frame. I can’t remember the exact size, but it’s close to 40″ tall. The coffee table is from Shop Candelabra. You can see where everything in our home is from right here.

  30. Kat says:

    Thank you so much for sharing this! I am a photographer and LOVE how these turned out! Going to do this for my 3 boys:) just looked though and cannot find the frames on ikea site. Is the actual frame size 30×40? Or did you have to cut some of the prints? Thanks again

    • Emily Olson says:

      Kat, the RIBBA frames are still available but sadly the walnut finish was discontinued in 2012. Sad as it was definitely my favorite!

      • Kat says:

        Thanks Emily! That is sad:( I cannot even find them that large 39×40 online in any color… I may just need to go to the store! Thanks for your help!

      • Kat says:

        Oops I meant 30×40

  31. Meghan says:

    Is there any way that you could do this with photos you take with an iPhone? I have some amazing pictures that I’ve taken with the iPhone camera, but every time I print them out, they look blurry. Thoughts? Recommendations?

  32. Bethany R says:

    I’ve printed out engineer prints before, but they’ve always turned out pretty meh. But I followed your instructions today and my print turned out great! I just tagged you on Insta so you’d see it. : ) THANKS so much!

  33. Amy says:

    I just want to clarify… did you send your photos in as B&W or color? I’ve been wanting to do large prints of my kids for a while and I’m finally reading your tips on this!! We just bought our first home and wall space is a little interesting, so hopefully the hall is a good spot!

  34. Jacy says:

    I am so so impressed with this idea and so glad I stumbled across this tutorial from Michele and happycamperlife.com! I never would have thought to do this, and I love the soft walnut finish against the high contrast black and white. I can’t wait to do this when I have kiddos of my own!

    Jacy
    http://www.lovelenore.com

  35. Beja says:

    I wandered over from your feature on The Nester’s website. LOVE how they turned out. Love that I already have the action. Think I will redo an engineer print I did of a buffalo photography I took a few years ago.

    Thanks for this post!!!!!

  36. These are so sweet! Thank you for the tips!!

  37. Jeannine says:

    This is so awsome! I have wanted to try this for so long and have the perfect pictures of my girls. I tried a few different ways and it was so expensive. Thank you so much for the detailed post

  38. Susie says:

    Did you mount your photos to foam core or anything before framing? I just got photos of my three gals framed, and I love them, but the paper looks pretty rippled still under the glass. I’m wondering if mounting them first might be necessary? Did you have this issue?

    • April says:

      You probably just have too much space within the frame (between the print and the frame back). Adding something behind the print (like a sheet of foam core or cardboard) should help, but you probably don’t need to stick the photo to it.

  39. Anne says:

    Great post! Love your tips–and LOVE how beautifully you’ve portrayed your girls! I did something similar with pictures of my kids, but I love your ideas for how to make them really shine. Thanks for sharing!

  40. emily says:

    Inspired – I adore these!

    I’m confused about step 1. Can you please explain how you made the backgrounds all white? I cant wait to try this!

    Ps I use a Mac too and dint have speccial software.

    • Julia says:

      When you use a plain, relatively light wall for your background, when you make the image black and white and brighten it a bit–it will look white.

      • Emily says:

        Thank you! I am going to try this. Really appreciate the detailed post and the notes on how to do it!

  41. Sarah says:

    Wow! I LOVE these!
    I’m 40, but I feel like I’m 106 when it comes to technology. I’d love, love, love to have these of my kids, but the process looks too daunting….
    Do you think I could email the pictures somewhere and pay someone to create?
    It’d be the perfect Mother’s Day dream-come-true!
    I’d love to know if you have any suggestions.
    Thank you,
    Sarah

  42. Alina says:

    Adorable! Great tips :). Just what i needed. Thank you. Absolutely gorgeous!!!

  43. Support a local/family-owned business, and have your prints printed at a reprographics (aka blueprint) shop! My family owns one, and most of the other reprographers in my area (So Cal) are family-owned too. At my shop, 24×36 b&w prints from a full-size PDF are just $1.08/each (though we have an $8 printing minimum).

  44. Katie says:

    I just did a huge engineer print today for our 2015 goals and it was sooooooooooooooo cheap and it looks great. I definitely want to try it again but with photos this time. Thanks for sharing all your tips and for including the link to Pioneer Woman’s photoshop actions. I just dowloaded them and have been playing around — they are GREAT!

  45. Michelle says:

    Great idea! Curious what frames did you purchase? Thank you so much !

  46. genius! we printed some artwork at the local printer in our last house. I need to try this stat!

  47. These turned out stunningly! I love being walked through the process. I have yet to try an engineer print but I have some pretty large walls to fill. And thanks for sharing that action—can’t wait to try it!

  48. Brittany says:

    I love these prints! You’re girls are adorable. I work at an AlphaGraphics location and just wanted to point out that not all locations take walk ins. The one I work at usually only works with businesses as well. AG is franchised so the locations are all slightly different.

  49. Claire says:

    Lovely! But just so you know, the phrase is “larger than life”, not “larger than light” :)

  50. Meagan Briggs says:

    LOVE this. Love it. Want to do it now!

  51. Shelby says:

    I just love these!!! They turned out so good. I don’t have any kids (yet) but I’m dying to do engineer prints of my pups…if only my friends wouldn’t make fun of me! :)

  52. Victoria says:

    I’ve been wanting to pull the trigger on some engineer prints. This might have been just the thing to push me over the edge.

  53. Evelina says:

    These look SO amazing! I looooooooove the negative space.

    Engineer prints scare me. I would be so scared that they are pixely but yours look great!

  54. Jeni says:

    OK, yeah, I had a picture selected to make a print out of but I think I will totally copy you instead and do portraits of our little ladies! Love them.

    Ps. New follower here. Enjoying all of your content :)

  55. Julia, your girls are so cute. And the prints look fantastic love that they’re a slightly more artistic/modern portrait.

  56. Jennifer says:

    Where did you get the prints done? They look lovely!

    • Julia says:

      I better add that to the post. I got them printed at my local Alphagraphics. They are nationwide so maybe you have one by you?

      • Anonymous says:

        I have the perfect photo to go ahead and print and there’s an alphagraphics right down the street from us! I feel like I’ve been all through their website, but I can’t find an option for engineer prints. What print option did you choose? Mine keeps working out to around $30 and I know that’s not right!

      • Julia says:

        The first time I did it, I emailed my local store and they sent me back this response:

        For quantities of 1- 20, our standard engineering prints are:
        18×24 – $1.25 per print
        24×36 – $2.25 per print
        30×42 – $3.25 per print

        (those are all black and white prints on the butcher paper)

        For these large Ikea frames, I get the largest one. Try emailing or calling your local store!

      • Jenn says:

        oops…didn’t mean to post as anonymous, or AGAIN. you’d think that I’m completely internet incompetent! haha rough day. lots of toddler. lots of coffee.

  57. These came out so beautifully, hard to believe they are so inexpensive!

  58. Marianne says:

    Great pictures Julia ! Your girl are so lovely. These prints are meaningful and very modern at the same time. Well done !

all the latest

We believe we should all love where we live.

We’re a couple of homebodies, working to uncover the home our home wants to be. And we’re so happy to have you here. 

HI! We're Chris + Julia

read more

Load More

Reader Faves

SHop all

What We're                     Right Now

What We're                 Right Now

Looking for our favorite things? A place to shop our home room by room, or just catch up on what Julia's wearing / loving right now? Browse the CLJ shop. 

Loving

looking for inspiration? 

A reader recently asked me if I’m starting to fully embrace traditional style and whether we still consider our house to be a “modern Colonial” and why. It was a really great question and so timely — I had really just been thinking about my approach to this home and how my style has changed […]

Can We Send You Our Love Letter?

Another way for us to stay in touch! Joining our weekly newsletter gives you access to exclusive content, never-before-seen photos, your questions answered, and our favorite DIYs. Sign up below!

Follow Along on Instagram

Welcome to our online community where we've posted home, DIY, style, renovations, and family since '09. Renovating our #cljmoderncottage in Idaho and headed for new adventures in Raleigh, NC. #cljfam #cljtransformations

@chrislovesjulia