4 Courses to Love – Home Made Vanilla Bean Ice Cream with Raspberry + Mint
February 13, 2014


This is the 3rd course in a 4 course meal, designed to be a springboard for your special occasion. You can find the other courses here:
Course 1 – Broth Seasoned with Pork + Vegetables
Course 2 – Arugula with Pears + Prosciutto
Course 3- Pork Tenderloin and Asparagus Over Dijon Potato Puree w/ Pomegranate + Balsamic Reduction

So today we’re wrapping up our 4 Courses to Love meal, and hopefully you’ve found something useful along the way. And there’s one thing I just want to make clear – you don’t have to make all four courses! I posted each recipe separate so you could make them separate. They go well together, but they’re great on their own as well. I know this is pretty obvious, but I just wanted to make sure we’re all on the same page.
The great thing about vanilla ice cream is it’s pretty much perfect as is. Sure, you can add lots of stuff to it and it’s still awesome, but the standard mix of cream, eggs, sugar and vanilla just doesn’t require a lot of embellishment. So this dessert keeps it simple, while adding just a touch of fancy in the form of a homemade raspberry syrup.
Fruit syrups are really easy. Fresh fruit is of course preferable in almost all uses, but syrups are a tad less picky. So if you can’t find fresh raspberries in your grocery store, you’ll be fine with frozen. Here’s what you need:
• 1/2 cup fresh raspberries (1/3 cup frozen)
• 1 1/2 cups water
• 1/4 cup sugar
Put that stuff in a small sauté pan and simmer until the raspberries fall apart and the liquid has thickened a bit. If the raspberries aren’t falling apart and the water is reducing too much, add more water and keep it simmering. Once that’s done, pour the liquid through a fine-mesh sieve and work at it with the back of a spoon, smashing the raspberries into the sieve, like so:
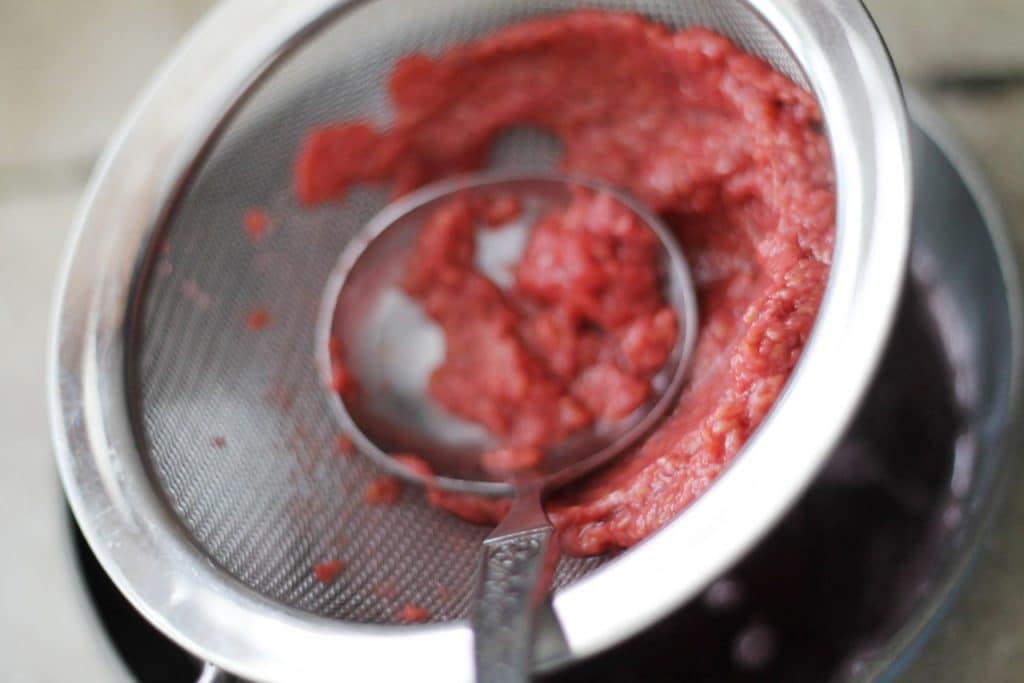
You want to keep smashing the raspberries through the sieve until the pulp starts to get chunky and you can tell most of the liquid and syrup has made its way out. When you’ve reach that point, take another spoon and scrape the syrup from the bottom of the strainer and add it to the rest of the liquid that has strained out. The stuff stuck on the bottom of the strainer is golden, and you don’t want to waste any of it. If the syrup is too thin, you can put it back on the heat and reduce it more. Your call.
Make the syrup as far in advance as you need, and cool it in the fridge.
The syrup was easy. The ice cream, almost as easy. This is an adaptation of a recipe I learned in my culinary classes. Here’s what you need:
• 1 pint 2% milk
• 1 pint heavy cream
• 1/2 vanilla bean, split (or 1 tsp vanilla extract – not as good, but still good)
• 8 egg yolks
• 10 oz granulated sugar
• an ice cream machine – of course
The trick with ice cream is cooking the eggs, without them turning scrambled in your final product. We do this through a technique called tempering. First, put the milk and cream in a pot. Using a paring knife, scrape the insides of the vanilla bean to get all the good stuff out. Put the good stuff into the cream mix and whisk a bit. Then just put the vanilla bean in, as well. Bring this mix to a boil, whisking frequently and taking care not to let the mix burn on the bottom of the pan.
While the cream is coming to a boil, in a bowl or stand mixer, cream the egg yolks and sugar together until it’s fairly smooth. Once the cream has come to a boil, remove it from the heat and, while whisking constantly, ladle some of the hot cream into the egg and sugar mix. Whisking constantly is the key. This is tempering. Essentially, the hot liquid cooks the eggs, but the act of whisking prevents the eggs from coagulating. You’ll want to slowly ladle in about half of the cream, all while whisking. Then, pour the egg and cream mix into the rest of the cream, and bring back to a simmer while whisking.
Once the ice cream base begins to simmer, turn off the heat and strain the base through a fine-mesh sieve. Straining is important, because it’s likely you’ll get at least a few tiny pieces of coagulated egg. The strainer will keep those out.
Cool the ice cream base in an ice bath (put the base in a bowl, put that bowl in a larger bowl of ice water), transfer to a lidded container and refrigerate for 8 hours or overnight. One the mix has cooled, put it in your ice cream maker and run that thing until it’s thick, like a Frosty from Wendy’s. Then put it in a lidded container and stick it in the freezer, again for 8 hours or overnight.
Even though the process is slow, it’s really not difficult. And you can do this the day before, so you don’t have to worry about it the day of. To serve, put a couple spoonfuls of the raspberry syrup in the bottom of your bowl, place a scoop of ice cream directly on top, add a couple sprigs of mint, and shave some dark chocolate on top.

And there you have it. 4 modestly-portioned courses that equal one delicious meal that will satisfy your hunger and not inhibit any other… *ahem*… activities planned with your Valentine. I hope you’ve enjoyed this series and, even if you already have plans for Valentine’s Day, I’d encourage you to try these dishes out another time. Tasty will still be tasty, even after the holiday passes. Happy Valentine’s Day, internet friends.

4 Courses to Love – Home Made Vanilla Bean Ice Cream with Raspberry + Mint
Ingredients
For the Raspberry Syrup:
- 1/2 cup fresh raspberries 1/3 cup frozen
- 1 1/2 cups water
- 1/4 cup sugar
For the Ice Cream Base:
- 1 pint 2% milk
- 1 pint heavy cream
- 1/2 vanilla bean split (or 1 tsp vanilla extract – not as good, but still good)
- 8 egg yolks
- 10 oz granulated sugar
To Serve:
- dark chocolate - 70-80%
- fresh mint
Instructions
First, make the raspberry syrup:
- Put the ingredients for the syrup in a small sauté pan and bring to a simmer.
- Cook the syrup until the raspberries fall apart. If the mix becomes too reduced, add more water.
- Once done, pour the syrup through a fine mesh sieve and work at it with the back of a spoon, mashing the raspberries into the sieve
- Scrape the bottom of the sieve with a spoon to collect the pulp there and add it to the rest of the liquid.
- Stir the pulp and syrup together, transfer to a bowl and put in the fridge to cool.
Next, make your ice cream base:
- Combine the milk and cream in a sauce pan. Scrape out the insides of the vanilla bean and add the seeds (that's what all those tiny things are) to the cream.
- Bring the cream to a boil, whisking frequently to prevent scorching.
- While the cream is coming to a boil, in a stand mixer (or other bowl if you don't have a stand mixer), whisk together the eggs and sugar until smooth and uniform.
- Once the cream has come to a boil, remove it from the heat and, while whisking constantly, slowly ladle in about 1/2 of the cream.
- Add the egg and cream mixture to the rest of the cream and whisk together. Put back on the stove over medium low heat and whisk constantly until it comes to a simmer.
- Strain the ice cream base into a bowl set in an ice bath.
- Cool the ice cream base to a little below room temperature before transferring to a lidded container and placing in the fridge for 8 hours
Mix the ice cream:
- Put the chilled ice cream base into your ice cream machine and mix until it's thick and creamy.
- Transfer back to the lidded container (be sure you wash and dry the container first) and put in the freezer over night.
To Serve:
- Put a couple spoonfuls of the syrup into the bottom of your serving bowl, then add a rounded scoop of vanilla ice cream directly on top. Garnish with chocolate shavings and a sprig of mint.

Semihandmade
Our wood grain Shaker cabinet fronts were designed for busy, high-traffic homes like ours. Clad with durable textured thermofoils, this line is compatible with Sektion, Akurum, Godmorgon, and Besta cabinets from IKEA. It's the perfect, practical way to add the warmth of wood to all the rooms of your home.
Collaborations
learn more

next
Loloi
We have teamed up with Loloi to create a line of rugs that are as affordable as they are beautiful. This collection houses a great mix of traditional and modern rugs, in cottage-y colorways, as well as vintage-inspired beauties that you’ll want to roll out in every room.
Collaborations
learn more

next
STUGA
We partnered with Stuga on a line of hardwood floors — The Ingrid is really livable, and the color is very neutral. It doesn’t lean warm or cool, it’s that just right in-between. We have really loved putting it everywhere in our house. It’s the best jumping-off point for design, no matter your interior style. In addition to being beautiful, Ingrid is really durable — we have three kids, and we always have a home construction project going on. Ingrid stands up to it all.
Collaborations
learn more

next
SHop all
What We're Right Now
What We're Right Now
Looking for our favorite things? A place to shop our home room by room, or just catch up on what Julia's wearing / loving right now? Browse the CLJ shop.
Loving


Portfolio


Design
Befores, afters, mood boards, plans, failures, wins. We’ve done a lot of projects, and they’re all here.
BROWSE BY CATEGORY
let's break this thing up
We have a long-standing relationship with DIY, and love rolling our sleeves up and making it happen.
Projects
Even when you don’t want to rip down a wall, you can make that space in your home better. Right now.
read more
read more
read more
02
01
03
looking for inspiration?
A reader recently asked me if I’m starting to fully embrace traditional style and whether we still consider our house to be a “modern Colonial” and why. It was a really great question and so timely — I had really just been thinking about my approach to this home and how my style has changed […]


SEARCH THE BLOG
We've been doing this since 2009 and we've posted a whopping 24145+ blog posts and counting. You might need a little help searching, huh?
looking for something?
find stuff like:
")
Can We Send You Our Love Letter?
Another way for us to stay in touch! Joining our weekly newsletter gives you access to exclusive content, never-before-seen photos, your questions answered, and our favorite DIYs. Sign up below!
Follow Along on Instagram
Welcome to our online community where we've posted home, DIY, style, renovations, and family since '09. Renovating our #cljmoderncottage in Idaho and headed for new adventures in Raleigh, NC. #cljfam #cljtransformations
@chrislovesjulia


Links
Get Around
Make yourself right at home
Portfolio
Design
Casual Friday
Projects
Lifestyle
Gift Guides
All Posts
Shop
Love where you live.
Social
RivrLinks
Links
Get Around
Make yourself right at home
Portfolio
Design
Casual Friday
Projects
Lifestyle
Gift Guides
All Posts
Shop
Love where you live.
Social
RivrLinks
What do you think?